Signs of a diode bridge malfunction
First of all, you need to remember that the diode bridge on the VAZ-2114 is no different from the same unit on the VAZ-2109, VAZ-2110 and other models. Therefore, if you figure out how to determine the malfunction, it will not be difficult to identify it on any of the cars. There are several main symptoms; they can appear together or separately. Any of them requires an immediate check of the generator:
- The warning lamp, which lights up when the ignition is turned on, does not go out even after the engine is started. This is a general indicator of a problem, but if the diode bridge has failed, the lamp will light in any case. If a voltmeter is installed in the car, you can check its readings; the arrow will most likely be either in the red zone or at its very border.
- Another option is that the warning light does not light up when you turn the ignition key and does not light up after starting the engine.
- When measuring the voltage produced by the generator with the engine running, the reading is less than 13.5 Volts. You need to measure at the battery terminals.
- The next morning the car will not start due to a dead battery, although in the evening it was in normal condition. After charging the battery, it discharged again in a short time, and the generator housing becomes so hot that you can burn your hand on its surface.
- Extraneous noise appears under the hood, most often it is a whistle or howl. The noise level may vary depending on engine speed.
- Various errors appear - the ABS, ESP, and so on may light up. The power steering may stop working, the radio will begin to wheeze and freeze. Instead of a turn signal, the light turns on. All this manifests itself against the background of a dead battery, which does not charge due to a broken diode bridge.
- The headlights begin to dim or stop working altogether, and the air conditioner does not cool as it should.
These are the main signs of a diode bridge breakdown, but it is worth remembering that they may indicate other generator failures. Therefore, first of all, you need to accurately identify the faulty unit. It is not necessary to take the car to a service center for diagnostics; the car owner can do the work; a minimum set of tools is needed.
If the control light on the panel lights up or, conversely, does not work, first of all you need to check it and the control relay. Often it is these elements that are faulty, and not the generator.
The practical part is removing the generator, disassembling it, repairing it and reinstalling it.
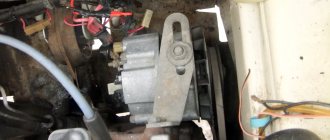
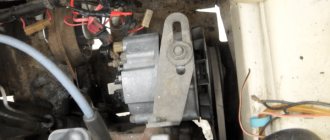
Due to the fact that the generator is located under the hood of the car, it is necessary to turn off the engine, turn the steering wheel to the right all the way and open the hood. The electric generator on VAZ 2108 - 15 cars is installed in front of the engine, in the lower left corner of the engine compartment, between the engine and the cooling radiator.
Before dismantling the generator, it is necessary to disconnect the ground from the battery, i.e. negative contact.
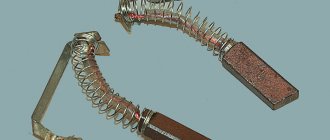
Replacing VAZ generator brushes
Before removing the generator itself, in order not to do unnecessary work, we remove the charging relay from the generator housing and check the production of the generator brushes.
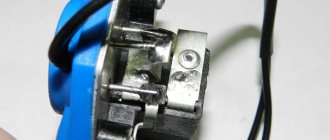
The charging relay is installed in the rear of the generator housing, and is attached to it with two bolts. To unscrew them you will need a Phillips screwdriver. When unscrewing the bolts, be careful not to drop them on the crankcase guard, otherwise getting them out of there will be one big problem. To remove the relay, you need to disconnect the wire, the “female” contact. After removing the charging relay and visually inspecting the brushes, we decide to purchase a new generator voltage regulator relay or reinstall the dismantled one, depending on the wear of the brushes. For their normal operation, a brush length of at least 4 cm is required. Now we proceed directly to removing the electric generator from the engine.
- We disconnect the wires from the generator - as a rule, they are red and consist of two groups of wires, red. One group consists of two wires and is attached with a nut to a bolt on the rear wall of the generator. The other group consists of one wire and is connected to the generator terminal via a male-female contact, also on the rear wall of the generator.
- To remove the generator from the engine, you need to unscrew two nuts and one bolt in the following sequence: unscrew the nut attached to the generator belt tensioner bar (at the top of the generator), unscrew the bolt securing the tensioner bar to the engine block and remove it. The last step is to unscrew the nut from the bolt securing the generator bracket to the engine block.
- The generator mounting bracket is located at the bottom of the engine block, directly below the generator. After unscrewing this nut, you need to remove the generator belt from the generator pulley itself.
- The generator mounting bolt should be pushed to the left, out of the bracket, until it stops against the body shell or the generator’s mud protection.
- On the right wheel side, you need to unscrew the two screws that secure the dust protection of the generator to the car body.
- If the generator mounting bolt still rests against any body parts, you should press on the engine with one hand, and at the same time pull out the bolt with the other hand.
Now your generator is completely disconnected from the engine, and you can begin to disassemble and repair it.
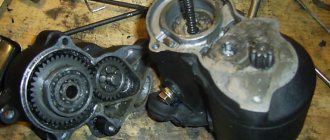
Disassembling the electric generator
When disassembling an electric generator, you need to have two important things on hand: a bearing puller and a vice. This will greatly simplify and speed up your work. Using a wrench set to “19”, unscrew the nut from the rotor shaft, which secures the impeller to the shaft.
To do this, you need to hold the impeller directly with one hand and unscrew the nut with the other hand, counterclockwise. It will take some effort, of course, but this nut needs to be unscrewed. The generator impeller is secured to the shaft with a key, and after removing the impeller from the shaft, it is necessary to remove this very key.
Now we turn the generator over with the back cover up, and unscrew the four nuts with an “8” wrench. We take out the released four studs and release the front part of the generator housing.
In the front part of the generator cover there is a “front” bearing secured by plates. We remove it by unscrewing the nuts and plates and knock the bearing out of its seat. The easiest way to do this is with a wooden plank, the size of which matches the diameter of the bearing.
Now we need a vice: screw a nut onto the rotor shaft and secure the generator, or something that we have not yet disassembled, in the vice. We tear off the back cover with a sharp upward movement from the bearing seat.
We still have the rotor shaft clamped in a vice, with the “rear” bearing in the very top part. To dismantle it, you need a puller; we put it on the bearing and remove it from the shaft.
Now you have two bearings on your hands - “front” (small) and “rear” (larger) - look at their markings and purchase exactly the same ones.
Important : Practice shows that when purchasing bearings for a generator , you need to remove them and, by analogy, buy them in a store. Advice from sellers such as: “they are all the same type” or “if you have an old-style generator, then take these” are often wrong. Yes, they are almost always wrong. To save time, the easiest way is to remove the bearings and select similar ones based on their markings.
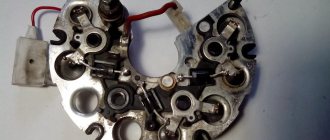
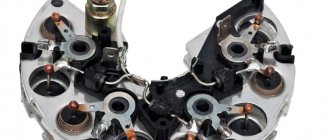
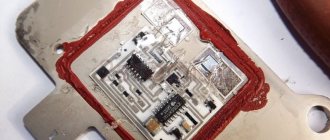
The same advice applies to the diode bridge installed in the rear cover of the generator. If damage or metal oxide is visually observed on it, it is better to remove it without hesitation (it is secured with four nuts to the inside of the back cover) and purchase a new one.
Cost of spare parts (on average): Bearings (pair) – 150 rubles. Charging relay: 140 rubles. Diode bridge – 200 rubles. Bearing puller - 100 rubles. Total: 590 rubles.
The generator is assembled in the reverse order:
- We start by installing the rear bearing on the shaft. This is done using a hammer and a small board. With two or three blows we seat the bearing on the shaft.
- If the diode bridge is removed, we fix it in its “original” places, on the same four studs, in the back cover of the generator housing.
- We install the back cover on the generator rotor so that the bearing completely “sits” into its seat in the back cover of the generator; to simplify the procedure, you can use a hammer and, with not very strong blows on the back cover, “seat” it onto the shaft.
- In the front cover we replace the small (or front) bearing and secure it with plates in the seat.
- We take the generator out of the vice and before putting on the front cover, we put the spacer ring on the shaft, between the front bearing and the thrust recess on the shaft.
- We install the front cover and tighten the nuts “crosswise” on long studs so that the tightening is even.
- We install a key in the recess on the rotor shaft, then put on the generator impeller and tighten it with a nut.
The generator is assembled and now, for convenience, you need to install the generator relay with brushes in its standard place. And don’t forget to connect the wire from the generator to it (the relay).
Diagnostic methods
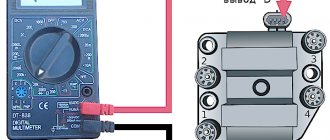
There are two main methods that will allow you to determine the malfunction of the generator diode bridge. You need to choose based on what you have at hand. The first option requires the presence of a multimeter, and the most entry-level option, which is inexpensive, is suitable. The second is a regular 12V light bulb with three long wires so you can connect them to the right pins.
Diagnostics using a multimeter
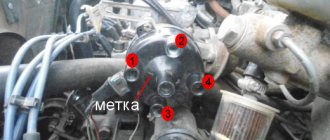
Let's look at the option without removing the diode bridge, since it requires less time. The test is easy to carry out on an installed unit if you know the main features. The process is simple; you first need to provide access to the generator contacts. After this, carry out the following checks:
- When checking for a short circuit, press the positive contact of the multimeter to pin 30, and the negative contact to the body. If everything is in order with the diode bridge, the resistance readings will tend to infinity. Any other reading indicates a problem.
- To find out whether the positive diodes are broken, you should attach the positive terminal to pin 30 on the generator, and the negative terminal to the diode bridge mounting bolt. If everything is in order, the resistance will tend to infinity.
- To test the performance of negative diodes, you need to press the positive probe against the bolt that secures the diode bridge, and attach the negative probe to the housing. The readings should tend to infinity.
- To check additional diodes, the positive contact of the multimeter should be pressed to pin 61 on the generator, and the negative contact to the mounting bolt of the diode bridge. As in all cases above, the resistance should tend to infinity.
How to check the functionality of the product
Using a multimeter it is very easy to check the serviceability. Need to:
- Place the positive probe of the multimeter at the positive diode bus;
- Do the same with the negative probe and the “-” diode output;
- This test, if the diode bridge is working properly, should give readings close to infinity. If this is not the case, there is a malfunction and needs replacement;
- Now we swap the probes (put plus to minus and vice versa);
- Let's look at the readings. If the unit is working properly, the readings should be several hundred ohms;
- To check the additional diode, perform the same steps as described above.
Why does the diode bridge burn out?
There are several reasons for the failure of the diode bridge on VAZ cars. To prevent the breakdown from occurring again, you need to check the machine for one of the options described below. Only by eliminating the problem can normal operation be ensured.
Most often, a bridge burns down due to the following:
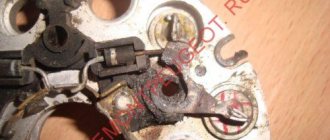
- Moisture getting inside the generator housing. Over time, casings or connections may become loose, which allows water to enter. Also, diodes burn out due to contaminants: soot, lubricant particles, which inevitably accumulate inside the generator over time.
- A faulty battery can also cause diodes to burn out. Another very common option is when car enthusiasts confuse the positive and negative terminals on the battery when connecting. In this case, the diode bridge almost always burns out.
- If the car is from another car in violation of the rules of this process, the diodes may also burn out.
Trouble-shooting
There are two main options for solving the problem. The first is accurate diagnostics on the bench: after detecting signs of burnt-out diodes, a check is carried out and it is determined which elements have failed. After this, the faulty diodes are soldered off, and new ones are soldered in their place. It is very important to take exactly the same brand; any analogues will not last long.
It is much easier to change the assembly, it is faster and of better quality, since you can be sure that the spare part will last for some time. The price of the part is low, for example, on a VAZ 2110 it is about 650 rubles. Replacement is not difficult and can be done independently.
Identifying a faulty diode bridge and replacing it is not difficult for any car enthusiast with a minimum set of tools. If the check shows a breakdown, it is best to remove the generator and carry out repairs. The process is simple and takes no more than an hour.
Source
FUNCTIONAL PURPOSE AND FEATURES OF THE RECTIFIER
The diode bridge of the generator, depending on the type, can consist of either 4 or 6 diodes that perform the function of converting alternating current into direct current with a given pulsation frequency. The operating principle of the device is based on the bipolar rectification method, which is also widely used in a variety of electronic systems.
In addition to the conversion, the unit acts as a valve, the purpose of which is to pass current exclusively in one direction. With a properly functioning device, the current from the generator enters the fourteenth power network, but does not pass back to the stator. If the node fails, current leaks and flows in both directions. This will cause a constant lack of power, and the vehicle's systems that consume electricity will not be able to operate.
The VAZ 2114 is equipped with a three-phase rectifier, which has the following advantages:
- Converts alternating current into direct current with the lowest pulsation frequency: the lower the frequency, the more stable the vehicle’s electronic systems will function;
- Can be equipped with diodes of both bridge and half-bridge types;
- Makes it possible to install a current filter - a capacitor.
Article on the topic: Why the speedometer does not work on the 4: we check the speed sensor The cost of the diode bridge ranges from 500 to 1100 rubles, depending on the manufacturer. The market offers rectifiers both from Chinese companies, which have a low cost and questionable quality, and from well-known brands, the reliability of their products has been tested by many car owners.
As evidenced by reviews from the owners of the fourteenth, devices from LG have proven themselves to be the best. The best option in terms of price-quality ratio is the LG 0108 model. It can also be used as a diode bridge for a VAZ 2115 generator.
Malfunctions of the VAZ 2108, 2109, 21099 generator
The generator is responsible for power supply to the entire on-board network of a car with a running engine.
Its malfunction leads either to a cessation of electric current production (charging) or to an excessive increase in voltage (battery overcharging). On VAZ 2108, 2109, 21099 cars, the easiest way to identify the causes of a generator malfunction is by external signs.
Signs of a malfunction of the generator of VAZ 2108, 2109, 21099 cars
After starting the engine, the battery discharge indicator lamp in the instrument panel lights up
The generator does not produce the required charging current. Simultaneously with the light on, the voltmeter readings tend to zero. The battery is constantly not recharged. Using a voltmeter (multimeter), we check the voltage at the battery terminals (the engine is idling). The voltmeter readings should be as follows: generator 37.3701 - 13.6 V, generator 9402.3701 - 13.2 V.
The “folk” method of checking a generator by removing the terminal from the battery while the engine is running is only suitable for carburetor engines. If the engine stalls after removing the terminal, it means the generator has stopped producing electric current.
If it is less, then the problem is not in the faulty wiring going to the control lamp and voltmeter, but in the generator. Next, sequentially, from simple to complex, from the most probable to the least probable, we look for the cause of the malfunction.
— The generator drive belt tension is loose
The belt slips on the pulley, and the generator rotor stops rotating at the required frequency. In this case, a “whistle” is possible from the generator drive side, the discharge lamp flashes, and may go out when the speed increases. We check and adjust the belt tension if necessary.