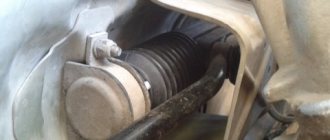
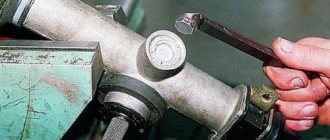
The first time the rack bushing was changed at a service station with a mileage of approximately 80 thousand km. Installed from BMW (number 32111116 910).
This time I did it myself. I removed the rail from the car so that it would be convenient to check everything completely. The boots were intact, everything inside was greased, no rust or dirt. The bushing appeared intact in appearance, but the rack shaft in it had noticeable transverse play, and the inner hole of the bushing was damaged. Therefore, I did not save it; I broke it with a screwdriver and pulled it out piece by piece. If you need to remove it intact, then you need the skill of picking it out with a thin screwdriver and pushing it with a shaft.
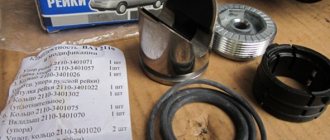
I ordered a new bushing through the online store “one hundred parts” for 150 rubles, the delivery time turned out to be at least 19 days and on “Exist” it was about the same. Two weeks passed and then the poet’s soul could not stand it, it suddenly burned and, without waiting, he decided to put it out of repair. set of VAZ 2110. I bought it at the first stall I came across for 200 rubles))). The configuration of the bushing turned out to be similar to that of a BMW, but the inner diameter is 26 mm and the outer diameter is 34 mm, which is 1 mm higher. more than necessary. But due to the longitudinal slots, the bushing compresses well and, after installation in the rack body, tightly compresses the shaft. I inserted the bushing with rubber bands, they fit into the belt. complete. The orientation of the bushing during installation is with the lugs facing you. (I don’t know exactly how to do it correctly, but if the lugs were away from you, then part of the bushing would stick out cantilevered beyond the bore diameter). I used Litol-24 as a lubricant. After the replacement, I had a wheel alignment done at a service station for 700 rubles.
In the whole process, the hardest part was picking out the old bushing. If there is no need to disassemble the rack and clean it from rust, then you don’t have to remove it, then it’s even easier and faster. Before repairing the rack, I recommend removing the airbag cable. If you do not remove it, there is a very high probability of tearing it. It takes 5-10 minutes to remove the cable.
In my case, due to inexperience, everything took about 6 hours. Next time, already knowing what and how, it will actually be done in 3 hours.
The savings on replacing the bushing amounted to 8,000 rubles. Although at the service station it was supposed to grind the bushing on site, apparently from fluoroplastic. Of course, I don’t think that the bushing from a VAZ 2110 lasts longer than from a BMW, but now I have the skill to replace it.
Price tag: 900 ₽ Mileage: 155150 km
FakeHeader
Comments 26
Please help me with advice. In the spring, the service center condemned the steering rods. I bought ASAM 70530 rods. After replacing the rods, they started doing camber and couldn’t set the steering wheel straight. One of the rods was cut (I don’t know which one), it became better, but the steering wheel did not stand perfectly straight. There was quite a bit of play in the steering wheel and I drove until the summer without even feeling that the steering wheel was a little crooked (this was simply not visible due to the play in the steering wheel). Recently I felt a grinding and clanking noise when turning the steering wheel. On the bumps, too, in the area of the river, something rattled. There were knocking noises when the steering wheel was swayed. I bought a bushing for the steering rack from a BMW, rubber rings for it from VAZ wells, an acquaintance gave me his used rack, which did not play or rattle, but its shaft was rusty. With all this, I went to a friend’s service center (they don’t do slats there, but they promised to help with the repairs). They took my rack off. After disassembling it, it was revealed that the needle bearing of the worm shaft had fallen apart and all the needles had spilled into the rack. The worm was all chewed up, but the rack shaft itself remained intact. The upper ball bearing was very loose and the rack bushing turned into a sponge, although it remained intact. In general, we assembled one of two slats, washed everything and coated it well. We set it approximately so that both ends of the rack shaft protruded from the body equally and gave it to the mechanics to install the rack back on the car. After the rail was installed they began to do the camber. The steering wheel did not stand straight at all. It costs about 45% to the left. The mechanic said that the left rod is completely tightened and the right one is screwed in. They say there is nowhere to regulate further. I drove for a day and this time I clearly feel that when the car drives straight, the steering wheel is crooked. All the play in the steering wheel went away after the rack was rebuilt. The car doesn't go anywhere if you let go of the steering wheel. I returned to the service center and told the locksmiths this. They said that you can turn the steering wheel a little on the splines of the steering shaft (if there are double splines, they can be sawed off). But if you turn the steering wheel on the steering shaft, the steering column cable may break (although it can probably break now because the steering wheel turns 1.5 turns in one direction and a quarter turn more in the other direction)? Or they say you can try swapping the rods and suddenly something will change. Or perhaps when assembling the rack we missed one tooth of the rack with a worm
How can I fix this now? I would really appreciate your help
Sorry, I didn’t understand, should there be a bushing without cuts? Today I bought this repair kit, but there is a bushing with gaps one to one like from a BMW, but the inside diameter dangles more on the rack shaft, somehow they stuffed it there without rubber bands, and at the end it burst, so I didn’t understand if there was any play, a day remained, how did you stuff it into the rack with rubber bands, and can you be more specific about which bushing from the 10k?
Welcome! Steering rod silent blocks - They consist mostly of rubber, the rubber hardens over time, which is why it cracks later, which is why there is play in the steering wheel (If the silent blocks are in good condition, then take a look at the steering rack, because of it too there may be some play, read the article: “Adjusting the rack on the tenth family”) and by the way, if the rods in your city don’t cost much money, then we recommend that you immediately buy them entirely with silent blocks, because when everything is manufactured at the factory, it will be better.
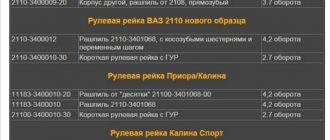
Features of replacement and operation of the VAZ 2110 steering wheel
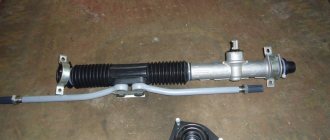
The control mechanism is connected by detachable bolted connections to the rods, so the structure can be dismantled either as an assembly with the levers or separately, after first unscrewing the two “22” bolts and disconnecting the inner ends of the rods from the rack.
It is worth noting that removing the power steering rack will be more difficult and you will have to tinker a little, because you will have to drain the power steering fluid.
When connecting the steering wheel, be careful; the steering rack has a groove for the clamp bolt, and you need to install it so that the clamp is opposite the groove. This will allow you to install the bolt back without any extra effort.
Try not to drive at high speed on uneven roads and avoid driving over large obstacles (such as curbs); at least, do it carefully to preserve and prolong the operation of the steering rack, and it will serve you for a long time.
If you also replaced the steering rods, do not forget to do the wheel alignment.
1
We jack up the car. Using a 17mm wrench, unscrew the front wheel bolts.
2
Remove the front wheel.
3
We take out the locking pin. Using a 19mm wrench, unscrew the nut securing the tip to the strut arm.
4
If there is no puller, unscrew the nut not completely, insert the assembly into the spacer between the steering rod and the strut arm, and apply a hammer to the end of the strut arm.
5
Now set the steering wheel to a neutral position (when the wheels look straight). Using a 13mm spanner, unscrew the bolt from the lower flange of the elastic coupling, which is located near the pedal assembly.
6
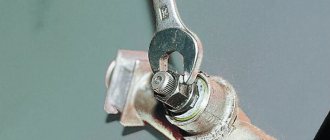
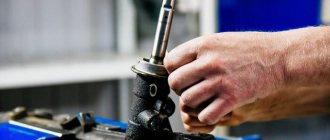
Using a chisel, carefully loosen the tightened clamp.
7
We clean the steering rack studs from dirt and rust and unscrew them. From the beginning on the left side...
8
... then on the right, after soaking them in WD-40.
10
We take out the steering rack.
11
It is necessary to loosen the tie rod mounting bolts, then use a 22mm wrench to unscrew the two tie rod bolts.
12
We install the steering rod, carefully prying the edges of the rubber boot of the steering mechanism, and insert the bushing of the inner tip.
13
We tighten the steering rods.
14
Let's start installing the steering rack. In order to catch the required middle position of the steering rack, you must first install the steering pins in the racks...
15
... after which we install the shaft on the splines in the cabin. The steering shaft has free movement, making it easy to install it in the required position.
16
Use a 13mm wrench to tighten the spline connection bolt.
17
We assemble the entire steering unit in the reverse order. If necessary, use a steering rack wrench to adjust the thrust nut.
Welcome! The steering rack is responsible for turning the wheels of the car; inside the rack there are mechanisms that make it not so difficult to turn the wheels with the help of the steering wheel, but it is comparable to if you turned the wheels by hand; in addition to the steering rack, the steering rack is also responsible for the easy rotation of the wheels power steering, the power steering can be Electric or Hydraulic, on cars of the tenth family only power steering was practiced, on cars of Ukrainian assembly (Bogdan) an electric power steering was also installed, we should immediately note that removing the steering rack with a hydraulic power steering will be more difficult than without it, you will have to tinker a little, so immediately tune in to this and take into account the fact that a steering rack with power steering costs much more, in addition, when buying a new rack, try to take a new one assembled so that all the tips are there, and so on, if you do this and don’t save a little If you spend a little money, the installation will go much faster and you won’t even have to bother with the rack.
Note! To remove this part, stock up on: Blocks of wood, you will need to put the front part of the car on them and remove both wheels from the front, if you have a pair of jacks, then you can leave the car hanging on them, but it can simply fall off the jacks, all the keys that You also have a large flat-head screwdriver that will come in handy, as well as pliers and a mounting spatula with a hammer!
Summary:
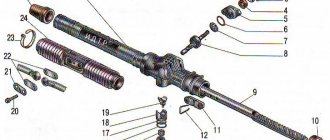
Where is the steering rack located? The rack is located on a shield that separates the engine compartment and the interior of the car, the rack is secured using two metal clamps that secure it on the sides, through a small hole in this shield, the rack goes into the passenger compartment where it connects to the steering shaft, you can understand everything schematically in more detail, You can look at the photo below, in which everything is indicated, but only that very shield (Partition) is not there, and the rail is indicated under the number 18.
When should you change your steering rack? A sign that the rack needs to be replaced is a characteristic knock that will still transfer to the steering wheel, as well as play in the steering wheel, if all these symptoms do not disappear by adjusting the steering rack (How to adjust the rack, read “in this article”), then In this case, the steering rack needs to be replaced.
How to replace silent blocks in steering rods on a VAZ 2110-VAZ 2112?
1. First, remove the steering rod you need, or both at once, to remove them, you will need to unscrew the bolts that attach the rods to the steering rack (How to do this is explained above), then you will have to remove the tie rods from the holes and you can remove the rods (Regarding tips, it is written in the article: “Replacing steering tips on a VAZ”).
2. After which you will have to use a bolt of the appropriate size, the bolt that secures the wheel (One of the fastening bolts), it will need to be inserted into the hole of the silent block and using a hammer, you will have to hit the bolt several times and it, together with the silent block, will come out , but just keep in mind that you need to hit in such a way that the silent block can be pressed out without problems, that is, putting a rod on the asphalt and hitting the bolt with a hammer simply won’t work, you will have to either look for a vice and knock out the silent block as shown in the photo below, or just a couple of bricks Place it side by side, they will replace the same vice and the silent block will easily come out the third or fourth time (Instead of a bolt, you can use a head of a suitable diameter).
3. To press in a new silent block, lubricant will be needed for them, any long bolt of the same size (So that the silent block fits into the hole), one nut for this bolt and a washer, when you have stocked up with all this, lubricate the inside of the steering rod, where the silent block will be installed (see photo 1) and collecting special. a device made of a bolt, nut and washers (see photo 2), install the silent block in its regular place, while holding the bolt itself with the help of a head and a wrench from turning and at this moment tightening the nut, which will press the silent block into its regular place.
Additional video clip: Watch a video that shows the process of replacing silent blocks on steering rods from a VAZ 2108 car, in these rods the silent blocks are used, but they are changed in exactly the same way as on the tenth family of cars, but only in this video everything is done with a hammer is done, we do not advise you to press the new silent block as shown in the video, because it can be damaged very easily.
1.Which steering rod silent blocks are better?
Recently, there have been many samples of low-quality products, especially in the range of auto parts. The silent blocks of the front levers of the VAZ 2110 are being replaced, including the VAZ 2109. The silent blocks of the front levers of the VAZ 2106 are being replaced. The silent blocks of the steering rods of the VAZ 2110 are being replaced. Among the main manufacturers of high-quality auto parts are the following Korean and Polish companies CTR, GUMEX. The main thing is not to fall for cheaper Chinese-made analogues. Replacement of silent blocks on steering rod from VAZ 2108 -. The part must be manufactured with high quality and meet the necessary requirements, both in size (width and diameter) and rubber quality. for a beginner to decide on a quality part, so you should rely on the seller’s recommendations.
I would like to note that steering rod silent blocks for VAZ-2110, VAZ 2111, VAZ 2112, Balakovo (BRT) production fit perfectly into steering rods of Daewoo Lanos, Daewoo Nexia, Daewoo Sens, ZAZ Sens (ZAZ Sens).
Repair of steering rack on VAZ-2110, 2111, 2112
The steering rack is designed to transmit force from the steering wheel to the steered front wheels of the car.
Its design consists of the rack itself, which is a steel strip with notched teeth, a metal body, as well as additional elements in the form of bearings, bushings, seals, anthers, etc.
The rack is driven by the teeth of the steering shaft drive gear, which rotates and moves the rack to the left or right.
Steering rods are attached to the rack, which, in fact, force the wheels to turn in one direction or another.
The steering rack is located in the engine compartment at the rear of the engine, and is attached to the lower part of the partition of the engine compartment and passenger compartment.
With the exception of the latest versions equipped with electric power steering, the “dozens” were not equipped with power steering devices.
How to choose a steering rack
In the case where a defect in a unit does not allow for easy repairs, it is more advisable to completely replace the unit. But here you will have to shell out a considerable amount: a standard VAZ rack will cost about 3,000 rubles, tuning versions cost much more, up to 15,000 rubles.
That’s why the number one question is the correct choice of reiki, so as not to get into trouble.
- It is better to give preference to original parts rather than copies, as they guarantee not only perfect compatibility, but also good quality. Although today there are a lot of companies and small businesses that sell cheap copies under the brand of the originals. Therefore, you should not purchase components from dubious shops and markets, but from serious and trusted sellers.
- Don't pay attention to parts that are too cheap, as they are unlikely to last long.
- When choosing a rack for a ten, it is necessary that the product number ends with “10”, remember that the steering rack is a purely individual part, there is one for each model, so don’t go wrong.
- Of course, it is necessary to conduct a visual inspection of the product before purchasing to identify defects, damage to anthers and other components.
Basic faults
Like any other mechanical structure, the steering rack, due to certain circumstances, may show signs of malfunction. These include:
- crunch (knock) when turning the steering wheel;
- “tight” steering wheel;
- increased play in the steering wheel or steering shaft drive gear;
- vibration of the steering shaft when driving;
- uneven tire wear caused by improper alignment of the front wheels.
The listed symptoms indicate that it is time to repair or replace the steering rack. However, do not rush into replacement. The rail itself is made of durable steel, and it is not so easy to damage it. Most often, auxiliary structural elements become unusable:
- support sleeve;
- drive gear bearings (ball and needle);
- seals;
- anthers, etc.
There can be any number of reasons for the failure of these parts, from spent resources to mechanical damage due to off-road driving. If you are sure that the rack itself will not have to be changed, you can get by with minor repairs to the steering structure, which consists of replacing the listed “consumables”.
How to recognize steering rack faults
Any mechanism does not last forever, including this part. Most often, a malfunction of the steering rack is indicated by a knock that can be heard when turning. But there are other signs. To accurately determine the cause of the knocking noise, which lies in the steering rack, you must:
- take the steering shaft with your hand where it connects to the rack and move it up and down (if there is a knock, then the steering rack needle bearing in the steering rack needs to be replaced or simply lubricated);
- hold the joint of the steering rods with your hand and check the play of the bushing, as well as the steering gear.
Often the cause of knocking is poor adjustment of the fasteners and then nothing, everything works without dismantling. But if knocking is still observed in the rack itself, then you need to do the following:
- purchase a new steering rack;
- restore it to a service station;
- carry out independent repairs.
Attention: All three options have their advantages, but the most profitable from an economic point of view is, of course, the third method. It will allow you not to spend money on expensive parts and auto mechanic services. But this method will require certain initial knowledge about the mechanisms of the car, dexterity and patience.
DIY steering rack repair on a VAZ 2110 (video)
Using the steering mechanism, the driver determines the direction of movement of the car. The steering rack plays an important role in the reliable functionality of the system. It is she who transmits the force that the driver applies to the steering wheel through the tips, rods, and to the turning levers connected to the wheels via a pin.
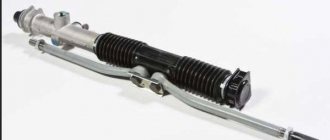
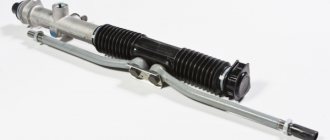
Photo of the steering rack for VAZ 2110
To be sure that the car is safe to drive, you should make sure that the steering rack is in good condition. If problems are found, they should be corrected immediately. It is quite possible to replace the steering rack on a VAZ 2110 with your own hands. In most cases, it is enough to tighten it.
Steering elements
- Steering rod ends (internal and external);
- The bracket that holds the steering mechanism;
- Support;
- Anther;
- Carter;
- Tie bolt;
- Flange for flexible coupling;
- Adjustment rod;
- Turn lever;
- Ball joint tip;
- Bolt for holding the inner rod ends.
The drive gear is mounted on the crankcase bearings. It engages with the rail. The metal-ceramic stop is sealed in the crankcase using a rubber ring and presses the rack with a special spring to the gear.
Steering rack diagram
Due to the work of the locking ring, the unwinding nut is fixed. There are marks on the boot and crankcase that make it easy and quick to assemble the entire assembly.
Tools and materials
To replace the steering rack on a VAZ 2110, we recommend watching training videos. This will allow you to understand the structure of the system, perform the work competently and without any problems.
Also, to repair the steering rack with your own hands on a VAZ 2110 car, you will need a certain set of tools and materials. Their list is as follows:
- Aerosol Movil;
- 3 plastic clamps measuring 200 by 4 millimeters;
- Cotton rags;
- A can of WD40;
- Feol grease - for processing bearings.
From spare parts, take:
- Silent blocks;
- Cover for rack;
- Tips;
- Tubes;
- Repair kit (special for repairing steering racks).
And the tools you need are:
- Ratchet socket wrenches;
- Cardan with extension;
- Hammer;
- A puller used to remove tips;
- Key for 22;
- The chisel is about 7 millimeters wide, but no more;
- Octagon key.
Carrying out replacement work
Again, watch the video on how to repair the steering rack on a VAZ 2110 with your own hands. This will make it easier to go through each stage.
Before pulling the steering rack off your VAZ 2110, treat all fastening joints with WD40 . Wait an hour and a half and repeat the procedure again. This must be done a day before the repair itself. This will make it easier for you to unscrew all connections.
Proceed in the following sequence:
- Before repairing the steering rack, your VAZ 2110 must be firmly fixed so that the car does not move.
- Place supports under the rear wheels.
- Put the car on the handbrake.
- Lock the steering wheel.
- Disconnect power from the battery.
- Place the car on a jack.
- Remove the front wheels.
- Buy a new boot for the rack in advance, as it will require replacement. Even if its condition is satisfactory, it is better to change it immediately.
- Unscrew the nuts from the ends.
- Remove your fingers from the strut levers. To do this you will need to arm yourself with a puller. It is mounted on the lever, the screw is tightened until it stops and the lever is hit with force with a hammer. In this case, be sure to hold the puller screw with a wrench.
- Unscrew the nuts from the clamps.
- Unscrew the bolt located in the passenger compartment on the steering floor near the floor.
- Pull the bar towards you using progressive and oscillatory movements.
- Please note that disconnecting the gear shank from the shaft is problematic. When the rail is just detached through the hole, tilt the assembly to the right side and remove the entire structure. Make sure the splines on the element are intact.
- Through the right hole on the body, remove the entire assembly.
Replacing rubber joints on the rear suspension
More on how things are changing. First, let's look at how to replace the rear silent blocks of a VAZ-2109. To perform the operation you will need:
- Inspection hole;
- Jacks;
- Tools (key sets, hammer, attachments);
- Bench vice;
- Mount;
- Spring ties;
- Soap solution;
- Pullers for rubber joints;
First, the silent blocks of the rear beam of the VAZ-2109 are replaced. For this:
- We put the car in a pit, jack up the rear on one side, remove the wheel;
- Unscrew the nut of the bolt securing the beam to the body, remove the bolt;
- Using a pry bar, we press the beam down to remove it from the bracket, fix it in this position (by installing a wooden spacer between the beam and the body);
- Using a hammer, carefully knock out the worn hinge;
- Using a device (a long bolt with a nut, two wide washers and a piece of pipe), we press in a new element, having previously generously lubricated the seat and the hinge itself with soapy water;
- We install the beam into the bracket and fix it with a fastening bolt;
How to make repairs
- Fix the rail in a vice in a vertical position. Clean the surfaces with a brush or cotton cloth previously soaked in white alcohol.
- Take out the steering rods. To do this, unscrew the bolts on the bracket that hold the rods, bend the force at the locking plate using a 22mm wrench.
- Remove the plate rods - locking and connecting.
- Pull out the tie rods.
- On the right side of the steering assembly housing, remove the retaining ring and support.
- Cut off the clamps that hold the protective cover. These are disposable items made of plastic. Replacing them is very easy and cheap.
- Remove the cover.
- On the left, remove the support and protective cap.
- Armed with a 17mm wrench, unscrew the nuts that are located on the rack stop. Remove it, take out the spring and ring.
- Knock the rack stop out of the socket. Hit the crankcase against a wooden base. To seal the groove, install a rubber ring on the stop.
- Remove the seal, remove the gear boot by prying it off with a screwdriver.
- Remove the lock washer.
- Using a 24mm wrench, unscrew the nut that holds the gear bearing.
- Remove the nut from the shaft.
- Using a 14mm wrench, unscrew the gear from the crankcase, simultaneously with the bearing itself.
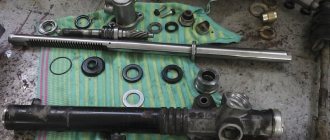
- Remove the rack and remove the bushing. The element is pryed off with a screwdriver so that the protrusions fit into the holes in the crankcase. This will allow you to get the part without any problems.
- Install a new bushing. It is recommended to attach new damper rings made of rubber to it. This must be done so that the thin part of the ring is opposite the cuts in the bushing, and the protrusions on the bushing are freely placed in the crankcase hole.
- The rings need to be cut along the edges of the sleeve and the excess elements removed.
- Remove the retaining ring from the gear shaft.
- Use a two-jaw puller to compress the wide bearing.
- Press out the needle bearing with the same device, or make two holes with a diameter of 2 mm in the end of the crankcase, and then the bearing will come out onto the ring.
- Rinse the crankcase thoroughly, press in the needle bearing using a piece of pipe. Treat the holes made with cold welding.
- Using Fiol 1 lubricant, treat the bearings, rack and gear teeth. Place UNIOL 1 grease into the cavity under the nut securing the drive gear bearing.
- Reassemble the structure in reverse order.
- Place the new cover in place.
- Be sure to try to maintain a gap of 0.12 mm between the rack stop nut and the stop itself.
- Tilt the nut after adjusting the gap, which will prevent it from unscrewing.
If such a DIY repair of the steering rack on a VAZ 2110 does not give the desired result, simply replace the element. You have already become familiar with the process of dismantling the rail. Having taken out the old unit, put a new one in its place, following a strict sequence of steps.
To illustrate the repair of the steering rack on a VAZ 2110, we recommend watching the video. With their help, the process will not seem as complicated as described above. The work will take some time, but you won't have to hang around in the garage all day.
Replacing the silent blocks of the upper arm
Replacing them involves the following steps:
- Raise the car on a jack and secure it.
- Remove the front wheel.
- Remove the upper arm. However, before doing this, you need to carefully look to see if the silent blocks in the lever are slipping. They must be stationary.
- To make it easier to remove the upper arm, you need to knock out the upper support. To do this, unscrew the support nut.
Note: it is quite difficult to unscrew, but without this the support will remain in place.
- You need to turn the wheel by hitting the bipod with a hammer. Only after this the support will pop out.
- Then you should unscrew the lever bolt located on top.
Note: It is quite long, so unscrewing it may take a long time.
- This bolt needs to be pulled out, which will allow you to remove the machine arm.
- You can start replacing them.
Note: the problem may be not only in the silent blocks, but also in the lever. To check if it is working properly, you need to put the lever bolt in place and see if there is a lot of axial play.
If it is large, then the problem with silent blocks may occur again. Therefore, before inserting a new one, you need to repair the lever.
- You can remove the silent blocks using a hammer or chisel. In fact, they fall out almost after the first hit. The main thing is not to damage the car.
- Now you need to insert the new silent block where the old one was. You need to press it in properly so that it does not dangle. You can press it in easily: one bushing fits the size of the silent block skirt, the other is a little larger. By pressing with the smaller bushing, it easily fits into the lever.
Repair of axial play
There are two repair options:
- Replace the entire pole completely. However, not only is it very expensive, but its quality is not the best.
- You can tighten two washers on the sides so that the bolt cannot dangle.
Note: screwing in these washers may result in the silent blocks not fitting into the lever, so they will need to be shortened slightly using a hacksaw. This can significantly reduce the service life of silent blocks.
Replacing the lower arm silent block
The lower silent blocks are a little more difficult to replace:
- First you need to remove the stabilizer, which will allow you to move the lever left and right.
- Now you need to unscrew all the nuts that hold the silent block stationary.
- You need to remove the lower control arm silent blocks. To do this, you need to repeat all the steps as with the silent blocks of the upper arm.
- Now you can start pressing in new silent blocks.
Note: they can only be fixed when the vehicle is loaded. After all, if you fix them on a suspended suspension, they may soon fail.
High-quality photos, a corresponding video or instructions will help everyone complete the work of replacing the front silent block with their own hands. However, you need to be extremely careful, because you can do a lot of damage to your car. This will result in you having to pay in
If you find an error, please select a piece of text and press Ctrl+Enter.