There are many car security systems on the market today, and choosing the right option is not always easy. In the selection process, you need to pay attention to the quality of the security system, long-term reliability, and the number of additional functions. This article with instructions for the Tomahawk 7010 will reveal the features of this model and help you make an informed decision.
You can download the official instructions.
Equipment and main functions
For high-quality installation, trouble-free operation and full compliance with technical specifications, you must purchase a full set containing all the parts. The Tomahawk TZ-7010 kit includes:
- main processor processing signals from the remote control;
- main pager equipped with an LCD screen and feedback;
- additional keychain in case you lose the main one. Without display and single-sided;
- antenna responsible for receiving and sending signals;
- two-level analyzer of impact and vehicle tilt;
- wires and corresponding connectors for correct connection;
- installation and operation manual;
- warranty card.
The complex has excellent functionality and has a large number of options:
- anti-scanner and anti-grabber that protects communications from interception and hacking;
- non-volatile memory that retains data even in the event of a power outage;
- panic mode;
- silent arming and monitoring function;
- Valet mode, which allows you to temporarily disable some security functions;
- anti-hijack, blocking the engine in case of theft;
- bypass of faulty zones, protection against fictitious system activations;
- remote analysis of the current state;
- memory of system activations;
- option to set a personal code to disable.
Equipment
The basic signaling kit includes:
- Main electronic control module. The device is designed to receive, process and transmit pulse data with a communicator. It is supplied to the market in a black plastic case, on which the name and brand of the model are applied.
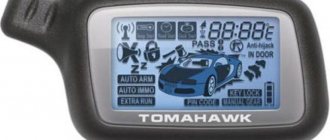
- Main communicator. The device is equipped with a screen that displays information regarding the status of the alarm.
- Spare pager. Does not have a display or feedback function.
- Shock regulator. Necessary to determine the physical impact on the car body. When installing, it is important to set the sensitivity correctly to prevent false alarms.
- LED indicator of signaling status.
- Transceiver module.
- Mounting kit of wires for connecting an electronic module, transceiver, central locking and other devices.
- User's manual for installation and use of Tomahawk 7010. The service manual describes all the functions and nuances regarding the operation of the security complex.
- One limit switch. The device belongs to the push-button category.
- Package.
Door limit switches and a siren will have to be purchased separately, since these devices are not included in the package.
Alarm equipment Tomahawk TW-7010
Tomahawk 7010: instruction manual
Trouble-free use of the Tomahawk TZ-7010 system is only possible if used in accordance with the operating instructions. You can download the instructions for use here. The first part of the 37-page document will answer basic questions and tell you about the alarm functions. The second section is devoted to programming the settings, and the final part will tell you about installing the system yourself.
Key fob characteristics
Tomahawk car alarms (modern versions, such as the popular x5, tz-9020 or tw-9010, 9030) usually come with two key fobs:
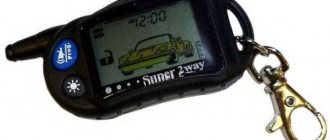
- the main one, with two-way communication - a key fob with a liquid crystal display, which allows the car owner to receive security alerts and control the security system from a distance; it usually has five buttons;
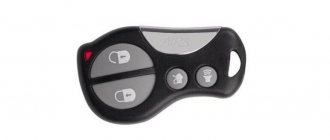
- additional, with one-way communication - this key fob does not have a display, it has only four buttons and an LED indicator.
Photo of Tomahawk key fob tw-9020, 9030 (main, additional and antenna)
Using the key fob of most alarm systems, you can perform the following basic functions:
- arranging/disarming a car;
- closing and opening doors with the engine running;
- opening the trunk lock at a distance, including separately from the doors;
- automatic engine start (including delayed by timer or set temperature)
- immobilizer control;
- searching for a car in a large parking lot;
- turning on siren and anti-robbery modes;
- monitoring all systems of a protected vehicle from a distance (temperature, battery charge, gasoline level, etc.);
- viewing the history of system alerts;
- adjusting the sensitivity level of motion and shock sensors;
- programming car alarm functions;
- remote activation of service mode.
These options are described in detail in the instructions for use for any key fob.
How to properly set up a car alarm
The complex offers many secondary functions that make life much easier for the owner. They are configured through the programming mode.
- With the ignition off, the Override button is pressed five times.
- The ignition turns on and the car emits five beeps.
- Each subsequent click of Override helps you select the appropriate function according to the table (1 click – central locking pulse length, 2 clicks – safe driving setting, etc.).
- Pressing a certain button on the key fob sets the corresponding parameter.
Malfunctions Tomahawk 7000
The Tomahawk TW-7000 car alarm system is easy to use and has no serious problems. But sometimes it happens that the system does not work. If the complex is faulty, then some faults can be corrected yourself.
Car alarm does not respond to key fob
In this case, the car owner may not disarm the vehicle. Most often, the problem lies in a dead remote battery. It is necessary to disassemble the pager and change the AAA nutrient element. The reason may be due to a discharged battery. The machine does not transmit the signal correctly to the Tomahawk TW-7000 processor unit. It is also recommended to reduce the distance - perhaps there is a lot of interference nearby and the antenna cannot receive the signal.
Dimensions are constantly blinking
When the car's emergency lights flash, this may indicate a malfunction of the hood switch or damage to the communication module. The last factor is checked using the driver call command.
Tomahawk 7000 alarm does not close the doors
The presence of this problem warns of a breakdown of the door limit switches or a malfunction of the central locking system. All parts should be inspected for corrosion, traces of rust should be removed, and parts should be treated with silicone grease.
How to unblock
If the key fob is lost, the car owner has the opportunity to switch the alarm system to emergency mode and drive away. Instructions on how to disable Tomahawk TV-7000 are described below.
- The door opens with a key.
- The key is inserted into the lock and the ignition is activated.
- The Override button is pressed a certain number of times equal to the individual code.
- The alarm goes into emergency mode.
Engine won't start
If the Tomahawk TW-7000 does not allow you to start the car, you need to check the connection of the central unit. The main processor may be faulty. Sometimes rolling back to earlier firmware versions or returning to factory settings helps. For more serious problems, you need to contact service src=»https://daciaclubmd.ru/wp-content/uploads/2019/10/signalizaciya-tw7000-16.jpg» class=»aligncenter» width=»600″ height=» 435″
Tomahawk 7010: Keychain
Car alarms have two types of remote controls: main and backup. The main pager is equipped with five buttons and is powered by a standard AAA battery. Buttons near the LCD screen allow you to disarm the car and put it under protection. The end keys are responsible for activating and deactivating additional functions. The maximum signal range is 1200 meters in ideal conditions.
The spare remote control is designed in case of loss of the main one and is suitable for temporary use. There are four buttons here and there is no screen with informative displays. Feedback is provided by an LED, and the signal range is up to 30 meters.
Read also: How to check an electric motor with a multimeter
Key Features
Features of the Tomahawk 7010 security system:
- The presence of an anti-grabber and an anti-scanner ensures reliable transmission of signals between the electronic module and the communicator without the possibility of interception. According to the manufacturer, no modern scanner or code grabber can intercept pulses.
- The electronic signaling unit is equipped with a non-volatile status memory module. Thanks to this, when the battery is disconnected and then turned on again, the alarm will return to its original state.
- Availability of an integrated two-level touch controller. Its use allows you to determine the physical impact and send information about this to the car owner’s remote control.
- Panic option. With its help, the car owner can activate the siren and optical devices for a certain time. This will scare away strangers who are near the car.
- Option to automatically re-set to protection mode.
- Ability to bypass non-working areas. If one of the security zones refuses to work for certain reasons, the alarm will automatically bypass it. Information about the problem area will be sent to the communicator.
- Availability of protection against false inclusions. If the motion controller is set correctly, the alarm will not go off without a reason.
- Option to search for a car in the parking lot. When it is turned on, the car's optical devices will blink, which allows the car owner to determine the location of the car in a large parking lot.
- Availability of a low battery indication system in the pager. The communicator screen displays the battery charge level. Thanks to this, the consumer will be able to promptly replace the power source in order to prevent problems in the operation of the Tomahawk 7010.
- Availability of an additional control channel. This channel is programmable.
- Possibility of turning on the protection mode when the power unit is running.
- The electronic alarm module is equipped with several connectors. An additional controller can be connected to one of them.
- The central locking control time interval can be programmed. The setting time is 0.8, 10 or 30 seconds.
- Two-stage opening of door locks and disabling the security mode.
- Temporary deactivation of the sensitivity controller, as well as additional controls.
- Possibility of delaying the switching on of interior lighting. The function is programmable and can be set to different time intervals.
- Function of remote unlocking of the tailgate. The option is configurable.
- Possibility of blocking the power unit. The function is set via a normally closed or open relay.
- Availability of a built-in relay for connecting optical devices. For this, two additional channels are used.
- Availability of built-in central locking. Provides additional vehicle protection.
- Possibility of controlling the central locking when the power unit is running.
- Built-in engine blocker. Allows you to block the operation of the power unit in case of unauthorized access to the car.
- The main communicator screen graphically displays the operation of all activated triggers. Also, using the display, the consumer can find out about the protection status of the machine.
- Anti-hijack mode or anti-robbery function. This option is designed to protect the car owner from robbery and is intelligent. If the machine is grabbed forcefully and the option is configured correctly, the engine will be blocked. The blocking process will begin after a certain time, when the attacker moves away to a safe distance from the owner of the car.
- Using a personal password. The code is used to activate or disable the anti-theft function, as well as control basic options.
- Availability of a memory module for car alarm activations. The communicator display shows complete information regarding the activation of alarm signals. Also, using the screen, the consumer can find out about the zones that were triggered and led to the activation of the alarm mode.
- Option to warn the car owner about an unlocked door when starting to drive.
- Increased range of the communicator. Ideally, this parameter is 1200 meters. But in fact it will be less. Its operation is affected by weather conditions, architectural features of the area, as well as interference. If they are present, the range of the communicator will be reduced several times.
- The car owner has the opportunity to connect a standard horn. This feature is programmable.
- If necessary, the consumer can install and connect an additional remote engine start module. Depending on the module, the start procedure can be implemented by command, air temperature or timer.
- Availability of a comfort system. If your car has power windows and a sunroof, you can set these devices to close automatically when the protection mode is turned on.
Channel 130 presented a brief overview of the Tomahawk 7010 anti-theft system.
Remote compatibility
If the Tomahawk TZ-7010 key fob is lost or damaged, you need to purchase an original spare part. The cost of the part is about 1000 rubles. However, the pager is not completely original; the company welcomes interchangeability, so you can buy related spare parts from other alarm models. Parts from the N1b H2, LR-1010, TW-7010, TW-9020, TW-9030 systems are perfect. A complete analogue is the TZ-9020/TZ-9030 keychain.
How to determine the model by keychain
You can recognize the alarm model by the appearance of the remote control housing and by the icons on the display:
- TW-7010. It stands out among the rest by the presence of silver inserts in the edging of the keychain. The remote control also has a removable antenna made of black plastic.
- TW-9010. The device is equipped with an asymmetrically shaped antenna fused with the body and differs from others by a set of icons on the screen. On the right side of the key fob there is an “eye” for attaching the remote control to a bunch of keys.
- TW-9020 and TW-9030. The remote controls in this series have the same body as the TW-9010, but the image of the car on the display is the same as that of the TW-7010.
Programming key fob Tomahawk TZ 7010
When purchasing new original remote controls or analogue ones, the question arises - how to register them in the car’s memory? The procedure is carried out in several steps.
- The car ignition turns off.
- The override button is pressed 7 times.
- After turning on the ignition, the machine will emit seven beeps confirming the entry into recording mode.
- On the remote control you press and hold buttons with a lock and a sound signal.
- Up to four pagers can be stored in memory at the same time, and the transition to standard mode is carried out automatically; you only need to press nothing for 6 seconds.
How to use the button?
Please note that the procedure for managing car alarm settings requires a more responsible approach. It is better for car owners who have experience and skills in carrying out this task to start it. If you make mistakes when programming the Tomahawk security complex with the Override button, this will lead to a malfunction of the alarm system.
Options setting table with button
The most common option is the ability to cancel the speed limit for moving the car in reverse:
- To disable this function or remove restrictions, the car owner needs to click and hold the button in this state for several seconds. After this, the consumer must smoothly press the throttle lever. This will disable the lock.
- If the throttle lever is already depressed, then you should not press and hold the Override key. This will cause you to lose control of the vehicle.
Entering the settings menu
To enter the Tomahawk car alarm settings menu, follow these steps:
- Insert the key into the lock and turn off the ignition.
- Press the Override service key several times. The button is clicked three times to enter the emergency Valet mode. You must press the button four times if you need to select the function of daily automatic start of the power unit. To change the setting of the automatic engine warm-up function according to the specified temperature in the car interior, the key is clicked five times.
- Then the ignition is turned off.
- The security system will play several siren signals in confirmation, their number depends on the choice of function. The alarm will indicate successful entry into emergency mode with three sounds and flashes of the side lights. If the system has entered the mode for setting up the daily automatic engine start function, the siren will emit four signals, and the car’s turns will blink the same number of times.
- To enable or disable the option, click on the Override button.
- In response, the alarm system must confirm the activation or deactivation of the option through a siren, as well as signals from the system status diode light. One sound will indicate the successful activation of the option, and if the siren plays a double signal, this indicates that the function is disabled.
- After setting the functions, you must turn off the ignition. The car's lights will blink five times.
Enabling or disabling protection mode
To emergency activate and deactivate the protective mode, do the following:
- The ignition is activated. The procedure for turning on the protective mode is carried out with the power unit turned off.
- The service key is clicked eight times.
- The ignition in the car turns off. In confirmation, the vehicle’s lighting devices will blink once, and the complex’s siren will also play one signal. Twenty seconds after the actions are completed, the protective mode will be activated. During this time, you need to have time to leave the car, turn off all electrical equipment and close the doors. If one of the security zones is turned on after activation of the emergency protection mode, the complex will report this with three flashes of light devices and a triple siren signal. If the driver does not disable the protective mode within 20 seconds after the notification from the system, this will trigger an alarm.
- To disarm the car when the pager is not working or lost, you need to turn on the ignition using the key. There is no need to start the power unit of the car.
- To disable the function, press the service key four times. After this, the ignition is turned off.
Keychain binding
The Tip-Top channel talked about linking new pagers to the Tomahawk security complex.
Linking new key fobs to control the alarm using the Override button is done as follows:
- The ignition is activated by inserting and turning the key in the lock. The engine should not be started.
- The service key is pressed until the car siren sounds four times. This indicates that the processor device has successfully entered the pager binding mode.
- The Override button is released.
- The keys on the remote control are pressed in the form of an open luggage compartment and a crossed out speaker. Successful binding of the pager will be indicated by one signal if the first remote control is linked, the second one will sound two signals, the third one will sound three, etc.
- If you do not send signals to the security complex for six seconds, it will automatically exit the setup mode. You can also leave the menu by turning off the ignition.
How to reset settings
When buying a used car or experiencing system glitches, sometimes you need to reset user settings. Resetting to factory settings takes a couple of minutes.
- The ignition is turned off.
- Press the Override key ten times.
- The ignition is turned on, 10 sound and light signals are heard.
- Pressing the service button again will activate the return to standard settings mode.
- The button with the lock is clicked once on the remote control.
The car signals the success of the procedure by resetting all user parameters to factory settings.
Trouble-shooting
Features of troubleshooting signaling problems:
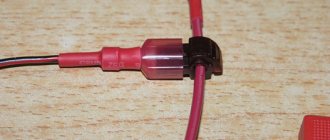
- When the anti-theft complex does not respond to commands, first of all you need to check the functionality of the battery. To replace the battery, you need to open the back cover of the remote control and remove the used battery, then click the F button on the remote control. A new battery is installed; polarity must be taken into account during installation. Then the lid of the device is closed and the button with the open trunk symbol on the pager is pressed.
- If these steps do not help, you need to check the condition of the board and buttons on the remote control. To do this, unscrew the bolts that secure the two parts of the case to each other and disassemble the device. If moisture gets inside the case, traces of it will be visible on the board, then the circuit must be dried. To do this, place it in a warm place, but not on the radiator. Do not dry the board near a household stove or under the influence of sunlight. Assess the condition of the contact elements on the diagram; if they are damaged or acidified, they need to be re-soldered or cleaned. Damaged communicator buttons must be replaced.
- The next stage will be diagnostics of the electrical circuits through which the alarm elements are connected. If they are damaged, broken, or have worn out insulation, signal transmission will be intermittent. Checking power lines is done using a multimeter. First of all, you need to pay attention to those sections of the wires that are located at the bends. If damaged electrical circuits are found, they must be replaced.
- Then all connections and connectors on the devices are checked. In particular, you need to check the electronic module and transceiver. If the installation conditions were not met when installing the antenna adapter, the quality of pulse data reception will be poor. Carefully inspect the condition of the connectors on the devices; if they have acidified contacts, they must be cleaned.
- If the siren turns on the alarm mode for no reason, you need to check the operation of the shock sensor. The device sensitivity setting may need to be adjusted.
- If the steps described above did not allow you to find the cause of the problem, you need to diagnose the electronic module. One of the reasons for its breakdown or incorrect operation may be moisture getting on the board. As with the communicator, diagnostics and drying of the circuit will be required. If there is no visible damage on the board, then the reason may be a software malfunction. Only high-quality diagnostics can determine the problem.
Installation Guide: Connection Diagram
Having the user manual in hand (watch) and a suitable set of tools, you can connect the Tomahawk TZ-7010 alarm system with your own hands. To work you will need:
- a set of soldering accessories (tin, rosin, blowtorch);
- several heat-shrinkable tubes or electrical tape;
- tools for removing decorative panels in the interior;
- tester or warning light.
All elements must be correctly connected to each other, and their arrangement must have a certain meaning.
- The processor unit is installed in a protected place where the hijacker cannot reach.
- The antenna is mounted away from metal parts that create interference, but at the highest point of the car body.
- The LED is installed in a visible place to make it easy to determine the current state of the system.
- The sound alarm is located under the hood, away from sources of high temperatures, to avoid melting.
- The door and luggage compartment ends must be located in places inaccessible to moisture to ensure their serviceability and the absence of corrosion or short circuits.
- The shock sensor is placed near the front pillar, in a place with easy access (to make adjustments if necessary).
- All wire connections must be properly insulated.
- The service key is hidden in a hidden place.
How to install?
The alarm installation procedure begins with studying the circuit; when connecting, you should take into account the following nuances:
- Electrical circuits should be laid away from electronic devices. Their presence may cause interference when sending commands.
- Cables should not be laid in places where there are moving body parts. If they are damaged, it will be difficult to detect the problem.
- The installation of all main system devices should be carried out away from power electrical circuits and components. We are talking about ignition coils, high-voltage cables to which the spark plugs are connected, etc.
- Before installing the security complex, you can connect all the elements according to the diagram and connect them to the battery. This will allow you to verify in advance that the alarm is in working condition.
- If the car is equipped with airbags and a radio with a code, then disconnecting the battery is not recommended. When you connect it further, the audio system will ask for a code, so we recommend that you refer to the service manual in advance.
- All electronic modules and devices are connected only after they have been installed.
General installation map of Tomahawk 7010
The installation procedure is performed as follows:
- The electronic module of the system is installed away from sources of interference, moisture and heat. We are talking about electronic devices, as well as the heating system. If this requirement is not taken into account, the operation of the unit may be disrupted. The module is installed with the connector down to prevent drops of condensation from flowing down the wires into the device onto the board. For installation, you should choose the most hidden place, for example, behind the instrument panel or in the free space behind the center console. The module is fixed using self-tapping screws, double-sided tape or plastic ties. The block must be secured as securely as possible to prevent it from being damaged by vibrations during movement.
- The siren is installed in the engine compartment. It is not included in the package, so it can not be installed, but an alarm without a siren is virtually useless. The device is mounted with the horn down, this will avoid the accumulation of moisture inside the device. If the siren is autonomous, that is, equipped with a built-in battery, then during installation it is necessary to ensure free access to the keyhole. The siren must be installed away from the cylinder block and sources of moisture to avoid the negative effects of high temperatures. The installation must be performed in such a way that intruders do not have access from under the bottom of the car to the device and its connection wires.
- The transceiver module is mounted on the inside of the windshield, away from electronic devices and metal parts. The distance between them and the antenna should be at least 5 cm, this will avoid possible interference. Installation is carried out on a cleaned and degreased surface. It is not recommended to install the module under the tint film or at the bottom of the glass, this will lead to poor signal transmission.
- The limit switch is installed on the hood of the car. When the hood is closed, there should be no access to the switch; this must be taken into account during installation. If you purchased additional limit switches, they are installed on the luggage compartment, as well as on the doors. For installation you will need to make holes in the metal.
- Installation of the Valet service button is carried out in a place inaccessible to the criminal, since it can be used to disable the alarm. To hide the button, you can disguise it under one of the standard wiring harnesses by wrapping it with electrical tape. The button must be positioned so that the car owner has easy access to it from the driver’s seat.
- The shock sensor is securely fixed in the central part of the body to metal. There should be no plastic or rubber gaskets between it and the surface, this will lead to a deterioration in the sensitivity parameter. The device is fixed with bolts, self-tapping screws or double-sided tape.
- The alarm status LED light is installed on the dashboard. It must be installed so that the flickering of the diode is visible from the street. This will designate the vehicle as protected.
- When all components are installed and secured, they are connected to the battery and electronic module. Electrical lines are laid under the plastic upholstery, in particular, under the sills. When laying the wires, we recommend additionally wrapping them with electrical tape. This will provide reliable protection from external influences. In addition, in the event of a break-in, detecting the wiring of the anti-theft complex will be problematic.
How to set it to warm up hourly?
The Tomahawk TZ 7010 model is not equipped with remote start of the power plant as standard. You can tell whether a particular car has this option or not by the presence of a temperature sensor installed directly on the engine.
If this option is present, to remotely start at specified intervals, you need to press and hold the open lock button until the beep sounds, and then briefly click on the closed lock button. The car will make five beeps and a clock icon will appear on the screen. Deactivation is performed in the same way - by long pressing the key with the open lock and short clicking the button with the closed one.
Read also: Adapt the Opel robot box
How to view the temperature
The Tomahawk TW-7010 alarm system has a remote status polling function. To activate it, you need to press the button once with the trunk open. After this, the car will blink its headlights three times, confirming the command has been received, and the display will display data on the temperature in the cabin and information about the operation of the security system. As a setting, it is proposed to determine the unit of measurement (F or C) - this is done through the programming menu.
Also, when installing an additional engine temperature sensor (connected through the orange-gray wire and the hood limit switch), you can request information about the engine temperature. This operation is performed by the key with the car hood open.
The system is buggy
If problems arise with the Tomahawk TZ 7010 alarm system, you can fix some problems yourself:
- The car has trouble seeing the key fob. There may be sources of interference nearby or you need to replace the battery in the remote control and check the battery charge;
- the system is buggy. Often, rolling back to earlier firmware versions and resetting to factory settings helps;
- The central locking does not work or opens on its own. The serviceability of the limit switches should be checked;
- Frequent alarm sounds indicate the need to adjust the shock sensor.
Complex problems are best solved in a service center, where qualified technicians will do the work.
Errors in device operation and their elimination
Overview of malfunctions and malfunctions that may occur during the operation of the Tomahawk 7010:
- The security system does not respond to commands sent from the remote control. The user must diagnose the power supply in the device. If the battery needs to be replaced, be sure to pay attention to the polarity during installation. After dismantling the element, press button 5.
- If there is no response to commands, the cause of the problem may be damage to the board or contact elements on the communicator keys. To repair, the user will need to disassemble the device by unscrewing the bolts on its body and check the circuit. If traces of moisture are visible on it, then the communicator must be dried in a warm place, but not near a household stove or in the sun. Failed contacts must be resoldered or cleaned if the problem is their oxidation. Remove dust and debris from the housing with a dry brush or cloth.
- Incorrect operation of the alarm and lack of response may result from damaged cables. When the insulating layer wears out or breaks, the system does not close all doors or does not respond at all to the pager command. A multimeter is used to diagnose the integrity of electrical circuits. When checking, you must first assess the condition of the lines that are laid in the area of the moving nodes. When laying new wires, it is recommended to wrap them with electrical tape to ensure maximum reliability in the future.
- The cause of the malfunction may be poor contact of one of the alarm blocks with the control unit. It is necessary to diagnose the connectors for connecting the microprocessor, transceiver, and push-button switches. The contact elements may have become clogged or oxidized and will require cleaning to correct the problem. If the plug itself fails, it must be replaced.
- A large number of false alarms may be due to incorrect settings of the sensitivity of the shock regulator. To change this parameter, special control devices located directly on the sensor are used.
- If it was not possible to find the reason for the incorrect operation of the alarm, then it may be a malfunction of the microprocessor. The device could fail due to moisture getting inside. The steps to troubleshoot the problem are the same as in the case of a pager. If visual diagnostics did not allow us to identify the problem, then we can conclude that it is a software malfunction. To eliminate it, you will need to reflash the control unit or repair it.
Override button: what is it?
A special service key is called Override and is necessary for emergency situations. With its help, you can configure system parameters, switch to programming mode, deactivate some security functions, and turn off the alarm if the key fob is lost. The location of the button should be known to the owner, but if the installers or the previous owner did not provide this information, it is recommended to check the hidden places:
- central tunnel between the front seats;
- the inside of the compartments for small items on the door cards;
- glove compartment space;
- a place near the steering wheel or pedal assembly;
- compartment near the interior fuse box under the front panel.
Reviews
Victor, 49 years old:
“The system is not bad, I got it from the previous owner. But there is a minus - when in winter I tried to figure out how to enable temperature-based start, it turned out that there was no auto-start. In our climate and in my work, this is not very pleasant. I changed it to a Tomahawk with auto start, now I don’t know any grief. But I chose this manufacturer precisely because for the first six months the Tomahawk TW-7010 did not cause any problems at all - a well-made product.”
Dmitry, 36 years old:
“Good system, intuitive. For me, a person far from this, it was simple. When I lost the remote control, I quickly figured out which ones would be suitable instead, how to record the key fob and set up the alarm system for myself. I was also pleased with the price, so I think it’s a good choice in its price category.”
How to turn off the Tomahawk TZ 7010 alarm
If the key fob is lost or the battery is low, the owner can make an emergency shutdown of the car alarm.
- The car door opens with a key.
- The ignition is turned on within 20 seconds.
- The Override button is pressed three times.
- The ignition turns off, the car blinks its headlights three times, and the security mode is deactivated.
If the owner uses an individual Pin code, the number of presses must correspond to this number.
Functions
Supported Features:
- automatic restoration of the security mode;
- compatibility with active sirens;
- protection against false positives;
- protection of a car with a running engine;
- 2-stage door unlocking;
- status polling mode;
- locking the locks when the engine is running;
- emergency shutdown using a password;
- clock function (in the communicator).
Advantages and disadvantages
Advantages of the security complex:
- a large number of functions;
- low cost;
- connectors for external GSM units are provided;
- simple installation diagram.
Disadvantages of equipment noted by the owners:
- complexity of setup;
- there are no algorithms for automatically starting the power unit;
- problems when using factory settings;
- short range of remote control.
Car alarm price
Below is a table with the estimated cost of alarm systems in various cities of Russia.
| Places | Minimum cost of Tomahawk TZ-7010, rubles |
| Moscow | From 3990 |
| Saint Petersburg | 4050 |
| Ekaterinburg | 3800 |
| Volgograd | 4200 |
| Samara | 4000 |
Settings and Features
First of all, we suggest that you familiarize yourself with the manual for installing an alarm with or without auto start yourself. Regardless of the model, alarms must be installed according to the same principle.
Identification of buttons and remote control options
How to install?
The installation process of anti-theft equipment briefly looks like this:
First, the on-board network is de-energized; for this purpose, the battery is disconnected. Then a control device is installed - a block; it should be placed in the cabin, behind the dashboard, so that a criminal cannot reach it in the event of a car break-in. Next, the antenna adapter is installed. It is better to place it at the top of the windshield, on the inside, that is, in the cabin
Important - the antenna adapter should not come into contact with metal parts of the body and wiring, otherwise interference may occur when transmitting the signal from the key fob. Then the siren is installed - it must be placed with the horn down in the engine compartment. It is also advisable to limit access to the siren; also keep in mind that its operation can be negatively affected by high temperatures and moisture. If the system is equipped with a temperature sensor, then it is advisable to place this element in the engine compartment, in close proximity to the engine
This way the device will transmit the most accurate data. Limit switches are mounted in the doors, trunk lid and hood. A diode light bulb also needs to be installed in the area of the windshield - its blinking will let potential intruders know that the car is under guard. The impact controller is mounted in the vehicle interior; it is advisable to place it in the central part of the body. The device is fixed using ties or tape. Then all elements are connected to the control module, while the wires are better protected with fuses and also additionally insulated.
Model 9010 functionality
The TZ 9010 car alarm package includes a siren, a control unit, limit switches, an antenna diode indicator, mounting elements, and an instruction manual.
This model belongs to the budget segment of the market, however, it has many useful functions for the consumer:
- the presence of an anti-grabber and an anti-scanner to prevent signal interception;
- feedback function with the control panel;
- the ability to block the operation of the engine, as well as doors and luggage compartment;
- central locking control system;
- One of the key features is the automatic engine start function.
Model 9020 functionality
As the instructions for the car alarm model 9020 show, this alarm has standard functionality, but besides this, it also supports additional options:
- In addition to the shock sensor, the kit includes a vibration controller;
- the ability to start the engine remotely;
- the ability to receive a signal at a distance of 1.2 km;
- two-way communication with the control panel;
- protection against false inclusions;
- In addition, the system warns the car owner that the doors of his car are left unlocked (video author: Petr Permyakov).
Functions 9030
The instructions included with model 9030 describe all the nuances of installing and using the alarm. Main functions:
- protecting the system from signal interception;
- many auxiliary functions that allow you to remotely arm your car;
- if necessary, the car owner can program the control panel to suit his preferences;
- two-way communication with the system via a key fob with an LCD display;
- the ability to start and stop the engine remotely;
- option to warm up the internal combustion engine to a set temperature;
- The signal reception radius is 1.2 km.
Owner reviews
“I’ve been using the Tomahawk alarm system for two years now. Very satisfied in almost all respects. A person I knew told security that it was impossible to hack the system. In terms of functions, it has almost everything, except that autostart would be useful. It doesn’t cause any problems, only the second remote control is covered and doesn’t work, but these are minor things - just in case, I prescribed another main one and I’m not worried about it.”
Gregory, 24 years old:
“Not a bad option for your money. At least it worked well on my car thanks to the CAN bus. During the year of operation there were no complaints. Two comrades also ride with a tomahawk, both are happy. So we can safely recommend it to those who don’t want to spend a lot, but want to get a good alarm.”
37 pages of detailed instructions and user manuals
Advantages and disadvantages
Advantages of Tomahawk 7010:
- Effective protection thanks to the use of interactive signal coding. According to reviews, consumers do not encounter the problem of electronic hacking.
- The presence of feedback provides the ability to constantly monitor the status of the alarm in real time.
- Wide functionality at a relatively low cost. Tomahawk 7010 alarms are characterized by the presence of many useful functions that simplify the use and configuration of systems.
- Clear and convenient operating and installation instructions. With the help of service documentation, the consumer has the opportunity to independently install and connect all signaling components. Of course, this will require certain experience and skills. But in their absence, it is quite possible to complete the task yourself.
The main disadvantages of the Tomahawk 7010 include the rapid drainage of the battery in the remote control. When setting up the alarm, as well as intensive use, the battery may discharge. If this happens on the road, where it is impossible to buy a battery, then you will have to control the system using the service mode.
Tomahawk tw-7010
INSTALLATION GUIDE.
Basic principles of installation.
Selecting the location of the main blocks.
III. Connecting the system.
You have purchased a professional anti-theft alarm system -
tion. This security complex is manufactured with the greatest care, using the latest achievements and technologies. The alarm system will provide your car with reliable protection from the attacks of car thieves and robbers, thanks to the latest technologies. You will be able to completely control the situation inside and next to your “favorite”. The wide service functions of the security complex will reveal new capabilities of the car.
Specifications
Description of the main parameters of the Tomahawk 7010 car alarm:
- To supply power to the car security system, a 12-volt power supply is used. The use of alarms on heavy trucks and other vehicles where the voltage is 18–24 volts is not permitted.
- When the ignition is turned off and the protection mode is activated, the amount of current consumed by the system will be no more than 16 mA.
- The permissible current for power supply circuits and relay contact elements is no more than 15 amperes.
- To provide power to the contact elements of the remote blocking relay, no more than 30 amperes of current will be required.
- The siren is powered via a gray cable, the output current value will be no more than 1.5 amperes.
- Additional channels are powered via a black-yellow cable, which requires no more than 300 mA of current. The same amount of current is needed to connect the polite lighting system and the engine blocking relay.
- To power the alarm lights, approximately 7.5 amps will be required for each optical device.
How to disable Anti Hijack mode
The Tomahawk TW-7000 alarm system has a special Anti-Hijack function, provided in case of car theft. Its activation occurs after pressing the buttons with a lock and lightning on the remote control. In this case, the ignition should be turned on, and the car will blink its dimensions once. The mode involves three stages.
- The first is 30 seconds, when the alarm simply allows the owner to leave the car.
- The second is 30 seconds, during which the car flashes its lights and beeps.
- The third is to turn off the engine and refuse to restart.
You can disable the mode in the first two stages by pressing the button with the lock. After entering the third phase, deactivation is possible only after entering an individual PIN code.
Easy to maintain and reliable
What makes buyers purchase Tomahawk alarm models? First of all, it is a combination of many important parameters for car protection with auto start that make this anti-theft system so effective and popular among motorists:
- Installation and assembly of the device is so simple that there is no need to have special knowledge or complex equipment. Even a novice car mechanic can install the Tomahawk alarm system;
- Intensive use of any Tomahawk model maintains the stability of the alarm system and requires minimal maintenance costs. There are additional protective settings for the car, which are indicated in the instructions from the manufacturer;
- Tomahawk alarm system of any model offers a full package of services, thereby achieving the maximum level of driver comfort and safety.
Just turn on the Tomahawk and it will do the rest itself!
Replacing the key fob
It is often necessary to change the remote control when:
- loss of the main pager;
- key breakage.
It is very difficult to find a worthy alternative, so car owners prefer to replace the alarm completely. The main criteria for choosing a new key fob:
- devices with a display allow you to obtain information about the status of the machine, without a screen - only open, close and turn on the sound signal;
- use remote controls for identical alarm systems, because it is impossible to reprogram a pager from other companies;
- the more functions a device has, the higher its cost;
- Finding a keychain for an outdated model is difficult, almost impossible.
You can replace the control module with a Tomahawk 434 MHz by following the steps described below for the X3 model.
Tomahawk alarm instructions: basic settings of the timer, alarm clock or clock
For the setup mode, use a button on the main key fob with the designation “F in a circle” and buttons with the designation “silhouette of a car with an open trunk lid” and “speaker crossed out with two lines.”
Basic modes for setting the clock, alarm clock and timer (number of presses on the button marked “F in a circle”):
- Setting the minutes on the clock (number of presses – 1);
- Setting the clock on the alarm clock (number of presses – 2);
- Setting the minutes on the alarm clock (number of presses – 3);
- Turning on (off) the alarm clock (number of presses – 4);
- Setting the clock on the timer (number of presses – 5);
- Setting minutes on the timer (number of presses – 6);
- Turning on (off) the timer (number of presses – 7).
Tomahawk's instructions for setting the clock and alarm suggest the following steps. I start setting the time after setting the clock settings mode (after holding down the button marked “F in a circle”, a field with an electronic clock appears on the liquid crystal display of the key fob).
To set the clock value, use the buttons marked “silhouette of a car with an open trunk lid” (increasing time) and “speaker crossed out with two lines” (decreasing time).
Also in relation to the Tomahawk alarm, the instructions for setting the alarm are similar to setting the clock. The alarm clock is set after setting the hours and minutes by double pressing the button marked “F in a circle”.
After setting the required hours and minutes for the alarm clock (to quickly start, use the simultaneous pressing of the buttons marked “silhouette of a car with an open trunk lid” and “F in a circle”), by pressing the button marked “F in a circle” four times, exit to the submenu activating the alarm.
In relation to the Tomahawk complex, the instructions for setting the timer are as follows: after setting the alarm clock, press the button marked “F in a circle” five times, setting the hour value. Accordingly, you need to press the same button six times, setting the required minute value. After setting the time for the timer, activate (deactivate) it by pressing the button marked “F in a circle” seven times.