How to remove the cylinder head on a VAZ 2109. Replacing the cylinder head gasket with your own hands
It is necessary to remove the cylinder head (cylinder head) when replacing the gasket, block, as well as when repairing the piston group mechanism and its valves or when repairing the head itself. In addition, when tuning the engine or completely disassembling it, you also need to dismantle the cylinder head.
Before starting work, it is necessary that the car is installed on an overpass or inspection hole.
Dismantling the cylinder head on a VAZ 2109. Algorithm for replacing the cylinder head gasket yourself
It is necessary to remove the cylinder head (cylinder head) when replacing the gasket, block, as well as when repairing the piston group mechanism and its valves or when repairing the head itself. In addition, when tuning the engine or completely disassembling it, you also need to dismantle the cylinder head.
Before starting work, it is necessary that the car is installed on an overpass or inspection hole.
Removing the cylinder head on a VAZ 2109
- Disconnect the negative terminal from the battery.
- Drain the coolant into a plastic container.
- The exhaust pipe should be disconnected from the exhaust manifold.
- Remove the receiver with the throttle assembly (VAZ-2111). You also need to dismantle the carburetor (VAZ 21083), intake and exhaust manifolds (but you can do without this).
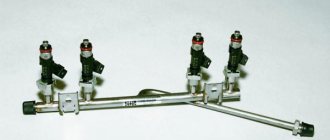
- If the work is performed on a VAZ 2111, you need to disconnect the “mass” wires attached to the left end of the head. Remove the fuel rail with fuel pipes and injectors.
- Disconnect the high voltage spark plug wires. Then we disconnect the coolant sensor connectors and remove the oil pressure level.
- On the VAZ-21083 the housing of the auxiliary units must be removed.
- Next, the housing of the auxiliary units, the distributor sensor, and the fuel pump are dismantled.
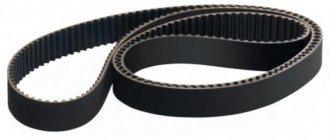
- First remove the timing belt. Then remove: the tension roller and the spacer washer. Next, you need to remove the camshaft timing pulley.
- Unscrew the rear mounting nut securing the timing cover to the cylinder head.
- Remove the cylinder head .
- Use a Phillips screwdriver to loosen the clamps, then you need to disconnect the hoses from the cylinder head exhaust pipe one by one.
Further actions
In order to replace the cylinder head gasket on a VAZ 2109, you need to dismantle the fuel pump. For this purpose, you need to disconnect the hoses from it, then use a 13mm wrench to unscrew the two nuts. Now you can pull out the fuel pump rod and plastic guide. Now comes the hardest part - disconnecting the exhaust manifold. It is necessary for the car to be found in the inspection hole. This makes it much easier to carry out work. The bracket is removed at the beginning; without this, the “pants” cannot be dismantled. The four nuts that secure the flange of the “pants” are turned out. Loosen the clamp and remove one hundred percent of the exhaust pipe. The wire is disconnected from the oil pressure sensor, but this can also be done from above the car. Now all that remains is to work a little with the drive mechanism of the gas distribution unit.
Also check out
- When disassembling the valve mechanism, it is necessary to place a wooden block under the valve plate.
Assemble and install the cylinder head in the reverse order.
Recommendations :
- Valve stems with engine oil. The same applies to guide bushings.
- Before installation, remove dirt, oil, and remnants of the old gasket from the surface of the cylinder block.
- The cylinder head gasket should be replaced using two special centering bushings.
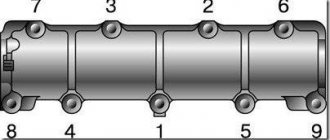
- Install the mounting screws; the diagram below shows 4 steps on how to tighten them.
- The first tightening torque of the screws is 20 N.m (2 kgf.m);
- The second - with a moment of 69.4–85.7 N.m (7.1–8.7 kgf.m);
- The third - with an extension of 90°;
- The fourth is to turn the screws 90°.
Step-by-step scheme of work
The procedure and torque for tightening the cylinder head of a VAZ 2109 with various types of engines was initially established at the manufacturer’s factory and written in full and step by step in the book. According to the diagram, the procedure for pulling the cylinder head of a VAZ 2109 should be done with 2 central bolts.
How to properly tighten the cylinder head of a VAZ 2109:
- First, the screws are twisted with a mandatory force of 2 kg/cm, which is measured in Newtons. The next step is to tighten the screws with an important torque of 7.5 to 8.5 kg/cm. Subsequently, the screws are tightened 90 degrees.
- Next, after the previously completed work, it is necessary to make one more turn of each individual bolt by 90 degrees.
Removing the head and replacing the cylinder head gasket
Burnout of the gasket under the cylinder head on VAZ 2109-2108 cars is the most common reason why the head has to be removed from the engine, and accordingly with further repairs, or rather, replacement of the gasket. If this problem is not noticed in time, it can lead to quite sad consequences, since the engine can overheat and even jam.
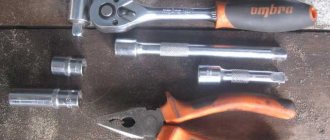
The procedure itself for removing the cylinder head and replacing its gasket is not complicated, but at the same time it requires certain technical skills and a small number of tools, the list of which is given below:
- Hex or similar bit with adapter for use with wrench
- Torque wrench - in this case I used the Ombra model with a range from 10 to 110 Nm, which is quite enough
- Flat screwdriver
- Extension
- Gasket Remover
In what cases does the gasket need to be changed?
And now it’s worth talking about why the cylinder head gasket changes. Firstly, sometimes you can always buy bad products. Secondly, from time to time a prerequisite for replacement is a violation of the integrity of the gasket, for this reason antifreeze leaks. In this case, all the coolant is mixed with oil, for this reason the engine resource is reduced. This happens for various reasons, but the most common is uneven tightening of the fastening bolts.
Often exhaust gases begin to break into the cooling system. At the same time, antifreeze begins to be thrown out of the radiator. True, there is an expansion tank that allows you to correct this problem. Today, removing the cylinder
on a VAZ 2109 it is necessary if the engine undergoes a half-year repair.
Also, when repairing the valve mechanism, it is necessary to change
the cylinder head gasket To put it simply, every time the cylinder head is removed, the gasket certainly changes.
The procedure for removing the cylinder head on a VAZ 2108-2109
Of course, it will be necessary to first carry out some preparatory procedures, without which it will be impossible to remove the head.
- First, you need to remove the air filter housing
- Then disconnect all fuel hoses and power wires from the carburetor or injector (depending on the type of engine)
- Completely drain the coolant from the system
- Disconnect the pants from the exhaust manifold
- Remove the distributor, although this is not a prerequisite - it will be enough to disconnect the high-voltage wires
- Unscrew and remove the valve cover
In general, it is necessary to free the head from everything unnecessary so that during dismantling there are no unnecessary problems. Of course, if you decide to completely replace it or repair it, then you will have to perform more operations, both the carburetor and the manifolds. Well, if it’s just a matter of gasketing, then you can get by with a minimum of actions.
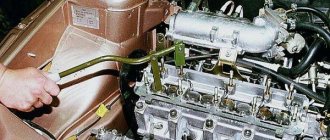
To unscrew the cylinder head on a VAZ 2109-2108, you need to use a powerful wrench and a hexagon, since the bolts securing it to the cylinder block are tightened with a large torque. In total you will have to unscrew 10 bolts, which are shown in the photo below:
As a lever, you can use a nozzle in the form of a regular metal pipe:
Then you can remove the bolts along with washers, as shown in the picture:
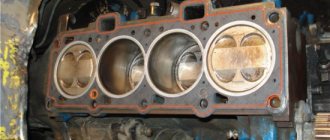
And now you can carefully lift the VAZ 2109-2108 cylinder head up, removing it from the engine block:
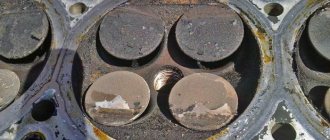
After which the following picture opens to us:
Coolant drain
Now it's time to drain the antifreeze. For this purpose, you will need a container of approximately 10 liters, a key of 13. First of all, the liquid from the radiator of the cooling system is combined. Place a container under the drain hole, after which the plug is unscrewed, however, it should be noted that without unscrewing the plug on the expansion tank, the liquid will not connect. In order to replace the cylinder head gasket on a VAZ 2109, it is unnecessary to completely empty the cooling system.
How to change the head gasket of a VAZ 2109.
Then a container is installed under the drain hole, which is located on the gasoline engine block. The plug is turned out using a key number 13. When you drain the antifreeze from the accounting software (software), you need to remove the rubber pipes. The top one, which connects to the radiator, then the stove pipe, and the last one is the one that connects the thermostat. If necessary, you can unscrew the aluminum insert on the motor block.
Procedure for replacing the cylinder head gasket on a VAZ 2109-2108
The gasket may remain either on the surface of the head or stick to the block itself. You can try to remove it by hand without using any tools, and if that doesn’t work, you can carefully pry it off with a flat-head screwdriver without damaging the surface of the part.
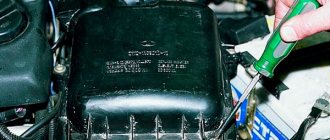
Carefully inspect the surface of the cylinder head and if pronounced traces of corrosion are found on it, especially in close proximity to the coolant channels, then it is necessary to repair it: milling, grinding, etc. If everything is normal, then we remove traces of the old gasket using special means:
We wait a few minutes until the whole thing has cooled down and remove the residues that have not succumbed to the chemicals, if any remain, with a razor blade. Then we wipe everything dry and you can even degrease it so that no foreign traces remain on the surface:
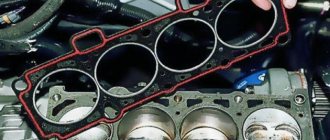
The engine block also needs to be cleaned and then a new gasket installed on it. It is important that the holes in the gasket coincide with the guides, which are located at the corners of the block:
Reinstalling the head
Now you can carefully install the cylinder head in its place, making sure that at this moment the gasket does not slip out or move to the side. Of course, the guides fix it, but you should still be extremely careful.
Next, we will need a torque wrench, since the bolts will have to be tightened with a certain torque. It is also worth keeping in mind that the tightening order must be observed. The diagram below shows the sequence in which to twist:
Puff
Reassembling the unit if you strictly follow the instructions for dismantling work will not pose any particular problems.
An incredibly important aspect of replacing the cylinder head gasket and all other activities associated with removing the head is the correct adjustment and tightening of the bolts.
Tightening the bolts is done strictly with a torque wrench, which will allow you to control the tension torque.
Here are some guidelines for using this specialized wrench and checking the current tension condition:
- Place the holder in the zero position. This will indicate that now the key data is equal to the moment of the original position;
- Look at the torque tool readings as you begin to tighten the bolts;
- Rotate the holder, monitor the indicators;
- If the torque does not change, the fastener may be stretchable, which is normal. This is exactly what should happen;
- If the torque increases rapidly, bolt movement should be achieved. That is, the stretch of the holder is small, it needs to be stabilized.
Golden rules of tightening
To properly reassemble the cylinder head, you need to adhere to the golden rules:
- Strictly follow the tightening torque data corresponding to the VAZ 2109;
- Make adjustments only using a torque wrench. Other tools do not allow you to get the desired result;
- To install the cylinder head, use only serviceable bolts that meet the requirements of your engine installed on the VAZ 2109;
- Before work, make sure that the holders are in good condition.
Checking the bolts
Tightening diagram
In addition to observing the required tightening torques for the cylinder head mounting bolts, one more rule must be observed here.
Returning the bolts to their places is carried out strictly according to the diagram below.
Tightening sequence
Next, do the work according to the table, and you will do everything right.
Tightening is performed in four circles, following the sequence of work with the mounting bolts indicated in the diagram.
| Tightening circle | Your actions |
| First round | All bolts are tightened using a torque wrench according to the diagram with an applied torque of up to 2.0 kg/cm m |
| Second round | Tightening in the second circle is carried out even according to the diagram, but the torque is applied up to 8 kg/cm m |
| Third circle | Each bolt on the third installation circle must be tightened 90 degrees. |
| Fourth circle | The fourth and final round of tightening the cylinder head bolts requires re-tightening the fasteners an additional 90 degrees. |
Make sure your bolts meet the specifications before following the instructions and diagram. Otherwise, even the most correct, strictly observed tightening will not give any result.
Why do we need and what are head gaskets made of?
The cylinder head gasket must be replaced when the head is removed. The gasket, although expensive, is a consumable item and cannot be restored or reused. The gasket has to withstand enormous loads. Both thermal and mechanical. The temperature in the combustion chamber can reach 1200°C, and in the VAZ 2106 it is no less than 1000°C, so the requirements for the material from which the gasket is made are very high.
The heat-resistant gasket is made of asbestos-containing material, which does not collapse or change its structure when exposed to high temperatures. Asbestos was banned for use in automotive technology, so it is now being replaced with new materials, but more often than not, the asbestos content is simply not indicated on the packaging of the gaskets. Ceramic gaskets are expensive, so they are used only on expensive cars, to which the nine has nothing to do.
In addition to the thermal load, the gasket must withstand the severe pressure that forms in the combustion chamber, as well as ensure sealing of the oil channels and cooling system channels. To do this, the head gasket must have a certain elasticity and strength. Tensile strength is given to it by reinforcing materials, which most often are thin steel wire.
How to lap valves
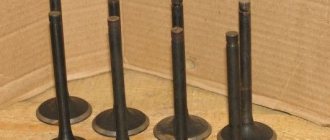
To do this, you will need a drill - either manual or electric, as long as it has a reverse function. You also need an old valve, from which you need to make a small adapter. It will need to be clamped into a drill. In addition, you need to get a small piece of durable rubber hoses. You will also need to purchase lapping paste. Please note that there are two types - for coarse and fine grinding. It is also worth considering that you need to place the valve on the seat to which it was ground. Otherwise, the work will be completely disrupted. There will be no tightness between the valve disc and the seat. This work will also need to be carried out if the cylinder head is being replaced. The cylinder heads of the VAZ engine must be ground into new valves.
A prerequisite is the presence of a drill with reverse. It is necessary to turn the valve in different directions evenly so that the surfaces are as smooth as possible. It is worth noting that a coarse-grained paste is used first, and after it removes all small irregularities from the surfaces, it is necessary to wipe it off and apply a fine-grained one. The latter will allow you to clean the valve plate and seat to a shine. Please note that the lapping paste is an abrasive material, so it is unacceptable to get into the cylinder and other rubbing engine components. Carry out valve grinding work away from the engine to prevent paste from getting into the cylinders. Also, be sure to clean it after the process is complete.
Signs of a broken gasket on a VAZ 2109
There are no regulations for replacing the gasket, since a good and well-made part can serve for quite a long time until the head is dismantled. But it is necessary to monitor its condition, and the difficulty is that damage to the gasket rarely manifests itself externally. Oil drips and antifreeze drips may not always indicate gasket damage. But there are a number of unconditional signs that the gasket needs urgent replacement.
- Suspension in the engine crankcase. This is determined by checking the oil level. Instead of clear or even dark oil, a watery, dark brown suspension appears on the control dipstick. The coolant can be forced into the lubrication system, where it mixes with the oil, but the mixture may not be homogeneous and looks like a suspension. The first sign of antifreeze leakage into the crankcase is an increasing oil level.
- Oily spots in the coolant expansion tank. The same story - oil got into the antifreeze, but it cannot dissolve there, so it looks like stains on the surface. This is also a signal that the gasket is broken.
- A drop in compression in a particular cylinder or in two adjacent ones. Most often this happens when the gasket is simply of poor quality and burns out in the place where the cylinder is sealed. It can burn out anywhere, along the perimeter of the combustion chamber - both outside the block and into the channels. External burnout can be heard immediately by sound. Therefore, such a nuisance must be eliminated immediately.
When is it time to change?
- There may be a need to replace or repair the cylinder head if you begin to notice that fuel consumption has increased or the power of the power plant has decreased.
- Incorrect assembly and installation of valves and cylinders can also lead to malfunctions in the cylinder head system.
- If you constantly fill your car with low-quality gasoline, then do not be surprised that over time this system will begin to malfunction and will need to be repaired.
- A crack that appears in a block cannot be eliminated in any other way than by completely replacing this element.
- A symptom indicating problems in the cylinder head may be white smoke coming from the exhaust pipe, this is caused by antifreeze getting into the engine cylinders.
White smoke from the exhaust pipe - If oil stains appear on the surface of the coolant in the tank, this also indicates that repair of the unit is necessary. This is due to the fact that oil, in one way or another, began to get to places where it should not be.
- Not often, but sometimes exhaust gases begin to break through the gasket. There is no other choice but to dismantle the head and replace the gasket.
- Removing the head may be necessary in the case of VAZ 2109 tuning, modifications, problems with plugs, tightening bolts or boring cylinders.
How to replace the VAZ 2109 block gasket
Replacing the cylinder head gasket of a VAZ 2109 is carried out according to the same scenario as on the eight, on VAZs of the tenth series, since the engine designs of these cars differ very slightly from each other. We will present the procedure for replacing the gasket schematically, since there is no need to describe the unscrewing of each bolt, and everyone has a Murzilka in the glove compartment. We will dwell only on the most important points that cannot be neglected in order to avoid failure of the entire motor.
The gasket is replaced as follows:
- We remove the terminal from the battery, drain the antifreeze, maybe not completely, if it is in normal condition. Drain the oil if antifreeze gets into it.
- We disconnect the wires from the sensors, remove the thermostat, air filter, timing cover, and disconnect the exhaust pipe of the muffler.
- We align the shafts and gears strictly according to the marks, remove the timing belt, disconnect all the hoses and wires from the carburetor and remove it.
- We remove the cooling system pipes and the timing cover, and then unscrew the cylinder head mounting bolts. After this, carefully remove the head from the car.
Replacement process
Replacing the cylinder head gasket on a VAZ 2109 is a simple procedure and is similar for engines that have both a carburetor and an injector.
Required Tools
In order to change the gasket, the cylinder head must be removed, and the following tools may be required for removal and replacement:
- hexagon;
- a set of keys;
- set of heads;
- torque wrench;
- extension;
- gasket remover;
- flat screwdriver.
To perform this procedure, the vehicle must be placed on a suitable lifting device.
Stages
Replacement is carried out as follows:
- The vehicle's power is turned off by disconnecting the negative terminal from the battery.
- Next, you need to drain the working fluids. The coolant may not be completely drained. The oil is drained if antifreeze gets into it.
- Next, you should disconnect all the wires with the sensors, remove the thermostat, the air filter along with the pipes.
- Then the timing cover is removed and the muffler pipe is disconnected.
- Next, you need to set the alignment marks and remove the timing belt.
- After disconnecting all supply hoses, you need to dismantle the carburetor.
- Next, remove the cooling system pipes and the protective timing cover.
- After this, the mounting bolts are unscrewed and the cylinder head is dismantled.
Dismantling the cylinder head on a VAZ 2109
Bolt tightening diagram
Installing the gasket and assembling the VAZ 2109 engine
The worst is over. Now it remains to find out the reasons for the burnout of the gasket or breakdown between the channels. Most likely, the gasket itself is to blame, but you need to be prepared for unpleasant exceptions. The fact is that if the gasket worked for some time in a broken state, cavities could form on the mating surface of the cylinder block or head. Therefore, before changing the gasket on a VAZ 2109, it is imperative to carefully examine the mating surfaces. Otherwise, a new gasket will last for a week and we will continue to change them ad infinitum.
If the surfaces are in order, lubricate the new gasket with a special heat-resistant sealant, carefully studying the instructions. Sealants are different, and application methods are different. Every self-respecting nine-wheel driver should know the procedure for tightening the cylinder head bolts by heart, but just in case, we have shown it in the picture. It is advisable to take into account the torque when tightening. If you have a torque wrench, great. Then we tighten the bolts the first time with a torque of 2 kgf/m, the second time with a torque of 8 kgf/m, and after that we press them in the same order by a quarter turn.
This is how the head gasket is changed on a nine and an eight. Every time you check the oil level in the engine, be sure to pay attention to its condition, and then your nine will run for many more years. Buy good gaskets, and good luck on the roads!
Source
How do you install the cylinder head and tighten the bolts?
What unexpected problems may occur during execution:
- Without a doubt, it is necessary to adhere to the cylinder head tightening torques.
- In this case, you cannot use other tools. Due to the fact that it is possible to determine the degree of tension only with a torque wrench.
- To perform tensioning, it is allowed to use serviceable screws. According to the requirements that are installed on the VAZ 2109 vehicle on the power unit.
- Subsequently, you need to know for sure that the holders are in working order.
- If a repair or complete replacement of the cylinder head has already been carried out before, in this case it is not advisable to use the bolts twice to perform tension. At the same time, go to the nearest spare parts store and buy a new spare part.
- On 16 cl internal combustion engines, secondary use of cylinder head screws is permitted, only in one case, if the length is no more than 9.5 centimeters. The screws are measured with a washer; if it turns out that the bolt is more than 9.5 centimeters, then it certainly needs to be changed.
- If the car is equipped with an aluminum head, then the cylinder head is mounted on TTU bolts. They will not have to be tightened as they are screwed into the thread.
- When purchasing cylinder head gaskets, first of all pay attention to the specifications of the manufacturer. Today they indicate a certain tightening ratio for each specific gasket. It is worth remembering that the specified moment of force should not differ from those used during repair work.
| Valve pusher with installed shim. |
| The position of the cams of the first cylinder when installing the camshaft on the cylinder head supports. |
Warnings
Before installing the camshaft, place wooden pads under the head of the VAZ 2108, VAZ 2109, VAZ 21099 block to avoid damage to the valves.
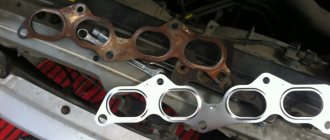
The intake manifold and exhaust manifold gaskets are supplied as replacement parts and are made of different thicknesses, so when installing new gaskets, make sure they are the same thickness.
Do not over-tighten the spark plugs as this may cause cracks in the spark plug insulator. The tightening torque of the spark plugs is 31-39 N m (3.1-3.9 kgf m).
1.
Install the support washer (plate) of the VAZ 2108 valve springs.
2.
Using a mandrel, press the oil deflector cap onto the valve guide (the mandrel is not shown in the photo).
3.
Lubricate the valve stem with engine oil and insert it into the guide sleeve of the corresponding cylinder (along the marks made during disassembly).
4.
Place a suitable stop under the valve.
5.
Turn over the head of the block of VAZ 2108, VAZ 2109, VAZ 21099 and insert the inner and outer valve springs.
6.
Install the VAZ 2109 valve spring plate onto the springs.
7.
Install a valve spring compressor.
8.
For ease of installation, glue the cracker to a thin screwdriver with grease. Compress the valve springs with a tool to release the cotter grooves on the valve stem. Insert the cracker into the grooves.
9.
Insert the second cracker in the same way and, gradually loosening the pressure on the handle of the device, unclench the valve springs so that the crackers fit into the hole of the valve spring plate. Remove the device. Install the remaining valves in the same way.
10.
Tap the ends of each valve stem with a hammer through a metal rod to force the crackers into place.
11.
Insert the shims into the pushers according to the marks made during disassembly. The washers are inserted into the pusher with the side where the washer thickness value is engraved.
12.
Lubricate with engine oil and install the pushers into the corresponding cylinders (according to the marks made during disassembly).
13.
Lubricate the camshaft supports in the head of the VAZ 21099 block and the adjusting washers of the pushers with engine oil (see note).
Before installing the camshaft, lubricate all bearings with engine oil.
14.
Place the camshaft on supports so that both cams of the first cylinder are directed upwards. In this case, the fuel pump drive cam should be on the side of the ignition distributor mounting studs.
15.
Lubricate the journals and cams of the camshaft VAZ 2108, VAZ 2109, VAZ 21099 with engine oil.
16.
Apply a thin layer of sealant to the surface of the head mating with the bearing housings in the area of the outer camshaft supports
17.
Lubricate the camshaft supports in the bearing housings with engine oil.
18.
Install the bearing housings onto the head of the satellite fret block and tighten the nuts securing them in the indicated order to a torque of 18.7-23.0 Nm (1.87-2.30 kgfm).
19.
Lubricate the oil seal seat in the Lada Samara block head and on the camshaft with engine oil.
20.
The camshaft oil seal is installed using a special mandrel. If there is no mandrel, slide the oil seal onto the camshaft up to the seat on the shaft. Then, using a sharpened stick made of soft wood, carefully tuck the working edge of the oil seal onto the shaft journal.
21.
Carefully push the oil seal in until it stops.
22.
Install the tension roller onto the stud and screw the fastening nut without tightening it.
25.
Install the inlet pipe onto the studs.
26.
Install the exhaust manifold onto the studs.
27.
Tighten the nine nuts securing the intake pipe and exhaust manifold to a torque of 21-26 Nm (2.1-2.6 kgfm).
28.
Install the warm air intake pipe and the eye on the studs.
29.
Tighten the nut securing the pipe and eye.
30.
Tighten the two remaining nuts securing the pipe.
31.
Close the oil pressure warning lamp sensor.
32.
Install the carburetor heat insulation shield onto the studs and tighten the two nuts securing it.
33.
Tighten the nut securing the shield to the fitting.
34.
Tighten the spark plugs.
36.
Install the carburetor on the studs and tighten the four nuts securing it to a torque of 13-16 Nm (1.3-1.6 kgfm).
37.
Tighten the screw securing the carburetor heating fitting.
The longevity of the cylinder head is determined by many factors - from proper use and timely maintenance to tightening the bolts of the device in accordance with a certain pattern. Therefore, it is important to know the tightening torque of the VAZ 2109 cylinder head and the sequence of task completion.
When is it necessary to puff?
How is the tightening torque of VAZ 2109 bolts adjusted?
Video “Visual aid for tightening cylinder head screws on a VAZ 2109”
Comments and Reviews