The cylinder head gasket is the most important gasket in the engine. Any inaccuracy during its installation or, moreover, manufacturing, leads to the inevitable death of the engine. Without exaggeration, we can say that the head gasket delimits the engine lubrication system, the cooling system and seals the combustion chambers. If you give the gasket some slack, the engine will at least knock or jam.
Why do we need and what are head gaskets made of?
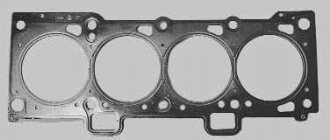
The cylinder head gasket must be replaced when the head is removed. The gasket, although expensive, is a consumable item and cannot be restored or reused. The gasket has to withstand enormous loads. Both thermal and mechanical. The temperature in the combustion chamber can reach 1200°C, and in the VAZ 2106 it is no less than 1000°C, so the requirements for the material from which the gasket is made are very high.
The heat-resistant gasket is made of asbestos-containing material, which does not collapse or change its structure when exposed to high temperatures. Asbestos was banned for use in automotive technology, so it is now being replaced with new materials, but more often than not, the asbestos content is simply not indicated on the packaging of the gaskets. Ceramic gaskets are expensive, so they are used only on expensive cars, to which the nine has nothing to do.
In addition to the thermal load, the gasket must withstand the severe pressure that forms in the combustion chamber, as well as ensure sealing of the oil channels and cooling system channels. To do this, the head gasket must have a certain elasticity and strength. Tensile strength is given to it by reinforcing materials, which most often are thin steel wire.
Reinstalling the head
Now you can carefully install the cylinder head in its place, making sure that at this moment the gasket does not slip out or move to the side. Of course, the guides fix it, but you should still be extremely careful.
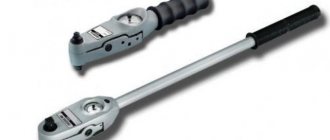
Next, we will need a torque wrench, since the bolts will have to be tightened with a certain torque. It is also worth keeping in mind that the tightening order must be observed. The diagram below shows the sequence in which to twist:
Now regarding the force with which it is necessary to tighten the bolts. This should be done in 4 steps:
- First, a torque of 20 Nm
- Second reception with a torque of 75-85 Nm
- Tighten each bolt another 90 degrees.
- Finally turn it 90 degrees.
After this, all that remains is to install all the equipment removed from the car, fill in the coolant, connect all the sensors, wires and hoses and check the work done. Usually everything becomes visible immediately after pouring antifreeze. If wet marks appear at the junction of the head and block, you can take everything back and do the whole job again! But I hope that this will not happen in your practice! Happy renovation!
Source
Signs of a broken gasket on a VAZ 2109
There are no regulations for replacing the gasket, since a good and well-made part can serve for quite a long time until the head is dismantled. But it is necessary to monitor its condition, and the difficulty is that damage to the gasket rarely manifests itself externally. Oil drips and antifreeze drips may not always indicate gasket damage. But there are a number of unconditional signs that the gasket needs urgent replacement.
- Suspension in the engine crankcase. This is determined by checking the oil level. Instead of clear or even dark oil, a watery, dark brown suspension appears on the control dipstick. The coolant can be forced into the lubrication system, where it mixes with the oil, but the mixture may not be homogeneous and looks like a suspension. The first sign of antifreeze leakage into the crankcase is an increasing oil level.
- Oily spots in the coolant expansion tank. The same story - oil got into the antifreeze, but it cannot dissolve there, so it looks like stains on the surface. This is also a signal that the gasket is broken.
- A drop in compression in a particular cylinder or in two adjacent ones. Most often this happens when the gasket is simply of poor quality and burns out in the place where the cylinder is sealed. It can burn out anywhere, along the perimeter of the combustion chamber - both outside the block and into the channels. External burnout can be heard immediately by sound. Therefore, such a nuisance must be eliminated immediately.
Puff
Reassembling the unit if you strictly follow the instructions for dismantling work will not pose any particular problems.
An incredibly important aspect of replacing the cylinder head gasket and all other activities associated with removing the head is the correct adjustment and tightening of the bolts.
Tightening the bolts is done strictly with a torque wrench, which will allow you to control the tension torque.
Here are some guidelines for using this specialized wrench and checking the current tension condition:
- Place the holder in the zero position. This will indicate that now the key data is equal to the moment of the original position;
- Look at the torque tool readings as you begin to tighten the bolts;
- Rotate the holder, monitor the indicators;
- If the torque does not change, the fastener may be stretchable, which is normal. This is exactly what should happen;
- If the torque increases rapidly, bolt movement should be achieved. That is, the stretch of the holder is small, it needs to be stabilized.
How to replace the VAZ 2109 block gasket
Replacing the cylinder head gasket of a VAZ 2109 is carried out according to the same scenario as on the eight, on VAZs of the tenth series, since the engine designs of these cars differ very slightly from each other. We will present the procedure for replacing the gasket schematically, since there is no need to describe the unscrewing of each bolt, and everyone has a Murzilka in the glove compartment. We will dwell only on the most important points that cannot be neglected in order to avoid failure of the entire motor.
The gasket is replaced as follows:
- We remove the terminal from the battery, drain the antifreeze, maybe not completely, if it is in normal condition. Drain the oil if antifreeze gets into it.
- We disconnect the wires from the sensors, remove the thermostat, air filter, timing cover, and disconnect the exhaust pipe of the muffler.
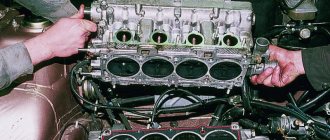
- We align the shafts and gears strictly according to the marks, remove the timing belt, disconnect all the hoses and wires from the carburetor and remove it.
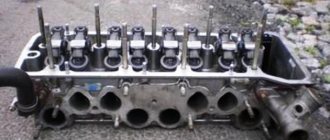
- We remove the cooling system pipes and the timing cover, and then unscrew the cylinder head mounting bolts. After this, carefully remove the head from the car.
Also check out
- When disassembling the valve mechanism, it is necessary to place a wooden block under the valve plate.
- Dry the valve. Remove it from the cylinder head guide bushing.
- Using a key “13”, unscrew the 2 nuts securing the inlet pipe.
Assemble and install the cylinder head in the reverse order.
Recommendations :
- Valve stems with engine oil. The same applies to guide bushings.
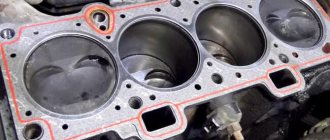
- Before installation, remove dirt, oil, and remnants of the old gasket from the surface of the cylinder block.
- The cylinder head gasket should be replaced using two special centering bushings.
- Install the mounting screws; the diagram below shows 4 steps on how to tighten them.
- The first tightening torque of the screws is 20 N.m (2 kgf.m);
- The second - with a moment of 69.4–85.7 N.m (7.1–8.7 kgf.m);
- The third - with an extension of 90°;
- The fourth is to turn the screws 90°.
Installing the gasket and assembling the VAZ 2109 engine
The worst is over. Now it remains to find out the reasons for the burnout of the gasket or breakdown between the channels. Most likely, the gasket itself is to blame, but you need to be prepared for unpleasant exceptions. The fact is that if the gasket worked for some time in a broken state, cavities could form on the mating surface of the cylinder block or head. Therefore, before changing the gasket on a VAZ 2109, it is imperative to carefully examine the mating surfaces. Otherwise, a new gasket will last for a week and we will continue to change them ad infinitum.
If the surfaces are in order, lubricate the new gasket with a special heat-resistant sealant, carefully studying the instructions. Sealants are different, and application methods are different. Every self-respecting nine-wheel driver should know the procedure for tightening the cylinder head bolts by heart, but just in case, we have shown it in the picture. It is advisable to take into account the torque when tightening. If you have a torque wrench, great. Then we tighten the bolts the first time with a torque of 2 kgf/m, the second time with a torque of 8 kgf/m, and after that we press them in the same order by a quarter turn.
This is how the head gasket is changed on a nine and an eight. Every time you check the oil level in the engine, be sure to pay attention to its condition, and then your nine will run for many more years. Buy good gaskets, and good luck on the roads!
Stages of work
As we have already said, the replacement process is not complicated, but if you decide to take on it for the first time, then it is better to invite someone with experience in this matter to help. You may also need help if you decide to improve the performance of the VAZ 2109 engine by tuning it using channel boring. Replacing the plugs also requires additional assistance. In this case, removing old plugs and correctly installing new ones requires certain skills.
Tools
Need for replacement
It is necessary to change the cylinder head gasket on a VAZ 2114 every time it is dismantled, regardless of the reasons that caused it. It is disposable and cannot be reused as this may damage the engine.
The gasket must meet the following requirements:
- have elastic deformation;
- be water- and oil-proof;
- resistant to hot gases;
- resistant to chemical influences;
- retain their properties for a long time.
If it burns out, it cannot perform its functions and should be replaced.
There are several signs by which you can determine the need for replacement:
- The smell of exhaust gas or antifreeze in gasoline.
- Oiling of antifreeze.
- A large amount of emulsion on the cap from the oil filler neck into the engine.
- Increased oil level in the sump.
- Lots of white steam coming out of the muffler.