VAZ Oka with a 0.75 liter engine is a popular small passenger car of the nineties and two thousandths, which won the hearts of many car enthusiasts with its fairly high maneuverability, driving ability and efficiency. But fuel consumption could not always be the same; it largely depended on how the Oka 11113 carburetor was configured.
Currently, these small cars are still on the roads of our country, and auto parts are in demand. Also for Okushka, carburetor units (CU) of various modifications, repair kits, jets, gaskets and other parts are sold; they can be purchased in specialized stores, and the fuel system is adjusted and repaired not only by specialists, but also by many car owners alone.
Oka carburetor design
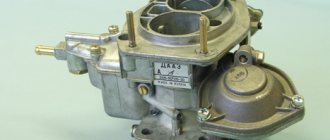
Cars under the Oka brand were produced from 1987 to 2008, initially a modification of the VAZ-1111 (with a two-cylinder 0.65 liter engine) was produced. The updated VAZ-11113 model was put into production in 1995 and received a 749 cm³ engine. Initially, the DAAZ 1111 carburetor was developed by the Dimitrovgrad Automobile Plant for engines with a volume of 0.65 liters, combining elements of the Ozone and Solex type HRVs. Subsequently, the DAAZ-11113 model began to be produced for a 0.75-liter internal combustion engine (ICE), which later underwent a slight modernization.
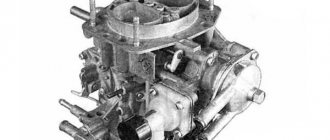
Carburetor 11113 is a device for creating a fuel-air mixture in a certain proportion, which sets stable operation of the car engine in all modes. The body of this unit consists of 3 parts: the top cover, the central (main) part where the float chamber is located, and the lower part with chokes (shock absorbers), the carburetor itself is a 2-chamber device, with sequential opening of bottlenecks.
The carburetor includes:
- the main accounting system (abbreviated as GDS), operating in all modes, including diffusers, jets, fuel / air supply to both chambers;
- idle speed system (abbreviated as XX), allowing the engine to operate stably at minimum speeds and consume fuel economically;
- an economizer that enriches the fuel mixture at high speeds and heavy loads;
- accelerator pump, its main function is to ensure uninterrupted operation without failures with any, even the sharpest, pressing of the accelerator (gas) pedal;
- a starter device that allows you to start a cold engine without interruption at low air temperatures;
- a floating chamber, thanks to which a constant level of gasoline is maintained in the carburetor, which is necessary for stable operation of the internal combustion engine.
- a transition system that allows you to make a series of smooth turns without jerking when opening the secondary chamber.
Each of the systems of this unit performs its own specific task, and adjustments and adjustments are made using adjusting screws, selection of injectors, setting the throttle and air damper angles.
Cleaning the carburetor from carbon deposits and dirt
Most carburetor problems occur due to poor quality fuel. This is what causes plaque and soot to appear. It also causes blockages in the fuel channels. To eliminate all this, you will have to use a special cleaning fluid for carburetors. It is a spray can. The cylinder is usually accompanied by a set of nozzles for flushing the carburetor channels. There are many manufacturers of fluid, but HG3177 fluid is especially popular among car enthusiasts, allowing you to perfectly flush the carburetor in a few minutes.
Carburetor flushing fluid HG3177 is very popular among car enthusiasts
Tools and Supplies
- rags;
- several toothpicks;
- a piece of thin steel wire 30 cm long;
- compressed air cylinder;
- protective rubber gloves and glasses;
- set of open-end wrenches;
- flat screwdriver;
- carburetor cleaning fluid.
Sequencing
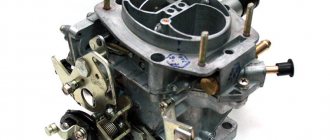
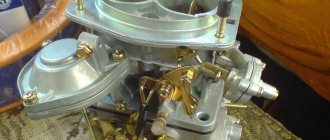
- Once removed from the vehicle, the carburetor is completely disassembled.
Completely disassembled and prepared for cleaning, the DAAZ 1111 carburetor for the OKA car - All clogged channels and holes are carefully cleaned using toothpicks. And if the carbon deposits are too strongly welded to the walls of the fuel channel, then steel wire is used to clean it.
- After preliminary cleaning, a nozzle with the thinnest tube is put on the can of liquid. Liquid is poured into all fuel channels and small carburetor openings. After this, the device should be left alone for 15–20 minutes (the exact time depends on the type of flushing liquid used and to clarify it, you should read the information on the can).
The thinnest nozzle for a can of carburetor cleaning fluid - After 20 minutes, the fuel channels are purged with compressed air from a can.
- All other contaminated carburetor parts are treated with liquid. The spray is sprayed without a nozzle. After 20 minutes, the parts are thoroughly wiped with a rag and the carburetor is reassembled.
Do-it-yourself cleaning of the VAZ Oka carburetor
The most common problem with normal Okushka engine failure is a clogged carburetor assembly, and both the jets and various passages can become clogged with grains and dirt. In this case, all sorts of problems arise:
- the minimum disappears;
- The internal combustion engine does not develop speed;
- lynx motor;
- fuel consumption increases;
- Black smoke comes out of the muffler exhaust pipe.
In some cases, there is no need for repairs as such; this can only be done by cleaning the carburetor. One of the most common problems of the VAZ small car is clogging of the gas pressure control channels, when the engine does not gain speed when the shock absorber of the 1st chamber of the carburetor is open, although the idle speed is not lost. Here, it is very often possible to blow out the heat exchanger with compressed air right on the spot, without removing the fuel mixing device itself. We perform this operation with our own hands something like this:
- with the engine off, open the hood, first remove the air filter box (AFC);
- blows through the GDS channels with compressed air (hand pump, blower or compressor);
- after such cleaning, we start the engine, check how the engine picks up speed;
If the operation of the internal combustion engine returns after normalization, you can insert the air filter, otherwise we will repeat the pumping again.
Adjusting the gasoline level Oka 11113
If the fuel level in the float chamber (FC) is much lower than prescribed, the fuel mixture will be lean, the car may accelerate poorly and there is a possibility of increased fuel consumption. As the level increases, fuel consumption also increases; in both cases it is necessary to adjust the position of the float to the desired speed. If the carburetor is flooded, the cause of the problem is most likely not related to the adjustment, but to a loosening of the locking needle on the seat and, in this case, the locking mechanism in the PC will already need to be replaced.
The adjustment is quite simple even for a driver with basic plumbing skills; this is done as follows:
- just like with purging, remove the CWF first;
- then disconnect the air cable:
- disconnect the fuel lines (“return” and main);
- unscrew the five screws that secure the top carburetor cover;
- remove the cover and gasket to the side;
- We take a specially cut caliper or a piece of ruler, measure the distance from the top edge of the body to the surface of the gasoline, it should be within 22-23 mm;
- if the readings obtained differ from the norm, bend the float tongue in one direction or another, achieving the desired result;
- If it is adjusted correctly, close the cover and reinstall the housing and air filter assembly.
When carrying out all these operations, one nuance should be taken into account: when removing and installing the carburetor cover 11113, a thrust needle falls out of it; you must remove it carefully so as not to lose the part, but install the creation of a vacuum (for example, using a rubber bulb, due to the vacuum the needle is held and does not fall).
VAZ 11113
Adjusting the carburetor drive
Performed when replacing the carburetor
, as well as when drive parts are worn or replaced.
- When the gas pedal is fully pressed, the throttle valves should be fully open, and when released, they should be closed.
- If this is not the case, by unscrewing or tightening the adjusting nuts on the front end of the drive cable (carburetor side), we achieve the correct position of the throttle valves.
- The tension of the cable with the pedal fully released is checked as follows: we pull the cable in the middle of the branch near the carburetor by about 10 mm, while the throttle valves should not open. If you pull the branch back a large amount (about 15 mm), they should begin to open slightly.
Adjusting the fuel level in the float chamber
Performed when replacing a needle valve or float (see also “Diagnostics of engine malfunctions”).
- We remove the carburetor cover (see “Disassembling the carburetor”) and measure the protrusion of the needle valve above the cover, which should be 10 mm. If this is not the case, replace the gasket or valve with gasket.
- Having placed the float with its lower part on a flat surface, measure the distance from it to the center of the float axis. It should be 23.1 mm. We adjust the size by bending the lever.
- We measure the distance from the tongue to the top plane of the float, which should be 2.0 mm.
- A drill can be used as a gauge.
- We adjust the distance by bending the tongue. In this case, its supporting surface must be perpendicular to the axis of the needle valve.
Adjusting the starter
Performed on a removed carburetor.
- When turning the choke control lever counterclockwise all the way, the choke should close completely. If it does not close, eliminate the cause of the jam (or straighten the deformed valve).
- With the air damper completely closed, the throttle valve of the first chamber must be slightly open to the starting gap C (see figure).
- This gap is adjusted by turning the screw on the throttle drive lever with a thin slotted screwdriver.
- With the air damper completely closed, press manually (you can use a screwdriver, stick, etc.) on the trigger rod until it stops. In this case, the air damper should open slightly to the starting gap (see table above). We use a drill as a gauge.
- To adjust the gap, use an “8” wrench to loosen the lock nut of the screw located on the starter cover. Inserting a thin slotted screwdriver into the slot, unscrew (to increase the gap) or tighten (to decrease the gap) the screw, and then tighten the locknut.
Starting device: 1 - starting device lever; 2 — throttle valve; 3 - thrust screw for opening the throttle valve; 4 — lever on the axis of the throttle valve of the first chamber; 5 — starter control cable: 6 — lower edge of the cam groove; 7 — upper edge of the cam groove: 8 — air damper spring; 9 - air damper: 10-lever on the air damper axis; 11 — trigger diaphragm rod: 12 — trigger diaphragm: 13 — diaphragm thrust (adjusting) screw; 14 — screw for fastening the trigger lever; B - starting gap of the air damper; C - starting gap of the throttle valve.
Adjusting the idle system
Performed during maintenance or engine malfunctions (see “Diagnostics of faults”).
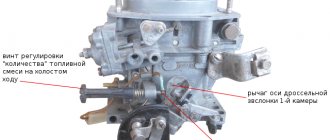
- The adjustment is performed on a warm engine. At the factory, the engine is adjusted to a minimum crankshaft speed of 820-900 rpm and a carbon monoxide (CO) content of 0.5-1.2%, after which a restrictive plastic sleeve is pressed onto the screw head. If by turning the bushings it is not possible to restore the factory adjustment parameters, we unscrew the screw, breaking the bushing, then by rotating the quantity screw we set the crankshaft speed, and by turning the quality screw we set the content of carbon monoxide in the exhaust gases.
- When you press the gas pedal, the engine should increase the crankshaft speed without interruption, and when you release the pedal, it should not stall.
- When turning the quantity screw clockwise, the crankshaft speed increases.
- When turning the quality screw clockwise, the CO content in the exhaust gases increases.
Idle adjustment
Loss of idle speed, instability of low speeds, frequent engine stops cause many problems for car owners; To eliminate such malfunctions, it is necessary to remove the carburetor. But in some cases you can avoid disassembling/reassembling the WHB by simply blowing it out.
Channel XX can be cleared as follows:
- turning off the engine, removing the KVF and disconnecting the power cable, unscrew the XX solenoid valve;
- plugging the channel at the point where the electromagnetic valve (EMV) is turned off with your finger, we start the internal combustion engine, fill it with fuel, and start the engine for a while;
- we clean the jet and the EMG itself, put the parts in place, connect the wiring;
- use the adjusting screw to increase the speed a little and start the engine;
- if the cleaning was successful, the engine will already be idling, but at increased speed;
- now, by tightening the quality screw, we adjust the fuel mixture, tighten it until the engine begins to slow down a little and “fail”;
- After slightly unscrewing the quality screw, once the engine is running stably, using the quantity screw we set XX within the prescribed standard (850-900 rpm).
If bleeding does not help, you will need to remove the carburetor, disassemble it and thoroughly clean it. If fuel consumption is too high, you can experiment with XX, for example, buy an EMG jet of a smaller cross-section at a car dealership and install it instead of a standard part.
Overfills the carburetor
Often on the Oka a situation arises when the carburetor is being refilled; with such a malfunction it is usually very difficult to start the car, and in other cases the engine does not start at all. There may be several reasons for the problem:
- does not hold the needle valve;
- the fuel pump creates too much fuel pressure (if a return line is not installed);
- the level in the PC is set incorrectly (more than normal);
- the float is not tight.
Finding the cause of the malfunction usually begins with inspecting the parts of the float chamber, and if there is significant overflow and the smell of gasoline, first of all you should pay attention to the locking mechanism.
What to prepare
The return is done through a tee. A hose that can withstand gasoline pressure is also used. Its length of 70 cm will be sufficient. You will need a check valve from the V8, a fuel pump filter and about a dozen metal clamps.
It is also recommended to use a 125 carburetor fuel jet. You just need to modernize it - make a thread, carefully work on the fitting. You need to make a smaller hole in the plug than in the fitting.
The price of parts that will be used in the modernization process will not exceed 100 rubles. You can use old hose and filter. They're probably lying around in the garage.
Installation of Solex on Oka
It is often possible to achieve fuel savings and more stable engine operation by repairing the carburetor, replacing the repair kit and carrying out proper adjustments. But not all small car owners are satisfied with the engine dynamics and its response to the throttle, so some drivers are engaged in tuning - installing Solex KU from cars 2108-09. The price of this build is relatively low and many can afford this configuration, but some additional parts and minor modifications will be required. You will need spare parts:
- thick carburetor spacer;
- 2 thin pads;
- clamps;
- fuel lines (if necessary).
In any case, you will have to do something with the air filter housing: update the existing part or buy it from the VAZ-2108 (09) model. It's all about price here, and if you want to save money, it's better, of course, to upgrade. Replacing a standard carburetor unit with a Solex is done as follows:
- remove the old HRSG (disassemble the air filter assembly, disconnect the fuel lines, gas draft, intake cable, unscrew the four fastening nuts);
- We install thin gaskets on the collector platform, and a spacer between them;
- secure the Solex with four nuts;
- we connect the gas rod, there should be no problems, adjustment is usually not required here;
- connect the EMG wire;
- we fasten the fuel pipes with clamps; if the machine does not have a “return”, install a plug on the corresponding fitting;
- the choke cable must be “thrown over”, otherwise its length will not be enough;
- After connecting and installing everything except the “air,” we pump fuel into the float chamber with a gasoline pump and try to start the engine.
Adjusting the idle speed must be carried out only after the internal combustion engine has completely warmed up; it can be adjusted from idle speed by tightening and unscrewing the quality and quantity screws. First, we slightly increase the revolutions by “quantity” (to about 1000), then tighten the quality screw until the engine starts to run quieter; there will be slight interruptions. Having “increased the quality” a little, slightly unscrewing the “quantity” screw, we reach the speed in the standard range of 850-900 rpm.
As a result, we install the “air” on site and conduct road tests. If fuel consumption seems high or idle speed is inconsistent, XX can always be adjusted on site without removing the air filter housing.
The power units of the Oka car 1111 and 11113 were equipped with a carburetor fuel system. Now such a system is obsolete and is not used, but at the time of production launch it was a priority; injectors were not used on domestic cars of those years of production.
The main element of such a fuel system is the carburetor. VAZ-11113 and its “younger” version received a separate DAAZ carburetor. It was simply not possible to borrow this unit from other models due to the fact that the Oka engines are two-cylinder, and the performance indicators of the carburetor of the same VAZ-2108 simply did not meet the required requirements.
But the designers took the DAAZ-2108-1107010 from the Eight (aka Solex) as a basis and on its basis created the DAAZ-1111-1107010, which was installed on the Oka.
It’s interesting to note that when creating the Oka carburetor, not only Solex was used, but also some design solutions were borrowed from Weber and Ozone carburetors.”
The VAZ-11113 carburetor is similar in general design principle to the Solex from the VAZ-2108, but there are some features, for example, in the Oka block on the body there are two plugs that can be disassembled to get to the gasoline jets without disassembling the carburetor itself.
How to remove
The removal procedure is quite simple, but it is recommended to follow a clear action plan so as not to damage the internal components of the carburetor during the dismantling process. To successfully carry out the work, you will need only three tools:
open-end wrench 8;
open-end wrench 13;
Before starting work, you must disconnect the wire from the negative terminal of the battery. This action will protect you from possible electric shock.
The procedure for dismantling the DAAZ-1111 carburetor is as follows:
Construction and components
The Oka carburetor is a two-chamber carburetor with an idle speed solenoid valve (XX). This valve is the only electronic component.
The Oka carburetor consists of 3 main parts:
- Lid;
- Main building;
- Throttle body.
These components are bolted together.
Lid
The cover has fittings for connecting fuel lines from the pump and draining excess (return). To further purify the supplied gasoline, a small mesh filter is installed under the power outlet.
An air damper is installed in one of the wells of the cover, the axis of which is connected by a cable to the handle for enriching the air-fuel mixture installed in the car interior (the so-called “manual suction”).
Also on the cover there are pins for attaching the filter housing.
Main building
The main working part of the carburetor.
Contains:
- GDS (main metering system) with diffusers;
- floating chamber;
- Accelerator pump;
- Economizer and inertial concentrator;
- XX system with electronic valve;
This component is designed to measure the amount of fuel in accordance with the operating mode of the engine and mix gasoline with air, ensuring stable operation of the power plant at idle.
Damper body
There are two shock absorbers installed in the throttle body (1st and 2nd chambers). Structurally, it is designed in such a way that the cable coming from the accelerator pedal is connected only to the axial lever of the primary chamber shock absorber. The impact on the second damper occurs through levers connecting both dampers.
Thanks to this device, the shock absorbers open asynchronously, that is, the accelerator of the 1st chamber is activated first, which pulls the shock absorber of the 2nd chamber. This allows you to turn off the 2nd chamber at low engine loads to save fuel.
The Oka carburetor is regulated by qualitative and quantitative screws.
Design features
Despite the fact that the Solex from the eight was taken as the basis for its creation, the Oka carburetor has some design features:
- The float and closing needle are separated. The first element is installed in the float chamber, the second is located in the cover. For this reason, the fuel level control technology differs from traditional Solex";
- There is one tray, located on the side of the main dosing system (and not on the sides, as in Solex);
- The float is fixed in the chamber in such a way that a normal constant supply of gasoline is ensured during acceleration and upward movement;
- The calibration (hole cross-section) of the jets is lower than that of DAAZ since 2108.
As for the differences between the carburetors of the Oka 1111 and 11113 models, they come down only to different calibrations of the jets.
On the 1111 model, the fuel jets are calibrated 95 (1st and 2nd chambers) and the air jets are calibrated 190 (1st chamber) and 95 (2nd).
Version 11113 has 95 fuel jets (for both chambers) and 170 (1st), 85 (2nd chamber).
Since the dimensional parameters of Solex jets are identical and differ only in cross-section, on the Oka you can upgrade the carburetor to increase power by installing larger jets (but this will also increase gasoline consumption).
Principle of operation
The VAZ-11113 carburetor works on the same principle as the Solex. The essence of the operation is very simple - there is always gasoline in the float chamber, which, due to the vacuum through the gas distribution system, is mixed into the air flow, forming a fuel-air mixture with it.
It all works like this: the driver, by pressing the accelerator pedal, acts on the throttles, thereby changing the flow of air sucked into the cylinders.
The air flow passing through the diffusers creates a vacuum in the nozzles, as a result of which fuel is sucked into the float chamber. Gasoline, sucked in by the jet, passes through the fuel nozzle, which, due to the small cross-section of the hole, breaks the liquid into small droplets, facilitating its evaporation. And already in evaporated form, gasoline is mixed into the air through a sprayer.
The engine operates in different modes, to which the gas distribution system does not always have time to adapt (it is necessary to throw out the amount of gasoline), which can cause failures and jerks.
To eliminate such problems, an economizer and a throttle pump are included in the carburetor design. The first provides more gasoline at high engine loads. This is achieved by feeding part of the fuel into the sprayer, bypassing the fuel stream.
The throttle pump is responsible for supplying the required amount of gasoline when the valves are opened suddenly. This is achieved by fuel injection through an additional nozzle. That is, when you sharply press the gas, gasoline is supplied to the air flow not only through the hydraulic system, but also through the accelerator atomizer.
Engine operation at idle is ensured by the idle speed system. It consists of channels through which fuel is supplied under the lower ribs. The air required for engine operation when the dampers are closed enters through the openings in the dampers. Consequently, even with the throttle valve fully released, the combustion chambers are supplied with the air-fuel mixture necessary to operate the engine at the lowest possible speed.
Maintenance, adjustment
Thanks to its simplicity of design and minimal amount of electronics, the Oka carburetor is a fairly reliable unit. But in order for it to remain fully functional, periodic maintenance is required.
Signs that the Oka carburetor requires repair are the following symptoms:
- Difficulty starting the engine;
- Unstable work in the twentieth century;
- The occurrence of depressions, ruptures under load, sudden opening of bottlenecks;
- Loss of power;
Since the same symptoms indicate problems with the ignition system, it would be a good idea to check its performance along with the fuel system.
The main disadvantage of a carburetor is the presence of a large number of channels and assemblies with small cross-section holes, which over time become clogged with debris and resinous deposits contained in the fuel settle in them.
Maintenance of the carburetor comes down to complete disassembly, washing and bleeding of channels, nozzles, and pipes. It is not recommended to use metal objects (needles, awls) for cleaning, so as not to affect the cross-sections of the holes, although the use of wooden objects (toothpicks) for cleaning is allowed).
For light contamination, special offers also help with carburetor cleaning products, the use of which does not require dismantling or disassembling the unit - washing is carried out with the carburetor installed and the engine running.
Possible failures of the unit include:
- Solenoid valve malfunction;
- Accelerator pump diaphragm rupture;
- Wear of the throttle axle bore;
- Deformation of the plane of the fitting body due to uneven tightening;
On the DAAZ "Oka" there are not so many settings: the level in the float chamber and the idle speed are regulated.
The first operation is performed like this:
- Remove the cover;
- We measure the height of the protrusion of the upper part of the fixing needle above the plane of the lid, holding the lid strictly horizontally (so that the needle “looks” down). The normal protrusion height is 10 mm. If the indicator does not match, you need to add a gasket under the needle seat;
- Put the cover in place;
- Manual pumping pumps fuel into the carburetor (it must be completely filled);
- Remove the cover;
- We measure the distance from the surface of the fuel to the upper plane of the body. With normal adjustment, this figure should correspond to 23-24 mm. If the distance is larger or smaller, adjust it by folding the tab on the float (to decrease the amount, fold it up, to increase it, fold it down).
XX speed adjustment is carried out using a high-quality screw. Work should be carried out with a hot engine and electrical appliances turned on (to create a load). The essence of the adjustment is that it is necessary to turn the screw so that the engine reaches a speed of 800-1000 rpm.
The carburetor is the main element in the engine control system of the VAZ 11113. At different times, various modifications of the carburetor were installed, which generally have the same device and differ only in some settings.
Design
Oka carburetor
The OKA carburetor is quite simple, as it includes a minimum of electronics. Among its main elements we find:
- Starting device;
- Valve;
- Lever for adjusting the mixture ratio at low speeds and its locking;
- Union;
- Butterfly valves;
- Shock absorber axles of the first and second chambers;
- Trigger lever;
- Choke release cable clamp on the trigger lever;
- Exhaust gas intake;
- Cable clasp for flap control.
In addition, the mechanism is combined into a single body, above which there is a cover. This design ensures reliable operation of the entire engine in all weather conditions. And if problems arise, you can try to fix them using a minimal set of tools.
Adjusting the air damper drive
If the engine does not produce full power and does not have sufficient throttle response, it may be due to the air in the carburetor or throttle valves not opening fully.
One of the reasons for the difficult starting of the engine could be incomplete closing of the air damper.
You will need: Key "8".
Before starting work, remove the air filter (see Subsection 3.9).
Pull out the choke control on the instrument panel until it stops.
. The air damper must close completely.
Fully press the choke control. In this case, the air damper must open completely. This can be checked.
. on the lever lock ball, which should fit into the hole in the lever. If the damper does not open or close completely, its actuator must be adjusted.
To adjust, loosen the bolt securing the linkage to the starter control lever.
Rotate the choke lever until it is fully open.
Pull the rod completely out of the housing and tighten the bolt securing the rod to the air control lever (make sure there is no flex in the rod).
Pull out the choke control (on the instrument panel) until it stops. If the air damper is not completely closed, unscrew the bolt securing the thrust housing.
Move the cover until the damper is completely closed. Tighten the casing bolt. After this, check again and, if necessary, adjust the full opening of the air damper using the rod.
Principle of operation
The carburetor on an OKA car works the same way as similar models on other cars. Gasoline from the float chamber is directed through the fuel system into the wells to form a mixture with air. Subsequently, due to the nozzles, this mixture enters the diffusers of the main mechanism, that is, the carburetor on the OKE.
At idle, the device takes gasoline from the well, after which it moves through the nozzles and creates a certain mixture with air in specified proportions. In addition, air comes from the first and second chambers of the carburetor. By the way, its quantity is regulated manually by turning a special screw responsible for the level of opening of the throttle valve.
When the throttle valve is opened slightly, a mixture of gasoline and air is directed into the chamber. If the fuel level fluctuates, the economizer adjusts itself and ensures smooth engine operation.
Adjusting the throttle valve drive
You will need: keys for “8” and “13” (two), a screwdriver.
Before starting work, remove the air filter (see Subsection 3.9).
The actuator is adjusted by the throttle valve of the first chamber of the carburetor. The throttle valve of the second chamber is actuated by the throttle lever of the first chamber.
Fully depress the accelerator pedal. In this case, the throttle valves must open fully (the throttle lever must move towards the front of the car until it stops).
Make sure the doors are completely open. To do this, press on the tip of the intermediate link. If it can be moved further, the unit must be adjusted.
Release the accelerator pedal and the throttles should close completely. The throttle lever should rotate, moving the intermediate link all the way in the opposite direction. If this does not happen, the drive must be adjusted.
To adjust, loosen one of the adjusting nuts. As you tighten another nut, make sure the damper is fully open and closed.
Notice that when you tighten nut 1, the door opens and nut 2 closes. Then tighten the loose nut.
If the rod is not long enough, adjust the position of the throttles (in this case, the throttle valve does not close completely).
. loosen the locknuts at the ends of the intermediate links.
. Remove the end of the rod from the intermediate transmission lever.
.. Attach the end of the stem shell to the bracket approximately in the middle.
. by unscrewing or screwing the ends, change the length of the intermediate link so that.
. could be connected without moving the levers. Secure the ends with locknuts. Then recheck and, if necessary, adjust the throttle valve to full opening using the rod.
Settings
The carburetor on the OKA car is a slightly modified and modified mechanism from the “classic”, designed specifically for placement in the VAZ 11113 engine, and also has a solenoid valve and jets adapted for small volumes.
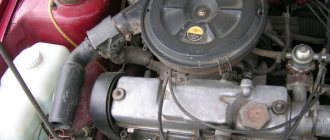
The carburetor under the hood is located transversely, unlike other cars, so if you turn quickly to the left, fuel can leak from the jets, causing engine failure.
To solve this problem, adjusting the carburetor is designed, the main task of which is to regulate the level of gasoline in the chambers. To do this, you need to set a distance of 2.2 cm from the gasket at the top of the carburetor, as this value is recommended by the manufacturer. It is impossible to do this without removing the cover itself.
Setting up the Oka carburetor
On an OKA car, special attention should be paid to this problem, since an excess of fuel will lead to “overfilling” of gasoline. The fuel should be slightly below the economizer tube. Otherwise, a rich mixture will constantly appear, the spark plugs will overflow, and the engine will sooner or later fail. To avoid unpleasant situations when cornering, a special economizer is used.
Adjusting the carburetor is primarily related to adjusting the operation of the jets. This procedure should only be performed with the engine fully running, otherwise its effect will be reduced. The carburetor must be adjusted so that from the moment of maximum depletion of the emulsion a level of 1.5 revolutions is ensured. On an OKA car this is done by turning a quality screw. Also, depending on the speed, adjustments are made.
it is also necessary to adjust the amount of fuel supplied using a special screw. This device must be rotated until the moment when stable and smooth operation of the motor on OKE occurs.
Low speeds are set so that the carburetor works smoothly and does not stall. In this case, you must first turn on all electrical equipment. Correctly setting the carburetor allows you to achieve gasoline consumption of up to 6 liters in the city in an OKA car.
Malfunctions and their diagnosis
The design of the carburetor on an OKA car is such that crankcase gases are not removed in the best way. This results in the engine not being able to make the most of its capabilities. Also, due to its design, oil can get into the carburetor and contaminate it. These problems can be solved quite simply. First, you can connect the hose to the water filter. By the way, all filters need to be changed very often, as they quickly get dirty, and this, in turn, negatively affects the operation of the engine.
When the ignition system is running, the following problems may occur:
- Poor mixture, EMC problems or dirty jet, resulting in unstable engine operation;
- A clogged injector can also cause inadequate and uninformative operation of the accelerator pedal;
- At a low level of the tank, poor dynamics are observed, it breaks at low and medium speeds;
- If there are disturbances in the movement of fuel in the float chamber, jerking may occur when the engine operates at maximum speed;
- Malfunction of the accelerator pump, if sharply pressing the accelerator pedal leads to failure;
- If the level of gasoline in the float chamber increases or the tightness of the needle valve is broken, difficulties may arise when starting an already warm engine;
- Incorrect setting of the starting mechanism leads to problems with starting the engine at cold and unstable speeds, etc. D
It should be noted that the main sign of any malfunction is an increase in the amount of gasoline consumed. For example, this can happen if the trigger adjustment has not been made correctly, the jets are not up to specifications or are dirty.
Fuel consumption is also affected by weather conditions, tires and OKA's driving style. If problems arise, you need to configure the device and everything will work without failure.
Device repair
Self-repair of a carburetor device requires a clear identification of the malfunction, the ability to properly dismantle the mechanism and wash it. In addition, in case of severe wear, it may be necessary to replace one or another structural element.
If the car owner does not have practical experience in servicing cars, it is not recommended to take any actions independently.
Video: performing repair work on the DAAZ-1111 with your own hands
Malfunctions and their diagnosis
The specificity of the structure of the cavities of the DAAZ-1111 carburetor is that exhaust gases are not removed immediately, but gradually. That is, the engine unit is forced to experience some difficulties when operating at high speeds. In addition, the entire design of the DAAZ-1111 does not prevent lubricating fluids from entering the carburetor, which can quickly lead to its contamination.
If the ignition system operates without interruption, the following malfunctions may occur on the Oka carburetor:
instability of the engine unit (this may be due to carbon deposits on the fuel nozzles or malfunctions of the economizer);
incorrect operation of the gas pedal while driving (the nozzle holes are clogged);
deterioration in the dynamic qualities of the car occurs due to a critical decrease in the fuel level in the float chamber - the engine simply does not have enough fuel to fully operate at high speeds;
jerks during movement indicate that carbon deposits have formed in the float chamber, therefore the normal movement of fuel in the system is disrupted;
instability of revolutions indicates that the carburetor trigger needs to be adjusted.
However, the main sign that indicates a malfunction of the carburetor can be considered a sharp increase in fuel consumption.