Periodic monitoring of the engine oil level, checking its condition, using high-quality motor oils and regularly replacing lubricants according to regulations can significantly extend the life of any internal combustion engine. In other words, the driver himself can delay the time of major repairs and reduce its final cost.
We also recommend reading an article about what a major engine repair is, how this type of repair differs from a partial one, and what this procedure involves. From this article you will learn about the main work that needs to be done in certain cases to restore normal operation of the internal combustion engine.
When checking the lubricant level or replacing the lubricant, you may encounter the appearance of an emulsion in the engine oil. Let us immediately note that in such a case it is necessary to urgently diagnose the motor. The fact is that often such a sign is alarming and indicates the need for urgent repairs.
Next we will talk about what the emulsion on the oil dipstick indicates. At the same time, problems will be considered that cause a white emulsion to form on the oil filler cap with varying degrees of intensity. We will also answer what the driver should do if a white emulsion in the engine oil was unexpectedly noticed without other obvious reasons.
Where to look for the cause of an antifreeze leak?
A leak can occur due to:
- block heads;
- cylinder head gaskets;
- cracks in the cylinder;
- cracks in the block head.
Let's start with the block head. This component of the engine is made of non-ferrous metals and, when installed, is strongly bolted to the cylinder block.
As a result of metal expansion due to overheating, the head warps. In some places, gaps appear between the cylinder head and the block, through which technical fluids enter the channels of other systems. That is, the coolant simply reaches the oil channels through the cracks and is mixed with the lubricant.
This malfunction is not very complex and can be easily repaired. But this will require dismantling the head, grinding its surface adjacent to the block, replacing the gasket and lubricant. When changing, it is necessary to flush the engine and lubrication system and replace the “old” oil with antifreeze impurities.
But warping of the block head causes the formation of an emulsion not so often. A more common problem is a cylinder head gasket failure.
This happens for the same reason - engine overheating. But if the head warps only when exposed to high temperatures for a long time, then short-term overheating is sufficient to damage the gasket. And since lubrication and cooling channels pass through the gasket, the jumpers between them are destroyed by high temperature. Note that a breakdown does not always occur only between channels. Damage can also connect the channels to the cylinder or lead outside the engine.
Although a cylinder head gasket failure is the most common reason for the appearance of a white emulsion in engine oil, it is also considered the easiest to fix. To do this, you just need to replace the damaged gasket with a new one, as well as change the engine oil and flush the engine. An experienced car enthusiast can carry out repairs within 4-5 hours.
Although cracks in the cylinder rarely occur, they can also cause the formation of an emulsion. This usually occurs due to defects in the metal structure of the liner.
Video: Emulsion on the oil filler cap
Over time, existing defects can lead to the appearance of a crack in the cylinder wall, and as it cools, liquid begins to leak into the combustion chambers. Most of the fluid leaves the engine through the exhaust pipe, but some of it also gets into the sub-piston space, which is where the emulsion comes from.
It is possible to repair an engine with such a breakdown only if the liners in it are removable and can be replaced. But in a number of power plants, the cylinders cannot be removed, and in this case the entire block must be replaced.
Another serious problem, the consequence of which is the formation of an emulsion in motor oil, is cracks in the head and block. They can form from overheating, internal metal defects, or shock loads.
Such damage is very difficult to identify, especially in the block, since the lubrication and cooling channels pass inside it, and it is not always possible to inspect or diagnose them.
It will also be impossible to repair such damage. Therefore, the engine part with the crack is simply replaced.
In order to avoid unscheduled engine repairs due to the appearance of an engine oil emulsion, it is only sufficient to carry out timely maintenance, especially regarding the replacement of technical fluids, and also to prevent the engine from overheating. And to do this, you should constantly monitor the temperature while driving.
If a problem with the emulsion in the engine oil appears, it is better to start the search with the simplest thing - the cylinder head gasket. In this case, after dismantling the head when replacing it, you should check it for warpage. This is very easy to do even in a garage. To do this, place the head with the surface adjacent to the block on clean glass. The irregularities formed as a result of warping will be clearly visible.
Usually the reason lies in the head and its gasket. Cracks in liners, block and cylinder head are very rare.
Welcome, friends, to the DIY auto repair website. Checking the engine oil is one of the main tasks of a car enthusiast. With its help, you can not only find out the level of lubricating fluid, but also assess the condition of the oil.
Emulsion on the dipstick
For example, darkening and the appearance of dark impurities in it literally “screams” about the need for replacement, and the appearance of small metal shavings is a sign of increased friction between engine elements (a possible reason is the wrong type of oil).
But what is most misleading is the white emulsion on the dipstick. What is the reason? Does the engine need to be repaired? Should we panic at all?
White slime on the oil filler cap, what is it and is it dangerous for the car?
The appearance of a white substance on the oil filler cap causes concern among many drivers. In some cases, it is quite justified, since a similar phenomenon is observed when serious problems arise in the operation of the power plant. The mixture is whipped to a foamy state either by the engine components or by mixing oil with water in the crankcase ventilation system. Why is white mucus dangerous?
If the white coating appears due to water, then there is no need to worry. It is much more dangerous if it is present on the dipstick. The presence of an aqueous emulsion instead of pure oil is fraught with destruction of the crank block, which is due to insufficient cooling and increased friction of parts. In addition, the pump is not able to provide the pressure necessary to ensure lubrication of other elements.
Reasons for the formation of white plaque
- A negative external temperature may act as a provoking factor, due to which condensation appears in the crankcase. When heated, moisture evaporates and vapors are released, mixing with oil in the crankcase space. During a long trip, water molecules evaporate and the mucus disappears, leaving behind only oily traces. This picture periodically forms in cold autumn, early spring and winter, but it is not able to harm the engine due to the involvement of minor foreign inclusions in the lubrication process. The phenomenon is most often observed in winter, when moisture covers all cooled surfaces that do not have time to warm up quickly, which is typical for short-distance trips. To verify the validity of this version, you need to drive a long distance of 70 km and check the cover again. If the defect has disappeared, then the engine is not in danger.
- The formation of an emulsion may indicate low-quality oil that has contained antifreeze or any other immiscible liquid. An antifreeze leak can be determined by a decrease in its level in the tank and an increase in the amount of oil in the pan.
- The answer may lie in the destruction of the cylinder head gasket, which occurred due to a manufacturing defect, which is extremely rare. Violation of the tightness of the cylindrical block due to deformation of the seals, poor-quality processing of the rolling planes or loose bolts leads to coolant entering the oil system and overheating of the engine. In the event of a gasket breakdown, the coolant is found not only in the lubrication system, but also in the combustion chamber, passing through which it settles on the exhaust pipe in the form of sweet drops of condensate, clearly visible when the engine is cold.
- This could be a crack in the crankcase itself or the head, which cannot be repaired. Parts will have to be replaced.
Having made sure that the appearance of white mucus is not associated with moisture condensation, the search for other sources must begin by examining easily accessible aggregates. First of all, you need to inspect the oil exchanger to see if there are any leaks or fogging on it. In the initial stage, the problem is solved by flushing the engine and repeatedly changing the oil. For this purpose, it is recommended to opt for an inexpensive product with a mineral base, since it will still have to be quickly removed. In this case, if the drained liquid is completely in a foamed state, then a complete disassembly of the power plant, cleaning or replacing the oil nozzles, purging the crankshaft lubrication channels, and checking the gaskets will be required. A flaw may lead to the need for major engine repairs.
Before traveling, you need to record the antifreeze level. If, after the engine has completely cooled down, no drop is noticed, then the reason does not lie in the loss of tightness. Otherwise, you should determine the place where the liquid is leaking.
Accurate diagnostics can only be carried out on a pressed stand, which will demonstrate the condition of the channels and lenses. At the same time, you need to make sure that the piston heads are intact and the spark plugs are in working condition. If there are no defects, then the elements will be completely clean.
subscribe to the channel and like, thank you all.
How to solve a problem?
So, if the reason for mixing consumables is mechanical damage to the oil cooler gasket, then it is necessary to replace it.
about 12-15 liters of distilled water; new oil cooler gasket; new antifreeze; container for collecting old refrigerant.
Step-by-step instruction
So, let's start replacing:
- If possible, add a special cleaning fluid to the refrigerant. Start the engine and let it run for a while (no more than 10 minutes). To allow the engine to warm up to operating temperature, wait for the cooling fan to start. It is recommended to flush the system before replacing the oil cooler gaskets.
- After washing, find the antifreeze drain plug under the bottom of the car. Place an old basin or any other container under it, unscrew the lid and drain the used refrigerant.
- After this, you need to dismantle the oil cooler. For each individual vehicle, instructions for disassembling the oil cooler may differ, so we recommend that you use the service book for your car. After disassembling the unit, you need to clean it completely. Remove old gaskets that have expired and install new ones in their place. Buy gaskets according to your car model. If you don't know which one is best to buy, consult your dealer.
- Having replaced the gasket, you can begin to remove the refrigerant expansion tank. Rinse it as much as possible. It won't be possible to wash it completely, so if you are too concerned about its appearance, you can replace the tank with a new one.
- When the coolant is drained and the expansion tank is flushed, you need to flush the system several more times. Replace the tank and fill it with distilled water. Start the engine and turn off the air flow inside the car. Also turn on all voltage consumers to maximum so that the motor warms up faster. When the operating temperature of the internal combustion engine rises to 100 degrees, the cooling system fan will turn on. Let the engine run for about 10 minutes, while turning off all voltage consumers and turning on the interior airflow. The motor will begin to cool slightly and the cooling fan will turn off. Wait about 15 minutes for the motor to cool slightly, otherwise you may get burned when draining the distillate. Drain the distilled water and repeat the procedure at least one more time. The system must be flushed until the drained distillate becomes almost transparent. Of course, it should be free of any traces of motor fluid.
- After this, you can tighten the drain plug and fill in fresh antifreeze. Use only original products recommended by the car manufacturer. If you purchase a counterfeit, this may be fraught with other problems.
- Start the engine and press the gas pedal firmly several times. At this point you will need the help of another person. When you press on the gas, an assistant should squeeze the cooling system pipes. In this case, the expansion tank cap must be closed. This is done in order to prevent the occurrence of air jams and eliminate those that have already appeared in the system. Open the expansion tank cap from time to time to release any trapped air.
What measures should the driver take?
If diagnostics revealed a damaged cylinder head gasket, it should be replaced. To replace the gasket you will have to remove the head. After installing the gasket, it is better to tighten the mounting bolts using a torque wrench so that the specified tightening torque is not exceeded. If the cylinder head “leads”, the problem can only be solved by turning it on a machine. It is better to entrust this work to specialists.
If the heat exchanger is damaged, it is sealed, if, of course, this is possible. If not, the heat exchanger is changed. If errors were made when connecting the main line of the cooling system, all pipes will have to be disconnected and reconnected.
If the BC is damaged, the unit will have to be dismantled. At the same time, the block is bored and sleeved.
If coolant leaks are detected in the pipes and connections, the leak must be eliminated. Then you will have to change the engine oil and antifreeze, after flushing the cooling system. Such leaks are diagnosed when the engine is running at high speeds. The liquid will flow out under pressure, and finding the leak will not be difficult.
Engine oil and the engine itself should be checked as often as possible. This is the only way to prevent serious damage.
When inspecting and diagnosing the engine, many car owners are faced with the presence of a whitish coating on the oil filler cap and the oil level dipstick.
How to determine antifreeze in oil
Many, especially novice, car enthusiasts are interested in the question of how to find out that antifreeze has entered the oil system of the car’s engine. In fact, there are a number of typical signs by the presence of which one can judge the occurrence of this malfunction. Among them:
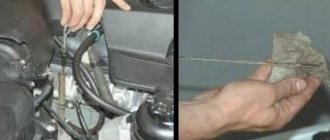
- At the neck under the lid, an emulsion of oil and antifreeze appears, usually white or yellowish in color, similar in appearance to cream (sour cream, mayonnaise). Accordingly, the more antifreeze or antifreeze that has leaked into the oil system, the more such a mixture will be in its composition. It is not difficult to check the presence of an emulsion; to do this, you just need to look at the condition of the engine oil on the dipstick. There will be a similar emulsion on the oil filler neck, just open the cap.
- Drop in coolant level. This sign is indirect, since antifreeze can leave the system not into the oil, but simply into the engine compartment. Therefore, in this case, additional diagnostics are necessary.
- Engine overheating. This symptom is also indirect, since it can be caused by other problems. However, if antifreeze and oil are mixed, then, accordingly, the cooling and lubrication systems will stop working normally, which will also lead to rapid overheating of the engine, especially when it operates at significant loads (speeds).
- Presence of oil in antifreeze. As a rule, when one (or both) systems depressurizes, mutual mixing of these process fluids occurs. At the same time, the antifreeze turns black and begins to smell like burnt oil, and the cooling system does not work well. You can look at the condition of the antifreeze by opening the cap of the expansion tank of the cooling system.
- Decrease in engine power. This factor is a logical result of the deterioration of the cooling and lubrication systems. Often the motor “troits”. Additional diagnostics must be performed as other problems may be causing the loss of power.
- White smoke from the exhaust pipe. This is true for both gasoline and diesel engines, however, the reasons why this phenomenon is caused differ in the first and second cases. If white smoke comes out of the exhaust system, then there is antifreeze in the engine elements. For gasoline engines, the coolant enters the cylinders, and for diesel engines, it enters the manifold.
- The spark plugs will have a light tint (the color of burnt antifreeze). True, this is only an indirect sign; a number of other reasons will need to be considered.
- Air bubbles in the expansion tank of the cooling system. They can be seen through the transparent tank body or by opening the cap (at high engine speeds). The higher they are, the more air will escape from the system. This sign directly indicates depressurization of the system.
- Coolant leaks from under the cylinder head gasket onto the body of the unit itself. At the same time, regardless of their color, it is necessary to check the condition of the engine oil and antifreeze in the engine to ensure they are mixed with each other.
If a car owner encounters one or more of the symptoms listed above, then it makes sense to check the condition of the engine oil, coolant, and also perform additional diagnostics of individual engine parts, which will be discussed below.
How to flush the engine from emulsion, dirt and deposits
It is quite obvious that if you need to wash the engine from the inside, then you need a good engine flush. There are a large number of different formulations on sale.
In practice, all products can be divided into two groups:
However, choosing the best engine flush product is not so easy. First of all, you need to proceed from the specific situation. If you just need to flush the lubrication system before changing the oil, and we are not talking about removing remnants of an emulsion or counterfeit product, then a regular “five-minute” may be quite enough.
It should also be remembered that quick flushes in oil can also have a negative effect on gaskets, seals and other seals. There have been cases where, after applying oil flushes, the engine began to leak.
In case of more serious contamination, it is better to use ready-made flushing oils, which are poured into the engine in full instead of base oil. Depending on the type of flushing composition, the unit should either operate only at idle speed, or short-term driving with minimal loads on the internal combustion engine is allowed.
This type of washing is less aggressive to rubber seals compared to “five-minute” ones, and also more thoroughly washes away dirt and deposits. We also note that flushing oils can be synthetic, semi-synthetic or mineral, and are also universal. In other words, they can be used in both gasoline and diesel internal combustion engines.
In practice, this solution can be considered optimal for flushing the engine from emulsion after antifreeze or antifreeze gets into the lubrication system. Flushing oils are also better suited for cleaning dirty internal combustion engines with high mileage.
At the same time, the risk of “clogging” the channels and filters (for example, in hydraulic compensators, the oil receiver mesh) with soggy dirt is still present, but it is not as high as compared to a quick rinse in engine oil.
The main reasons for the appearance of emulsion on the dipstick
Remember that any foreign matter, discoloration or emulsion on the dipstick is already a sign of a malfunction. The only question is how serious the problem is. In the case of white “foam,” there may be several reasons:
- Distortion of the cylinder head surface;
- the appearance of a crack (defect) in the cylinder block or on the head itself;
- breakdown (burnout) of the gasket located between the power unit block and the cylinder head;
- moisture entering the engine combustion chamber. After this, water may enter the crankcase;
- formation of condensation directly in the crankcase due to sudden temperature changes.
The first three malfunctions are interconnected, because in all cases the result is the same - the coolant enters the engine and mixes with the oil.
In this situation, do a few more checks:
- Inspect the engine along the perimeter between the cylinder head and the cylinder block. The presence of oil drips is a clear sign of damage to the gasket or, even worse, to the engine metal itself;
- evaluate the color of the exhaust smoke. If it is thick and white, then the likelihood of the problem we mentioned (mixing oil and antifreeze) is very high;
- look into the coolant reservoir. If there is less antifreeze or antifreeze, and the oil level, on the contrary, has increased, then everything is clear here without words.
Another problem is condensation. It would seem where he could come from. But under special operating conditions it may well appear in the engine. As a rule, foam occurs in the cold season.
Let's imagine the situation. The car is well warmed up and “sleeps” outside. A sharp decrease in temperature leads to the formation of condensation. Moisture gets into the oil, evaporates during operation and may appear on the cap or dipstick. With the advent of heat, this problem usually disappears.
Several more versions cannot be discarded - low quality oil, choosing the wrong brand or mixing different types of formulations, for example, “synthetics” and “mineral water”
The latter happens rarely, but due to negligence it does happen
What it is?
The basis of all modern motor oils is hydrocarbons. The combustion of fuel leads to the appearance of various substances: acid, various types of peroxides, moisture, etc. Their mixing in the hydrocarbon leads to the formation of an emulsion mass that settles on the oil filler cap and the dipstick for measuring it. Its adhesion to these areas is due to the fact that they are the coldest. The structure of the white emulsion is an abundance of microscopic bubbles. Its appearance is an alarming sign indicating the need for diagnostics of the power unit.
Details about the appearance of the emulsion
The problem of the appearance of a white mass on the neck cover especially concerns cars parked on the street. But it may also affect cars in the garage. If you regularly leave your car outside, it will be exposed to the weather. In autumn it often rains, and moisture may well accumulate in the crankcase cavity. In winter, “mayonnaise” can be observed even more often.
Another reason for the formation of white mass is frequent driving over short distances. During such trips, the engine does not have time to warm up, which leads to the formation of condensation. It follows from this that in winter the engine must be well warmed up before driving.
If the crankcase ventilation system is clogged, the accumulated gas will look for other places to escape, which will also lead to the appearance of an emulsion. In this case, there is no need to change the oil, you just need to clean the ventilation. It is much more dangerous if motor oil is mixed with antifreeze, as this leads to serious engine damage.
What is the danger
It all depends on the amount of “mayonnaise” mass and the reasons for its appearance. If there is not a lot of emulsion foam, and it was formed as a result of natural processes, then the motor system cannot suffer from this. The vapors formed as a result of the condensation process will be pumped out through the crankcase ventilation hose after 40-50 km and moved into the manifold cavity.
If antifreeze penetrates the oil, this will lead to a decrease in its lubricating properties, which indicates the need for its complete replacement. If this is not done, then scuffing may appear on the cylinders, the crankshaft liners will receive significant damage, which in turn will lead to malfunction of the timing system components.
In winter, the working fluid may even crystallize. The appearance of a film between the contacting parts of the mechanism, which vaguely resembles a lubricant, threatens to jam the motor.
If antifreeze begins to enter the cylinders of a running engine, this can lead to a pressure surge in the system. This causes deformation of the connecting rod. Piston fragments will damage the surfaces of the cylinder and combustion chamber. And if they fall into the crankcase, then damage to the crankshaft or even a broken connecting rod cannot be avoided, which in this case may well pierce the crankcase wall. After this, the propulsion system will have to undergo serious repairs, and it will not be possible to do without replacing some components.
Causes
As a rule, the driver becomes aware of a problem such as engine oil in the coolant expansion tank when he decides to check the level of antifreeze in the system. There may be oil residues on the neck, and the coolant itself may change its color or consistency. In addition, the refrigerant may develop a relatively unpleasant odor.
Engine lubricant enters the expansion tank with antifreeze
One way or another, you need to keep in mind that mixing lubricant and refrigerant is a very bad sign for the vehicle owner. Both consumables circulate through systems isolated from each other. Moreover, they are sealed, so mixing liquids should at least alert the driver. If consumables are mixed with each other, this means that the systems are no longer sealed, which can cause engine fluid to leak.
The most likely and common reason for the mixing of consumables, in particular the ingress of engine fluid, can be:
- occurrence of mechanical damage to the operation of the oil radiator or oil cooler;
- malfunction of the cylinder head (the block gasket has expired);
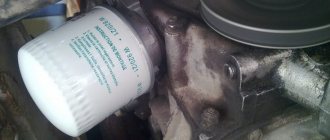
- The heat exchanger (oil cooler) gasket has exhausted its service life.
It should be noted here that it is at these points that the lubrication and cooling systems come into contact with each other. In an oil cooler, such contact is explained directly by the purpose of the device. In some vehicles, the engine fluid simply must be maintained at a certain temperature, as a result of which the vehicles are equipped with an oil cooler. The latter, in turn, directly interacts with the vehicle’s cooling system, where the refrigerant acts as a coolant.
Consequences of using poor-quality coolant
In addition, one of the important reasons is the inconsistency of the refrigerants that the driver pours into the system of his car. For example, the driver detected that the refrigerant level in the expansion tank was too low and found no other way out but to pour the first available antifreeze into the system. As you know, antifreeze manufacturers can use various additives in their products. If these substances are incompatible with each other, then when heated by the engine, they enter into a chemical reaction with each other.
Torn and expired oil cooler gasket
Condensation has appeared
If water enters the lubricating system, then the oil completely changes its properties. The oil will not be able to dissolve without a residue, but with prolonged mixing, an emulsion can form. This is the kind of liquid the driver detects on the dipstick. Even if the oil has just been changed, the water that gets in will completely change its properties.
Don't be afraid that there is a leak somewhere. Water in the cylinders may appear from the air. And that's a fact. If the ambient temperature has a large difference with the temperature of the metal parts of the engine, then condensation may settle on the cylinder walls. Typically, this phenomenon can be encountered in the fall or winter, when the car is parked on the street. Water condenses on the metal and flows into the crankcase, where it mixes with the oil. The result is foam.
In order to somehow overcome this problem, you need to warm up the engine thoroughly and for a long time in the winter. Then the water will simply evaporate. Experts also recommend insulating the engine to quickly warm it up in the morning.
Ways of water entering the power unit
So, we have already found out that deformation of the block head is one of the main ways for moisture to penetrate the lubrication system, and also that the appearance of microcracks usually begins with overheating of the engine. An inexperienced driver, noticing that the temperature gauge needle begins to rise alarmingly towards the red line, checks the coolant level and, when it drops, immediately pours the missing portion into the filler neck. This cannot be done - cool liquid, if it gets into a hot engine from overheating, will lead to the destruction of the metal (physics course, 7th grade).
The opposite phenomenon, the cracking of metal when water freezes, is also described in sufficient detail in school textbooks: when water freezes, it transforms from a liquid into a solid state, expanding during the process of crystallization (due to an increase in the distance between molecules in an ordered crystal lattice). Being in the enclosed space of the engine cooling system, the ice begins to forcefully press on the surface of the walls of the engine water jacket, and if there are inhomogeneities, the metal cracks in this place.
Usually the plugs are the first to suffer; the sleeves are also considered weak points. The crack may appear microscopic, but continue to expand under the influence of unfavorable factors. Most often, deformations are directed inside the motor, and not outward, so usually such deformations are not visible externally. Getting into the CPG through these defects, moisture flows into the crankcase, diluting the oil.
Another route for oil watering can be a crack in the cylinder head, formed between the cooling and oil lines as a result of turning the liner - in this case, the piston will hit the head with force, which will manifest itself as a characteristic knocking of the engine in the crankshaft area.
The appearance of emulsion in the engine can be caused by loss of sealing rubber seals. The rubber bands of the water jacket, as well as the sleeve seals, deteriorate most quickly, and the same notorious overheating is usually the culprit. As a result, the sleeves become very hot, and the first to suffer are the rubber seals, which are not designed for such high temperatures. However, they can also be destroyed as a result of prolonged inactivity of the vehicle - this phenomenon is known as “drying out,” when the rubber product becomes covered with cracks, losing its elasticity.
Where can engine oil leak from?
If during the next daily inspection it turns out that the oil level is significantly below the maximum mark, you should seriously look into troubleshooting
First of all, it is important to determine where the leak is located.
First of all, it is advisable to pay attention to the accessible engine components. One of them is the valve cover.
From under the valve cover
A leak in the valve mechanism may result in oil leakage from the engine lubrication system. Often, this problem is signaled by a characteristic burning smell from under the engine exhaust manifold.
In this case, it cannot be said with a high degree of probability that replacing the gasket will solve the problem. The occurrence of the presented malfunction may be associated with excessive pressure in the engine lubrication system.
This situation can be caused, for example, by a malfunction of the so-called pressure reducing valve.
Crankshaft oil seal
If a leak in the valve cover gasket can be corrected with little effort, as they say, the situation with the crankshaft oil seal is much more complicated. Replacing it due to the design features of the engine will require a lot of time and labor.
What could have caused the breach of its tightness?
Let us arrange the most probable causes of this malfunction in a certain sequence, starting with the most frequent:
- the operational resource has been developed;
- failure in the crankcase ventilation system;
- defective components;
- unscrupulous repairs.
Oil leak between engine and gearbox
Do not forget that the clutch flywheel housing also contains an oil seal, which sometimes makes itself felt, although extremely rarely. To verify the presence of such a malfunction, you will have to look under the bottom of the car.
In this case, it is best to drive the car into an inspection hole or so-called overpass. The presence of a leak will be indicated by an oily surface of the clutch housing and gearbox housing. To replace the oil seal, you will need to dismantle the gearbox.
Let us focus our attention on the reasons for this unfavorable phenomenon. Among them are:
- mismatch of lubricant viscosity;
- failures in the crankcase ventilation system;
- loss of elasticity of rubber goods;
- poor quality components.
Oil filter gasket
The oil filter seal can also be the culprit for an oil leak. So, during the next scheduled filter replacement, it could simply be tightened, and this is unacceptable. With such repairs, unfortunate oil leaks may appear over time.
It is also worth mentioning the fact that after each filter replacement, all associated rubber goods must be replaced. If this is not done, there is a high probability that oil formations will soon appear at the filter connection site.
In a particular case, oil from the engine lubrication system may be squeezed out due to malfunctions in the operation of the VKG system.
Engine crankcase problems
A frequent cause of engine oil leaks can be violations of the crankcase ventilation system. For the most part, owners of fairly used cars face a similar problem.
The fact is that as the CPG wears out, exhaust gases begin to accumulate in the engine crankcase. With a working crankcase ventilation system, excess pressure would be vented into the engine intake manifold. But it also happens that after prolonged use, and in the absence of proper care, the elements of the system become clogged.
This state of affairs leads to the fact that the gases have nowhere to go, and they begin to look for the most vulnerable places, which are played by various sealing elements.
Causes of emulsion in oil
There may be several reasons why an emulsion may appear in the engine. Most often it appears due to liquid entering the engine crankcase to cool it. This often happens due to damage to the cylinder head gasket. That is why, if traces of emulsion are noticed, the engine should be carefully examined for damage; First of all, you should be interested in the cylinder head gasket and the cylinder block itself. Over time, for various reasons, these parts may develop cracks or even serious holes that will be immediately noticeable. If any element of the cylinder head is deformed, coolant can enter the crankcase and clog it, mixing with oil, after which the emulsion will begin to spread throughout the engine, depositing in its components.
If an emulsion appears in the summer, the reason is usually the deformation of the cylinder head elements; in winter, its appearance is most often caused by condensation. Another reason may be a poor gas ventilation system. The exhaust gas temperature in the crankcase is quite high, and in addition, they contain quite a lot of water. It settles on the walls of the engine in the form of condensation, then mixes with oil, which leads to the appearance of an emulsion. However, in order to get rid of this unpleasant phenomenon, it is necessary to carry out a thorough diagnosis of the car, because without eliminating the root cause of the malfunction, it will be impossible to get rid of the “mayonnaise” in the engine; it will appear again. It is usually almost impossible to do this yourself; the cost of diagnostics is clearly lower than the cost of repairing an engine after operation with an emulsion.
Most often, the cause of the malfunction is a breakdown of the cylinder head gasket, which causes coolant to penetrate into the crankcase. After penetration, it clogs the lubrication channels and mixes with oil, causing the latter to instantly lose its characteristics and become ineffective. This may cause the engine to overheat. This problem can affect any engine, regardless of its design features.
The problem may arise as a result of untimely or improper vehicle maintenance. Most often, the appearance of an emulsion should be expected in winter or autumn, when condensation is most likely to form. If condensation causes emulsion, then there is no need to be afraid. When the engine warms up, the moisture in the oil will evaporate and it will become normal.
Chemical incompatibility
It is necessary to add the same engine oil as was added during replacement. Mineral oil is in no way compatible with synthetic oil. This “mix” disrupts the structure of the liquid. This is due to the fact that in mineral oil the hydrocarbon molecules have a wide range in size, while in synthetic oil all the molecules are homogeneous.
Due to the different molecular sizes of mineral oil, it performs well under operating temperature changes. Thus, the viscosity, freezing temperature and level of lubrication of the rubbing elements by the liquid change.
As you know, oil is not completely homogeneous. It contains various additives. They vary depending on which area needs more lubricity to be added. It happens that the added additive begins to enter into a chemical reaction with the poured oil, which leads to the appearance of foam.
How to diagnose a malfunction?
It is better to start diagnostics by checking the coolant level. If the antifreeze level drops without obvious reasons, this may indicate a cylinder head malfunction or a gasket failure. In the second case, the engine runs unevenly, and antifreeze leaves the cooling system.
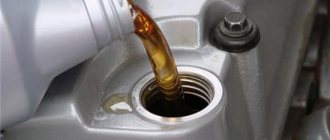
To check the oil for the presence of coolant, it must be drained into a clean container. The engine should be warmed up as the oil should be warm.
Pay attention to what the working fluid looks like. In the heated oil, traces of coolant will be clearly visible, which, when cooled, turns into an emulsion
If antifreeze is diluted with water, the bulk of it is concentrated at the bottom of the crankcase and is drawn into the oil receiver. There may be no traces of emulsion on the dipstick, but you cannot drive such a car, as the viscous substance will clog the lubrication channels. The consequence may be failure of the engine valve or connecting rod bearings.
The appearance of an emulsion on the neck cover indicates the destruction of the cylinder head gasket. Confirmation of gasket wear will be the leakage of working fluid from the tank. When inspecting the power unit, check the junction of the BC and cylinder head. The presence of smudges in this place will confirm an oil leak.
If thick white smoke comes out of the exhaust pipe, this is evidence of coolant getting into the engine elements. This is true for all types of power units. However, for diesel engines the coolant enters the manifold, and for gasoline engines it enters the cylinders.
Self-diagnosis
The primary diagnosis is to check the antifreeze level in the expansion tank. Testing is carried out after the power unit has cooled, since the heated fluid increases in volume. A drop in level indicates antifreeze leakage into the internal cavities of the engine. In hot weather, a small amount of liquid evaporates naturally. The composition of the antifreeze is also analyzed: it should not contain rainbow oil stains.
If stains are detected, it is necessary to start the engine and visually monitor the condition of the fluid in the tank. If there is damage to the gasket or metal parts, the gases under pressure squeeze the lubricant into the reservoir. Gas bubbles appear on the surface of the antifreeze, which leave spreading drops of oil on the surface. The antifreeze that gets into the cylinders burns, resulting in a running engine that smokes (the flow of exhaust gases is white and smells like coolant).
Then you should drain the engine oil from the power plant sump into a clean container. The engine is preheated until the cooling fan operates. If water-based liquid gets into the lubricant, it will be visible in the container as spots of emulsion or a thickened substance.
Additional diagnostics include checking the crankcase ventilation system, where condensation accumulates. If the system breaks down, excess pressure is created inside the engine, which leads to the sedimentation of an emulsion with the smell of fuel on the oil filler cap.