Many owners of VAZ cars (and the 14th is no exception) over time encounter problems such as valve wear or burnout. When faced with it, you can go in two ways - contact a service center or do the repair yourself. We will talk about how to replace VAZ 2114 valves, as well as what is needed for this, in today’s article.
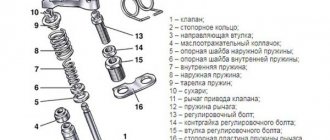
VAZ 2114 valve set
Causes of valve failure
Why does it happen that valves burn out over time and engine performance is disrupted? The main reasons are:
- Use of low quality fuel;
- Installation of spark plugs that are not suitable for the heat number in the cylinder head;
- Frequent driving at engine speed limits;
- Using a propane mixture as fuel without flashing the control unit;
- Operation with signs of engine detonation.
The root cause is always an unscrupulous attitude towards the car, if you monitor the operation of the engine in a timely manner, refuel with a high-quality fuel mixture and service all units in a timely manner, you can avoid subsequent problems.
Useful: Correct valve adjustment on a VAZ 2114
How to replace valves on a VAZ-2114 8 valves with your own hands
In order for the VAZ-2114 car to work properly and not let the driver down on the road, the car owner must certainly monitor the technical serviceability of the car.
At the slightest change in the operation of the car, it is important for him to establish the true cause of the malfunction and eliminate it as quickly as possible. You need to constantly monitor the technical serviceability of the thermostat, injectors, manifold and even seals, because most often serious damage is caused by the failure of these elements, which can be quite easily replaced yourself. If during operation a specific, previously unobserved knocking noise is heard, then this should be regarded as the first sign that replacing the valves on a VAZ-2114 8-valve car should be carried out as quickly as possible. After all, if this action is not carried out in the near future, the timing belt may break, which will lead to engine failure.
Experienced drivers and service station workers recommend changing the timing belt after 30-35 thousand kilometers, but these are just recommendations that do not always correspond to every car. Therefore, the car owner must independently monitor the condition of this element and promptly replace the one that has become unusable.
What is required for replacement
After checking the condition of the cylinder head, it turned out that valve replacement is required, then you need to prepare for the process and collect all the necessary tools and spare parts:
- New set of valves;
- Saddles;
- Guide bushings;
- Valve stem seals;
- Screwdriver Set;
- Set of sockets and open-end wrenches;
- Valve desiccant;
- Oil seal remover.
You should not disassemble the engine on the street, but it is better to go into a closed room, which should be cleaned first. Dust that can get into the motor when disassembled can cause huge problems after reassembly, including major repairs.
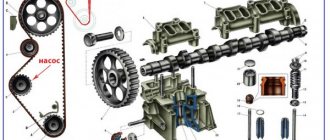
Where is the timing belt located?
Monitoring the condition of the timing belt and its serviceability is quite simple, because this part immediately catches your eye after opening the hood. Its surface is toothed, it passes through the crankshaft and camshaft, and is a connecting link for the following elements:
Since the belt performs several tasks simultaneously, it can quickly fail, so you should pay very close attention to its appearance.
If it is noticed that this element often “slips” from its main place or begins to tear, it needs to be replaced as soon as possible. A broken belt in a VAZ-2114 will be indicated by an injector in the form of a light that lights up on the dashboard, while other models may simply stall on the way, and the driver will not be able to start the car on his own. However, not only a broken belt becomes the reason for replacing the valves; quite often the valves have to be changed due to a violation of the clearance in the motor chain. If the car owner notices that the valves are not positioned as usual, then the car is under no circumstances allowed to be operated until the valve guides are completely replaced. It’s really possible to do this kind of work yourself, despite the lengthy process. Every car enthusiast can handle it if he follows the instructions provided by professionals in their field.
Step-by-step valve replacement
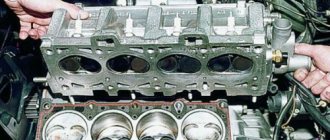
- First of all, you need to remove the cylinder head from the car:
- the battery is de-energized and removed;
- Coolant and engine oil are drained into separate containers;
- vacuum hoses, cylinder head gaskets, cooling systems are completely removed from the car;
- the cylinder head cover is removed, the timing belt and casing are removed;
- Using a key, the fasteners that secure the cylinder head are unscrewed.
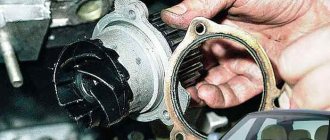
- After removing the cylinder head, you can begin replacing the valves. But before you start, you need to prepare a special tool called a puller. Of course, you can use improvised tools, for example, a chisel and a hammer, but this will complicate the work a little:
- the camshaft and gas camshaft are removed from the cylinder head;
- using a removable device or a hammer with a chisel, the studs are secured to the gas distribution shaft;
- a stand is placed under the “plate” of the valves, and the “crackers” are removed;
- the seals are removed. To make it more convenient to remove the camshaft oil seals, experts recommend using a clamp to press the oil seal, but not very hard, and carefully turn it in different directions;
- the springs and the “plate”, which is located under them, are removed.
- We remove the valves that have become unusable.
At this point, the valve replacement process can be considered complete, and assembly should be performed in the reverse order.
Which manufacturer should you choose?
If you need to replace valves on a VAZ 2114, then when choosing new spare parts, you should approach the process wisely so as not to return to repairs in the near future. According to reviews from VAZ car owners, many prefer “original” valves; they are distinguished by high quality workmanship and an affordable price (around 350 rubles for 1 piece).
Useful : Tightening torque for VAZ 2114 cylinder head
But when purchasing new parts, you should not pay attention to the box, since now there are a lot of analogues with a design like the original. Look at the catalog numbers, they should match these:
- 2108-1007010 (intake)
- 2108-1007012 (graduation)
Thus, you will not fall for a “good” fake of your original product.
You can choose several options from good analogues of intake models:
- AMP PLAD005-S-0-D (Poland);
- Freccia R4387/SNT (Italy);
- Master-sport 08IN-SET/4/-MS (Russia).
There is more choice of exhaust valves as the demand is higher. Popular models include:
- Osvat 0504 (Italy);
- Ae V91180 (Italy);
- Kolbenschmidt 17092 (Germany);
- AMP PLAD004-A-0-D (Poland);
- Master-sport 08EX-SET/4/-MS (Russia).
If you have the opportunity to consult with a mechanic who regularly carries out repairs, you can find out which models are more popular in your region and make a choice based on the information received.
Choosing oil
According to the operating manual for the VAZ 2114, for this model it is recommended to use semi-synthetic motor oil, the viscosity of which is 10W-30. This way you will be able to decide what kind of oil to fill in your VAZ 2114. Choosing oils from leading manufacturers is not a mandatory requirement. But this is a recommendation based on detailed analysis. Practice shows that it is high-quality lubricated fluids that interact best with VAZ 2114 engines.
Market analysis and a survey of owners of the “fourteenth” model show that the main demand is now for several types of oils from leading manufacturers. However, their temperature ranges are different. To determine the choice of this parameter, we offer the corresponding table for your reference.
| Minimum engine cold start temperature, °C | Viscosity grade according to SAE J 300 | Maximum ambient temperature, °C |
| below -35 | 0W-30 | 25 |
| below -35 | 0W-40 | 30 |
| -30 | 5W-30 | 25 |
| -30 | 5W-40 | 35 |
| -25 | 10W-30 | 25 |
| -25 | 10W-40 | 35 |
| -20 | 15W-40 | 45 |
| -15 | 20W-50 | above 45 |
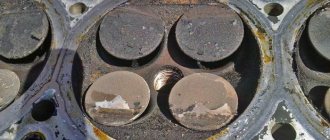
Symptoms of burnt valves
The main symptom of a valve burnout will be uneven operation and twitching of the engine in different operating modes. But the difficulty of detecting a malfunction lies in the fact that you have to partially disassemble the motor.
Troubleshooting can also occur for other reasons: a malfunction in the piston group, spark plugs, high-voltage wires and ignition coil. Without analysis, diagnostics can be carried out using the following method:
- We start the engine and remove the armor wire from each cylinder one by one and listen to its operation. If significant changes in operation are noticeable, then the cylinder is in good condition. If they are minor, then we carry out further diagnostics of the problematic component.
- We unscrew the spark plug and measure the compression. The indicators are normal - therefore, the problem is in the ignition system, and if the indicators are low, we move on to further diagnostics.
- We take a syringe and fill the cylinder with a small amount of engine oil, after which we take another measurement. If there is a noticeable increase in compression, the problem is in the piston group. When the readings remain the same, the problem is most likely in the valves.
Such diagnostics do not give an accurate result and the fault can be understood only after opening the cylinder head. But this procedure will help you accurately tell whether it is worth disassembling the motor or whether the problem is in another part.
We take a screwdriver in our hands
Since not everyone has the required amount of free time, patience and perseverance, folk craftsmen introduced another method using a screwdriver.
A drill is also often recommended, but its chuck has a significantly higher rotation speed, which may not have the best effect on the final result. So if you still decide on a drill, then you need to take a tool with the ability to adjust the speed and the reverse function. In this case, the valves can be ground in either through the combustion chambers or simply from above.
Grinding in valves from the combustion chamber side
The work is performed in the following sequence:
- The first step is to make small solid washers from metal with a diameter slightly smaller than that of the valve discs. Holes are cut in the center of these washers, as for a flat screwdriver.
- Using molten bitumen (or equivalents), slotted washers are attached to the valve discs.
- The cylinder head is turned over with the combustion chambers facing up, the required valve is put in place and a layer of paste is applied to the area to be ground.
- A rod with an end like a flat-head screwdriver is attached to the drill chuck.
- The flat end of the rod is inserted into the cut of the washer and at low speeds of the drill, grinding of the valve begins.
- The valve is turned in each direction about ten times. It must also be remembered that when changing the direction of rotation, the abrasive paste must be reapplied.
- After the procedure, its spring is attached to the valve.
- You can remove the washer from the valve by heating it.
- The remaining bitumen is removed with solvent, gasoline or similar means.
How to lap valves from above
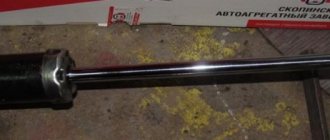
The entire process is almost identical to the manual method. The main difference here is that the valve is rotated using a tool. Some people directly attach the valve stem to the drill chuck, but for greater efficiency and safety, it is better to insert a stem with a diameter close to that of the valve stem into the chuck. Then an approximately 10-centimeter piece of rubber tube is taken and the mentioned rods are connected with its help. For greater reliability, the rubber tube should be clamped at the ends with clamps.
Minimum required tool for grinding valves with a drill
Video: how to grind valves with a drill
Replacement process
How to replace valves on a VAZ 2114 with your own hands? When starting the replacement process, wait until the engine is cold - this will reduce the chance of stripping the bolts.
Replacement takes place in a certain sequence:
- First of all, remove the protective casing from the gas distribution mechanism.
- We mark the mechanism and begin its analysis. Remove the tensioner and timing belt.
- Carefully remove the camshaft gear from the pulley. If you can’t remove it manually, you can use a small pry bar or a screwdriver to push it.
- Unscrew the fasteners of the valve compartment cover of the gas distribution mechanism. Underneath there will be 10 cylinder head mounting bolts. Depending on the year of manufacture of the car, they may be hexagon or TORX head. Unscrew them and remove the head.
- We dismantle the camshaft.
- Then we remove the seals using a puller.
- Use a special device to dry out the valve.
- Remove the plates and springs.
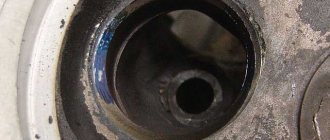
- Now we can remove the valves from their seats. At this point, the dismantling procedure ends and you can begin installation, but before that it is advisable to wash the head from dirt and carbon deposits.
- The installation begins with lapping; for this we need to lubricate the new valves with lapping lubricant, wipe the stem with oil and install the spare part in place. Next, we put the hose on the drill, and the other part of it on the rod, and at low speed of the drill we begin to grind it in, holding it with our finger. Do not rub for a long time, 15-20 seconds for each is enough.
- We install the valve without oil seals and spill them, using, for example, acetone for this. Next, we wait a few minutes and see whether they begin to get wet or not. If it is dry, then the valve is ground in correctly.
- Afterwards you need to install new guides, oil seals and replace the valve seats. When everything is done, you can begin assembling the cylinder head in the reverse order.
When replacing VAZ 2114 valves with your own hands, you should approach the process carefully. Any dust can ruin all your work, and this will only be discovered after complete assembly. Replacing burnt-out valves itself is not a labor-intensive process; it can be done without special knowledge, the most important thing is to follow the instructions and use the appropriate tool, which is presented in the article. This will help you save almost half of the budget required for renovation.
Remember that you need to approach the selection of spare parts very seriously, since due to the poor quality of the product you can return to repairs in just a couple of months.
Some installation tips
The piston of cylinder No. 1 must be placed at its dead top point before installation. The key for 17 will help with this.
The pulleys have grooves and the camshafts have spikes. Each pulley has marks and they should face up. It’s better to place the crankshaft according to the mark that is on the gearbox unit.
When dismantling, it is necessary to note at what angles the tension rollers are fixed. The key plate must be set at the correct angle and the nut must be tightened with a force of 40 N*m.
The screws and their working part must be lubricated with engine oil and tightened in the correct order.
Then you need to turn the screws 90 degrees during the second pass and 90 degrees again during the third pass.
Didn't find the information you are looking for? on our forum.
We recommend reading:
Instrument panel for VAZ 2112 europanel. Installation instructions
How to change the handbrake on a VAZ 2112 - 2110
Checking the functionality of the generator on VAZ cars
What and how to flush the cooling system of a VAZ
Clutch cable for VAZ 2112
Replacing valve stem seals without removing the head of a VAZ 2112, 16 valves, step-by-step instructions with photos
VAZ 2112, 16 valves cylinder head assembly
VAZ 2112 16 valves operating temperature
Fault diagnosis
Before starting work, it is logical to make sure of the feasibility of this event, initiated by the following reasons:
- The time has come to perform periodic checks, adjustments, and replacement of parts and components. Determined by mileage (15,000 – 30,000 km), operating conditions of the vehicle.
- The appearance of characteristic symptoms of damage, the occurrence of breakdowns.
The main signs signaling the driver to pay attention to the valves are:
- noticeable loss of engine power;
- “tripleting” of the engine, which manifests itself when operating at different loads (one or several cylinders fail, the mixture in the combustion chamber does not ignite, ignites with a delay, is not completely consumed, the phenomenon of detonation occurs);
- noticeable increase in fuel consumption;
- the car moves jerkily, the idle speed “floats”;
- the appearance of soot and soot on the spark plugs;
- extraneous knocks, noises in the engine compartment.
Similar symptoms are typical for different types of car malfunctions. An engine is not a fountain pen. Unreasonable disassembly and reassembly is a long, troublesome undertaking. You should first make sure that it is necessary.
Idle cylinder detection
If unstable engine behavior occurs, it is necessary to try to localize the cause, moving from simple checks to complex diagnostic examination methods. You should first make sure that the starter is working properly and that the battery is fully charged.
- Start the engine and leave it at idle speed.
- Raise the hood.
- Remove the spark plug cap from the first cylinder. The engine has stalled - the cylinder is working, no changes have occurred - intervention is required. In this way, go through the remaining cylinders.
- Change spark plugs and high-voltage wires on rejected cylinders. Repeat testing. The persistence of the situation indicates a search for a breakdown inside the engine.
Presence of spark, fuel
Check for spark. On an engine equipped with an injector, disconnect the injector power supply connector. Unscrew the spark plugs one by one, lean the body against the ground of the car, start the starter, watch, observing safety precautions. It is more convenient to perform these actions together (one is under the hood, the other is in the cabin).- Make sure there is fuel supply. On a cold engine, connect the injectors, disconnect the ignition module control connector. Turn out the spark plugs. Use the starter to crank the engine for seven to ten seconds. The threads of the spark plug seats are filled with fuel - this is normal. Dry holes mean problems with fuel supply. Questions arise about the fuel system and electronic control unit.
Compression test method
The search for the culprit continues by measuring the pressure in the cylinders at maximum compression. A compression gauge is inserted instead of a spark plug. The piston is installed at top dead center (the special mark on the camshaft gear is aligned with the mark on the cylinder head). Excessive pressure is created in the upper part of the cylinder. The normal value according to the device should be in the range of 11 – 13 kg/cm3. The acceptable value is indicated by the manufacturer in the technical documentation for the vehicle. Low compression - lack of tightness of the combustion chamber.
- The rings on the piston are worn out.
- The valves do not fit tightly.
- The cylinder head gasket is damaged.
- Cracks in the block, cylinder head.
Necessary tool
Replacing intake and exhaust devices requires the availability of specialized tools:
- set of wrenches;
- heads;
- screwdrivers;
- crankshaft clamp;
- torque wrench;
- desiccant or spring remover (locking elements);
- grinding device - in order not to buy a special one, you can use a drill and a piece of hose;
- micrometer - will help to accurately measure the diameter of the rod and identify defects;
- a special key for installing the tension roller - required after a timing belt breaks, when installing a new belt and adjusting the tension.
You definitely need an oil seal remover if replacing them is not intended. Of course, the elements can be removed with ordinary pliers, but this option will damage the product, and in the future the engine will begin to consume a large amount of oil. It will also be possible to pull out the elements with a long end head, but it must correspond to the diameter of the cap.
In addition, you will need a certain amount of consumables:
- new valve stem seals - if they are meant to be replaced;
- cylinder head and valve cover gaskets;
- sealant;
- suitable quality bolts for tightening the head - should not be overextended;
- lapping paste or powder diluted with engine oil.
Nuances worth knowing about
To an experienced repairman, the tips below may seem unnecessary, but a novice repairman should definitely remember the following:
- It is better not to remove all rockers (cams on the valves) right away. It is necessary that each valve gets its own rocker back. While the engine is running, the camshaft cam and the corresponding rocker grind in and if they are “separated”, unpleasant clicks may appear when the valves operate, despite the fact that they have been properly adjusted before.
- And you also need to understand that each valve must return to its place. Changing them even after grinding in would not be the best idea.
- You can use various abrasive pastes in your work. You can start with the largest and end with the smallest. This will improve the results obtained.
- For a better fit, it is sometimes suggested to use machine oil at the finishing stage.
Valve grinding is carried out using various abrasive pastes