The front windshield wiper on the Lada Priora has a design similar to the tenth family, so this repair will be similar. But still, some points will be different. So, repair or replacement of some parts usually occurs for the following reasons:
- Windshield wiper motor failure
- Trapezoid failure
- The occurrence of increased play in the operation of the trapezoid
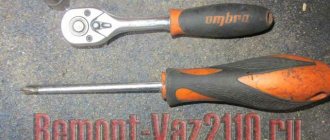
To make repairs or replacements yourself, you will need the following tools:
- Ratchet handles
- Extension
- Head for 10 and 13 mm
- Sharp knife or screwdriver
- Phillips screwdriver
What is a trapezoid: design and signs of the need for replacement (repair)
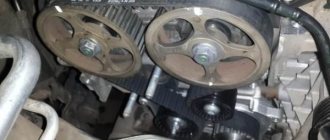
A trapezoid on a car is a drive mechanism consisting of a system of rods and levers that perform reciprocating movements, moving the windshield wiper blades. On most cars, including the Lada Priora, such devices are located in a niche under the windshield.
With the help of a trapezoid, reciprocating movements are created. This is achieved precisely with the help of a special device circuit. Below is the design of the Priora trapezoid.
In addition to creating reciprocating movements, the trapezoid also performs another important function. With its help, the wipers move synchronously to clean the windshield. The malfunction of this mechanism leads to the operation of the wipers being disrupted. If malfunctions occur, the device must be repaired. The ability to repair depends on the type of damage. Most often, hinge joints fail, which can be replaced using a repair kit. If they are in good working order, then when removing the trapezoid, they must be lubricated.
If the integrity of the threaded connections is compromised or parts of the levers and rods are damaged, then the trapezoid must be replaced. Determining the malfunction of the device is not difficult. Defects can be identified by a number of characteristic signs:
- slow operation of windshield wipers;
- the wipers do not work at all or only one of the two wipers functions;
- intermittent and jerky movement of the brushes, which may indicate souring of the driver drive in the bushings (which is why they must also be lubricated).
It is necessary to dismantle the trapezoid and repair it in any of the above cases. Excessive load negatively affects the operation of the gearmotor, which can simply burn out due to overheating. That is why pay due attention to the device if there are signs indicating a malfunction.
GUIDE: Reanimating the windshield wiper trapezoid
One day, in the vastness of the mysterious country of the USSR, Yu.M. was born. Luzhkov. And after 73 years, my windshield wipers squeaked.
It all started in winter. At temperatures below -10 degrees, a wild knocking sound began from the area of the right axis of the wipers when driving over the slightest irregularities. As soon as spring came to Moscow, the windshield wipers began to creak SO much during their work that after 20 minutes of driving I wanted to kill everyone around me with my bare hands. At first I sinned on the HORS wipers, which are like real silicone. But a simple test of bending the leashes showed that the squeak does not go away. The creaking itself is heard much more from the interior than from the street.
What is needed to carry out the work and the article numbers of parts required for replacement
To carry out work on removing and replacing the trapezoid and wiper motor on a Priora, you will need a minimum set of tools. These include:
- 13" head and ratchet;
- Phillips head screwdriver;
- head at "10".
In addition, if the trapezoid or engine is being replaced, then these parts must also be purchased. It is recommended to choose original devices, so their article numbers are presented below:
- trapezoid - article 2170-5205015;
- wiper gear motor - 842-3730-50 or 2123-523612.040.
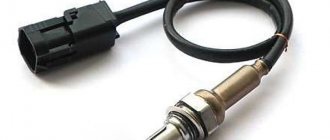
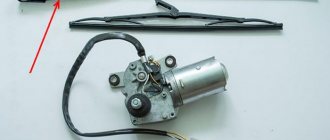
The wiper motor is correctly called a gearmotor, since it consists not only of an electric motor, but also a set of gears through which rotational movements are transmitted.
In addition, when removing products you will need to use gear lubricant. It is needed to lubricate the gear unit and rods. When the tools and materials are ready, you can start working.
Diagram of the Priora windshield wiper system
This is interesting! Priora is equipped with geared motors from the factory, which differ in rod diameter. They come in 10 mm and 12 mm. This is important to consider when choosing a new product.
How to choose wipers
Windshield wipers come in regular and frameless types. The first ones consist of a metal frame, are noisy and quickly become loose. Since the wipers on the Priora are not interchangeable, it is necessary to select them taking into account the length. For winter, there are special brushes that help combat icing. The VAZ Priora is equipped with frame windshield wipers at the factory. This type allows you to only replace the brushes if necessary, although frameless ones have better cleaning quality.
There are also hybrid wipers - the most expensive option. They borrowed rocker arms and supports from frame wipers, and a plastic body from the frameless type. This option is the most advanced and is distinguished by its durability. Replacing the tape in frameless and hybrid wipers requires certain skills, while anyone can change the rubber bands in conventional windshield wipers.
Instructions for removing and replacing trapezoidal wipers on a Priora without air conditioning
Once all the tools are ready, you can begin the actual process. First you need to disconnect the negative terminal on the battery. You don't need to remove the hood of your car, but if you do this, you will make the job about 30-40% easier. If work is carried out without removing the hood, then it is better to close it. The need to open it will arise when you remove the left side of the frill. To remove the trapezoidal wipers with a motor on a Priora without air conditioning for the purpose of repairing or replacing it, you should perform the following steps:
- Initially, the leashes or levers are dismantled along with the wipers. This is necessary in order to remove the frill. To do this, remove the plugs and use a “13” key to unscrew the fastening nuts.
- Next, remove the lever. Before removing, squeeze the leash, and only then remove the lever.
- Use a screwdriver to pry off the three plastic plugs, under which the frill fastening screws are located.
- Use a Phillips screwdriver to unscrew the frill fasteners.
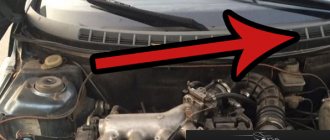
- Open the hood.
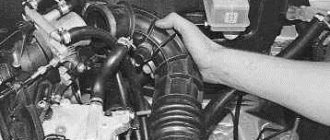
- Move the rubber hood seal aside.
- Using a Phillips screwdriver, unscrew the four screws securing the sound insulation of the engine compartment from the top.
- And one screw from the bottom, which is located under the brake system reservoir.
- Loosen the clamp of the hose coming from the passenger compartment to the expansion tank. Disconnect the hose from the tank and move it to the side.
- Remove the frill by pulling it towards you.
- Remove the expansion tank from its seat. It does not have fasteners. To remove it, you need to unfold it and pull it towards you.
- After this, we remove the hose through the hole in the sound insulation, which was previously disconnected from the expansion tank.
- Remove sound insulation.
- To dismantle the trapezoid of the wipers and the motor, it is necessary to first dismantle the platform (platform) on which the expansion tank is located. It is secured with two bolts and two nuts. The photo below shows the location of the bolts on the hood side.
- The platform mounting nuts are located on the wheel arches on the wheel side.
- Remove the platform and set it aside.
- Having gained access to the wiper trapeze with the motor, you can begin to dismantle it. To do this, you need to unscrew the two nuts on the “10” fastening of the trapezoid. They are located in the area where the wiper arms are mounted (near the rods). Below is shown the first trapezoid mounting nut on the Priora.
- And the second nut for the “10” trapezoid mount on the Priora.
- The motor is secured with a “10” bolt, which is located underneath it. It also needs to be unscrewed.
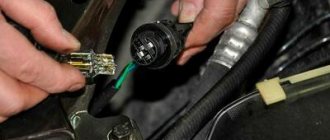
- We remove the trapezoid and disconnect the motor power supply. To remove it, you need to twist it in different directions until you get out of the niche. It is important to note that the wipers do not need to be moved to the vertical position first. This will not make it easier to dismantle the trapezoid with the wiper motor on the Priora.
- This completes the process of dismantling the windshield wiper trapezium assembly with the motor on the Priora. Further actions depend on the reasons for the need for dismantling. If you need to replace the trapezoid along with the motor, then we install new elements instead of the removed ones. If you need to repair a motor or trapezoid, then we disconnect these parts and perform the appropriate actions.
- To disconnect the trapezoid from the motor, unscrew the nut to “10” or “12” (depending on the model of the gearmotor), as well as the three bolt connections to “10”.
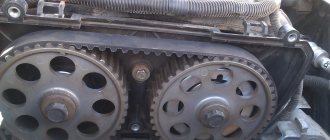
- Before disconnecting the trapezoid from the wiper motor, you should mark the location of the trapezoid relative to the motor. To do this, we use a marker and use it to outline the location of the trapezoid (or make notches with a screwdriver). This is necessary so that after assembly there is no need to adjust the operation of the wipers.
This is interesting! After installing the trapezoid with the motor in place, do not rush to install the frill. First, turn on the wipers and let them work for one cycle. Then reinstall the wiper arms and check how they work. If everything is in order, then you can continue assembly. If operating defects occur, for example, they do not wipe or start moving down and then up, then they should be adjusted first. The adjustment is made by changing the position of the plate, which is shown by the arrow in the photo above.
This completes the expert instructions for removing and replacing the trapezoid and wiper motor on a Priora. The assembly process is performed in the reverse order of removal. Below is a video clip that details the process of dismantling the trapezoid and wiper motor on a Priora without air conditioning.
Freezing of devices
The problem of brush failure in winter is quite common. Often car enthusiasts start looking for a cat in a dark room, disassembling the system and trying to find a breakdown where there is none. In fact, the reason may lie in elementary things, namely freezing. This often happens in the following cases:
- when the car is left in the open air after using water wipers;
- when the car ends up in an unheated garage.
Therefore, before disassembling, first try to find out if everything is normal with your brushes. Are they frozen to the windshield or rear window? Folding up the wipers after parking the car will help prevent this.
Other ways to solve the problem
But it’s not for nothing that a whole list of various problems that occur in addition to trapezoid malfunctions was presented. If there are no problems with it, but the wipers are still working slowly, it would not hurt to completely disassemble the system and check all its mechanisms for problems. Pick up a standard set of tools and go!
It is recommended to check in this order:
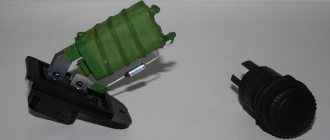
- First, inspect the electric motor, the winding of its wires, and the armature shaft. Look carefully for any damage. If you notice a scratch on a part that cannot be smoothed out with sandpaper, it would be best to completely replace the item.
- Check the condition of the brushes and springs. If parts lose proper elasticity, they should also be replaced.
- Find out how easily the brushes move in the holders. If you find any jams, you can use emery, but if there are too many chips or cracks, you should think about replacing parts.
- Check the condition of the collector. Any damage must be smoothed out with sandpaper, and carbon deposits must be removed with a special polishing paste.
- Find out the condition of the gearbox drive. There should be no chipped teeth or other irregularities on the gear. Sandpaper won't help here; you need to replace the gear.
After all the procedures, the mechanism should be assembled, starting with the engine. During assembly, it is better to thoroughly lubricate all parts. That's all, the repair work can be considered complete. If even this does not help you, you should think about replacing the entire system due to its malfunction.
Manufacturers and prices of analogues
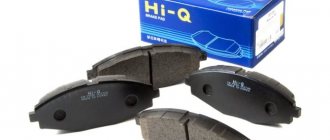
Analogs include frame, frameless, and hybrid brushes. There are several options on the market. Choose the one that suits you best - no matter whether it has a frame or not. The main thing is not to let the old windshield wiper start to scratch the windshield or rear window.
When replacing cleaning brushes, use the following dimensions in millimeters (driver - passenger side):
- 630 – 480;
- 530 – 510;
- 510 – 500.
Other layouts are considered by car owners to be not as effective. Among the well-known analogs of windshield wiper blades are:
- Bosch Aerotwin - frameless, made in Belgium. Full name: Bosch aerotwin retrofitar 532 s. Price – 1200-1300 rubles. The length of the driver's seat is 53 cm, the passenger's length is 50 cm. Sold as a set.
- Bosch Twin is a simpler model. They have the same dimensions, but despite the lower price they are famous for their reliability. The cost is about 800 rubles.
- Bosch Eco is the most economical option. They are inexpensive and sold individually. Price – 300 rubles for one brush. Length – 50 cm.
- Denso Hybrid is recognized as almost the best model on the market. Withstands cold and heat. Price per piece – 500 rubles. Length 50 cm.
- Alca - simple, 500 rubles apiece. The length is 50 cm, but on the passenger side an area of approximately 5 cm wide is left uncovered.
Read more: Do-it-yourself VAZ 2110 interior tuning at home with photos - modification, alteration
Steering wheel shift paddles are a common cause of problems
Windshield wipers in most modern cars are activated using steering column switches in the form of levers with data on the operating modes of the equipment printed on them. These levers must work well and have the necessary signals to turn on the wipers. Often the handle fails, the switch does not send the necessary signals, and because of this, the wipers themselves do not work properly. The main tasks in this case are the following:
- it is necessary to remove the plastic parts of the steering column in order to get directly to the installation site of the wiper switches;
- in most cars, the switches are very easy to remove; the maximum work awaiting you will be unscrewing a few bolts;
- after removing the switch, you can use a tester to check its operation by connecting the contacts one by one to different terminals and turning on the wiper operating modes;
- if the switch really fails, you should simply replace it with a new one, installing it as simply as disassembling it;
- If the switch works, you will have to look for other causes of the problem; it is quite possible that the reasons lie in the area where the switch is connected.
Often, wires simply come off the terminals of this steering column switch and need to be returned to their place. Most likely, after carrying out a complete audit of the electrical system, including switches and other important technical aspects, you will be able to determine the problem and easily fix it. You don't even need any special tools or abilities for this. All you need to do is perform a high-quality restoration of the operation of all simple wiper systems. We offer a short video on how to deal with the problem if the wipers suddenly stop working: