Without electricity, nothing will work. So on a car, the voltage in the on-board network is maintained by a generator. You need to understand how many amperes you need in the on-board network.
It all depends on the amount of attachments, air conditioning, heating, etc. Depending on the configuration, a generator is also selected. Read the article to the end and we will cover this topic. Removing and replacing the generator on a Lada Priora car depends on the attachments; if the car does not have air conditioning, then the unit can be removed in 6 steps. If the air conditioner costs 9 steps, we will talk about them in the article. This part on Priora comes in 3 types. Their prices are also different.
How to remove the generator
It is preferable to have a crane beam indoors; in extreme cases, you can use a jack on wheels, special for hanging the engine. You should proceed in the following way.
- Disconnect the battery terminals.
- Hang up the motor.
- Remove the drive belt.
- Loosen the hoses on the power steering or air conditioning.
- Remove the mountings from the generator.
- The generator can now be disconnected and powered up. First to the side, then up.
- When all wiring is disconnected, the generator can be removed.
Replacing the alternator belt on a Priora 16 valve is carried out in the reverse order, just install the new part following the instructions.
Alternator bearings for Lada Priora: diagnostics, signs of malfunction and replacement
The following circumstances indicate the need to replace the bearing:
Malfunctions of electrical equipment;
Extraneous noises, whistling and humming when starting up;
Slow or insufficient battery charging;
Distinct beating due to uneven rotation of the shaft;
Diagnosis of the malfunction is carried out using the following steps:
- We remove the belt.
- We start the engine and listen carefully. If the extraneous sound disappears, it means the ball bearing was humming.
- We move the pulley. If there is play, the bearing needs to be replaced.
What kind of bearing is needed
Depending on the year of manufacture of the car, the generator can be old or new. They differ in shaft diameter: the new one is 17 mm, and the old one is 15 mm.
- For a 17 mm shaft, bearing No. 303 is suitable.
- Bearing No. 302 is suitable for a 15 mm shaft.
- They have the same rear bearing No.202.
Bearing replacement
For work you will need: Phillips and flathead screwdrivers, 8 and 10 wrenches, 8 and 24 socket wrenches, a hammer. First you will need to remove the generator of the Lada Priora car, and then follow the sequence:
- Remove the voltage regulator.
- Remove the generator cover and remove the stator from it.
- Using a spanner, unscrew the nut holding the shaft from turning.
- Remove the pulley with the spring washer of the generator rotor shaft.
- Press the rotor shaft out of the bearing.
- Remove the 4 screws holding the bearing thrust washer.
- Using a 24mm socket wrench and a hammer, press in the bearing.
Reassemble the product in the reverse order, starting with pressing the new bearing into the generator cover.
Alternator belt - article price, how to tension
In stores you can find 2 types of belts for the Lada Priora 6rk1115 and 6rk1125. To avoid making the wrong choice, inspect the old belt to see if the size is still the same. If there is no size, take 2 belts, taking into account the possibility of returning one of them.
- 6р1115 — approximate price 242 rubles;
- 6р1125 — approximate price 345 rubles;
How to remove a generator on a Lada without air conditioning
If you do not have additional equipment installed, replacing the Priora 16 valve generator will be a little easier, since there will be more space under the hood.
- Remove the negative terminal from the battery.
- Remove the protection from the engine.
- Unscrew the nut on the belt tensioner (not completely, a maximum of four turns). Now you can turn it around by turning the screw a little. When it is loose enough, you can remove it.
- Remove the protective cap to later remove the terminal from the wiring harness. Now you can remove the wiring block.
- Remove the nut to remove the top mounting bolt, then do the same with the bottom mounting bolt.
- Remove the belt and then the entire generator.
Since in advanced configurations with air conditioning the belt on the generator is longer, then if it is necessary to replace it, you need to remember some subtleties. Especially if you feel that the quality of grip on the rollers has become much worse, then you will have to re-tension or change them. The first thing that indicates a problem is a whistle, a clear decrease in the battery charge level, even if it should be fully charged. New batteries can be ordered here: https://www.rimir.by/products/car/akkumulyatory-95/. In this case, first of all, you should look at the belt to see if it is elastic, if there are any third-party cracks on it.
Replacing the Priora 16 valve alternator belt should be done after 60 thousand kilometers, or once every two years.
Checking the removed modern type relay regulator
On most vehicles, the control relay can be removed from the brush assembly, leaving the alternator in place. To do this, disconnect the negative terminal from the battery and look for the relay located in a special window at the end of the generator. Next, unscrew the fastening screw and remove the assembly, which includes the relay and brushes. The assembly must be cleaned of graphite dust. To carry out the test, you will need a simple electrical circuit, which includes:
- 12V voltage source (preferably regulated, for example, a charger);
- car light bulb (“dimensions”)
- wires.
Some chargers can only function with the battery connected. If this is what you have, connect the battery to it. Connect the negative to the relay body, plus to the second terminal. Connect a light bulb to the brushes using small “crocodiles” (so as not to break the rods). If the charger is set to minimum voltage, the lamp will light up. Now increase the voltage to 14.5V: it should go out. If this is the case, we can talk about the serviceability of the control device.
How to tension a belt and check its tension
For Priora, in addition to the original ones, similar belts from foreign brands such as Contitech, Dayco, Gates, and Flennor are recommended.
- Loosen the roller nut; you will have to hold the cage with a wrench. By then rotating this key, the clip can be turned.
- Tighten the nut against the roller. Check the quality of tension only on the long section between the pulleys. If, when pressing on the belt in this place, it bends no more than 10 millimeters, the tension is appropriate.
- If your Lada has a hydraulic booster, you should tighten it a little more. If you don't pull it tight enough, it will whistle obviously, a defect that can be easily detected by ear. Then pull it a little tighter. If you hear not a whistle, but a hum, the belt, on the contrary, needs to be lowered.
On a Priora, in a regular service, changing just the belt can cost from 300 rubles (not counting consumables). If the generator is with rollers or mounted, then the price will increase significantly to one and a half thousand rubles. Do not forget the receipt for the services provided; the warranty for the work performed must be at least six months; if the belt deteriorates due to poor installation or tension, you must demand a replacement at the expense of the service.
The replacement generator itself starts at 5 thousand rubles. The cost of removal and installation work alone will average 1000 rubles for simple models.
How to check the generator voltage regulator with a multimeter without removing
Set the meter to the DC voltage test position and first measure it at the battery terminals without starting the engine. It should be 12.5-12.7V. If the value is less, the battery already needs to be charged: that is, you need to look for the reason for the undercharging. Further actions:
- start the engine and measure the voltage again, having previously set the limit value of the voltmeter scale to 20V;
- at idle it should be in the range of 13.2-14V;
- ask the assistant to press the gas pedal, bringing the speed to 2-2.5 thousand;
- measure the voltage, which should not exceed 14.2V;
- increase the speed to 3.5 thousand;
- measure the voltage again, the value of which should not be more than 14.5V.
If during testing the voltage remains at 12.7V or exceeds 14.5V, the relay regulator must be replaced. But there is a small nuance: the above signs may also indicate a malfunction of the generator. If the voltage regulator is separate, you should check it first, and only then work on the generator. You can simply take a known-good device and replace it with the one you removed. If the relay is located inside the brush assembly, the device will have to be dismantled.
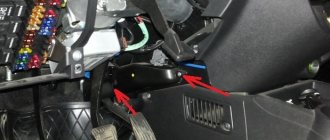
How to remove a generator on a Priora: step-by-step instructions
You need to remove it as follows:
- first you need to disconnect the battery from the negative terminal;
- Next you need to remove the generator drive belt;
- then disconnect the block with the wire from the “D+” generator.
- then remove the rubber boot by unscrewing the fastening nut;
- Now you need to disconnect the wires from the contact pin;
- Next, you need to remove the nut of the bolt from the lower fastening of the device;
- then the nut and sleeve are removed;
- then you need to pull out the bolt of the lower fastening of the device;
- then remove the tension bar by completely unscrewing the bolt;
- after this you can safely remove the generator (it is important to check its condition).
Installation of the device is carried out in reverse order. There are times when it is necessary to remove the pulley from the generator. To do this, you need to remove the generator drive belt, loosen the radiator mounting bolts, then unscrew the adjusting bolt, and then remove all the mounting nuts. It is advisable to perform this procedure with two people so that one holds the generator and the other removes the mounting bolt. Only then can you begin to remove the pulley.
It is also advisable to do this work with a partner, since the pulley is quite difficult to remove.
How to replace Priora generator brushes
If the owner of a Priora notices that the battery is no longer charging, then first of all you need to check the condition of the generator brushes. It is worth noting that at first the battery charge will decrease slightly, but if the problem is not corrected in a timely manner, the battery charge will soon disappear altogether. Replacing the worn brushes of the Priora generator will help correct this problem. And since this process is not so complicated, you can carry out such work yourself, taking into account advice from professionals in your field.
Removing a generator with air conditioning
Let's start with the fact that if the air conditioner is Panasonic, then you do not need to remove the compressor along with the generator, but if it is Halla, then you cannot do without removing the compressor. The procedure for removing the generator in this case consists of the following steps:
- First, the engine protection (8 or 16 valves) is removed.
- Next, remove the compressor drive belt (if necessary).
- After this, the generator contacts are disconnected.
- Next, the engine compartment mount is unscrewed, after which the bolt is pulled out.
- Then, if the compressor is removed, then it must be moved down and then to the right.
- Then the bolt with the metal sleeve is pulled out.
- Only then can you remove the generator down the engine compartment.
It should be noted that during this procedure, a problem with the engine bolt often arises. It happens that it is installed with the head down, which is why it is not possible to remove it completely. The fact is that it rests against the engine mount, which prevents removal of the generator. In this case, you need to jack up the engine and carefully remove the cushion. If this cannot be done, then it is advisable to replace the bolt with a new one. It must be positioned with the head facing outwards, then there will be no problems with removing the generator.
To summarize, we note that removing the generator is a long and serious procedure. In order to do everything correctly, you need to have skills and knowledge. If you doubt your abilities, it is better to contact the craftsmen who will quickly and efficiently remove the generator cover with or without steering wheel, replace these parts, and also completely put in order any car, whether it is a luxury class or not. If you have certain knowledge, you can safely carry out this work, following the instructions. Moreover, this page is accompanied by a video that will help you remove the generator on your Priora yourself.
Source
Replacing the drive belt on a car with air conditioning
- The replacement process looks a little different on a car with air conditioning.
- VD40 is used to process engine mounts and part bracket bolts.
- The right front wheel is removed or turned out.
- The generator roller is unscrewed. The belt is moved to the side and the engine mount bolts are unscrewed.
- The Lada Priora needs to be jacked up so as to hang the engine.
- We replace the old belt with a new one.
- We lift the car with a jack, the engine is lowered and you will be able to tighten all the bolts.
Signs of trouble
Other manifestations may indicate malfunctions of the energy generator, for example:
- dim headlights/dashboard;
- unstable lighting brightness;
- blinking or lighting of the indicator lamp on the instrument panel.
It is worth considering that the generator is partly interdependent with the battery. The generator is responsible for the electricity; the battery functions as a backup battery, which operates only during certain periods: when the engine starts and to supply power to the electronics when the engine is turned off.
Problems with power supply and voltage drops make it clear to the motorist that it is time for maintenance.
Design and principle of operation of the generator
This device converts the mechanical energy received from the crankshaft into electricity. Thanks to the generator, power is supplied to the electrical appliances of the car. It powers the ignition, recharges the battery and other systems. When the driver starts the engine, the largest amount of electricity is consumed by the starter. At this moment, power to electrical consumers is supplied only from the battery. Naturally, the battery may drain quickly. To prevent this from happening, it must be powered by a generator.
The generator consists of an aluminum housing, inside of which there is a rotor on bearings and a coil. There is a stationary stator between the back and front covers. A belt connected to the crankshaft causes the rotor to rotate. To rectify the current in terms of voltage and strength, a diode rectifier is used.
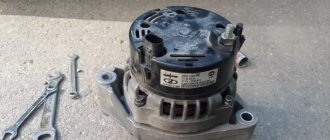
Generator device
The transmitting link is brushes - sliding contacts. They carry control current from the voltage stabilizer. Due to the stabilizer, the generator creates a voltage of about 14 Volts, regardless of the engine speed. It is important that the regulator remains in good working order, otherwise optimal voltage parameters will not be maintained. In this case, the auto electrician may fail.
The temperature of the operating generator is reduced by fans. The device is attached to the brackets using four bolts. It can be seen if you open the hood. The mounting points are located on the covers.
Appearance of the generator for Priora
It is important to promptly identify problems with the power supply. The first symptoms are the flashing of the headlights and the appearance of a warning light on the dashboard. If the generator breaks down or fails completely, the battery quickly runs out of power. In this case, it is impossible to even start the engine. The car cannot move.
Causes of problems
Lack of power supply may be due to mechanical damage or disturbances in the electrical device of the generator.
- body deformation;
- violation of fixation (breakage of fastenings);
- wear of bearings, springs, couplings and other components.
Electrical problems on Lada Priora:
- interruption of the electrical circuit in the winding/short circuit;
- relay failure;
- disturbances in the conductivity of the diode bridge current;
- wear of carbon brushes;
- armature plate deformation/short circuit.
It’s good if the damage turns out to be minor, for example, wear of the carbon brushes. Then replacing them will solve the problem. In some cases, only a new unit can correct the situation. To replace the brushes, you can get by with freeing access to the dynamo without removing it, but replacement requires the complete dismantling of the equipment.
Given the differences in models, there are also nuances in removing the generator.
Common causes of generator failure
Avto-VAZ very often presents car owners with various surprises that arise during operation. One of these is the generator on the Priora, which can hardly maintain 60 thousand kilometers without problems. Once the numbers on the odometer exceed the specified value, malfunctions of this most important component on the car may occur at any time. A faulty generator makes it simply impossible to operate the car, since it does not produce the current necessary to charge the battery. Everyone is familiar with the purpose of a generator on a car, and if there are gaps in memory, then below is material that will help refresh your knowledge.
The service life of generators depends on various factors. This includes the manufacturing quality of the device, operating features, and even work on diagnosing and eliminating minor defects. Typically, their service life on budget cars is at least 5 years or 100-120 thousand kilometers. This is exactly the service life that, in theory, devices on Priors should have, but as mentioned above, these values differ greatly (it is important to note that this is not always the case). This is all due to the quality of the generators that the Priors are equipped with from the factory. These are devices of the famous or “LADA”, problems with which are known not only on the VAZ-2170, but also on other cars from the Russian concern.
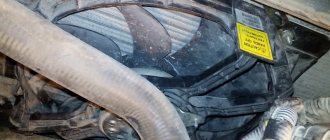
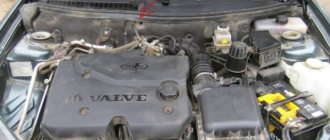
Touching upon generator malfunctions on Priora, it should be noted that a common problem is not in the electrical part, but in the mechanical part. The reason lies in the rotor bearing, which, when it fails, produces a characteristic hum and grinding noise, indicating that the car owner is faced with at least the need to dismantle the generator. Such repairs are not at all complicated, but quite labor-intensive for known reasons. The biggest difficulty is removing the generator on the Priora, which is located between the engine and the radiator. Owners of the VAZ-2170, who have had to look under the hood of their car more than once, are well aware that the generator is located in a very limited space, and access to it is closed from all sides.
Interesting! An overtightened alternator belt leads to accelerated wear of the bearings.
The most common reasons why Prior owners need to dismantle the generator are:
- Bearing failure. These elements fail more often than the brushes on the voltage regulator wear out.
- Voltage regulator malfunction. The brushes on the device wear out, and the generated voltage to the battery also drops.
- Worn slip rings or commutator.
- Malfunctions of the diode bridge, which often occurs when moisture gets into the device, and as a result, oxidation appears.
In all of the above situations, you can repair the generator by replacing or eliminating defective elements. If the stator or rotor winding fails, then in such situations the unit must be completely replaced.
Interesting! If it is necessary to replace generator bearings on a Priora, you should choose products of the following types: B17-102DG38 - front support (has the following dimensions: outer diameter - 47 mm, inner diameter - 17 mm, width - 14 mm), 6202DW8 - rear support (outer diameter - 35 mm, internal diameter 15 mm, width - 11 mm).
Preparation and necessary tools
It is more convenient to remove the generator on a Lada Priora on an overpass or inspection hole. Before you begin dismantling, prepare the following tools:
- locksmith's crank;
- extension;
- cardan from the tool kit;
- heads for 10, 12, 13, 17;
- spanners for 10, 12, 13, 17.
- WD-40 product.
This is interesting: On the way to a “perpetual” engine When you drive onto a pit or overpass, do not forget to install chocks under the wheels so that the car does not roll spontaneously. Then disconnect the negative terminal from the battery. Apply WD-40 to the mounting areas of the generator and air conditioning compressor. Wait 10-15 minutes for the product to take effect.
Required tools and materials
Most motorists already have everything they need for this operation. Therefore, you won’t have to spend money on buying expensive equipment or consumables. The following tools should be at hand:
- Wrenches with a diameter of 10, 13, 17 mm.
- The collar is L-shaped.
- Combination and socket wrenches with a diameter of 13 mm and 17 mm.
- Screwdriver with star bit.
- A prybar or small crowbar.
- Flexible extension.
- Lubrication - may be required to treat bolts that are difficult to loosen.
For convenience, you can replace the wrenches with a set of sockets with extensions. It is also advisable to put stops, otherwise the wheels may roll during repair work.
Algorithm for removing the generator
In any configuration, it is initially necessary to prevent the flow of electricity. To do this, disconnect the negative terminal from the battery.
Next, perform actions in the following sequence:
- remove the generator drive belt;
- remove the rubber cover, which is secured with a nut;
- remove the connection wires with the contact pin;
- unscrew the lower fastening nut;
- remove the nut with sleeve;
- remove the lower fastening bolt;
- remove the bolt and remove the tension bar.
The generator can be removed. Reinstalling the unit is carried out in reverse order.
The hydraulic booster on the Lada does not prevent the generator from being removed through the lower protection or through the headlight; it depends on the specific model.
Additionally, we recommend reading the article by our specialist, which describes in detail the VAZ-2106 generator.
We also recommend reading our expert’s interesting article on how to remove the generator on a VAZ-2114.
If there is a need to remove the pulley, first remove the generator drive belt and loosen the radiator mounting bolts. Next, the adjustment bolt is unscrewed and the fastening nuts are removed directly. When removing the mounting bolt, it is necessary to support the generator; after removing the bolt, you can remove the pulley.
The principle of operation, what it consists of and the main malfunctions
The generator converts the mechanical energy coming from the engine into electrical energy. The principle of operation and its design are the same for all cars. The difference lies only in the quality, dimensions and location of the connecting nodes.
What it consists of:
- Pulley - transmits mechanical energy through the belt from the engine to the generator.
- The body is presented in the form of two covers. The starter is attached to them and the rotor supports are placed. The back cover contains external terminals for connecting to electrical equipment, a voltage regulator, a rectifier and a brush assembly.
- Stator - produces power. It is made of steel sheets and has the shape of a pipe. A three-phase winding is installed in the stator slots.
- The rotor is the moving part of the unit. When the engine starts, the rotor begins to rotate, and voltage is supplied to its exciting winding from the battery. The steel core becomes electromagnetic, creating an alternating magnetic field when rotated.
- Voltage regulator - maintains voltage stability in the on-board network when the ambient temperature and rotor speed changes.
- Assembly with rectifier diodes
- Diode module cover
- The brush assembly is a removable structure where brushes are installed that interact with the rotor rings.
Generator replacement
Taking into account that the Lada Priora is equipped with a large number of electrical appliances, it is necessary to install a powerful generator that can cope with all tasks. Characteristics of a suitable device:
- marking 5102.3771;
- power 80 Ampere or 115 Ampere. For lovers of good music, the power should be 170 Amps.
First, you need to remove the old generator. This should be done in three steps, shown in the photographs:
- Remove the terminal from the battery and the belt placed on the generator and crankshaft pulley (there is no need to lift the engine mount).
- Disconnect the three wires going to the generator. The first is in the form of a connector, the other two are in the form of terminals under a protective cap, which must be bent and the fastening nut unscrewed to disconnect the wires.
- Use a wrench (a socket wrench size “13” will do) to unscrew the nut of the bolt for the lower mounting of the generator, and then carefully remove the bolt. If necessary, use a hammer to knock out the bolt. Then completely unscrew the nut securing the generator to the upper bracket. After removing the adjusting bolt, you need to remove the generator from the car.
Secondly, install a new suitable generator. It is mounted in the same order in which the old mechanism was removed. It is necessary to take into account that installing a generator with a power of 115 Amps from Priora Lux on the Lada Priora requires connecting a new D+ wire connector, which has different parameters. It can be bought at any car dealership. Finally, you should connect the remaining wires to the generator.
As you can see, replacing the generator with a new one according to the above scheme is not difficult.
If you find an error, please select a piece of text and press Ctrl+Enter.
How to check relay type YA112V1
These devices (“chocolate bars”) were installed on previously produced VAZs. To check the device, you need to unscrew it from the generator cover. For testing, use the homemade stand described above. The wire coming from the plus of the battery and the charger is connected here simultaneously to three points: the contact of the light bulb, terminal “B” and “C” of the relay regulator.
Connect the minus to its body. Terminal “Ш” is connected to the second contact of the lamp. We carry out testing in the same way as described above.
Repair work
Replacing a Lada Priora generator with air conditioning
If you need to replace a Priora generator with air conditioning, then there are two nuances that lie in the manufacturer of the air conditioner. Panasonic allows you to remove the unit without a compressor, but the Hull compressor will not allow you to get the generator.
Removing the generator from a Lada Priora with air conditioning step by step:
Principle of operation
When you turn the ignition on, current from the battery enters the field winding through the brush assembly, where a magnetic field appears. When the crankshaft rotates, the rotor goes into rotation. The magnetic field passes through the stator winding and an alternating voltage is generated at the output. Having reached a certain rotation speed, the excitation winding begins to be powered directly from the generator.
The alternating voltage is changed to constant thanks to the rectifier unit. Now the generator charges the battery and powers consumers. When the rotation speed changes, the voltage regulator is connected to the operation.
Basic faults
Why does the generator not charge the Lada Priora car? There may be several reasons:
- the diode bridge is damaged;
- the turns of the stator winding are closed;
- slip rings wear out;
- the pulley is damaged or worn out;
- the wires of the charging circuit are damaged;
- the bearing is destroyed or worn out;
- the voltage regulator is damaged;
- The current collecting brushes wear out.
In all of the above cases, repair of the Lada Priora generator will be required.
How to Remove a Generator on a Priora With Gur
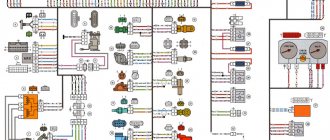
Removing and replacing the Priora generator: symptoms, devices, diagrams
After visiting the car, the owner of Lada Prior may wonder how many components need to be disassembled to get to the generator. The technicians will explain that VAZ 2170 air conditioners and power steering models require a special approach. But in fact, the replacement is not as difficult as the service center employees describe. It will take just over an hour to take your time and enter a new block. To help you understand what we are talking about, we have prepared additional materials: wiring and alternator , car tags. We also recommend that you study the section that describes how to install a generator on Prioru.
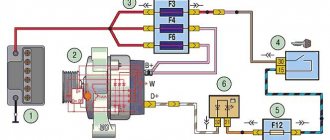
Circuit and device
The alternator diagram shows how the device is connected to other parts of the car. Air-conditioned Lada Priora and GUR received model 5102.3771, which has a number of advantages over previous generations. An increase in power at low engine speeds is one of the advantages of the device: the rotor speed decreases over time by 300 minutes, and the output power increases by 4-6 A. This innovation allowed the use of a box-type machine, and also increased the yield for the winter.
The diagram shows that the operation of the device is controlled by a warning light that is mounted on the dashboard. When you turn on the ignition key, the lamp should light up after starting. Come out. This is how a working generator
. If the light stays on while the engine is running, it means the unit is malfunctioning, the diagram will help you understand.
Once the circuit is understood, you can move on to the parts of the generator.
Symptoms of malfunction
On car forums, you can often notice Lada owners complaining about air conditioning as the flow increases. You should immediately be able to tell that the current is not increasing. it's about tension. If the devices indicate that the generator is too strong, you should look for the problem in the relay. Electrical defects include burning or wear of the brush, damage to wiring and windings, damage to the controller relay (high current), defects in the operation of the diode bridge. As for mechanical problems, these include worn springs and bearings, damaged belts, or damaged housings.
Source
Which generator to put on the Lada Priora
Today the choice of components for Lada Priora is huge. The price varies greatly depending on the manufacturer and the power output. If your car is equipped with options such as power steering, air conditioning and many other consumers, then you will need a fairly powerful generator to provide stable electricity.
Reputable manufacturers:
- KZATE;
- Bosch.
Let's look at the example of installing a Bosch generator with a current of 120 A. This is more than enough for all the needs of the car. If you are a music lover and are into car audio, then the power is enough for a good speaker system.
Circuit and device
The generator diagram shows how the unit is connected to other components of the car. Lada Priora with air conditioning and power steering received model 5102.3771, which has a number of advantages over generators of previous generations. Increased current output at low engine speeds is one of the advantages of the device: the timing rotor speed is reduced by 300 min, while the output is increased by 4-6 A. This innovation made it possible to use an automatic transmission, and also increased performance for the winter period.
The diagram shows that the operation of the device is monitored by a warning lamp that is installed in the dashboard. When you turn the key in the ignition, the lamp should light up, and after starting it should go out. This is how a working generator works. If the lamp continues to light while the engine is running, then there is a malfunction in the operation of the unit; the diagram will help you understand it.
Once the circuit has been studied, you can move on to the details of the generator.
Removal and replacement
The generator body should be marked so that it can be assembled later. Tags will be needed for motorists who want to disassemble its body. The marks will help in the final stage to correctly place the cover and secure all the fasteners.
If you want to carry out a full check or change the timing belt, then you won’t be able to do it without dismantling it. Below are instructions for Lada Priora with air conditioning and power steering. The difference from a car without air conditioning is that we will have to approach the generator from below. The car should be driven onto a viewing hole or a lift, after which the replacement begins. For repairs you will need a standard set of tools.
- Replacement begins with dismantling the engine protection;
- Now we move on to the timing belt tensioner pulley, we need to loosen its tension a little, check that the tension remains;
- Find the upper timing belt mounting bolt and unscrew it;
Symptoms of a problem
On automobile forums you can often see complaints from Lada owners with air conditioning about increased current. It is worth saying right away that the current cannot be increased - this applies to voltage. If the instruments show you that the current in the generator is too high, then you need to look for a problem in the relay. Electrical defects include burnout or wear of brushes, broken wiring and windings, damage to the regulator relay (increased current), and defects in the operation of the diode bridge. As for mechanical failures, these include worn springs and bearings, belt damage or damage to the housing.
Tablet for Priora generator
I was tired of voltage sags when shifting gears, the low beam was already dimmed, and in general the voltage sags bothered me when the consumers were turned on. You turn on the air conditioner, and the voltage on the dashboard drops right down to 12 and a penny volts. Oh yes, the KZATE generator is 115A.
After reading and finding out about this problem on the drive, I realized that it is necessary to change the voltage regulator, like from the factory they put some Chinese crap in it that does not handle voltage sags. Well, change, change! I was not in the mood to change the brushes and remove the genes; I’m too lazy to remove them for this reason). I read about the drive, how other prior drivers change it, one person even removed the gene through the headlight, so as not to unscrew the AC compressor) Well, I found a way to still get to the brushes, moved the air filter and barely reached the gene, the most difficult, oddly enough, it turned out to be difficult to remove the plastic cover on the gene. The plastic that presses the latches of this cover broke off and it was impossible to click it in place, or rather, it was impossible to get to it from the angle from which I was reaching for it) In the end, I simply broke off this plastic cover)