The interior of Priora 2 (after the latest restyling) is significantly different from the previous version of the car. The interior now has a more stylish dashboard (dashboard) with the ability to install a modern multimedia system. If you are engaged in independent modifications or repairs of your car, then you will need instructions for removing the central lining (together with the tunnel, it is also called the “beard”).
The plastic center console is attached to the panel (dashboard) with 6 screws. To gain access to the lower two mounting screws, you will have to remove the tunnel cover:
- Remove 2 screws under the heater and air conditioning control unit;
- Remove the gearshift knob cover by prying it off with a flat screwdriver and remove the 3 screws under the cover;
- Unscrew the 2 lower screws securing the center console .
To remove the remaining four screws securing the center console:
- Remove the upper block of buttons and the plug by prying them off with a flat screwdriver or a plastic spatula;
- Remove the 2 upper console mounting screws;
- Remove the 2 middle console mounting screws .
All that remains is to pull the center console towards you and disconnect the connectors with wires at the back. Installing the plastic cover is done in the reverse order. The process is also shown in the video:
Let us remind you that after removing the center console, it can be covered with vinyl film.
The whole interior is rattling, I bought a model and I want to tighten the panel, tell me how to tighten it, the creaking is fucked
And what glue to use
by Adminrive · Published 04/05/2017
If you paint the stamps with Bolonchik it will last a long time
by Adminrive · Published 04/18/2016
We are selling two Prioras 2011
by Adminrive · Published 07/29/2013
- Comments 5
- Pingbacks 0
where are the side air ducts, there are two bolts
Alexander, and she can’t stand on anything anymore?
Sergey, hold on, I just don’t remember where else
Sergey, at the bottom in the corners there is a bolt I sometimes tighten them up
Description of indicators and icons on the instrument panel
The instrument panels of the 1st and 2nd generation Priors are different. Starting from the second generation, Lada Priora receives a full-fledged on-board computer, and in some trim levels even navigation. In addition, some functions are added, which is why there are more icons on the panel.
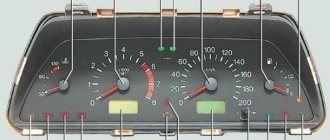
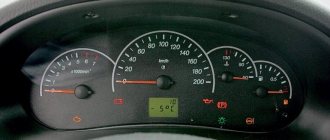
Priora first generation
Most indicators are standard on all vehicles. Therefore, their designation will be the same even on foreign cars.
| Indicator number | Designation |
| 1 | Tachometer |
| 2 | Starter protection |
| 3 | No charge from generator |
| 4 | Left turn signal |
| 5 | Speedometer |
| 6 | No oil pressure |
| 7 | Right turn signal |
| 8 | Parking brake |
| 9 | Antifreeze temperature indicator |
| 10 | Fuel level indicator |
| 11 | Fuel reserve indicator |
| 12 | Daily mileage reset key |
| 13 | Alarm indicator |
| 14 | EUR malfunction indicator |
| 15 | High beam headlights |
| 16 | Side light |
| 17 | Airbag warning lamp |
| 18 | Immobilizer |
| 19 | Odometer |
| 20 | Unfastened seat belt |
| 21 | Insufficient brake fluid level |
| 22 | Critical wear of brake pads |
| 23 | ABS malfunction |
| 24 | Check Engine - “check the engine” |
Knowing the symbols is necessary in order to notice malfunctions in time and take appropriate measures to eliminate the problem or deliver the car to a car service center.
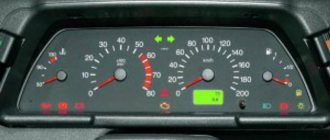
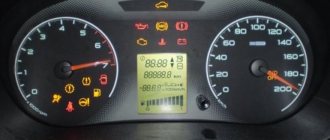
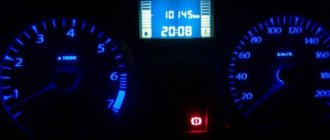
Lada Priora second generation
Since many indicators were discussed above, for Priora 2 only new icons that were not included in the previous table will be described.
| Number | Designation |
| 1 | Cruise control on |
| 2 | Speed limiter enabled |
| 3 | Indicator requiring the brake pedal to be pressed (for AMT) |
| 4 | Stability control indicator |
| 5 | Stability control disabled |
| 6 | Insufficient tire pressure |
| 7 | One of the doors is open |
| 8 | AMT malfunction |
The presence or absence of certain indicators on the Lada Priora instrument panel depends on the configuration. For example, those related to a car with AMT will be inactive for cars with a manual transmission.
Online store of VAZ and Lada spare parts NVS-Car
You can order spare parts for VAZ (Lada) for all parts of the car:
- engine and brake system;
- transmissions and suspensions;
- electronics and exhaust system;
- fuel system and wheelbase;
- optics and glass.
You can buy these and other components, as well as body parts, tuning elements, auto chemicals, mats and other little things in one place, thereby saving time on searching and ordering the right product. Whoever you are - a private motorist, the owner of a car service or tire shop, a tuning specialist - you can always count on us! We guarantee high quality products, secured by guarantees, as well as prompt processing of your orders.
Tuned instrument panels for Lada Priora
Owners of Lada Priora cars are not always satisfied with the functionality of the standard dashboard. Therefore, they come to the decision to replace the shield with a tuned one. This shield provides the following capabilities:
- on-board computer;
- built-in ECU diagnostics with description of error codes;
- more pleasant lighting;
- electronic indication of speed and tachometer parameters.
The leading manufacturers of such instrument panels are Flash, Itelma and Gamma.
The most functional and pleasant is the instrument panel from the Flash company, while Itelma is the official supplier of electronics to the Lada conveyor.
It is worth considering that a tuned instrument panel is quite expensive. Some samples can cost up to 35-40 thousand rubles.
Engine
Car owners seeking to improve their car do not limit themselves to modifying the appearance. Installing additional accessories and replacing parts with more expensive, high-quality ones will allow you to modernize your technical capabilities. In order to refine the engine, the following activities are carried out:
- replace the engine mounts on the VAZ;
- change some accessories: camshaft, flywheel, standard pistons;
- reinstall the electronic unit software;
- install an automatic heater;
- replace the carburetor pump along with the jets;
- clean all channels;
- Use sandpaper to clean the carburetor from different sides.
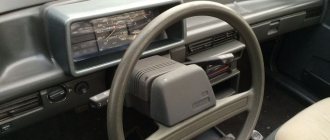
Removing and installing the instrument panel on a Priora
When performing work on installing an alarm system, replacing backlight lamps or the panel itself, it is necessary to remove it.
The replacement work is the same for Lada Priora 1 and 2, since their panels have only minor differences. In this regard, in order to unify and simplify the repair and maintenance of the car, the manufacturer made this procedure identical.
Required tool:
- Phillips head screwdriver;
- flat screwdriver;
- plastic tool for disassembling the interior.
To make a replacement, you must perform the following procedure:
- Under the steering column, remove the lower trim covering the fuse box. To do this, rotate the three clamps 90 degrees.
- Unscrew the four screws securing the instrument panel trim. Two above and two below.
- Remove the decorative trim of the instrument panel.
- Unscrew the two screws securing the panel. Tilt it and disconnect the electrical connector.
- Remove it from the dashboard.
Installation of the instrument panel is carried out in the reverse order.
Body plastic
Body elements can be replaced. Replacing some components and adding accessories will turn the AvtoVAZ model into a normal car. Replacing the rear bumper on a VAZ will refresh and update the design. Replacing the front bumper will affect the performance and improve the power qualities of the engine. In addition, the following accessories are used for decorative purposes: spoilers, plastic, chrome trims. Stainless steel thresholds are installed to protect against dirt and damage. Changing the radiator grille to different shapes radically transforms the front view. A radiator grille in the form of a saber, in the form of a honeycomb, or stripes - any of these accessories will elegantly complement the design. Replacing the mirrors with the new se model will please the eye and expand the side view.
Modernizing the design and interior space, adding modern accessories increases the level of comfort, transforms the car, and improves technical characteristics.
Error codes on the instrument panel of Lada Priora
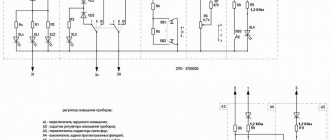
For the first generation Priora, the manufacturer left a built-in self-diagnosis system for the dashboard itself and the engine ECU. To enter this mode, you must do the following:
- Hold down the daily mileage reset button and turn on the ignition while continuing to hold the button.
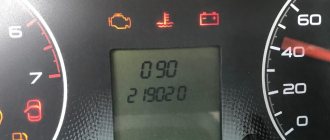
- The arrows will begin to move and all the icons will light up. The panel self-diagnosis mode will turn on. If one of the indicators does not light up and the arrow remains in place, the instrument panel is considered faulty and requires replacement.
- Use the buttons on the steering column switch to cycle through the modes. The inscription “Ver” shows the dashboard firmware version. And numbers in the “-*—” format indicate the error code.
- To exit the diagnostic mode, just turn off the ignition and turn it on again.
The interpretation of error codes is presented in the table below:
| Code | Decoding |
| 2 | High mains voltage |
| 3 | Open circuit in the FLS circuit |
| 4 | Problems with the coolant temperature sensor - open circuit |
| 5 | Violations in the work of DTOZH |
| 6 | Engine overheating |
| 7 | Oil pressure too low |
| 8 | Problems with the braking system |
| 9 | Low battery charge |
| E | EEPROM memory error |
You should not completely trust such a diagnostic system. Her testimony is indirect and often does not correspond to reality.
A good way to diagnose a Priora engine is to use scanners like the ELM327. Only such devices can accurately display error codes.
Possible faults
The instrument cluster does not always tell the truth, and sometimes its readings can mislead the driver - they may seem absurd. For each common malfunction, a brief commentary will be given on the possibility of eliminating them:
- The fault lamp does not light up (check the lamp);
- the lamp is on - check the sensor, reset the error via the diagnostic connector.
If none of the above measures help resolve the problem, carefully inspect the wiring - damage to it may cause the light bulb to activate or deactivate.
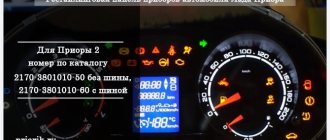
Required
The Itelma instrument panel with navigation can be of two types (externally they are no different):
- 2170-3801010-50 without CAN bus;
- 2170-3801010-60 from CAN bus.
They are not interchangeable, so before purchasing, you should determine whether your vehicle uses a CAN bus or not.
- until 06.2012, cars were produced without a CAN bus;
- remove the instrument cluster and look at the article number or at the block with wires (see pinout of connectors below).
For Kalina (VAZ 1117, 1118, 1119) - all cars without a CAN bus.
- Right steering column switch with joystick (catalog number: 1118-3709340-20);
- Antenna (for roof installation): 1118-7903074.
You can also buy ready-made kits (device + antenna + switch):
- for Lada Priora - 2170-3801010-55;
- for Lada Kalina 1 - 1118-3801010-55.
Why did it happen so?
Perhaps the automatic requests do not belong to you, but to another user accessing the network from the same IP address as you. You need to enter the characters into the form once, after which we will remember you and be able to distinguish you from other users exiting from this IP. In this case, the page with the captcha will not bother you for quite a long time.
You may have add-ons installed in your browser that can make automatic search requests. In this case, we recommend that you disable them.
It is also possible that your computer is infected with a virus program that is using it to collect information. Maybe you should check your system for viruses.
If you have any problems or would like our support team, please use the feedback form.
Tachometer, speedometer, on-board computer indicators, light bulbs - all these components are located on the Lada instrument panel. The “tidy” is designed to display the current state of various Lada Priora systems. An experienced motorist will immediately notice that one of the components requires repair; a certain icon will inform him about this. If you are a novice driver, then it will be useful for you to study the Lada Priora dashboard. This material provides a detailed description of each element of the tidy.
FakeHeader
Comments 13
The shield you choose is sold in two versions, for cars with a CAN bus and without a CAN bus. Read more carefully when purchasing.
This dashboard doesn't exist without the tires.
First, take your eyes out of the butt, and look and read for yourself.
You are reading this with a chocolate eye. Or you don’t understand what we’re talking about at all. And he managed to tear the vest on his chest
For the woodpecker I explain: There is a dashboard, like the person in the photo above, i.e. Priora 2 dashboard. It is WITHOUT navigation and has never had it. And it is produced ONLY with a CAN bus.
There is a dashboard from a TRANSITIONAL Priora 2012-2013 with NAVIGATION. And it is NOT the dashboard from Priora 2. It was produced in two versions - with and WITHOUT CAN bus
The person asks EXACTLY about the first dashboard, i.e. about the Priora 2 panel with CAN bus
Set the gamma, it works without the channel bus and the functionality is good
You can completely change the wiring for the bus then it will be possible, but it will be very expensive
Hi all! Recently I presented my choice of “Set of parts for the Priora 2 instrument panel for the conversion of Priora 1 to Priora 2.” In the general photo there was a little more than what is included in the package.
Let's look at it in detail.
I will indicate serial numbers on the parts.
I remember that before purchasing, I really wanted to know them) True, they are of little use; only a part of them makes it into stores. 1) The main part is the cover of the Priora 2 torpedo.
There are two numbers here because the part is soldered from several parts (inner 2172-5325188-00, outer 2172-5325182-00)
2) Instrument panel shield (screen visor (BC)).
On the reverse side it has several guides and six places for latches. Number: 2172-5325125-00. Landing:
In addition, there are a couple of fixation points for the standard MMS or BC screen.
3) Hazard alarm button and metal visor clips.
The new hazard warning switch now has a horizontal location on the console and a changed shape. Number: 2172-3710010-00.
The latches are designed for installation on special protrusions on the back side of the shield.
5) Console trim (black glossy plastic, without varnish).
6) Central deflector.
The photo shows the deflector itself and its extension to the right (to the panel air duct), there used to be one part!
I couldn’t find the number on the deflector; it may be located under the seal. Number: 21720-8104200-00 The wording is also found: “Console cover 2172-5326014-00 in sat with nozzle”
Spacer number (extension): 2172-8104202-00 21720-8104200-00 The assembly is as follows:
7) Glove box screen or glove box body.
A completely new part, it didn’t exist before.
It was really not enough to close the mess when opening the glove box. My photo is from a VAZ 2110, the situation is similar on the Priora.
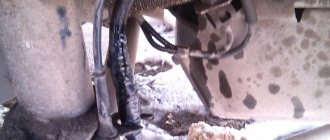
 Lower air duct (tree).
The part has again been changed, with different fasteners below in the area where it interfaces with the restyled floor tunnel of Prior 2.
10) Console trim plug.
Behind it there are two attachment points for the console trim. It is suspicious to make such a thing for the sake of simply hiding two self-tapping screws. Perhaps in the future we will find a more useful device in this place. 03/21/2016: there is an option to install a cover under a pair of buttons.
Soft-look.
And finally, a decorative coating that has caused a lot of controversy and discussion. The plant used a soft-look material for the decoration of the instrument panel. There is the following description online: “This is a plastic that looks like soft, well-made leather, but at the same time it has increased scratch resistance.” I don’t know how it is with scratch resistance, but I really liked the look of it))) Below are a few close-up shots.
Product delivery options
Note! Below are the shipping methods available specifically for this product. Payment options may vary depending on the delivery method.
Detailed information can be found on the “Delivery and Payment” page.
Parcel by Russian Post
Available payment methods:
- Cash on delivery (payment upon receipt)
- Using cards Sberbank, VTB, Post Bank, Tinkoff
- Yandex money
- QIWI
- ROBOKASSA
Shipping throughout Russia. Delivery time is from 5 to 12 days.
Parcel by Russian Post 1st class
Available payment methods:
- Cash on delivery (payment upon receipt)
- Using cards Sberbank, VTB, Post Bank, Tinkoff
- Yandex money
- QIWI
- ROBOKASSA
Shipping throughout Russia. Delivery time is from 2 to 5 days. More expensive than regular delivery by Russian Post, approximately 50%. Parcel weight up to 2.5 kg
Express Parcel EMS
Available payment methods:
- Cash on delivery (payment upon receipt)
- Using cards Sberbank, VTB, Post Bank, Tinkoff
- Yandex money
- QIWI
- ROBOKASSA
Shipping throughout Russia. Delivery time is from 3 to 7 days. More expensive than regular delivery by Russian Post, approximately 100%.
Transport companies
Available payment methods:
- Using cards Sberbank, VTB, Post Bank, Tinkoff
- Yandex money
- QIWI
- ROBOKASSA
Delivery is possible to any locality where there is a representative office of the transport company. Delivery time is from 2 to 10 days. Sending large parcels is approximately 50% more profitable than by Russian Post.
Courier delivery in Togliatti
Available payment methods:
- Cash upon receipt
- Using cards Sberbank, VTB, Post Bank, Tinkoff
- Yandex money
- QIWI
- ROBOKASSA
Delivery time from 1 to 12 hours.
Pickup from our warehouse
Available payment methods:
- Cash upon receipt
- Credit, installments
- Using cards Sberbank, VTB, Post Bank, Tinkoff
- Yandex money
- QIWI
- ROBOKASSA
Pickup times must coincide with store opening hours.
Let's sum it up
Modern cars are not the privilege of the AvtoVAZ concern, at least until today. But the company is striving to change its status and gain greater recognition in its state and beyond. Today, buying a new Lada is no longer as unusual as it used to be. The company began promoting its new models, which turned out to be of quite high quality, durable, and interesting in appearance. The cars have a good character, which allows them to take first place in sales in their class without much difficulty.
Despite the fact that many buyers are dissatisfied with Lada's pricing policy, the concern continues to develop and maintain a leading position in sales in certain segments. Today, the manufacturer’s products are even supplied to Central European countries and are beginning their promotion in this difficult market. But Lada Priora will no longer be a participant in this banquet. Most likely, the company is minimizing its model range in order to expand it into new segments and create more constructive competition in the market. What do you think about the removal of one of the most popular VAZ models from the assembly line?
Required
The Itelma instrument panel with navigation can be of two types (externally they are no different):
- 2170-3801010-50 without CAN bus;
- 2170-3801010-60 from CAN bus.
They are not interchangeable, so before purchasing, you should determine whether your vehicle uses a CAN bus or not.
- until 06.2012, cars were produced without a CAN bus;
- remove the instrument cluster and look at the article number or at the block with wires (see pinout of connectors below).
For Kalina (VAZ 1117, 1118, 1119) - all cars without a CAN bus.
- Right steering column switch with joystick (catalog number: 1118-3709340-20);
- Antenna (for roof installation): 1118-7903074.
You can also buy ready-made kits (device + antenna + switch):
- for Lada Priora - 2170-3801010-55;
- for Lada Kalina 1 - 1118-3801010-55.