Responsibility for faulty lighting devices
Traffic rules prohibit operating a vehicle with faulty lighting devices. This is due to safety considerations for all road users. It is also prohibited to use vehicles that use lamps that do not meet the design requirements for the operation of the vehicle.
It is important to remember that you are not the only participant driving on the highway, and it is highly not recommended to install more powerful and brighter lamps in the headlights of your car. By this action you endanger traffic participants moving in the opposite direction.
All changes in the design of the vehicle or non-working lighting devices entail administrative penalties.
Does it make sense to wash your car in the cold?
Published: 01/13/2019
Spread the love
Spread the love Washing a car in winterContents1 Washing a car in winter1.1 Before washing1.2 After washing1.2.1 We are in VK Even in cold weather, you can wash your car. However, be careful not to damage the vehicle as well as yourself! You can wash your car even at a few degrees below zero without any problems. Washing a car in open car washes is associated with...
Does it make sense to wash your car in the cold? Read completely "
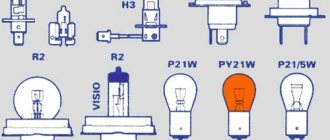
Types of lamps used in Priora
- H7 (Low beam);
- H15 (High beam and DRL);
- PY21W (Turn signal lamp);
- P21W (Reversing lamp);
- P21/5W (Brake and parking lamp);
- H11 (PTF lamp);
- C10W and C5W (Lighting lamp: interior, glove box and trunk);
- W5W (Lamp for side lights of headlights);
- H1 (High beam lamp until 2013 without DRL);
Description of the scheme
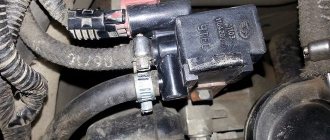
The relay must be connected according to this diagram. The relay has only 4 contacts, which are assigned numbers: 85, 86, 87 and 30.
- We connect contact number 86 to the negative of the battery;
- We connect contact number 30 to the “plus” of the battery;
- Contact number 87 is connected to the power wire (plus) of the PTF;
- We connect contact number 85 to the PTF ON/OFF button with a blue wire through a fuse;
We hope our article was useful to you.
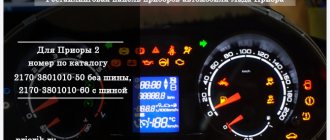
Car : Lada Priora. Asked by : anonymous. The essence of the question : lamps in PTF for PRIORU, price/quality?
Hi all. The lamps in the PTF burned out, and my car was yellow. I will change to standard ones, I'm afraid of sanctions from the traffic police. Tell:
- Which PTF lamps are better in price and quality?
- What type?
- Is it possible to install diodes, will there be any benefit?
Headlight bulbs
The headlight bulbs of the Lada Priora differ depending on the year of manufacture of the car, since at the end of 2013 daytime running lights began to be installed in the Priora.
Headlight bulbs for Priora models up to 2013.
| Installation location | Lamp type | Power, W) | Number in photo |
| Low beam | H7 | 55 | 1 |
| High beam | H1 | 55 | 9 |
| Turn signal | PY21W | 21 | 3 |
| parking lights | W5W | 5 | 8 |
Headlight lamp for Priora after 2013
| Installation location | Lamp type | Power, W) | Number in photo |
| Low beam | H7 | 55 | 1 |
| High beam/DRL | H15 | 55/15 | 2 |
| Turn signal | PY21W | 21 | 3 |
| parking lights | W5W | 5 | 8 |
Replacing low and high beam bulbs in the headlight
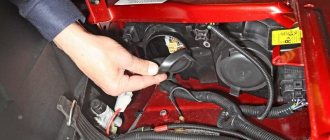
- To replace the high and low beam lamps, you must remove the rubber or plastic headlight protection covers. Then pull the connector towards you and remove it from the lamp. By pressing on the lamp clamp, release it from the clamps and remove the lamp.
Replacing the turn signal lamps in the headlight
- Replacing the turn signal lamps must be done by turning the socket counterclockwise and removing it towards you from the headlight.
Replacing the headlight bulb
- To remove the side light bulb, you need to pull the bulb socket towards you.
What to do if your car windows fog up.
Published: 01/13/2019
Spread the love
Spread the love How to avoid window foggingContents1 How to avoid window fogging1.1 Method 1: washing windows from the center of the cabin1.2 Method 2: replace the cabin filter1.3 Method 3: get rid of moisture and vacuum the interior1.4 Method 4: use air conditioning1.4.1 We in VK This year the end of the year is full of precipitation, but not snow, but rain. With such high humidity...
What to do if your car windows fog up. Read completely "
Tail lamps
The taillights also differ depending on the year of manufacture. In cars after 2013. The taillight brake lights have become LED, but the bulbs used in the lights remain unchanged.
| Installation location | Lamp type | Power, W) | Number in photo |
| Reverse | P21W | 21 | 4 |
| Brake light/dimensions | P21/5W | 21/5 | 5 |
| Turn signal | PY21W | 21 | 3 |
| Rear PTF | P21W | 21 | 4 |
Replacing tail light bulbs
- To replace it, you must remove the rear light. To do this, unscrew the 3 screws that secure the light and move it away from the car body. Then unscrew the sockets counterclockwise and remove the desired lamp.
The most common causes of car fires.
Published: 01/13/2019
Spread the love
Spread the love The car caught fire, reasons. Contents1 The car caught fire, reasons.1.1 Leaks that are not visible1.2 Installation problems1.3 Electricity cannot be extinguished1.3.1 We are in VK In most cases, it was not about arson. The bad news: modern cars are especially vulnerable to fire! Unfortunately, a small car fire extinguisher is not enough to put out even a small fire. The hardest thing to put out electric cars is the firefighters themselves...
The most common causes of car fires. Read completely "
Turn signal repeaters
Repeaters are installed in the front fender, with the exception of luxury trim levels, where the repeater is installed in the side rear view mirror.
| Installation location | Lamp type | Power, W) | Number in photo |
| Turn signal | W5W | 5 | 8 |
To remove the lamp in the turn signal, you need to pull it towards you and remove it from the wing. Then turn the socket counterclockwise and remove the lamp.
Installation
There is practically no difference in the installation of PTF Priora 1 and 2. The only differences will be noticeable in making holes in the bumper for the headlights. In the SE bumper you need to cut a triangle along the contour and in a regular bumper you don’t need to cut anything.
There will be no other differences in installation.
Required tool:
- 10mm wrench;
- Screwdriver “+”;
- Insulating tape;
- Knife or jigsaw;
- Pliers;
Installation process
- Remove the negative terminal of the battery;
- We remove the car bumper; to do this, unscrew many screws from the bottom and top of the bumper, then disengage it from the fender and remove it.
- Next, use a knife to cut out a hole in the bumper for the PTF. Be careful and take your time so as not to damage the paintwork on it.
- We attach the PTF to the bumper using self-tapping screws.
- Let's start running the wiring into the cabin. We lay the wires from the PTF next to the main braid of wires on the left side of the car (in the direction of travel) behind the washer reservoir.
- Next, you need to run the wires into the car interior. The most convenient place to run the wires is in the area of the brake master cylinder. There is a hole there plugged with a rubber band, you need to insert the wires into this hole. For convenience, it is recommended to remove or move the expansion tank.
- We fasten the wires tightly so that they do not rub or come into contact with the metal. It is better to place them in a protective plastic corrugation.
- In the cabin, remove the cover of the fuse box (attached with three clips), turn them counterclockwise 90° and pull the cover towards you.
- Then we bend the sound insulation and tighten the wires under the center console.
- Remove the center console (central insert), fasten it with screws.
- Next, we proceed to connecting the wiring; for a correct and safe connection, we use the diagram from the kit or the diagram below.
- We install a button instead of a plug on the center console.
- After connecting, we check the functionality of the PTF. The main difficulties arise precisely when connecting the wiring. To avoid problems, carefully double-check the connected wires and strictly follow the connection diagram.
- Assembly must be done in reverse order.
Interior lamps
Lada Priora has lighting for the entire interior, glove box, trunk and license plate lighting.
| Installation location | Lamp type | Power, W) | Number in photo |
| Number plate illumination | W5W | 5 | 8 |
| Interior lamp | C10W | 10 | 7 |
| Glove compartment lamp | C5W | 5 | 7 |
| Trunk light | C5W | 5 | 7 |
Types of PTF
As you know, Priora underwent several stages of restyling, where one of the main changes was the bumpers. With the change in bumpers, the design of the PTFs themselves also changed.
In the old bumper, the fog lights had a round appearance, but in the new one they already received a frame in the shape of a triangle, but still with the same round headlight.
At first glance, you might think that they are exactly the same, but this is a wrong assumption; they have different mounting brackets. Therefore, it is important to know which bumper the PTF will be installed on.
There are two manufacturers of fog lights for Priora - BOSH and Kirzhach. It is difficult to notice any particular difference in the luminous flux of these manufacturers, but there are differences in the mounting for installation in them. It will be difficult to replace “BOSH” with “Kirzhach”; for this you will have to change the PTF spacer in the SE bumper.
There are two options for installing a pre-restyle Priora and a post-restyle Priora into the bumper (SE bumper, Priora 2).
Articles and price of PTF for PRIORA 1 (pre-restayl until 2012):
PTF Priora 1
PTF "Kirzhach": 21700-3743010-52. The price starts from 700 and reaches 1000 rubles. For one headlight, sellers ask from 500 rubles.
PTF "BOSCH": 21700-3743010-54. The price starts from 1500 and reaches 2000 rubles. For one headlight you will have to pay from 1000 rubles.
Articles and price of PTF for PRIORA 2 (restyled after September 2012):
PTF Priora 2 (with frame)
PTF "Kirzhach": 21700-3743010-53. The price starts from 800 and reaches 1100 rubles. For one headlight, sellers ask from 600 rubles.
PTF "BOSCH": 21700-3743010-50. The price starts from 1000 and reaches 1500 rubles. For one headlight you will have to pay from 700 rubles.
It should also be noted that not all stores come with a mounting kit of wires and relays for the PTF. It is necessary to check with the sellers whether they have an installation kit. Otherwise, you need to purchase it in addition. Its cost is from 600 rubles.
Analogs
If for some reason the models from and “Kirzhach” do not suit you, then you should not be upset. Currently, the market is simply filled with a huge number of Chinese-made analogues.
Manufacturers from China have a large selection of high-quality PTFs that are not inferior to more expensive models.
One of the most popular Chinese PTF models are headlights that completely cover the cutout for the fog lamp, that is, they have the shape of a triangle.
Chinese PTF
If you are categorically not a supporter of Chinese production, there are a number of domestic manufacturers creating analogues of fog lights for the Lada Priora.
- Automotive lighting;
- Ray;
- DAAZ;
- Orion-7;
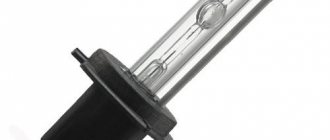
Halogen
The most common type for fog lights, which has an affordable cost as its main advantage. Such elements ensure acceptable PTF efficiency in foggy conditions, and when properly configured, do not cause blinding oncoming drivers. Among the disadvantages of halogen lighting is a short working life, and replacing a bulb in a fog lamp is not always an easy task. In addition, the headlight becomes very hot, which, if it cools suddenly, can cause the glass to crack. If the power of standard lamps for the driver is insufficient, when replacing lamps in fog lights
for more powerful ones, there is a high risk of the control unit overheating and the headlights automatically turning off.
See:
Gas discharge
Xenon allows you to make fog lights as bright and effective as possible. The service life of high-quality xenon is about three years, but xenon can be used for foglights only in accordance with strict rules, violation of which will not result in a fine, but in deprivation of rights for up to one year. So, for xenon, you can only use special headlights marked “D”, and an automatic corrector is required. Self-installation of xenon in fog lights is more complex than other types of lamps, but if installed correctly, the result will please you for several years in a row. The disadvantages of gas-discharge lamps, in addition to their high cost, include the need to replace both lamps if only one burns out.
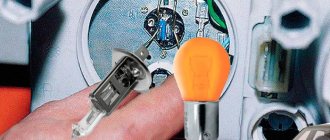
How to replace a lamp yourself
Replacing a fog lamp lamp in itself is not a complicated operation, but if the lamp
changes to a similar one to the burnt one, practically no problems arise. Before starting work, for example, on a VAZ family car, it is advisable to drive the car into a pit, use a lift or raise the front part with a jack. This way it will be much more convenient to work, and less time will be spent.
Before changing the light bulb in the fog light, you should buy a similar one - in this case, it is better to give preference to well-known brands with a good reputation. For VAZs, the process of replacing a light bulb is as follows:
See:
- the fog lamp power supply is found, the rubber protection moves away from the headlight;
- after this the block is carefully disconnected;
- the spring clips on the headlight reflector are unlocked;
- the light bulb is removed along with the wire;
- a new lamp ;
- The headlight is reassembled and checked.
It is enough to perform this manipulation once, so that the next time it takes only a few minutes to replace the light bulb in the fog light. The replacement process on other models depends on the design features of the foglights. On some cars, the PTFs are located in a block with the headlights - here you will have to disassemble the optics a little. An example of a replacement on a domestic Kalina in the video:
Installation of fog lights
It is impossible to install any fog lamp without dismantling its predecessor. The scheme for replacing equipment is very simple:
- Remove all plugs from the bumper;
- Remove the previously installed headlights;
- Install new ones in their place;
- Carefully tighten all screws.
It may happen that the hole size of the old headlights is too small for the new fog counterparts. In such a situation, you should remove the bumper from the priors and widen the holes. If there are no places in the bumper itself for fog lights, then this problem can be quickly solved by cutting out these holes with a sharp knife.
After the replacement has been made , it is necessary to make a harness from the wires coming from the headlights and lay it along the cable under the hood. The wires are routed to the control panel mainly through the hole next to the fuses. After this, the negative wires must be connected to the body of the priors, and the bumper must be fixed in place.
What bulbs are best for H7 headlights?
Rating of the best H7 lamps - Top 10
| Category | Place | Name |
| Best Standard H7 Halogen Bulbs | 2 | BOSCH H7 Pure Light |
| 3 | Narva Standard H7 | |
| The best H7 lamps with increased luminous flux | 1 | Bosch H7 Plus 90 |
| 2 | Osram H7 Night Breaker Unlimited |
Replacing the fog lamp of Lada Priora (VAZ Priora)
If you have a Chinese car with burned out fog light bulbs and you don’t know how to replace them, then this instruction is especially for you. After all, replacing a fog light bulb is necessary for safety reasons, unless of course you want to get into a dangerous situation on the road. In principle, there is nothing complicated about this, but you still have to be patient and demonstrate your skills. I want to warn you right away that replacing the right headlight bulb will seem more difficult to you than the left one. You will ask why? Yes, because on this side the spring latches are located out of sight and you have to act by touch.
Here's a list of the tools and accessories you'll need:
- short screwdrivers (phillips and flathead);
- wrench 7;
- mirror;
- flashlight;
- a new bulb that matches your car;
This is not a difficult matter at all, and it’s not worth going to a service station for such a small thing. Any car owner can do this. And, if you have never done this, you have an excellent reason to learn something new. Replacing a fog lamp (after mandatory car washing) is carried out in several stages.
To gain access to the PTF, the first step is to free up space in the work area. To do this, turn the steering wheel all the way to the right for the right fog lamp, for the left one, respectively, to the left, while the engine must be started. Also, in order to facilitate access, you can raise the front of the car using auxiliary materials - bricks, boards, a jack, or simply drive the appropriate front wheel onto the curb. In this case, you need to be especially careful and make sure that the wheel does not jump off the ledge.
Next, you need to remove the protective plastic material located on the wing. We equip ourselves with a 7 key and unscrew the screws around the wheel. It is also necessary to unscrew the plastic bolt located on the bottom of the machine. Use a flat screwdriver to pry up the tip into which the plastic bolt was screwed. We bend the freed wing plastic until the wheel allows it. Don't be afraid to break this plastic - it's very flexible and durable.
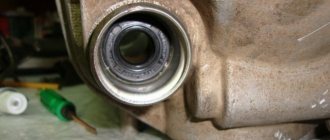
The third stage is the most difficult. It is necessary to remove the burnt out fog light bulb. For this:
we put our hand under the plastic into the cavity formed and twist the lid one quarter of a turn counterclockwise (it usually comes off easily);
We arm ourselves with a mirror, a flashlight and thoroughly study the spring fastening mechanism that holds the light bulb;
disconnect the lamp contact in the cover from the connector, the headlight cover contact from the socket;
remove the headlight socket from the housing (remember the location of the lamp in the socket and try not to drop the entire mechanism to insert the headlights);
We hold it in our right hand, and with our left hand we move the spring clamp of the lamp to the socket (this is how we release the clamp from the hooks);
we take out the burnt out lamp and install a new one (it is extremely important not to touch the lamp with your fingers, as there may be traces that are difficult to remove. And this will directly affect the life of the lamp)
Sometimes water accumulates in the PTF cavity. It can be removed using a rag from a rag, carefully pushing it through the hole for the lamp into the cavity of the fog lamp.
After this, for preventive purposes, it is necessary to wipe the surfaces of the lamp bulbs and headlights with cotton material soaked in a degreaser or alcohol. This is necessary in order to remove dirt that formed on them during lamp replacement, since the contaminated surface of the fog lamps leads to poor visibility.
At the final, fourth stage, the car must be returned to its original appearance. Showing patience and accuracy, we assemble all the parts in the reverse order.
Many car owners want to know how to install fog lights on a Priora, because... The climate of our country is predisposed to the periodic occurrence of fogs, especially in the morning and evening. In non-ideal road conditions, the presence of such an accessory will help you better navigate in poor visibility, since the wide beam of standard headlights can “illuminate” a large space, creating a kind of light curtain for both the motorist and oncoming cars.
Why the headlights don't light up - reasons
The most common reason for headlights not working is a burnt out light bulb. Its service life is indicated in hours on the packaging. For a low beam bulb, this limit can be 400 hours of operation. The second extremely possible reason could be a wiring malfunction due to water leakage, or the wire simply frayed. This problem is already more serious, because you will have to fuss with it much longer than with a regular replacement of consumables.
Often, car enthusiasts are too lazy to change light bulbs, driving out onto the road in “one-eyed” cars. This is very unsafe - it is recommended that immediately after a malfunction is noticed, you go for a spare part to replace a new lamp.