Your adapter has stopped connecting to the car or does not turn on at all, check its functionality. Next we will talk about ways to test the ELM327.
- To get started, connect your adapter to the OBD2 connector of your car, turn on the ignition and search for Bluetooth devices on your gadget.
- If the smartphone or tablet finds the scanner, then the bluetooth module is ok.
- When the device is not detected, check whether the adapter indicator is lit - usually the red LED on the ELM327 itself.
- There are situations when power is not supplied from the OBD2 connector, in this case the reason is not in the adapter.
- There are situations when the indicator is on, but the auto scanner does not appear on the device; you need to check the ELM327 for functionality using a tester.
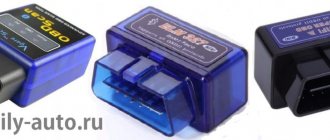
What is ELM327
The designation ELM327 is well known to many car owners. This is a scanner or adapter that connects to the car’s on-board computer via the OBD-II connector. A useful device is used to diagnose faults, read performance indicators and reset ECU (electronic control unit) errors.
Scanner ELM327 / aliexpress.com
The scanner got its name from the microcontroller, which is a kind of connecting link between the car’s diagnostic bus and a computer or smartphone. This chip, developed by a Canadian company, fell into the hands of Chinese electronics manufacturers, who jumped at the chance to copy it.
Checking elm327 with an electronic tester
We look for the presence of a jumper between the fourth and fifth contacts.
Checking the voltage on the ELM327. To do this, connect ground to pin 4 or 5, apply +12V to pin 16 and apply power.
We connect to the 7th contact of the K-line, there should be 11V on it.
We check the 15th contact of the L-line, the same 11V
We measure the 6th and 14th contact Can - line, normal 2.5V
What does the ELM327 scanner do?
The functionality of the ELM327 is quite extensive. But it largely depends on the support of certain capabilities by the specific version of the adapter, the ECU of the machine itself, as well as the software that is used for diagnostics.
In addition to reading, decoding and clearing diagnostic error codes, the scanner can display in real time engine speed and vehicle speed, the temperature of all fluids, current fuel and air consumption, throttle position, pressure in the fuel system and much more.
In some cars, using the ELM327 adapter, you can unlock and reconfigure automatic locking and folding of mirrors, gas pedal responsiveness, and dashboard data.
Checking the scanner version
The simplest check, so as not to get confused with the terminals, is to use the program https://hobdrive.com/ - this is an on-board computer for a car. By the way, I already bought it for myself, although I haven’t gotten around to testing it seriously.
I bought it because at the time of purchase, only this program “without dancing with a tambourine” understood my car + I liked the work of the support (on the forum) + the promotional price was completely ridiculous. For testing, the free version of the program is quite suitable, which is available both on the market and on manufacturer's website.
After installing the program: ~ in the system settings, change the level of system logs from error to trace ~ in the auto parameters, select the elm initialization string template: VAZ Yanvar ~ connect to elm, look at the result of the responses in log.txt (located in the folder with the program)
The resulting log indicates support for KWP2000 (non-standard protocols).
[TRACE] 05/13/2018 10:31:13.848[OBD2Engine] -> INIT [TRACE] 05/13/2018 10:31:13.858[OBD2Engine] -> ATZ [TRACE] 05/13/2018 10:31:13.871[OBD2Engine] SendCommand: ATZ [TRACE] 05/13/2018 10:31:13.727 [OBD2Engine] HandleReply: ELM327 v1.5
[INFO] 05/13/2018 10:31:13.727[OBD2Engine] VersionInfo: ELM327 v1.5 [TRACE] 05/13/2018 10:31:13.728[OBD2Engine] -> ATE0 [TRACE] 05/13/2018 10:31:13.739[OBD2E ngine ] SendCommand:ATE0 [TRACE] 05/13/2018 10:31:14.814 [OBD2Engine] HandleReply: ATE0 OK
[TRACE] 05/13/2018 10:31:14.814[OBD2Engine] -> ATL0 [TRACE] 05/13/2018 10:31:14.819[OBD2Engine] SendCommand:ATL0 [TRACE] 05/13/2018 10:31:14.892[OBD2Engine] Handle Reply: OK
[TRACE] 05/13/2018 10:31:14.892[OBD2Engine] -> EXTRAINIT [TRACE] 05/13/2018 10:31:14.903[OBD2Engine] SendCommand:ATSP5 [TRACE] 05/13/2018 10:31:14.979[OBD2Engine] Hand leReply: OK
[TRACE] 05/13/2018 10:31:14.980[OBD2Engine] -> EXTRAINIT [TRACE] 05/13/2018 10:31:14.992[OBD2Engine] SendCommand:ATAL [TRACE] 05/13/2018 10:31:14.067[OBD2Engine] Handle Reply: OK
[TRACE] 05/13/2018 10:31:14.067[OBD2Engine] -> EXTRAINIT [TRACE] 05/13/2018 10:31:14.072[OBD2Engine] SendCommand:ATIB10 [TRACE] 05/13/2018 10:31:14.145[OBD2Engine ]HandleReply: OK
[TRACE] 05/13/2018 10:31:14.145[OBD2Engine] -> EXTRAINIT [TRACE] 05/13/2018 10:31:14.154[OBD2Engine] SendCommand:ATSH8110F1 [TRACE] 05/13/2018 10:31:14.230[OBD2 Engine]HandleReply: OK
[TRACE] 05/13/2018 10:31:14.230[OBD2Engine] -> EXTRAINIT [TRACE] 05/13/2018 10:31:14.243[OBD2Engine] SendCommand:ATST32 [TRACE] 05/13/2018 10:31:14.319[OBD2Engine] HandleReply: OK
[TRACE] 05/13/2018 10:31:14.319[OBD2Engine] -> EXTRAINIT [TRACE] 05/13/2018 10:31:14.326[OBD2Engine] SendCommand:ATSW00 [TRACE] 05/13/2018 10:31:14.399[OBD2Engine] HandleReply: OK
[TRACE] 05/13/2018 10:31:14.399[OBD2Engine] -> EXTRAINIT [TRACE] 05/13/2018 10:31:14.412[OBD2Engine] SendCommand:ATFI [TRACE] 05/13/2018 10:31:15.869[OBD2Engine] Handle Reply: BUS INIT: OK
more detailed information about checks here
There are other programs for checking, but for many of them there are already “fake patches” - the Chinese do not stand still
How to choose ELM327
Due to the many clones of different quality, there is a risk of running into a device with reduced functionality that will not work correctly or will not start at all. There are three important things to consider when purchasing.
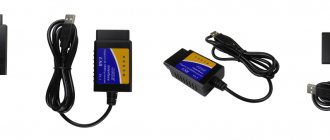
Connection type
There are several versions of ELM327 with different connection interfaces. The most common are adapters with Bluetooth, Wi-Fi and USB. They differ not only in connectivity, but also in compatibility with smartphones and computers. Otherwise the functions are identical.
- Bluetooth are the cheapest scanners that work only with Android smartphones.
- Wi-Fi - more expensive versions, compatible with both Android and iOS smartphones, as well as computers.
- USB is slightly cheaper than Wi-Fi scanners. They work only with computers, but they are distinguished by reliable communication.
Firmware version
The adapter software is constantly updated. On the original ELM327, the current version is already 2.2. Chinese clones are sold with firmware 1.5 and 2.1. Oddly enough, the newer version is worse.
The chip that came to the Chinese had firmware version 1.5. All clones with this firmware have the original ELM327 software. Later, copies of scanners version 2.1 appeared. The latter is just a modified firmware 1.5, and not for the better - to reduce the cost of production, the Chinese have removed many communication protocols. In addition, there are regular adapters with version 1.5, which are sold under the guise of 2.1.
In fact, three variants of ELM327 clones are currently available for sale:
- ELM327 1.5 - old but original firmware;
- ELM327 2.1 - stripped-down original firmware disguised as newer one;
- ELM327 2.1 - original firmware disguised as new, but without changes.
Obviously, it is worth buying an adapter with the original firmware version 1.5. For example, here is one of the trusted sellers from whom you can buy an inexpensive Bluetooth version of the ELM327.
Car diagnostic connector type
For some cars, especially before 2000 and domestic ones, the diagnostic connector has connectors of other standards. It is not possible to connect a scanner directly to them. For such cases, special adapters are used: on one side they have a compatible connector for a specific car model, and on the other, a standard OBD-II.
On the left is the adapter VAG 2×2 - OBD-II (Volkswagen, Audi until 1997), on the right - GM12 - OBD-II (Daewoo, VAZ) / aliexpress.com
Proprietary pads can have different shapes and number of contacts. Therefore, before purchasing a scanner, check which connector standard is used on your car, and, if necessary, purchase the appropriate adapter.
Disassembling the device
The first thing, of course, was useful to look at the filling (and check the functionality) of the resulting device
. Easy to disassemble - screws under the sticker
but not in this photo :))) When I took the photo, I probably put a sticker on the other side - please forgive me, I’ll correct myself 
Judging by the markings of the chip and quartz, the adapter is version 1.5
Back side…
I was pleased with the presence of resistor R2 between pins 3 and 4 of the OBD connector and the design of the connectors, which makes it easier to modify this adapter (if necessary).
The fact is that in cars using a CAN bus, some modules are located on high (HS-CAN), others on medium (MS-CAN) buses, and in order to see the maximum number of blocks it may be necessary to modify the adapter with a bus type switch
Without modifications, Chinese adapters work only on the high-speed HS-CAN bus (pin 6,14), and the MS-CAN bus contacts (pin 3, 11) are not used. To be able to switch the bus speed, you need to install a switch:
In addition, a fairly common problem with Chinese adapters is related to the way CAN is turned on - using only one 120 Ohm resistor (R2) connected between the CAN buses, while according to the ELM327 specification there should be one 100 Ohm on each, connected through a 560 pF capacitor to the ground. Therefore, you may need to turn it on/off (some types of ECUs may refuse to work with it, and some without it (fun;)) - you can install a switch or try to modify the circuit to the specification, especially since this is not at all difficult. The connector design is very convenient for this modification.
The connector is mounted symmetrically; if necessary, you can rotate it 180 degrees. I did this right away - in my car the operation indicator was turned away from me (was not visible)
Now it looks like this
Part 1. ELM327 adapter and Motordata program - as the first step into auto diagnostics Part 2. Features, problems and choosing the right ELM327 adapter
The advent of generally available entry-level diagnostic tools, coupled with the widespread adoption of mobile devices, has revolutionized the automotive industry. They made it possible for car owners themselves, without the use of expensive professional scanners, to monitor in real time the processes occurring in the power unit and independently perform some basic operations without contacting a service center. On the other hand, they have become an important tool for attracting novice diagnosticians into the profession.
The questions that arise when choosing such devices are approximately the same, regardless of car models and brands. We tried to answer them with this article, and also consider in detail examples of diagnosing a car using a common adapter on the ELM327 chip (using the free MotorData ELM program from the MotorData online diagnostic system, as well as the MotorData OBD application for Android).
Content
• From the history of OBD • Diagnostic adapters • Diagnostic programs • Examples of self-diagnosis • Diagnostics using MotorData ELM • Diagnostics using MotorData OBD
From the history of OBD
Let's start with a brief excursion into history and a general description of diagnostic capabilities.
When the ignition is turned on, the indicators on the instrument cluster light up, which then go out either after a few seconds or after the engine starts. Indicators that continue to light or turn on while driving indicate a malfunction in one or another system.
Not so long ago, it was possible to read diagnostic engine fault codes on cars using the flashing “CHECK ENGINE” indicator on the instrument cluster (for this it was necessary to perform some manipulations with the diagnostic connector pins). In more modern cars, the possibility of self-diagnosis using the indicator remains only for some peripheral systems.
But today, car owners still have the opportunity to independently diagnose the main car systems, now using inexpensive diagnostic devices that work according to the OBD-II standard. Many of them allow you not only to independently carry out diagnostics when a malfunction indication appears, but also to control the selected operating parameters of various systems in motion.
In 1988, the California Air Resources Board (CARB) established regulations regarding automobiles sold in the State of California. These laws established requirements for on-board diagnostic systems related to troubleshooting in the exhaust emission control system, which marked the beginning of the standardization of trouble codes in the United States and Europe. These requirements became known as On-Board Diagnostics I (OBD-I), which was then adopted by manufacturers for vehicles sold outside of California.
The main requirements of OBD-I are as follows: · The presence of an indicator informing the driver of the occurrence of a malfunction that could lead to an increase in harmful emissions. · Ensuring the recording, storage and output of fault codes that may lead to an increase in harmful emissions. · The location of the diagnostic connector, the code reading method and the self-diagnosis method are determined by the vehicle manufacturer. As a result, with almost no standardization, it was necessary to train technicians in different inspection procedures and use different diagnostic equipment to service different brands of vehicles.
In 1995, CARB, in consultation with the Society of Automotive Engineers (SAE), introduced additional requirements for automobile sales in California. These requirements, known as the OBD-II system, have become widespread in all states. The requirements clearly define the order in which fault codes are recorded and displayed. The conditions for monitoring the functioning of systems and components are more strictly defined. OBD-II applies not only to the engine management system, but also to other systems.
The main provisions of OBD-II for the USA, adapted to European cars, are called EOBD (European On Board Diagnostics). The EOBD system is mandatory for use on new cars with gasoline engines manufactured after January 1, 2000 (on cars with diesel and LPG (gas) engines, the use of EOBD has been introduced since 2003). Most gasoline-powered vehicles produced before January 2000 have been modified to meet the new standard.
The 16-pin Diagnostic Connector (DLC) configuration is standardized and the pin assignments are defined according to the standard and followed by vehicle manufacturers.
| Conclusion | Purpose |
| 1 | Determined by manufacturer |
| 2 | Data bus “+” - SAE J1850 |
| 3 | Determined by manufacturer |
| 4 | Weight (chassis) |
| 5 | Ground (signal) |
| 6 | CAN data bus, HI - ISO 15765-4 |
| 7 | K-line - ISO 9141-2 / ISO 14230-4 |
| 8 | Determined by manufacturer |
| 9 | Determined by manufacturer |
| 10 | Data bus “-” - SAE J1850 |
| 11 | Determined by manufacturer |
| 12 | Determined by manufacturer |
| 13 | Determined by manufacturer |
| 14 | CAN data bus, LOW - ISO 15765-4 |
| 15 | L-line - ISO 9141-2 / ISO 14230-4 |
| 16 | "+" battery |
The possible locations of diagnostic connectors are also defined by the standard, which simplifies their search. Typically, the connector is located in the area of the steering column, center console or glove box.
What fault codes are read by ELM327 adapters via the OBD-II interface? Mostly P-codes, sometimes U-codes, very rarely they can be used to obtain information about some other codes.
The OBD standard fault code consists of a letter and four numbers (for example, P0100). The letter determines whether the code belongs to the SYSTEM: P - Powertrain - codes related to the vehicle’s power plant, i.e. to everything that sets the car in motion (engine, gearbox, hybrid installation, etc.). C - Chassis - codes related to vehicle chassis systems (anti-lock brakes, stability control, air suspension, power steering, etc.). B - Body - codes related to body systems, mainly located inside the vehicle (body electrical control system, anti-theft systems, airbag system, lighting, etc.). U - codes related to data exchange systems between control units/systems in the vehicle.
Diagnostic trouble codes (hereinafter simply “codes”) can be divided into two groups based on their sound: a) Codes that have a standard sound for all manufacturers - standard codes (starting with P0, P2, B0, C0, U0). b) Codes whose sound is not determined by the standard and is left to the automakers - non-standard codes (starting with P1, P3, B1, B2, C1, C2, U1, U2).
Diagnostic adapters elm327
• Which scanner to choose - elm327 bluetooth, USB, Wi-Fi - and what are their differences? You can select and buy the elm327 adapter in our online store. All presented models have been tested by our specialists. The most common devices today are those implemented on clones of the ELM327 chip. Diagnostic scanners based on the ELM-327 chip do not have their own software. They are only a connecting link, an adapter, between a car and a computer, tablet or smartphone (hereinafter referred to as the “computer”). Communication between a computer and adapters of various types can be carried out either via a cable via a COM or USB port, or wirelessly via Bluetooth or Wi-Fi. The data reading speed is slightly higher for USB-based scanners, but in addition to the lack of wires, BT and WiFi have the main advantage of being able to connect via smartphones and other mobile devices.
The functionality of adapters mainly depends on the software installed on the computer. Today, such software is presented quite widely both for personal computers and for mobile devices based on the operating systems Android (tablets and smartphones), iOS (iPhone, iPad), Windows CE (standard multimedia devices of cars, navigators), Symbian (smartphones). The functionality and prices of programs vary greatly, which allows you to choose the most suitable one for your own needs.
• What brands and protocols does ELM327 support? The ELM327 adapter supports the following OBDII standard protocols: J1850 VPW, J1850 PWM, ISO9141-2, ISO14230-4 (KWP2000), ISO15765-4 (CAN). Supported vehicles: - models for the US market since 1996; — models for the Japanese market since 2002; - models for the European market since 2001 and models with diesel engines since 2004. Note: Some of the models shown may not support OBD II standard.
• How to pair elm327 bluetooth with a computer, tablet or smartphone? Connecting the diagnostic device (adapter) is carried out in the following sequence: turn off the ignition, connect the device to the OBD-II diagnostic connector of the car, turn on the ignition. After this, the software pre-installed on your laptop/tablet/smartphone will allow you to communicate with the adapter and display the vehicle parameters on the gadget screen.
Note: ELM327 Bluetooth adapters receive power from the on-board network, so this procedure is performed in the car.
1. With the ignition off, connect the adapter to the diagnostic connector. 2. Turn on the ignition. 3. Make sure the Bluetooth module on your computer is turned on. If you use special software to control Bluetooth (typical of many laptops), refer to the manufacturer's instructions. — In Windows XP, go to: Control Panel -> Bluetooth Settings. - In Windows Vista, go to: Control Panel -> Hardware and Sound -> Bluetooth Devices - In Windows 7, go to: Control Panel -> Hardware and Sound -> Devices and Printers -> Add a Bluetooth device. 4. Click the appropriate button to add a device. To confirm the connection, the computer will ask for a password to access the OBD adapter, usually it is 0000 or 1234 (the password is specified in the adapter instructions), there are other passwords such as 4321, 5678.
| For information about the features of ELM327 versions (1.5, 2.1, ...) and the problems of choosing the right adapter, see the information section >> |
| Bluetooth size S art.6001B RUR 1,240 | Bluetooth size M art.6003B RUR 1,320 | Bluetooth size L art.6002B 1400 rub. | Wi-Fi size L art.6002W RUR 1,960 |
| Wi-Fi size S art.6001W RUR 1,580 | Wi-Fi size M art.6003W RUR 1,580 |
Car diagnostic programs
Probably, today it is unnecessary to remind about such popular universal programs as Torque, ScanMaster, etc.
In 2013, she developed her own free program Motordata ELM for Windows, which works with adapters on the ELM327 chip. In addition to the standard functions supported by other applications, MotorData is specially adapted for diagnosing right-hand drive Toyota vehicles in the Japanese domestic market.
Since 2016, MotorData also works on mobile devices (Android) - the new MotorData OBD application is available on GooglePlay. There are no plans to further develop the MotorData client program for Windows, so all improvements and new functions will be available in this mobile application.
The release of a version for mobile devices on iOS is expected by the end of 2017.
| MotorData OBD - a program that allows you to diagnose the engine management system (with the plug-in connected - and other vehicle systems), read fault codes, freeze frames and current data, and after repair - erase the codes and turn off the fault indicator (Check Engine). |
Supported adapters: ELM 327 Bluetooth, Bluetooth mini, ELM 327 WiFi (Wi-Fi).
Available plugins (paid functionality for advanced diagnostics of left-hand drive and right-hand drive JDM models): - Toyota (engine, automatic transmission, ABS, SRS, ESP, air conditioning) - Toyota + Toyota Hybrid (engine, automatic transmission, hybrid power plant, high-voltage battery, ABS, SRS , ESP, air conditioning) — Nissan (engine)
In the “Directories” section there is an indicator module. General indicators are freely available, additional plugins provide access to indicators. In addition to describing the operation of indicators and their corresponding systems, the appendix contains recommendations in case of their inclusion.
Examples of self-diagnosis
Here are a few examples of the effective use of an entry-level diagnostic device.
Trouble code P0300
When refueling with low-quality fuel, the “CHECK ENGINE” indicator may turn on and the engine control system may go into emergency mode. In this case, as a rule, a fault code P0300 appears - multiple misfires. In this case, you should contact a specialist, but the malfunction may occur far from car services. Then a device for reading and erasing fault codes will help. Without it, you need to call a tow truck or, at your own peril and risk, move on. However, by reading the fault codes yourself, you can contact a specialist for advice. When this code appears, the owner will be advised to drain the low-quality gasoline, change the gas station, refill with normal gasoline and erase the code that appears. This will allow you to easily get to the nearest service center for more in-depth diagnostics. Very often the so-called appear. “floating” faults in the engine control system. For example, the car sometimes does not start or starts with difficulty. But on the way to the service, the fault “disappears”. There can be many reasons for this behavior of the car, for example, changes in climatic parameters (temperature, humidity) or some engine operating parameters. In this case, you have to leave the car at the service station and wait until the fault manifests itself again. This is not always convenient, and often simply impossible, and may not give any results. And here it will be useful to use a diagnostic tool to record the engine operating parameters during the occurrence of the malfunction, and then show them to an experienced auto diagnostician. This can significantly reduce diagnostic time, and therefore the amount of the repair bill.
Car diagnostics before purchase
When buying a car, it would be a good idea to check for errors in the engine and gearbox. Unscrupulous sellers imitate the working condition of these systems by placing all sorts of “deceptions” on the fault indicators. Reading the codes will allow you to check this. The instrument cluster only allows you to approximately know some of the car’s parameters. The accuracy of the instruments is very far from ideal (especially at low values). A diagnostic tool will allow you to check their readings.
Trouble code P0420
Using graphs displaying the current parameters of conventional oxygen sensors before and after the catalytic converter, you can judge the condition of the converter. If DTC P0420 (Catalytic Converter Low Efficiency) is read and the rear oxygen sensor (after the catalyst) waveform matches the front oxygen sensor (before the catalyst) waveform, then low efficiency can be concluded. When buying a used car, it is necessary to carry out such diagnostics in order to avoid expensive repairs, which can cost a considerable amount and ruin your mood.
Engine warm-up control
You can use the adapter to monitor the warming up of the engine and gearbox, and after reaching the optimal temperature, start driving comfortably and safely. This can be conveniently done using a gadget using Bluetooth or Wi-Fi wireless technologies, when you can control the heating of a car parked under the window from home. Nowadays, many cars do not have a temperature dial indicator - it has been replaced by LEDs of different colors. The diagnostic tool will allow you to find out, for example, the temperature at which the warm-up indicator turns off, and monitor the temperature at which the engine cooling fan and thermostat operate. Some software allows you to monitor mileage and average fuel consumption. Thus, the software that exists today allows you to use an adapter to implement the widest functions of a trip computer on almost any gadget.
Diagnostics with ELM MotorData program
In 2013, the free Motordata ELM program was released, which is an integral part of the MotorData diagnostic system, performing real-time vehicle diagnostic functions via the OBD II connector using a standard ELM327 adapter. You can download the latest version of the Motordata ELM program for Windows (in Russian) for free using the link from the main page of the website motordata.ru
The program allows you to connect to the engine control unit and read/erase codes (most codes are read and presented in Russian), display current data in digital or graphical form, freeze frames, VIN number of the car, unit version and firmware version in offline mode, those. without an Internet connection - a client program with ELM327 functions works independently of the “mother” online diagnostic system MotorData. The article contains screenshots taken during the diagnosis of real cars: a right-hand drive Toyota Estima 2003 and a Subaru Forester SH 2008.
Connection to car
1. Launch the Motordata program and click on the ELM327 button located on the upper left side of the screen to go to the main interface of the diagnostic program. A similar transition can be made by clicking on the “Communication - ELM327 Free” button.
2. After this, the program interface will open for connecting directly to the car. In the screenshot in the program window there are two connections. The first is via the ELM327 Bluetooth adapter and the second is via the ELM327 USB. Depending on the type of adapter used, you need to select either the first or second item. Instructions for connecting ELM327 Bluetooth and ELM327 USB are discussed in detail here.
After connecting to the vehicle, you must select the control unit you want to connect to.
| Reading/erasing fault codes |
The module is designed to read and erase fault codes when connecting the ELM327 adapter to the diagnostic connector of a car that supports the OBD II standard. Supported protocols: J1850 VPW, J1850 PWM, ISO9141-2, ISO14230-4 (KWP2000), ISO15765-4 (CAN). Using the inexpensive ELM327 adapter will allow you to diagnose the engine management system at minimal cost and, after repair, turn off the “Check Engine” lamp. To read fault codes, you must follow the instructions to connect to the control unit, go to the fault codes section, press the DTC button on the bottom panel and then press the “Read” button. To erase fault codes from the control unit’s memory, press the “Erase” button. Do not rush to delete fault codes, since deleting the fault code itself does not eliminate the problem, but only erases the code from memory, which will appear again after a while. This procedure will also erase the Freeze Frame data, which contains the system parameters at which the fault code was recorded. This information may assist in analyzing the cause of the DTC.
| Current data (Data Stream) |
The module is designed to read the current parameters of the engine control system in real time. It is possible to remove both all available parameters and those selected by the user, depending on the malfunction, and then save the user settings for ease of use.
To connect to Toyota vehicles (LHD+RHD) and obtain an expanded set of read parameters, you must select it before connecting to the car. This version of the program supports Toyota cars via K-line and reads more than 150 parameters of current data from the power unit control unit, including automatic transmission valve states and other data. For vehicles with a CAN bus, use the “Other Manufacturers” connection.
| Freeze Frame |
When recording a fault code, the vehicle parameters at which the fault was detected are entered into the control unit’s memory. This data is available in the MotorData program and will be useful in analyzing the causes of the malfunction.
| Vehicle information |
A special program module that allows you to read vehicle identification information. This is data about the vehicle's VIN number, control unit version and firmware version. This information can be useful both for additional verification of the authenticity of vehicle identification numbers and for diagnostic purposes. For example, some malfunctions are prescribed by manufacturers to be eliminated by simply updating the software or, conversely, errors cannot be properly eliminated without replacing the control unit. The display of this information depends on whether the vehicle being diagnosed supports this function.
| Instruments - information display |
This information output mode is useful for simultaneous monitoring of several parameters, better visibility and analysis. Allows the user to select the required number of parameters to display. If during the reading process it is necessary to change the number of displayed parameters, then they can be added to the previously selected ones. In addition to displaying the values of the current parameters, information about the minimum and maximum values of the parameter during the current measurement is also displayed. For example, the current air flow is 2.69 g/s, the minimum value is 2.65, and the maximum is 12.87.
| Graphs - displaying information |
Graphical display of information is the most visual way to analyze the parameters of current data in real time depending on control actions, for example, a sharp increase in rotation speed or “reset” of revolutions. Convenient selection of parameters, changing the scale of displaying graphs, their relative position and color.
You can also watch a video of how a Toyota Estima car was diagnosed using the free Motordata ELM program:
• The latest version of the Motordata ELM program for Windows (in Russian) can be downloaded for free using the link from the main page of the website motordata.ru • The instructions will help you set up the connection between the adapter and the computer -
Diagnostics using MotorData OBD
In 2016, a new MotorData OBD application was released for Android mobile devices. Since there are no plans to further develop the MotorData client program for Windows, all improvements and new functions will be available in this mobile application.
This program allows you to diagnose the engine management system, read fault codes, freeze frames (Freeze Frame) and current data (speed, revolutions, temperature, pressure, oxygen sensor readings, short-term and long-term corrections, etc.), display graphs in real time change parameters, and after repair - erase codes and turn off the malfunction indicator (Check Engine).
Diagnostics according to the EOBD standard are available in a free version, and extended functionality is provided in the form of plug-ins (for example Toyota + Hybrid, for advanced diagnostics of Toyota, Lexus cars, including hybrid cars).
If the PC version of the program connects only to the engine control unit, then the Android application plugin provides support for other control units - ABS, high-voltage battery, hybrid power unit control, SRS, air conditioning. The number of supported parameters and control units is constantly increasing. For example, if according to the EOBD standard it is possible to read 20-40 parameters from the engine/automatic transmission control unit, then with the plug-in enabled it is possible to read up to 200 parameters.
Sergey Kurlenya, Matvey Shlenov December 2013 - March 2022 © Legion-Avtodata
Using a scanner with rare protocols
Well, have you looked/tested the adapter (more or less)?
But the scanner was bought to work with a car, and not for self-testing! Let's now look at how to make it work in the popular Torque Pro (OBD2/Car)
with a car that has a non-standard protocol, which the program “from the market” stupidly does not see.
In general, logically, if at least one program works through the adapter, then you can run any other (we need) - it all depends on the program’s configuration capabilities (where the developer allowed us).
I’ll show you the example of my car using the K-Line Daihatsu protocol (this is a whole range of cars from Daihatsu and Toyota) - I think it’ll be just a typical example, at the same time we’ll carry out a more detailed check of the auto scanner.
To connect Torque to a car that is not initially detected by the program, you need to write the “correct” initialization string. To do this, go to your profile settings and turn on “Show advanced settings” (located at the very bottom). And still, at the very bottom of the additional settings, we find a line where you can write your own initialization string.
The question immediately arises - where to get these “correct” settings? There are two options - “dig the Internet”, or copy from another program that already has the “correct” initialization line for your car (or a compatible close analogue) written down.
I copied the settings from the above-mentioned HobDrive... In it, you just need to enter the car templates, select the one you need and copy the entire line from there (only part of it is visible in the screenshot)
Replace “;” in the copied line to “\n” (slightly different syntax) and paste it into Torque
So that our car can not only connect, but also receive the necessary information from sensors, we need so-called PIDs for our car (a list of sensors with formulas for recalculating the received data), we also look for them on the Internet, for example, or here on 4pda, they are available decent catalogue.
The downloaded file is “dropped” into the Torque folder - .torque/extendedpids. Sometimes you need to create the extendedpids folder yourself (for example, I didn’t have one)
The .torque folder is located in the root of the memory card or Android device and is hidden; in order to access it, you must enable the display of hidden folders in your file manager. For example like this
After that, in the “settings”, select “Manage additional PID/Sensors”, click on the three dots in the upper right corner and “add set” From the drop-down list, select what we need... and get a list with new sensors and recalculation formulas... Move to the instrument panel, we delete unused sensors of the standard set - we don’t need them and we MUST add at least one sensor/device from the diagram we added (they are signed and visible from the information in the list). If we do not add more than one sensor from the new set, the connection with the ECU may not occur (at least according to the indication) - Torque has such a “jamb” or feature (at first I also couldn’t understand what I did wrong until I added new devices)
Well, the result! Everything works (well, relatively everything - only the sensors registered in the PID are visible).
There is not enough (for me, for complete happiness) a knock sensor for diagnostics, but nevertheless, what we have works fine! If you find a PID with more sensors, you can get a better result. The example shows only a portion of the available graphs/gauges. Some are zeros, because the car is unheated and without loads, close to XX. Screenshots of different sensors were not taken at the same time! Therefore, they can only be viewed for reference.
Reading errors by adapter
Like any other adapter, elm327 quickly diagnoses and reads car errors. If the Check Engine indicator on the dashboard is on, connect the adapter to the connector, run the program and read the error, then find a description of the error on the Internet and determine the malfunction without long trips to the service center, since the service professionals will begin the same procedure and offer to diagnose your car .
Also, with the help of elm327, you can quickly reset any error on the panel, but here you need to be more careful, because if you do not eliminate the cause of the error, that is, do not repair the car, the error will appear again after a certain time.
Let's sum it up
- When choosing an adapter, check not only the firmware version, but also the chip.
- Before purchasing elm327, make sure that your car supports the protocol that the adapter works with.
- The presence of an OBD2 connector is required.
If you have a right-hand drive vehicle manufactured for the Japanese market, not every application will be able to run on these vehicles. The same rules apply to most cars of the Russian automobile industry. Electronic units January, Mikas, Bosh can work using protocols with changed data transfer rates, but there are programs for them too. Based on this, the ELM327 can safely be considered a professional multi-brand adapter that is capable of much.
Review of OBD 2 ELM327 Bluetooth adapters for car diagnostics
Ilya Vasiliev Reviews February 08, 2018
OBD2 ELM327 diagnostic scanners are small programmable controllers, with a set of digital inputs for working with standard data transfer protocols from the vehicle's ECU and digital outputs for displaying the final information on its own or external display. The adapter's inputs are made in the form of a standard OBD connector. The controller reads information in the form of linear data transmitted in several communication protocols.
An installed program on an external or built-in operating system processes the received values, performs the necessary calculations, and produces final indicators in the form of error codes , graphs, and exact values read from sensors.
The output information displayed by the device has several types:
- Tables of parameter values;
- Time graphs and parameter diagrams;
- Digital values;
- Error codes;
OBD 2 connector and its pinout
The appearance of OBD 2 connectors in modern cars is due to mandatory American standards for manufacturers. The OBD 1 (On Board Diagnostic) standard was introduced in 1989. This was due to the requirement to control electrical parameters that affect harmful emissions. Since 1996, the standard has been improved and tightened.
According to OBD 2 requirements, any parameters that affect engine operation and the amount of emissions are monitored. These are not only electrical parameters and lambda sensor readings. Now all readings of air control devices, temperature conditions, and injection system parameters are monitored.
The connector design and adopted protocols transmit a significantly larger amount of data. Therefore, manufacturers use the free resources of these channels at their discretion.
The table shows the assignments of the information channels of the connector. Parameters marked with “0” are free contacts, the purpose of which is specified individually by the manufacturer for a specific model.
The pinout of the standard OBD connector terminals is as follows:
- Only the protocol established by the manufacturer;
- For SAE-1850 VPW, SAE-J1850 PWM protocols;
- 0;
- Earth;
- Grounding condition;
- High speed protocols ISO 15765-4, SAE-J2284;
- Protocol line ISO 9141-2, ISO 14230);
- 0;
- Low speed protocols;
- Protocols SAE-J1850 PWM, SAE-1850 VPW;
- 0;
- 0;
- 0;
- High speed protocols ISO 15765-4, SAE-J2284;
- For ISO 14230, ISO 9141-2 protocols;
- Power line +12V;
Connecting the adapter to a smartphone/tablet.
This is what a connected Wi-Fi adapter looks like.
In the case of a Bluetooth adapter, everything is quite simple: you need to create a Bluetooth pair with the adapter by first connecting it. Sometimes a PIN code will be required for pairing, usually it is 0000 or 1234. The seller usually provides information about the PIN code, but if he forgot to do this, you can ask him. With a Wi-Fi adapter, everything is even simpler: after turning on the adapter, we look for a Wi-Fi network, usually it is called OBDII/OBD2/WIFI_OBDII . A PIN code is not required in this case. When using diagnostic applications and connecting via Wi-Fi, you will need to specify the adapter's IP address in the settings.