HOW TO CHANGE THE VALVE SEAT:
Valves, together with their seats, are subject to high thermal loads, as a result of which defects appear on them, such as cracks, burns, cavities due to overheating, or foreign objects enter the engine and damage the seat.
If the head has overheated, the valve seat and guide may become misaligned, resulting in a leak. The wear of the seat also occurs unevenly, along the axis of the cam, which is why the seat becomes oval. All these defects must be corrected using cutters, cutters or countersinks, and then the valves must be ground in; Using specialized equipment, you can adjust the seat in one go without subsequent grinding.
If the old seat cannot be corrected, then it must be replaced with a new one, and then processed and chamfered for the new valve. The replacement process can be divided into several parts: removing the valve seat, preparing a blank for the new seat, installing a new part and finishing with a chamfer fitting for the new valve. Let's look at everything in order.
Replacing guide bushings for VAZ 2107
The need to replace guide bushings arises in the following cases:
- The appearance of high oil consumption. Blue smoke comes out of the exhaust pipe. This indicates that oil enters the combustion chamber and then into the exhaust system.
- During engine operation, a characteristic sound occurs from the cylinder head.
- Carrying out certain repair work, for example, replacing valves or overhauling the entire cylinder head.
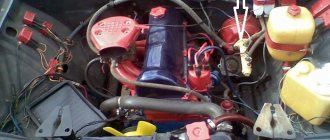
Before replacing the bushings, you need to remove the head from the block. The procedure is as follows:
1. Remove the air filter "pan" and drain the coolant.
2. Unscrew all carburetor hose clamps and remove the hoses. Disconnect the gas pedal linkage and unscrew the air intake cable. After this, unscrew the four fastening nuts and remove the carburetor.
3. Now unscrew the nuts securing the “pants” to the exhaust manifold.
4. Take a 10 mm socket wrench and unscrew all the nuts that secure the cylinder head cover. After that, remove the cover.
5. Then unscrew the nut designed to secure the ignition distributor and remove the high-voltage wires. After this, pull out the distributor and put it away so that it does not interfere with the work.
6. Flare and remove the camshaft gear bolt. The gear must be pulled out, and the chain must be secured so that it does not fall into the cylinder block, since getting it out will be very problematic.
7. Together with the shaft, remove the bed from the distribution mechanism.
8. Unscrew the bolts securing the head and remove it from the block. Be careful, the guide bushings may fall down, so it is recommended to be extremely careful.
After dismantling the cylinder head, it is necessary to wipe it with a dry cloth and clean it from traces of oil and dirt. After this, you can start replacing the bushings:
1. It is necessary to insert a mandrel into the hole of the old bushings and carefully knock them out with a hammer. The landing site must be thoroughly cleaned with gasoline. After this, blow them out with compressed air.
2. New bushings need to be compressed. To do this, you can place them in the freezer for two days. This method is the most effective.
3. To expand the bushing landing channels, heat the cylinder head on an electric stove to a temperature of approximately one hundred degrees Celsius.
4. Place special retaining rings on the new bushings and drive them into the seats in the same way.
After the cylinder head has cooled, you need to try on the valve stems under the bushing holes. If they do not fit, the holes are bored to the required diameters.
After assembling the assembly, install the cylinder head back onto the block. If possible, you can replace the cylinder head gasket and many other consumable parts. All this will only benefit the engine.
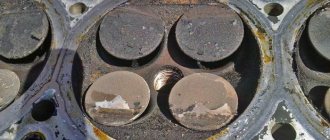
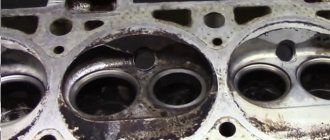
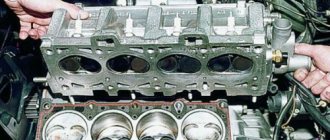
Removing the seat
First, let's look at what not to do, although some automotive garage gurus recommend doing just that.
-valve welding + knocking out
First, the old unnecessary valve is adjusted to the dimensions of the seat, inserted onto the seat and the valve is welded to the seat. While it is still warm, knock out the valve and it comes out along with the seat. Due to the different expansion of metals - steel and aluminum - the tension decreases; when it cools down, it will not be so easy to come out.
Why shouldn't you do this? During welding, the entire head heats up and it will certainly move, it will become crooked and in addition to this, hidden cracks will open where there were internal stresses in the metal (and they exist in any case). Then you will wonder why my head suddenly turned out to be pierced.
The best way is to bore the valve seat on a machine until it becomes the size of foil and jumps out of the seat hole. But... this cannot be implemented in a garage due to the high cost of the equipment, and not every village will have such a machine. Therefore, let’s consider another method, easy and safe, and can be implemented in any garage.
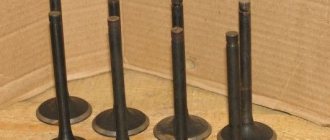
Design and probable malfunctions of the valve mechanism
This element operates in the aggressive environment of internal combustion engines and is always subject to significant dynamic loads, significant speed conditions and heating. To reduce premature wear of the running elements of this part, materials alloyed with nickel and chromium are most often used in its manufacture. The composition includes two main elements:
- head;
- core part.
These automotive components can have heads of various shapes:
- in the form of a tulip;
- flat;
- convex.
At the tip of the rod there are conical, shaped or cylindrical grooves that help fix the springs. The most likely sign of valve failure is a decrease in engine power and instability in operation. This is due to sticking and formation of gap areas. Another reason is the appearance of soot, which accumulates near the valve and does not allow it to close. Excessive emissions of exhaust fumes can also be considered a visible sign. If extraneous noise appears in the internal combustion engine, the rod parts and guides are worn out. Therefore, let’s look at how to replace valve seats with your own hands.
Choosing garage technicians: a simple and safe way
Using a milling cutter, grind the saddle all the way through one edge. The seat will weaken, lose tension and jump out of the seating hole on its own, without even having to sharpen it through, reaching the seating plane, when a little less than 0.5 mm of tension remains, the tension is no longer enough to hold on. By opening the ring, the saddle will no longer be able to resist.
A drill cutter is sold in any hardware store and costs no more than a drill, which is why this method is so affordable.
Now that the saddle is out, we need to think about what we are going to put in there.
Valve seat blank
For all popular engines, valve seat blanks are offered, both standard sizes and repair ones, with an increased outer diameter. For rare engines, blanks must be ordered or made to order.
Such blanks are quite cheap; if you don’t find one for a certain motor, you can choose the size from the available items. But don’t forget that companies that produce engine parts (Kolbenschmidt), in particular valves, also produce seats of the same sizes, so ask in stores in your city. After installation, the seat will need to be processed - chamfered for the valve.
What to use?
Such work involves the use of rough tools that are characterized by almost jeweler precision - countersinks and cutters. Such tools with narrow specifications are used exclusively for engine repairs.
A selection of cutters for valve seats is used for recessing the required diameter sizes. Such actions make it possible to give the plate maximum closing density.
Countersinks are used in the same way when repairing valve seats. But there is one difference - the countersink is used not only on mechanical, but also on power tools.
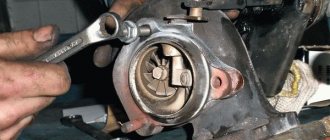
Installing a new saddle
The valve seat must be installed correctly with nitrogen; all other methods are not as reliable. In normal condition at room temperature, the diameter of the seat is greater than the diameter of the hole in the head, so after installation some interference is obtained. To fit the saddle, it must be reduced in size, this is what nitrogen is needed for.
Liquid nitrogen retains a very low temperature. While cooling in nitrogen, the valve contracts in diameter, and when cooled it can freely fit into the mounting hole of the head. At the same time, to enlarge the mounting hole in the head, the head can be heated, then the hole will expand and the gap will increase. If you heat the head, then you don’t need to cool the saddle so much, it will be enough to just put it in the freezer and the temperature difference will be enough.
It is impossible to install the saddle without preliminary heat treatment; the required tension will not be achieved and the saddle will fall out during operation.
When installing, you need to hammer the saddle so that it falls into place, you don’t need to hit it hard, light blows are enough.
Causes of parts failure and their consequences
A characteristic feature of the guide elements is that they do not fail at once, but wear out gradually. The lifespan of parts on budget cars ranges from 180 to 300 thousand km, and on more expensive foreign cars it can reach 1 million km. The wear process is influenced by several factors that can accelerate it:
- the quality of the motor oil used and the timeliness of its replacement;
- temperature conditions of the power unit, the more often the engine overheats, the faster the rubbing surfaces wear out;
- the quality of the fuel and combustible mixture, whose vapors penetrate into any leaks and contribute to the process of slow destruction of parts.
Carbon deposits on the rod destroy the bushing quite quickly
Note. The working life of all elements of the gas distribution mechanism is also affected by the serviceability of the power supply and ignition system. When, as a result of a malfunction, pops occur in the fuel or exhaust manifold, the lubricant between the valve-bushing pair is washed off with unburned gasoline, which is why the mechanism runs “dry” for several seconds.
A worn part is characterized by a “broken” internal hole, as a result of which the valve stem begins to move too freely in it, and then play appears. The rod warps during operation, and the plate does not fit well with the seat, the tightness of the interface is gradually lost. Gases escape from the combustion chamber into the mechanism, and oil enters from above, resulting in the formation of carbon deposits. It also accelerates wear, quickly rendering the part completely unusable.
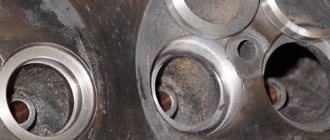
Machining a new seat
The newly installed seat must be chamfered. It is best to do this on a specialized machine, so it can be processed most accurately. This is achieved thanks to rigid centering of the cutter, which cannot be achieved using hand cutters.
But if there is no such equipment in your area, roller cutters are all you can count on. If there is a metalworking shop nearby, you can try processing the valves on a milling machine, the result will be fine.
On the seat you need to cut three edges - the outer, the inner and on top of them the central, narrowest one, along which the seat will come into contact with the valve.
Didn't find the information you are looking for? on our forum.
Purpose of sleeves
The main task of the valves is to supply the combustion chamber with a fuel-air mixture and remove exhaust gases from it. Each engine cylinder has two valves - intake and exhaust. A rod moves in the guide bushing, which lets in/out exhaust gases and the fuel mixture. The combustion chamber is sealed due to the precise “fitting” of the head on the seat.
The quality of engine valve operation depends on the guide bushings and seats. During operation, they wear out and cannot maintain high engine performance. In such a situation, they will have to be changed.
Final stage - development
It happens that when installing valves, they do not fit into the new bushings. This is due to the fact that when pressed in, the guides may slightly change their internal diameter. This is where reamers come to the rescue, with which our spare part is bored to the required diameter. We apply sequentially one after another in an increasing manner. At the same time, measurements are taken after each use. It is better to take diamond reamers straight away, since steel ones deteriorate much faster.
Reaming guide bushings 8.022 mm
As mentioned at the very beginning, valve guides, despite their apparent simplicity, are one of the basic elements of the gas distribution mechanism. Understanding this point, as well as the possible consequences in the event of a malfunction, will save a lot of nerves, time and money.
Source
Saddle repair
Repair of valve seats is carried out when they are naturally worn out and the disc does not fit tightly to its seat.
In order to restore the geometry of the rings, valve seat cutters are used - a set of milling heads that allow making the necessary angles.
Roller cutters can be used in combination with special equipment. However, it is expensive. Therefore, at home, a ratchet wrench with an extension is used. Properly treated areas have angles of 30˚, 60˚ and 45˚. The processing of valve seats to create each of them is carried out with the appropriate cutter.
Grinding valve seats does not require heating or other processing. Grooving is done “dry”. In the future, at the time of lapping, it is necessary to use a special lapping paste. To achieve the best result, it is recommended that lapping on new seats be done by hand rather than using a drill. » alt=»»> Another type of repair is the grooving of seats for repair inserts. To do this, according to the algorithm described above, the saddles are removed, after which the places for them are ground with a special cutting tool. The size of the repair area should be 0.01-0.02 cm smaller than the insert. Installation is carried out after heating the cylinder head and cooling the mounted elements.
You can attempt to bore correctly yourself at your own peril and risk. However, taking into account the complexity of the procedure and the required high precision of work, it is better to carry out such manipulations in a qualified auto repair shop or auto repair plant.
Source
Wear detection
The nature of the operation of the valve stem-bushing pair causes increased wear on the inner surface of the latter. It becomes noticeable when the vehicle is driven for a long time (about 150 thousand km). At the same time, the use of low quality oils can significantly speed up the life of the bushings. Therefore, it is always advisable to determine the degree of wear before replacing them. There are two methods for this:
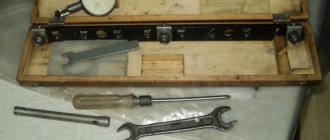
- Using a micrometer paired with a bore gauge. These tools measure the minimum internal diameter of the bushing, as well as the maximum diameter of the valve stem travel area. The difference between the obtained diameters will give us the width of the required gap. When taking measurements, one should not forget about the conical and barrel-shaped nature of the wear of the rod, as well as the fact that the diameter of the bushing changes with height. All surfaces must be thoroughly cleaned of dust and dirt before starting measurements.
Set of bore gauge and micrometer for determining bushing wear - Using a dial indicator with a special stand (micrometric bore gauge or indicator-type bore gauge). If the resulting gap value goes beyond the limits indicated in the manual, then a new valve is taken and the measurement procedure is repeated. If in the second case the gap is beyond the permissible limits, it means that the spare parts need to be replaced.
Bore gauge with dial indicator for measuring clearances between the bushing and the valve