First of all, I express my deep gratitude for the help, providing a garage with the necessary equipment to my friend Demich (Demid91), thank you bro)
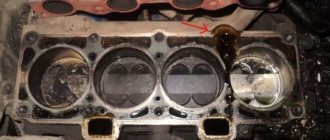
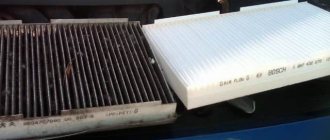
Now it’s a matter of pressing in the seats, for this we used the “electric stove-fire extinguisher” method already tested and patented by Demich, and if anyone has problems with this, we’ll see you in court... The process itself: we heat the head (not ours, but the cylinder block) degrees to 90, and We cool the seats with a carbon dioxide fire extinguisher (-70 degrees Celsius) and press them with mandrels made from modified old valves.
But as in our business, it’s expected without any jambs: the 7th saddle chipped 2 times, 1st saddle went out of alignment and burst, the next day everything was fixed and all the saddles were in their places.
The need to replace the valve seat may arise in the following cases.
1. The saddle is worn. While countersinking the valve seat for lapping, you discover that there is no seat material for further refinement. The valve sits so deep that the gap cannot be adjusted. The only solution may be to replace the saddle. 2. The seat and valve are burnt out. And what's the reason? You never know the reasons! The seat and valve were poorly ground or the clearance in the valve drive was insufficient. It doesn't matter anymore. It is important that when you remove the blackness on the valve seat with a countersink, you discover that there is not enough material. And then point 1. 3. The fit of the saddle in the head has weakened. Corrosion is noticeable on the outer diameter. 4. A crack was found in the valve seat. 5. When tuning the head, you change the valves to larger ones. Accordingly, larger saddles are needed. Check first to see if you can use the saddles you have. Replacing seats is not a very difficult job, but in case of an error you will have to go to a car dealer or for recycling.
How to Remove an Old Valve Seat
The easiest and most convenient way on the machine. When the seat is bored, its thickness and strength decrease, and then at one point the cutting force exceeds the friction force in the joint. The remainder of the seat is rotated and can then be removed with pliers. If you are going to install larger diameter saddles, then you will need to bore the seat next.
Valve mechanism design - operating principle and possible malfunctions
Valves are used to seal engine cylinders during gas exchange.
The principle of their operation is to ensure the intake of a mixture of fuel and air for its further compression. After ignition and exhaustion, the gases enter the exhaust system, and valves are also responsible for this. This mechanism operates in the aggressive conditions of an internal combustion engine and is constantly subjected to high dynamic loads, high speeds and heat. To reduce the rapid wear of the running parts of this part, the manufacturing materials most often have a high degree of alloying with nickel and chromium. The valve mechanism has two main components: the head and the stem. These car components come with a tulip-shaped, flat and convex head. At the end of the rod there are conical, shaped or cylindrical grooves for fixing springs on them. The main manifestation of a valve mechanism malfunction is a loss of engine power, as well as unstable operation of the engine as a whole. Failures of this type occur due to sticking and the appearance of a gap. Carbon deposits can also cause this problem; it accumulates near the valve itself and prevents it from closing.
Another sign of a malfunction is increased smoke emission during exhaust. A worn rod and guide of this mechanism will cause unnatural engine noise.
Need for replacement
On all cars, the repair principle is the same, just like replacing valves on a VAZ Priora can be done with your own hands.
The main sign of malfunctioning valves is a decrease in compression. This mainly happens for three reasons.
The first is burnout. This happens like this: the valve plates are destroyed or cracks appear in them, subsequently, at any position of the camshaft, the combustion chamber is depressurized.
Exhaust valves are mainly affected by this, because they are subject to a large thermal load.
In most of these situations, it is necessary to replace the valve seats, which is difficult to do with your own hands, since they will need to be pressed out and then pressed into place.
This problem may occur due to:
- incorrectly adjusted thermal gap, this applies to engines without a hydraulic compensator;
- a very lean mixture, this increases the temperature in the combustion chamber;
- The timing phases are not properly adjusted, which is why a fire is created during the period when the valve does not fit tightly to the seat. This can also contribute to the formation of carbon deposits in places where parts come into contact;
- a manufacturing defect;
- engine detonation for any reason.
The second is the bending of the valves as a result of a collision with the pistons. This is only possible if the timing belt breaks or jumps; the jump occurs due to a stretched belt or chain.
The third is rod wear. In the operating mode of the engine, the valves move along the guide bushings; during prolonged use, the rod wears out.
In this case, an excessive gap occurs between the inner walls of the bushings and the valve stems, which negatively affects the operation of the valve mechanism.
In this case, you will have to replace not only the valves, but also the guide bushings, which you can also do yourself.
Symptoms of a problem
The cause of unstable engine operation caused by loss of power, compression in any cylinder and vibration can be not only the valves.
If the timing belt breaks, it is not a fact that the valves will bend; the pushers more often break off. Even with the help of a compression gauge, you can only make sure that there is no compression in the cylinders, but you will not be able to find out the reason.
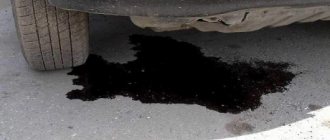
You can add a small amount of engine oil to the cylinder, but if the compression increases, the reason is the wear of the piston group.
To more accurately determine the diagnosis of the engine, it is better to conduct a test with a pneumatic tester.
Causes of parts failure and their consequences
A characteristic feature of the guide elements is that they do not fail at once, but wear out gradually. The lifespan of parts on budget cars ranges from 180 to 300 thousand km, and on more expensive foreign cars it can reach 1 million km. The wear process is influenced by several factors that can accelerate it:
- the quality of the motor oil used and the timeliness of its replacement;
- temperature conditions of the power unit, the more often the engine overheats, the faster the rubbing surfaces wear out;
- the quality of the fuel and combustible mixture, whose vapors penetrate into any leaks and contribute to the process of slow destruction of parts.
Carbon deposits on the rod destroy the bushing quite quickly
A worn part is characterized by a “broken” internal hole, as a result of which the valve stem begins to move too freely in it, and then play appears. The rod warps during operation, and the plate does not fit well with the seat, the tightness of the interface is gradually lost. Gases escape from the combustion chamber into the mechanism, and oil enters from above, resulting in the formation of carbon deposits. It also accelerates wear, quickly rendering the part completely unusable.
What to use?
Such work involves the use of rough tools that are characterized by almost jeweler precision - countersinks and cutters. Such tools with narrow specifications are used exclusively for engine repairs.
A selection of cutters for valve seats is used for recessing the required diameter sizes. Such actions make it possible to give the plate maximum closing density.
Countersinks are used in the same way when repairing valve seats. But there is one difference - the countersink is used not only on mechanical, but also on power tools.
Tool
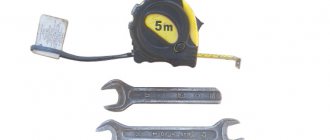
If we are replacing valves with our own hands, be it a VAZ or another car, we must not miss such a nuance as the presence of a special tool. Here's what you'll need:
Sets: wrenches, sockets, screwdrivers for dismantling and installing machine elements.
Valve desiccant. It is needed to compress the springs in order to eliminate the cracks (locking elements).
This is interesting: Do-it-yourself repair of Daewoo Nexia and operating instructions - detailed instructions
Lapping tool. The valves require lapping to ensure compression. Purchasing a special device is not advisable; you can use a drill and a piece of hose.
The hose tightly connects the valve stem and the drill attachment and grinds in with translational movements. Then pour diesel fuel at the junction of the valve and the seat; if it does not leak, then the job is done efficiently.
Tool for removing oil seals. When replacing valves, you need to change the caps on the bushings, which will be quite difficult to do with your own hands. It is better to use a special puller.
Using improvised tools can cause damage to the integrity of the part, which will lead to the need to purchase new seals.
There is another device - a micrometer. It will give an accurate measurement of the rod parameter and identify valve wear defects.
A key for fixing the crankshaft in order to adjust the correct operation of the timing belt.
It is advisable to have a torque wrench to tighten the bolts.
Consumables
In addition to valves, you will need:
- suitable sealing caps;
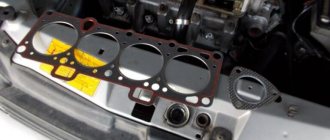
- cylinder head gasket;
- valve cover gasket;
- if necessary, sealant;
- cylinder head mounting bolts, sometimes it is possible to use old bolts;
- lapping paste or powder.
Countersinks and cutters for repairing valve seats – what to choose?
Replacing valve seats with your own hands requires the presence of not only a rough tool, but also an almost jewelry one - a roller cutter or a countersink. These highly specialized tools are used only for repairing internal combustion engines. A set of cutters for valve seats is used to grind out the desired shape of their internal diameter . This operation allows you to achieve a tight seal from the plate. In order to accurately process the valve seat, it is advisable to have a drawing of the mechanism at hand.
The cutter is made in the form of a metal cylinder, in which there is a hole and two or one conical surface; its angle can vary from 15 to 60 degrees. There are incisors on the surface of the cone. A set of countersinks for repairing valve seats is used in the same way as cutters, but there is one difference. The countersink can be used on mechanical and electrical tools.
Valve seat blank
For all popular engines, valve seat blanks are offered, both standard sizes and repair ones, with an increased outer diameter. For rare engines, blanks must be ordered or made to order.
Such blanks are quite cheap; if you don’t find one for a certain motor, you can choose the size from the available items. But don’t forget that companies that produce engine parts (Kolbenschmidt), in particular valves, also produce seats of the same sizes, so ask in stores in your city. After installation, the seat will need to be processed - chamfered for the valve.
Piston group
Valve seat
The valve seat is designed to improve the durability of the valve's contact area with the cylinder head. To make the seat, special alloy cast irons or heat-resistant alloys are used. A layer of refractory material is sometimes applied to the working surface of the exhaust valve seat. A cap or cuff made of oil-gasoline-resistant rubber prevents oil from entering the combustion chamber. To obtain a good seal, the seat collar, about 2 mm wide, is made with a variable angle. The outer surface of the seat may have a cylindrical or conical shape. The saddles are fastened by pressing with tension and caulking of the head, and steel saddles are additionally flared in the upper part. On the outer surface of the cylindrical and conical seats, annular grooves are machined into which the metal of the head flows when pressed. The conical seat is pressed into the seat with a small end gap, and the cylindrical seat is pressed until it stops. The heat flow from the working fluid in the combustion chamber is perceived by the valve head (especially the exhaust) and is transmitted through the chamfer to the seat, and through the valve stem to the guide sleeve, which necessitates intensive cooling of these parts. For this purpose, design solutions can be used: supply of coolant to the most heated zones; increasing the diameter of the valve stem and the length of its guide sleeve; transfer of heat from the head to the rod due to the agitation of liquid sodium in the valve rod as it moves (the cavity in the valve is filled 50...60% with sodium salts, the melting point of which is 97 ° C). To prevent the valve from jamming in the bushing at high temperatures and possible misalignment (in the valve drive directly by the shaft cam), the lower inner surface of the bushing is made conical or the diameter of the valve stem at the head is reduced. Typical defects of the valve assembly: deformation and breakage of the valves as a result of impacts of the piston on an unclosed valve due to a broken belt or camshaft drive chain, jamming of the shaft bearing due to insufficient lubrication or excessive rotation speed; deformation of the end surface of the valves (concave shape) when the engine overheats; uneven wear of the valve head and seat due to the formation of carbon deposits on the surface of the valve and seat chamfer; cracks and deep cavities on the valve seat and chamfer due to insufficient cooling, poor contact with the seat (carbon deposits, large valve clearance), impact at the time of landing, foreign objects entering the intake system, engine operation with late ignition and a lean mixture; valve burnout due to overheating when carbon deposits form on the working facets of the seat and valve (heat removal from the valve head sharply decreases), as well as when there is a small gap in the actuator (“stuck” of the valve); wear of the valve stem and bushing due to uneven expansion of the stem with uneven temperature distribution of the valve; accumulation of carbon deposits on the guide bushings due to low quality oil (presence of contaminants, low viscosity and poor lubricating properties). Return to list
Replacing the VAZ valve seat
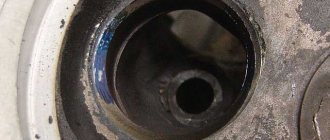
The valve seat is an important part of the cylinder head design; this can be easily verified by examining the operation of the valve and its components.
The most important function that the seat performs is to form a strong compression between itself and the valve. Thanks to this, gas leakage from the combustion chamber is minimized; good thermal contact between the valve and the seat are necessary conditions for this.
In other words, the tight fit between the parts allows heat to be removed from the plate with maximum efficiency, transferring heat from the valve through the seat to the cylinder head, which in turn is cooled by the liquid. During engine operation, the chamfers and seats wear out, which leads to defective valve seats. When depressurization occurs, the heat transfer order of the plate and seat is disrupted, which provokes defects and destruction of parts.
Under such conditions, the issue of maintaining the tightness of the connection comes to the fore. This can be achieved mainly only by forming the necessary profile for the valve seat and chamfer, which will balance the wear of the surfaces of the parts.
Brief information
The valves have a simple design and are highly wear-resistant. The latter is due to the manufacturing material, which must withstand increased loads.
The valve itself consists of several sections:
- plates (lower expanded part of the part);
- rod (the upper narrow part of the part, going from the plate upward);
- chamfers (the place where the plate adheres to the cylinder block);
- plate edges;
- the end of the rod (its upper part located above the groove);
- recesses for crackers (small groove under the end).
The contact point between the plate and the cylinder head is called the seat. It is made of steel or cast iron and pressed into the cylinder head.
According to their purpose, valves are of two types:
Inlet
Responsible for supplying the air-fuel mixture to the cylinder-piston system. They have a solid rod and, usually, a larger diameter plate to improve working properties.
High school graduation
Responsible for the removal of exhaust gases during the operation of the internal combustion engine. The stem of this type of valve is made hollow; Sodium is placed inside it. This design allows the exhaust valve to be cooled, since it is subject to higher heat than the intake valve. For its production, heat-resistant metal is necessarily used.
Why is there a need to replace valves?
Under normal operating conditions, valves may need to be replaced due to wear. This happens after about 300 thousand km.
There are usually two reasons for the need for unscheduled replacement: burnout and deformation.
Premature burnout can happen due to:
- constant driving at the highest possible speed and, as a result, a knocking engine;
- frequent refueling with low-quality fuel;
- incorrectly adjusted gap (the gap is too small and the heat dissipation is impaired);
- inappropriate number of spark plugs, etc.
The valve becomes deformed when the timing chain breaks or when it moves several links (this happens when the tension is poor). As a result, the rod bends, which leads to a loose fit of the plate to the seat.
Execution technology
The work is complex, but if you have the necessary skills, it can be done in a garage.
There are several ways to remove the saddle. A quick, but not very correct method is to weld the valve onto the seat and then knock it out. The valve is ground to the size of the seat, inserted into it and scalded. Until the metal had time to cool. The saddle must be knocked out with a hammer. The entire structure should come out without any problems. But remember that welding heats up the metal, which can cause deformation of the head. By knocking it out, you can damage the seat under the saddle, which will entail additional work on processing the cylinder head. It is best to use a lathe. This way you can grind the saddle to such a size that it becomes like foil and can be easily taken out. If you don’t have a machine, you can use a drill and a cutter attachment. Stitching is carried out on one side until the tension weakens. The saddle can now be reached by hand.
The ideal option for installing a new seat is nitrogen, in which the seats should be pre-cooled. The fact is that their dimensions are slightly larger than the holes, and due to cooling the outer diameter decreases. Naturally, nitrogen in the garage is very rare. Then remember the properties of metal to expand and contract. The saddle is simply placed in the freezer for a couple of hours, and the hole is heated with a burner.
This is interesting: Hang or put? How to properly store car tires on rims: practical tips
If during installation it will be necessary to apply force, it is recommended to take a block suitable for the diameter of the seat and use it to press it.
Removing the seat
First, let's look at what not to do, although some automotive garage gurus recommend doing just that.
-valve welding + knocking out
First, the old unnecessary valve is adjusted to the dimensions of the seat, inserted onto the seat and the valve is welded to the seat. While it is still warm, knock out the valve and it comes out along with the seat. Due to the different expansion of metals - steel and aluminum - the tension decreases; when it cools down, it will not be so easy to come out.
Why shouldn't you do this? During welding, the entire head heats up and it will certainly move, it will become crooked and in addition to this, hidden cracks will open where there were internal stresses in the metal (and they exist in any case). Then you will wonder why my head suddenly turned out to be pierced.
The best way is to bore the valve seat on a machine until it becomes the size of foil and jumps out of the seat hole. But... this cannot be implemented in a garage due to the high cost of the equipment, and not every village will have such a machine. Therefore, let’s consider another method, easy and safe, and can be implemented in any garage.
Choosing garage technicians: a simple and safe way
Using a milling cutter, grind the saddle all the way through one edge. The seat will weaken, lose tension and jump out of the seating hole on its own, without even having to sharpen it through, reaching the seating plane, when a little less than 0.5 mm of tension remains, the tension is no longer enough to hold on. By opening the ring, the saddle will no longer be able to resist.
A drill cutter is sold in any hardware store and costs no more than a drill, which is why this method is so affordable.
Now that the saddle is out, we need to think about what we are going to put in there.
Stuffing the valve seals
But first you need to remove the old valve seals, on Zhiguli they must be removed carefully and in no case should you try to knock them off with a blow, the place where the seal is packed will break off, take pliers, hold the valve seal with them and try to turn it if it doesn’t work right away, grab it and try to turn it again, then grab it with the pliers and the valve seal will loosen and rotate and come out. Also remove the valve seals from the UAZ and GAZ.
And now we will fill the valve seals on the Zhiguli, insert the valve and put the valve seal on it up to the guide sleeve, take a tube with an internal diameter of 13 mm and carefully, with a light hammer, tap the valve seal with light blows, just do not overdo it, otherwise you will break the seal. If there is no such tube, you can flatten the larger tube a little to size, and saw the smaller one a little lengthwise and spread it to size. You can also first remove the spring from the valve seal so as not to accidentally damage it and then put it on the seal.
On UAZ and Gas, fill it in the same way as on Zhiguli, but the tube should have an internal diameter of 16mm.
Dry the valve
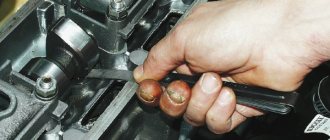
It was easy to remove the valve, but drying the valve without a valve remover is not very easy, but you can, put a piece of iron under the valve so that it rests on it, put on the springs, place a plate of springs on the springs and put crackers in it, take a 19 or 22 open-end wrench and firmly press on the springs and let your friend insert the crackers, this is all checked, I inserted the crackers into the valves like this several times.
Grinding the valve to the head
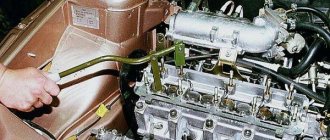
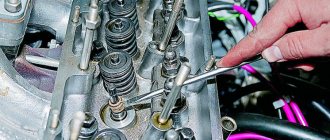
If the valve is burnt out, then the valve seat is also burnt out; usually mechanics first level the seat with a special cutter, which you don’t have; no, we can do without it (the engine has been tested and runs no worse). I’m amazed at how some motorists grind valves by hand (I’d go crazy) let an electric drill do the work for us (if you have a left-right reverse drill, it’s even better, but if not, this one will do). Spread the edge of the valve with rubbing powder, insert the valve into the head and clamp the end of the valve into the drill chuck, but not deeply, but to a depth of about 15 mm, the main thing is not to scratch the place where the valve comes into contact with the oil seal. Pull the valve up with a drill and turn it on, let the valve grind, make such movements up a little down and up again (I think you understand) if the drill is in reverse, switch the rotation. On a nine or eight, it is difficult to reach the valve with a drill; you need a very small chuck, but you can do this by taking a strong piece of reinforced rubber hose that fits very tightly onto the valve, take an 8mm pin and pull this piece of hose onto it as tightly as possible, clamp the pin into the drill and the other end hose onto the valve and also begin to grind the valve onto the head seat.
This is interesting: Misfire in a cylinder: what to do if the order is disturbed
How to drive a valve guide into a head
First you need to choose a valve bushing before hammering it in, there is a large selection of valve bushings in stores, ask the seller for factory guide bushings, and naturally he will answer yes (he needs to sell it and the sellers know how to hang noodles). And then you get a headache, the bushing is clogged and the valve won’t fit, but for this the mechanic has a special rubber that you don’t have. I’ll explain how to distinguish a high-quality valve bushing from the left (underground) ones. Take the valve with you and when buying valve bushings, try to put it on the valve, the factory bushing will fit easily and will move freely along the valve and the outer wall of the bushing will be polished to a shine, and the place where it is stuffed The valve seal will be matte in color. The left valve sleeve will not fit onto the valve or will fit tightly and its color will be completely dull. The valve sleeve should fit easily onto the valve, since when it is hammered into the head, it is slightly compressed and the valve fits in as it should.
Before hammering the valve sleeve into the head, put a retaining ring on it, remove it from the old sleeve, lubricate the hole in the valve head where you will drive the sleeve, the sleeve is driven from top to bottom until the retaining ring (do not overdo it.).
Zhiguli valve bushings must be driven in carefully, do not hit the place where the valve seal is packed, this place is very fragile, find a tube with an internal diameter of 12 and maximum 13 mm, place it on the bushing so that the place where the seal is packed is inside the tube, and also carefully hammer it into the head with a sledgehammer.
Drive the valve bushings onto the head of the UAZ or GAZ in such a way that on the edge on which you will hit, place a piece of tin or a thin piece of wood, place a bolt or round timber with which you knocked it out, and also hammer it into the head with a sledgehammer. If you suddenly accidentally slightly bend the edge of the bushing hole, you can level it with a drill or a file.
Installing a new saddle
Before starting the installation procedure of new saddles, the seats under them are cleaned of dirt. After the cylinder head should be heated evenly to a temperature exceeding 100˚C. At the same time, the metal expands, allowing the ring to be pressed in.
The mounted part is cooled using liquid nitrogen. In its absence, you can use a combination of ice and acetone, which allows you to reduce the temperature of the metal to -70˚C. The dimensions of the parts are selected in such a way that the difference between the diameter of the seat and the ring is no more than 0.05-0.09 mm on cold parts.
The valve seat is pressed into place using a special mandrel or a piece of pipe of suitable diameter. The part should fit into the seat with little effort. It is important that the ring fits without distortion.
After pressing in and cooling the cylinder head, you should check whether the element is loose in the seat. If there is no gap and the replaced element is held tightly in place, the replacement procedure can be considered complete. Next, you need to trim the valve seats using cutters.
Important! During the standard replacement procedure, the valve plates of all valves are set quite high. However, some experts recommend processing the chamfers so that the exhaust valves sit slightly deeper than the normal position. The intake valve seat is left in its normal position.
The valve seat must be installed correctly with nitrogen; all other methods are not as reliable. In normal condition at room temperature, the diameter of the seat is greater than the diameter of the hole in the head, so after installation some interference is obtained. To fit the saddle, it must be reduced in size, this is what nitrogen is needed for.
Liquid nitrogen retains a very low temperature. While cooling in nitrogen, the valve contracts in diameter, and when cooled it can freely fit into the mounting hole of the head. At the same time, to enlarge the mounting hole in the head, the head can be heated, then the hole will expand and the gap will increase. If you heat the head, then you don’t need to cool the saddle so much, it will be enough to just put it in the freezer and the temperature difference will be enough.
It is impossible to install the saddle without preliminary heat treatment; the required tension will not be achieved and the saddle will fall out during operation.
When installing, you need to hammer the saddle so that it falls into place, you don’t need to hit it hard, light blows are enough.
Machining a new seat
The newly installed seat must be chamfered. It is best to do this on a specialized machine, so it can be processed most accurately. This is achieved thanks to rigid centering of the cutter, which cannot be achieved using hand cutters.
But if there is no such equipment in your area, roller cutters are all you can count on. If there is a metalworking shop nearby, you can try processing the valves on a milling machine, the result will be fine.
On the seat you need to cut three edges - the outer, the inner and on top of them the central, narrowest one, along which the seat will come into contact with the valve.
Grinding stones for finishing saddles
There are three main types of grinding stones used. All of them are used for dry processing of saddles. A peeling stone is used to quickly remove thick layers of metal. The need for it arises when repairing heavily worn seats or when installing new plug-in valve seats. Roughing stone is sometimes called profiling stone. After processing the saddle with a profiling stone, the surface of the saddle is brought to the required level of cleanliness using a finishing stone. It is also used for grinding slightly worn cast iron seats. Carbide seat stones are used to machine refractory exhaust valve seat inserts made from stellite.
The grinding stone must have the proper diameter and angle of the working surface. The diameter of the grinding stone should exceed the diameter of the valve head, but it should not reach the edge of the combustion chamber when machining the seat. The angle of the working surface of the stone must correspond to the angle of the saddle.
Technical requirements
You can quickly and easily remove the valve seat insert using a soldering iron for soldering microwires in an inert gas environment - MIG (microware inert gas) welder. With the valve removed, apply a bead of solder along the edge of the insert seat adjacent to the wall of the seat. When the seam cools, it will shrink and the insert can be easily removed from the cylinder head.
In the case of cracked and severely burned inline seats, the cylinder head can often be repaired by replacing them with push-in seats. All cracks in the head must be repaired before the integral seat is bored. First, you must select a repair insert seat that has the required internal and external diameters, as well as the required thickness. Manufacturers of seat repair kits provide tables to help you select the appropriate seat repair insert. When replacing an insert seat, the new seat must be of the same or higher grade of material than the old one. The operating temperatures of inserted exhaust valve seats are 100°-150°F (56°-183°C) higher than the operating temperatures of integral seats, which reach up to 900°F (480°C). In order for the service life of repair seats and valves to be no less than that of the parts being replaced, some must be made of higher quality materials.
Manufactured valve seat repair inserts are made from a variety of materials, including:
- cast iron
- of stainless steel
- nickel-cobalt alloy
- powder metal
The cutting tool for making the seat is selected according to the outer diameter of the repair insert. The diameter of the bore of the seat must be less than the outer diameter of the insert seat. The tool holder is mounted on a guide rod selected to fit the hole in the valve guide. The tool holder feed drive is screwed in so that there are enough threads left to properly feed the cutter into the head being machined. The assembled assembly is installed in the valve guide so that the cutting tool rests on the seat being bored.
A seat repair insert is inserted between the support jig and the retaining ring. The locking ring is adjusted along the seat repair insert so that the cutter feed stops when the bore of the seat reaches a depth equal to the thickness of the new insert. The boring tool is rotated manually or using a gear motor. Boring continues until the retaining ring reaches the support jig. After this, the support jig and tool holder are removed. An appropriately sized mandrel and guide rod are secured to the impact head. It is best to cool the repair insert in solid carbon dioxide before installation so that it decreases in diameter.
With a strong blow of a heavy hammer, the repair insert is driven into the seat. First, the repair insert is pressed into the socket with strong blows of a hammer, and then with light blows it sinks until it fits into it all the way. Do not hit the impact head after the saddle is fully seated in the seat. The installed repair seat is caulked along the outer edge along the perimeter of the seat - in this case, the metal along the edge of the insert is slightly riveted, strengthening its adhesion to the seat. The seat in the repair insert is processed using the already described machining technology used to restore valve seats.
Repair inserts must remain in carbon dioxide until installed. This will significantly reduce the likelihood of metal being cut off from the walls of the mounting socket when installing a repair insert. Cut pieces of metal may get under the repair insert, preventing it from seating correctly. The cooled insert seat is placed on the seat.