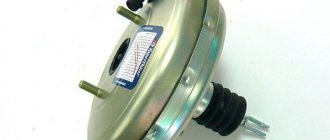
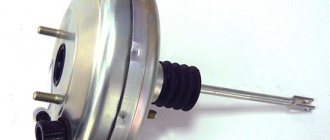
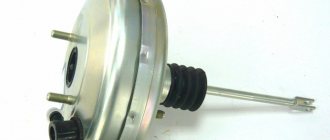
The vacuum brake booster of the fourteenth is a casing with a valve inside. It is divided into two parts by a rubber layer - a diaphragm - one part is atmospheric, and the second represents the vacuum space, which is connected to the intake pipe from the engine.
Vacuum booster
The amplifier valve is a plastic casing that contains the main parts that are subject to wear and cause trouble for the driver in the form of gearbox rattling. The composition is as follows: on the support bushing there is a rod, which is adjacent to the piston and its own buffer. Actually, the valve itself is on its pusher and return springs along with the filter.
The vacuum booster functions as follows: you press the brake to the floor, at this time the piston and valve pusher move in such a way that this opens the space between the two compartments of the unit. Then, a vacuum compartment moves into this space and takes in air. Air presses on the damper between the two parts of the amplifier, creating different levels of pressure in one and the other part. Due to this difference, the valve itself and the rod move, respectively. By lowering the pedal, all parts return to their places, the system ceases to function.
As with all parts of the system of any car, repair of the vacuum brake booster is inevitable. In order to decide on the repair work - whether it will be a DIY garage repair or whether you should go to a service center - you must first determine the signs of a malfunction in the VAZ 2114 vacuum brake booster.
Checking the amplifier assembly
The answer to the question of how to check the vacuum brake booster is suitable not only for the fourteenth VAZ model, but can also be applied to the thirteenth and fifteenth.
The process is like this:
- Press the brake to the floor 4-5 times with the engine not running. This will create uniform pressure in the two parts of the amplifier. When you press the brake, the valve will immediately show itself: if it squeaks, then you need to seriously think about it.
- After the pressure has become uniform, start the fourteenth. But at the same time you need to keep the brake to the floor. If everything is in order with the brake booster system, the pedal will rise after the engine starts. If this does not happen, then repair is definitely required.
- In the event that you realize that there is a problem with the amplifier, you need to look to be sure how the hose is secured and what condition the flange is in. If the fastenings at any point do not correspond to the norm, this may affect the fact that the pedal does not lift, and in fact the fault will be on a separate incorrect fastening, and not on the entire system as a whole.
Symptoms of a problem
There are a lot of vacuum amplifiers on the market, and they all differ not only in manufacturer, but also in quality. In recent years, the market has been conquered by Chinese analogues, which are of relatively lousy quality, but due to their prices beat their competitors. But skimping on brake system components means exposing yourself to danger. An amplifier of normal quality will cost you about 1000 rubles. Vacuum amplifiers produced by Politekh-AVTO have good reviews. The warranty on them is only a year, but in reality they last at least five.
Your safety depends on the condition of the braking system. This must be taken into account primarily when carrying out repairs and diagnostics. Therefore, a careless attitude is unacceptable. Signs of malfunction characterizing the failure of the VUT:
- It is necessary to apply more force to the pedal when braking.
- Braking efficiency deteriorates (it feels like you are pressing the pedal with the same force, but the rod moves worse).
But these symptoms can also appear if pipes and lines are contaminated. Therefore, it is possible to judge the failure of the VUT only on the condition that the serviceability of the remaining components is not in doubt. To check the VUT, you need to stop the engine and press the pedal hard several times. Then press down so that it is under pressure and start the engine. If the vacuum brake booster of the VAZ 2114 is working properly, you will feel the pedal sink significantly. Well, if it fails, it will be in its original position.
The next step is to identify a specific breakdown:
- Check whether the connection between the pipe and the check valve is tight.
- Are the fixing flanges intact?
- Pay attention to the condition of the pipes themselves - they sometimes crack in bends. A characteristic feature of this malfunction is the presence of wet marks.
- Very often the shank is destroyed. It is necessary to check the cap that is located on the seal. Remove it and start the engine. If even after all these procedures a hissing sound is heard, then the fault is in the shank.
Reasons for replacing the brake booster
Brakes are a whole system. Therefore, as soon as you have checked the amplifier, do not be lazy and check whether the brake fluid is leaking and whether the pedal itself is in order. Maybe it's worth looking at the brake master cylinder and generally running diagnostics. And if, nevertheless, you have not found any problems in the brake system, then you can think about how to change the vacuum on a VAZ 2114.
It is important to understand that replacing the vacuum on a VAZ 2114 or any other VAZ model is a mandatory process. If the unit is malfunctioning, then the engine is also malfunctioning. The power that the engine will produce depends on the correct functionality of the amplifier. What Russian doesn't like driving fast? As they say, if you love to ride, you also love to change the vacuum.
general information
The design solution of the brake system of the 2114th model is almost the same for most VAZs. Therefore, these instructions will help you change the vacuum seal on many cars.
If you decide to change the device yourself, you need to read the manufacturer’s recommendations in the operating manual of your VAZ. And purchase exactly the vacuum booster whose model is recommended by the car’s creators.
During operation, the mechanical connections of parts become clogged with dust, residual working fluids, and dirt. After a long period, it becomes very difficult to unscrew such bolts and nuts. They seem to grow and become a monolith. To make work easier and not damage the surfaces, you should use WD-40: first spray a small amount of aerosol into the joint and after a few seconds, start working.
How to replace?
For this process you will need the following tools:
- Simple screwdriver
- Pliers
- Spanners 13, 17
- Specific wrench for unscrewing brake pipes
- It’s worth buying new fittings and plugs
The question of how to change the vacuum booster on a VAZ 2114 is a very common one. If the perception of the text is not accurate enough for you, you can always rely on our article.
Step by step process:
- The brake cylinder will interfere with removing the booster. Therefore, you can first remove it, or simply disconnect the tube fittings from it and move it to the side. It's whatever your heart desires.
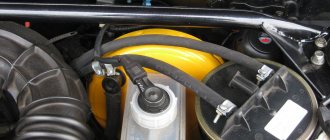
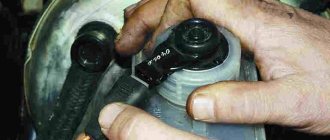
- But the cylinder is not the main obstacle. Unscrewing the amplifier fasteners is, in principle, not an easy task, or rather inconvenient. We start with the valve: remove the hose mount, pull out the support sleeve and pull out the brake pin.
- Then we take the key to 13 and begin to unscrew the 4 fastenings of the amplifier.
- Having endured troubles and inconveniences, we are preparing to install a new one in its original place. But first, you need to install a special mounting frame on the purchased amp. We wake it up with a key set to 17 and only then put it inside the car.
- The assembly sequence is simple, but an important point from the point of view of convenience is the primary action of connecting the brake (pedal) and the amplifier (all this with just a finger). And then attach the entire unit to the fourteenth.
As a recommendation, you can take the following information: when replacing the brake booster, you need to change the vacuum hose. It also does not last forever, and its wear and tear can have a bad effect on the quality of the new amplifier.
Vacuum for VAZ 2114, its selection and replacement
VUT (vacuum brake booster) is an indispensable thing for a comfortable and safe ride. Research shows that this part can reduce the effort required for effective emergency braking by almost 200% (from 13 kg to 7 kg at a deceleration of 6 m/s).
Vacuum brake booster
Today, the automotive spare parts market is replete with VUTs for VAZs (it is worth mentioning that the information presented in the article is applicable for the VAZ 2115 and VAZ 2113) from a variety of manufacturers - from cheap Chinese models of dubious quality to very expensive models. In general, VUT of more or less acceptable quality will cost you about 1 thousand rubles.
We can confidently recommend for purchase “SPORT” vacuum cleaners from Polytech-Auto (Togliatti), the quality of which has been tested by numerous car enthusiasts. The warranty service life of such VUTs is one year, but in practice, they last much longer. According to reviews, replacing a VUT with a VAZ does not take about 3-4 years.
From this article you will learn how to change the vacuum on a VAZ 2114 with your own hands, without spending money on service stations.
SIGNS OF MALFUNCTION AND CHECKING THE VACUUM BRAKE BOOSER
As soon as you have any doubts about whether the vacuum pump is working properly, you need to immediately check the vacuum brake booster of the VAZ 2114. It is worth noting that brakes are one of the key systems of any car, on which the life and safety of you and yours directly depends passengers, therefore, no negligence or irresponsibility is acceptable here.
Signs of a faulty vacuum brake booster, which indicate that the vacuum brake on a VAZ is broken, are as follows:
- The need to apply more force than before to press the brake pedal;
- Deterioration in the braking efficiency of a vehicle at the same pedal pressure.
As soon as any of these factors appear, immediately begin checking the spare part. To do this, you need to turn off the engine and press the brake pedal several times with sufficient force, then stop it in the middle of the range of motion (your foot fixes the pedal), and restart the engine.
If the vacuum brake booster of the VAZ 2114 is working properly, then the pedal itself will fall a little to the bottom, but if the vacuum booster fails, the pedal will remain in the same position.
After identifying the problem, you need to find out what exactly is wrong with the vacuum seal. This requires a visual inspection. In general, the inspection is carried out on the following points:
- The vacuum chamber is checked for tightness of the connection between the check valve and the pipe;
- The integrity of the fixing flanges is checked;
- A situation is possible when, due to wear in places of bends, the pipes have cracked, this is evidenced by characteristic wet marks on their surface;
- Often the main reason for failure of the vacuum seal is damage to the shank - check the protective cap on the seal; it should not stick. Remove the cap and start the engine; if you hear a hissing sound after bleeding the shank, that’s the problem.
NECESSARY TOOLS FOR THE JOB
Upon completion of the diagnosis, when the need to replace the part is obvious, before starting work it is necessary to prepare the tools and spare parts required for replacement.
First of all, purchase a new vacuum brake booster for your VAZ 2114; we also recommend replacing the connecting hose at the same time if it shows any signs of wear.
Replacing the vacuum on a VAZ 2114 requires the following tools:
- Pliers;
- Open-end and socket wrenches with a diameter of 10, 13 and 17 mm;
- Screwdriver.
Look at the condition of the plugs and fittings; you may need to replace them too, so when purchasing the necessary materials, do not forget to purchase them.
REPAIR AND REPLACEMENT OF THE VACUUM BRAKE BOOSTER WITH YOUR OWN HANDS
It’s worth clarifying right away that replacing the VAZ 2114 vacuum booster itself is not anything overly complicated, and if you have the above tools and one and a half to two hours of free time, it can be done at home without any problems, so in order to repair the vacuum brake booster, it is not necessary to contact a service station.
Let's consider replacing the vacuum seal on the fourteenth with our own hands step by step:
- First of all, it is necessary to dismantle the rod that connects the vacuum seal and the brake pedal. This, as a rule, does not cause any inconvenience - just pry out the locking plate with a knife or screwdriver and unscrew the locking element;
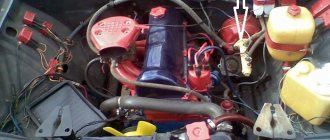
- Next, open the hood and move to the engine compartment. We need to disconnect the TC (brake cylinder) and the vacuum seal. This is done with socket or ring wrenches, depending on what connections were used for fixation (usually ordinary nuts). There is one dubious issue here that you will have to decide: the fact is that you can do it in different ways - disconnect at the same time all pipes from the brake cylinder, which will make removing the VUT somewhat easier, since nothing will interfere with the process, but subsequently you will need to re-bleed the brakes. Or leave them in place and try to remove the VUT by unscrewing only the 10 mm nut that secures the tubes to the inner surface of the body.
- After the TC is moved to the side, we need to remove the hose that connects the VUT and the manifold;
- Next, we remove the vacuum seal from its attachment to the body wall; it is fastened with 13 mm nuts, so for dismantling we will need the appropriate wrench;
- We remove the amplifier along with the bracket on which it is attached. According to reviews, in rare cases, in order to remove the VUT, it may be necessary to unscrew the strut spacer;
- Now you only need to install a new VUT, using a similar algorithm in reverse order.
It is worth saying that the vacuum brake booster of the VAZ 2115 and VAZ 2113 changes in a similar way, so this instruction is applicable for these cars as well.
Unit cost
It is better to find out how much a vacuum brake booster for a VAZ 2114 costs directly from the stores. Since the regions are different, the price categories are different and it’s easier to navigate the area locally. The approximate cost is from 2,000 to 3,000 rubles. Installing it in the service will cost a third, or even half, of the cost. Despite the inaccessibility of the unit and some inconvenience, it is much easier to change the amplifier yourself. The frequency of breakdowns or replacements directly depends on the quality of the track, driving style and the general wear and tear of car parts, in particular the chassis. Therefore, it is difficult to say that there is any specific regulatory period. The only thing you need to remember is about timely diagnosis: sometimes it’s worth getting confused and going over your fourteenth with the eye of a caring owner. And, of course, you shouldn’t delay repairing or replacing the unit.