Owners of a Daewoo Nexia must promptly replace car consumables so that the engine can operate without interruption and the power resource is preserved. If you promptly change the element that purifies the air entering the engine, then the windows will fog up less and the air in the cabin will be cleaner. Among other things, a dirty filter is a breeding ground for bacteria and germs, which gradually lead to respiratory diseases.
The article provides step-by-step instructions for replacing the air filter yourself, as well as information on how to choose the right filter and what is the frequency of its replacement.
Need for replacement
The air cleaning element is an important car consumable that requires timely replacement. So, according to statistics, a car consumes up to 15 cubic meters of air per 100 km. This air requires mandatory cleaning, otherwise dust and dirt will enter the engine. This will lead to breakdown, failure of the car’s power unit and the need to repair or replace the engine.
Related Posts
- Jamming traffic police cameras is an easy way to save on fines
The replacement period for the Daewoo Nexia air filter, specified by the manufacturer, is 30 thousand kilometers. But the realities of Russian roads indicate the need to replace the filter after 15 thousand kilometers . A number of car owners change it at the same time as changing the oil, or every other time.
If the car is driven on rural roads that have not seen asphalt, after 6-8 thousand kilometers it is necessary to inspect the filter for its suitability for further use.
The functions of the air filter , in addition to purifying the air entering the engine, are a noise muffler and a temperature regulator for the combustible mixture (in gasoline engines).
As the cleaning element is used, it becomes clogged, which means its resistance to air flow increases, preventing a sufficient amount of air from entering the engine. The driver should pay attention to signs of the need to replace the filter , which are:
- due to lack of air, the mixture becomes enriched and its combustion is incomplete;
- engine power performance decreases;
- the driver will be able to note increased fuel consumption;
- increase in toxins in exhaust gases.
The air filter, which needs to be changed according to the deadlines specified in the maintenance regulations, or based on existing symptoms, will preserve the engine life and solve this problem.
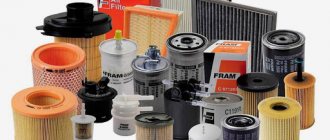
Filter selection
How to choose the right air filter for Daewoo Nexia? To begin with, the driver should decide on two main characteristics of air filters - what type of structural element is required for the selected car model, as well as what cleaning material the filter is required from - paper, synthetics, etc.
So, according to the design , the cleaning elements are:
- cylindrical;
- panel;
- frameless.
Material from which it is made:
- cardboard;
- synthetic fibers;
- multi-layer gauze soaked in special oils (relevant for sports cars).
Air purifier for Daewoo Nexia
Having made a choice in favor of a specific filter (which ones are required for the Daewoo Nexia will be described later in the article), the driver takes out the filter already in the car and visually inspects it. Such actions are resorted to when the driver is not sure that it is time to change the air purifying element. If the filter is dirty and traces of oil can be seen, replacement is no longer delayed. With a clean filter you can continue driving. It is also worth focusing on the realities of the roads on which the car is driven. In highly dusty and sandy areas, it is necessary to change the part 2 times more often than specified.
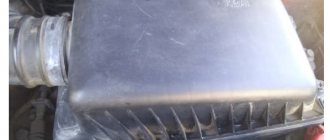
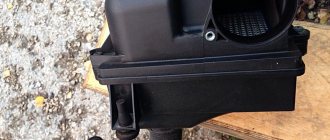
Where is it located? The air filter on Daewoo Nexia cars is located to the left of the engine (if the driver is standing in front of the hood).
The housing is located to the left of the vehicle's power unit
The housing is secured by three supports; inside there is filter material in the form of a flat rectangular shape. Special pipes are attached to the body through which air is supplied to the engine.
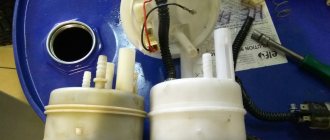
Why do you need a fuel pressure regulator?
As mentioned above, this regulator maintains the required fuel pressure necessary for normal operation of the injectors, taking into account one or another operating mode of the power unit. In other words, the RTD affects the amount and intensity of the fuel supply that enters the engine cylinders through the injectors.
Simply put, the amount of fuel supplied to the engine at the time of injection depends on the pressure that is created inside the fuel rail (rail), as well as on the pulse duration for opening the injector and the vacuum in the intake manifold.
For more accurate dosing and maintaining constant pressure, a diaphragm valve-regulator is used, which experiences fuel pressure on one side, and a spring force on the other. RTD is used in power systems where there is a so-called “return”. The regulator is installed at the fuel rail. Also, this element can be located in the fuel tank, while such systems do not have a return line.
- Let's first look at the common design in which the regulator is located in the fuel rail. The element operates on the following principle: the fuel pump forces fuel from the fuel tank along the line. The resulting fuel pressure acts on the regulator. The device itself has two chambers (a spring chamber and a fuel chamber), which are separated by a membrane. On one side, the membrane is pressed by fuel, which enters the regulator through special inlet holes, and on the other side, there is spring pressure and intake manifold pressure. If the fuel pressure turns out to be stronger than the spring force and the pressure in the inlet, then the regulator opens slightly, resulting in some of the fuel being discharged into the return line. The fuel returns through the return line to the fuel tank.
- In systems without a return line, the regulator is usually located directly in the tank. The advantages include the absence of an additional pipeline. The injectors are supplied with the required amount of fuel directly from the tank, that is, excess fuel does not enter the engine compartment, and there is no need to deliver it back to the tank. This also allows us to talk about less heating of the fuel and provides a number of additional advantages in the form of less intense evaporation.
The fuel pump supplies the injectors with a strictly defined amount of fuel in relation to specific conditions and operating modes of the internal combustion engine. Let us add that in this system there is additionally an excess pressure relief valve, which helps to avoid its increase to a critical level.
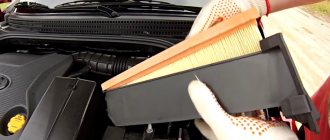
Replacing the Daewoo Nexia air filter
Sequence of actions when replacing the air filter on a Daewoo Nexia:
- place the car on level ground;
- find the location of the housing - in the corner, to the left of the engine;
- lift the latch to disconnect the sensor from the cover;
- disconnect the intake air duct; to do this, slightly loosen the clamp that secures it;
- Find 4 latches on the box lid and unclip them;
- remove the cover;
- remove the old filter element;
- wipe the inside of the box with a dry cloth;
- install a new filter in the housing;
- close the lid and snap the latches;
- All pipes are connected, after which they should be secured.
This completes the air filter replacement procedure.
It is worth noting that the Daewoo Nexia model is produced with two types of gasoline engines:
- 8-valve 1.5;
- 16-valve 1.6.
It’s easy to find a suitable filter for them on sale; air filters from different manufacturers for these cars will be of approximately the same quality, no different from the original 2598-LF-PCS-MS.
Replacing the air filter on a Daewoo Nexia 8 valves, as well as replacing the air filter on a Daewoo Nexia 16 valves, can be done using the following air filters (analogues):
- Profit 1512-0705 (Czech Republic);
- Wix AP082 (Poland);
- Nipparts J1320901 (Netherlands);
- UFI 30.990.00 (Italy);
- Bosch 1 457 433 003 (Germany);
- Fram CA5371 (Germany).
After 10 thousand kilometers, the filter on the Daewoo Nexia has 8 valves, as well as on the Daewoo Nexia 16 valves, it is necessary to inspect whether replacement is required.
How to check the fuel pressure sensor
Depending on what fuel supply system is used for the car, there are three ways to check the sensor for functionality without dismantling the fuel rail:
- mechanical method for old-style cars with rubber fuel discharge hoses for gasoline internal combustion engines;
- multimeter;
- pressure gauge.
Dismantling the rack and subsequent diagnostics of the regulator is a more reliable way to check the quality of the mixture, since all adjacent components and wiring are checked together with the DDT. In most cases, diagnostics are carried out at a service station, since you will need to use a special stand. Self-diagnosis in the garage without dismantling the rack requires a tester and is carried out in 15 minutes.
Mechanical diagnostics of an old-style regulator
For gasoline internal combustion engines in which a rubber pipe is used in the fuel removal system, the sensor is located at the inlet of the pump. The check is carried out only on a cold engine.
- Start the engine.
- Remember the nature of its operation (a faulty sensor causes the motor to trip).
- Pinch the fuel outlet pipe with pliers for 1–3 seconds.
If the fault is in the regulator, the engine will restore its operation, the speed will become smooth, and jerking will disappear. If, after the outlet pipe is closed, the motor continues to operate incorrectly, the fault may be in clogged filters or worn contacts, although the sensor is working properly.
Diagnostics with a multimeter
Using a tester, they check the performance of the RTD and the quality of power from the block. Checking the electrical signal to the block is carried out in steps.
- Remove the block from the sensor.
- Set the multimeter to voltage measurement mode.
- Set the black lead of the tester to “minus”, attach the red probe to the connector of the block.
If nothing interferes with the passage of electricity to the sensor, there is no voltage loss, the tester screen will display a value of 5 V. The permissible deviation is ±1%.
The second stage is to check the quality of the output signal from the electrical part of the regulator. Checking the signal from the sensor step by step.
The black probe from the tester is connected to the negative terminal of the battery, the red probe is connected to the signal wire of the regulator (more often the wire is located in the block in the middle in a red braid).
Start the engine and let it run for 1 minute at minimum idle speed. In this speed mode, the output voltage on the DDT should remain at a minimum of 1.3 V.
As the speed increases, the voltage parameter from the sensor should increase to 5 V. If the unit is faulty, at the highest speeds the readings may differ significantly, both up (in 10% of cases) and down. This leads to the pump starting to pump fuel and switching to emergency operation.
Checking with a pressure gauge
To check the sensor for functionality, use a pressure gauge, a device for measuring pressure in the rail and pipes of the fuel system, air pressure in tires, etc. Before checking with a pressure gauge, it is necessary to disconnect the vacuum hose from the system and connect the device between the fitting and the fuel pipe.
Before diagnosing, it is necessary to clarify the pressure value for a particular car according to the manual. The operating pressure for gasoline engines ranges from 2.5–3 Atm. During the regas process, the pressure drops by 1–2% of the norm, a working valve maintains the value within the acceptable range.
Consequences of untimely replacement
You should not ignore the importance of the air filter, as you can damage the car’s power unit. What are the consequences of such actions?
At first the car will lose its power . This is directly related to the fact that the filter walls are dirty, which means the amount of air that can enter the cylinders is reduced. This will lead to poor fuel combustion and a rich mixture. The result is increased fuel consumption and reduced engine efficiency.
The next stage and the consequence of untimely replacement is that the engine will start worse , the instability of idle speed , leading to a rapid increase in gasoline consumption.
Ultimately, dirt, dust, and grains of sand will accumulate on the walls of the filter, entering the cylinder block and scratching its walls . This leads to poor sliding, depressurization of the combustion chamber , loss of compression and power of the power unit.
The end result is that the rings will become unusable and the engine will require major overhaul . But it is worth noting that drivers rarely bring the situation to a critical point, and as soon as the car starts to have trouble starting, they immediately change a consumable such as the air filter.
Tips for the driver
To ensure that the car runs smoothly, experienced car owners give practical advice that is worth listening to:
- The filter element must be periodically removed from the box and inspected. You can extend its service life by simply shaking the filter, which will clean it of dust and small particles of sand, dirt, etc.;
- It is also necessary to inspect the filter before the time specified in the regulations or technical passport in order to promptly identify problems such as damage, cracks, severe contamination, and abrasions. If problems of this kind are detected, the cleaning part is replaced;
- during replacement work, it is necessary to clean the housing from dust and dirt that has settled on it;
- It is unacceptable to start a car if the housing with a filter has been removed from it or if there is no cleaning element in the box, since dust and small particles of dirt get into the engine cylinders, which subsequently leads to system failure;
- Change filters more often if the car is used in dusty areas.
By following these tips, you can avoid unplanned repairs and breakdowns.
How to change the air filter on a Daewoo Nexia?
If you change the air filter in your Daewoo Nexia car correctly and on time, the engine will run without interruption, and its service life will increase significantly. In addition, the air in the cabin will become much cleaner, the stove will work better and the windows will stop fogging up. Also, do not forget that a dirty filter is a breeding ground for mold and bacteria.
The period for replacing an air purifier for any car is individual and depends on the conditions in which the car is operated.
If you mainly drive around the city, on clean and dust-free roads, then you need to change it every 15,000-20,000 kilometers.
But if the car is driven on unpaved rural roads, then it is better to reduce the replacement period to 6000-8000 kilometers.
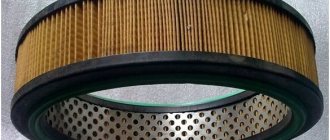
Air purifier for Daewoo Nexia
The air barrier on the Daewoo Nexia is needed to purify the air that is supplied to the power unit during operation. A conventional air purifier is a layer of special paper, which is folded like an accordion and placed in a plastic rectangular case.
A working air barrier is capable of trapping even the smallest particles in the air, but with prolonged use it becomes clogged and its capacity is reduced. Subsequently, this can lead to a decrease in power and interruptions in its operation. To prevent this from happening, you need to change the air purifier in a timely manner. The process is very simple and any car enthusiast can handle it.
Air filter location
The air filter in the Daewoo Nexia is located to the left of the engine when standing in front of the hood.
The box is located to the left of the engine
The body is supported by three supports. There is filter material inside the housing. The filter element has a flat rectangular shape and has a large filtration surface.
Special tubes are connected to the body through which air is supplied.
Replacement instructions
Replacing the air barrier is probably the simplest job in car servicing and will take no more than 15-20 minutes even for an inexperienced car enthusiast.
Tools
To change the air purifier on a Daewoo Nexia car, we do not need any special tools, just a regular screwdriver, the barrier itself and an old clean rag.
Stages
- The first step is to park the car on a flat surface. When we open the hood, the filter box is located to the left of the engine in the corner.
- There is a sensor on the cover. To disconnect it, you need to lift the latch.
- Next, disconnect the intake air duct by slightly loosening the clamp securing it.
- We unclip the four latches on the box lid.
- Let's take it off.
- We remove the old filter element.
- We wipe the box with a rag.
- We install a new one.
- We put the cover on and snap the latches.
- We connect all the pipes and secure them.
Location of the box Raise the clamp Unscrew the bolt on the clamp Unsnap the clamps Take out the old element Wipe the installation site of the new one with a clean rag
At this point the replacement process can be considered complete. Everything is very simple and there is no point in delaying replacement, because this may damage the components and systems of the power unit.
Useful tips
If you want your car's engine to work long and smoothly, then listen to some recommendations from experienced car owners.
- Sometimes you need to remove the filter and clean it of accumulated dust and dirt. To do this, just shake it or blow it with compressed air. Important! This is done in the opposite direction to air movement when the filter element is installed on the engine.
- Inspect the filter occasionally in order to promptly identify possible damage, cracks, abrasions, or simply heavy contamination. If such malfunctions are detected, immediately replace the barrier.
- During replacement, be sure to clean the inner surface of the case from any dirt and dust that has settled on its walls.
- You cannot start the engine if the filter housing is removed or if the filter element is removed from it. This may result in dust particles and dirt entering the cylinders of the power unit and subsequent failure of these components.
- If the machine is operated in a very dusty area, the filters need to be changed more often.
Signs of a malfunctioning fuel pressure regulator
There are five main symptoms of a malfunctioning fuel pressure regulator (both types), which can be used to judge the complete or partial failure of this important unit. Moreover, the symptoms indicated below are typical for cars with both gasoline and diesel engines
However, it is worth mentioning that the listed situations may be signs of failure of other engine components (fuel pump, clogged fuel filter), so it is advisable to carry out comprehensive diagnostics in order to accurately determine its performance. So, the signs of a malfunctioning fuel pressure regulator are as follows:
- Difficulty starting the engine. This is usually expressed in a long rotation of the starter with the accelerator pedal depressed. Moreover, this sign is characteristic under any external weather conditions.
- The engine stalls at idle speed. To maintain its operation, the driver must constantly apply gas. Another option is that when the engine is idling, the speed is usually “floating”, unstable, until the engine stops completely.
- Loss of power and dynamics. Simply put, the car “does not pull,” especially when driving uphill and/or when loaded. The dynamic characteristics of the car are also lost, it accelerates poorly, that is, when trying to accelerate, a deep drop in revolutions occurs at their high values.
- Fuel is leaking from the fuel hoses (rail). In this case, replacing hoses (clamps) and other nearby elements does not help.
- Excessive fuel consumption. Its value will depend on both the breakdown factors and the engine power.
Accordingly, if at least one of the above symptoms appears, it is necessary to perform additional diagnostics, including using an electronic error scanner available in the ECU memory.
Fuel pressure regulator error
Diagnostic errors of the fuel pressure regulator
In modern cars, a fuel pressure sensor is installed as a regulator. If it fails partially or completely, one or more errors associated with this unit are formed in the memory of the electronic engine control unit. At the same time, the engine malfunction light is activated on the dashboard.
When there is a DRT malfunction, the driver most often encounters errors numbered p2293 and p0089. The first is called “fuel pressure regulator - mechanical failure”. The second is “the fuel pressure regulator is faulty.” For some car owners, when the corresponding regulator fails, errors are formed in the ECU memory: p0087 “the pressure measured in the fuel rail is too low relative to the required one” or p0191 “fuel pressure regulator or pressure sensor.” The external signs of these errors are the same as the general signs of failure of the fuel pressure regulator.
You can connect to the car control unit via Bluetooth or Wi-Fi. Scan Tool Pro, having a 32-bit chip and easy to connect to, reads and stores all sensor data not only in the engine, but also in the gearbox, transmission, or auxiliary systems ABS, ESP, etc. It can also be used to monitor fuel pressure readings in real time, which it transmits to the vehicle’s ECM while performing a series of checks.
How to relieve pressure urgently?
There are times when the fuel system needs to be depressurized, but there is no time to wait for the pressure to drop. Then you can forcefully release the pressure. The algorithm for this procedure is as follows: 1. Disconnect the negative terminal of the battery. 2. The fuse that controls the power supply system of the electric fuel pump should be removed. It is marked F3. 3. Connect the battery. 4. Start the engine and let it run for two minutes. During this time, the remaining fuel in the system will be exhausted. The procedure is completed. The pressure has been released. The engine can be turned off. 5. Disconnect the car. 6. Reconnect the fuse marked F3.
Source
How to reduce the pressure in the power system of a fuel-injected car?
Note! Before you start, you should definitely know that in the fuel injection power system the pressure is 30 MPa (3 kgf/cm2). Based on these values, always remember that under no circumstances should you loosen the connection of the high-pressure fuel pipes while the car’s engine is running, or immediately after stopping it. But there is one interesting factor: after the car has been turned off and left unstarted for two to three hours, there is no need to reduce the pressure in the system at all, since during this time it itself drops to almost zero and rises sharply after starting engine!
1) In order to reduce the pressure, first open the hood of the car and then find the control valve in the engine compartment, which will still be closed with a protective cap that is very similar to a wheel nipple cap.
2) After the protective cap is found, take it and turn it completely by hand and after unscrewing the cap, a control valve will appear before your eyes, in the center of which there will be a spool (Indicated by an arrow), you will need to press on this spool using which be it with an awl or a screwdriver, or even with a wrench.
Note! When you press this spool, pressurized fuel will suddenly burst out of the control valve itself. By the way, this fuel can be poured into a container prepared in advance for this (This is only if you do not want to dirty the car engine), or you can go another way way, without draining the fuel into any container, but simply after splashing out, take it and wipe the places where the fuel has spilled dry with a rag! (Be sure to make sure that there are no traces of fuel on the engine, otherwise, due to fire getting on them, the engine may simply burst into flames and, as a result, completely burn out along with the car, so be careful)
3) Finally, when the pressure in the system has been reduced, take the cap in your hands and screw it back onto the control valve.
Source
Measuring process
Fuel pressure must be measured in 4 operating modes, that is, 4 different measurements will be required.
With the ignition on
When the ignition is turned on, the fuel pump must supply the system with the fuel needed to start the engine. Therefore, we simply turn on the ignition and look at the readings. The pressure must be above 3 atmospheres.
When the return line is turned off
Almost all modern cars have a fuel pressure regulator. It is aimed at preventing excessive pressure from being created in the system. When the limits are reached, it resets the pressure to normal. We clamp the return pipe and get the result on the pressure gauge.
It should be about 7 atmospheres
. If you have a 6 atmosphere pressure gauge, the needle should be “filled up”.
Under loads
And one more stage of measurement is the measurement of pressure drops under loads. Just apply the throttle (you can just “tug” the throttle cable if you have a mechanical one) and observe the changes.
During recharging, the pressure should be about 3 atmospheres, and then drop to the idle value - that is, up to 2.5 atmospheres
.
Method 3: Press down on the control valve
Another method to avoid spilling gasoline when releasing pressure is to operate the control valve. You need to take a tube, a bottle and a sharp object (an awl, a nail or a screwdriver). Sequencing:
- Unscrew the protective cap on the engine that covers the control valve;
- put a tube on the fitting;
- lower the free end of the hose into the bottle;
- pierce the hose near the fitting with a sharp object;
- Press the control valve spool with a screwdriver.
After dumping the fuel, the protective cap must be returned to its place.
There is another way to reduce pressure:
There are several methods to relieve pressure in a vehicle, but each of them should only be used with a cold, idle engine. It should be remembered that even an hour after stopping the engine, the fuel in the system is under pressure. A natural decrease in pressure occurs within three to four hours after stopping the engine.
Source
Causes of failure and solutions
A malfunction can occur for various reasons. There is no general rule for eliminating it; you need to carefully inspect and listen to the operation of the car. In almost all cases, the entire device will need to be replaced.
Signs that indicate a malfunction:
- There is a noise when the clutch is engaged;
- Work begins with jerks and twitches;
- Switching on does not occur completely, slipping occurs;
- It is impossible to turn it off completely, this indicates that it is being driven.
If you are not sure that everything will be fixed, then the only option left is to replace it. Before work, you should consult with specialists.