Housing VF VAZ 2112
As you know, the VAZ 2112 air filter housing protects an important part, which is especially important for any internal combustion engine. Its main task is to filter the air entering the combustion chambers. It should filter out all dust and dirt (especially abrasive) and interfere with the air flow as little as possible. This is a “double-edged sword”, because the better the filtration, the greater the resistance to the flow. Therefore, for each car a certain compromise is selected and the air filter must be attached to the body of the VAZ 2112 correctly.
Purpose
The task of this element is to clean the air that enters the engine intake manifold. As you know, the air for engine operation is taken from the atmosphere (that is, from the street).
Often, dust and small abrasive deposits enter the system along with it. They negatively affect engine performance. In order to prevent these particles from entering the engine, an air filter was invented.
Reasons for the appearance of oil in the filter
There are several reasons why oil appears in the air filter:
- insufficient compression in the cylinders;
- frequent addition of oil due to stuck piston rings;
- the oil deflector rod is clogged, so the oil, due to the impossibility of returning to the crankcase, is thrown into the air filter pipe.
The above reasons cause harm to the motor. A filter that is saturated with oil is no longer able to filter the air 100%. Its throughput decreases sharply and its power drops.
In a carburetor engine, there is a problem such as the appearance of condensation on the filter. Condensation accumulates due to a poor-quality filter - a tube from the breather is connected to the filter housing, and oil vapor passes through it, which then enters the intake manifold. When the oil cools, it takes all the moisture from the air, and when starting, it evaporates and settles on the walls of the air filter.
Correct installation of the air filter implies a clear reverse sequence of disassembling the filter. The main thing to remember is that the screws securing the housing cover are tightened “crosswise”, and you should not clamp them tightly, since the plates are fragile.
Device, principle of operation
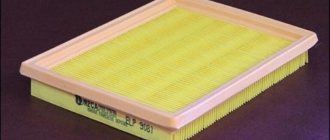
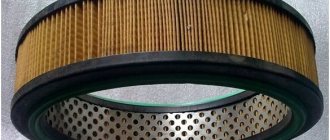
The design of the filter is quite simple. It is a paper cartridge with a rubberized frame. The element can have a rectangular or round shape (depending on the type of engine power system).
The main cleaning element is porous paper. In order to reduce resistance and speed up the passage of air through the filter, porous paper is folded into an accordion. How does this element work? During the intake stroke, the engine valve opens and creates a vacuum (in other words, a vacuum). Due to the pressure difference, air is drawn into the collector from the atmosphere. It passes through the filter through small pores. Their diameter is small, which helps retain the smallest dirt particles. Next, the purified air enters the intake manifold, where it is then mixed with fuel and burned in the engine cylinder.
Removing and installing the air filter VAZ 2170 Priora
- Repair manuals
- Repair manual for VAZ 2170 (Priora) 2004+.
- Removing and installing the air filter
The air filter is removed to gain access to other units in the engine compartment, as well as if it is damaged.
You will need: a 10mm wrench, a flat-blade and Phillips-blade screwdriver, and pliers.
1. Disconnect the wire from the negative terminal of the battery.
2. Disconnect the wiring harness connector from the mass air flow sensor (see “Replacing the air filter element” ).
| 3. Loosen the clamp securing the air supply hose... | 4. ...and disconnect the sleeve from the mass air flow sensor. |
| 5. If you are removing the air filter to replace it, and the new filter does not have a mass air flow sensor installed, remove the two sensor mounting bolts... | 6. ...and remove the sensor from the filter... |
7. ...and its O-ring.
| Note If you remove the air filter not for replacement, but to gain access to other units, the mass air flow sensor does not need to be removed. |
| 8. Squeeze the tapered shanks of the supports with pliers and remove the three rubber supports of the air filter from the holes. | 9. Remove the tip of the air intake hose from the bracket by pulling it towards the left headlight... |
| 10. ...and remove the air filter assembly with the air intake pipe. | 11. If necessary, remove the air intake hose from the adapter spacer. |
12. If you are replacing the air filter, remove the rubber air filter supports from the holes in its housing by squeezing the conical shanks of the supports with pliers (see paragraph 8). Install the supports on the new filter in the same way as when removing them, lubricating their shanks with engine oil to make installation easier.
| Note The manufacturer recommends cutting off the supports with a knife, in which case you will have to replace them with new ones. |
13. When installing rubber supports in the upper cross member of the front end, first insert the lower half of the support from the air filter side into the hole, and then, using a screwdriver, push the remaining lower part of the support into the hole.
14. Install the air filter and all removed parts in the reverse order of removal.
↓ Comments ↓
1. Car structure
1.0 Car structure 1.1 General information about the car 1.2 Passport data 1.3 Car keys 1.4. Controls 1.5. Heating and ventilation of the cabin 1.6 Ensuring a comfortable air temperature in the cabin 1.7. Doors 1.8. Passive safety equipment on the car 1.9. Seats
2. Recommendations for use
2.0 Recommendations for use 2.1. Safety rules and recommendations 2.2 Running in the car 2.3 Operating the car during the warranty period 2.4. Preparing the car for departure
3. Problems along the way
3.0 Malfunctions along the way 3.1. The engine does not start 3.2 Malfunctions of the fuel injection system 3.3 Idle speed has disappeared 3.4. Interruptions in the operation of the 3.5 engine. The car moves jerkily 3.6 The car accelerates poorly 3.7 The engine stalled while driving 3.8. Oil pressure dropped to 3.9. Engine overheating 3.10. The battery does not recharge 3.13. Knocks in the engine 3.16. Wheel puncture
4. Maintenance
4.0 Maintenance 4.1. General provisions 4.2. Inspection work 4.3. Lubrication and filling works 4.4. Diagnostic work 4.5. Repair and adjustment work
5. Engine
5.0 Engine 5.1 Design features 5.2 Possible engine malfunctions, their causes and solutions 5.3 Useful tips 5.4 Checking compression in the cylinders 5.5 Removing and installing the decorative engine casing 5.6 Removing and installing the engine splash guard 5.7 Installing the piston of the first cylinder to the TDC position of the compression stroke 5.8 Replacing the drive belt gas distribution mechanism and tension roller 5.9 Replacing the power unit supports 5.11. Replacing engine seals 5.13. Engine cylinder head 5.15. Engine repair 5.16. Lubrication system 5.17. Cooling system 5.18. Power supply system 5.19. Design Features
6. Transmission
6.0 Transmission 6.1. Clutch 6.2. Gearbox 6.3. Front wheel drives
7. Chassis
7.0 Chassis 7.1. Front suspension 7.2. Rear suspension
8. Steering
8.0 Steering 8.1 Design features 8.2 Possible steering malfunctions, their causes and solutions 8.3. Steering column 8.4. Steering linkage 8.5. Steering gear
9. Brake system
9.0 Brake system 9.1 Design features 9.2 Possible malfunctions of the brake system, their causes and solutions 9.3 Bleeding the brake system hydraulic drive 9.4 Removing and installing the vacuum brake booster 9.5 Replacing the brake pedal axle bushings 9.6. Main brake cylinder 9.7. Front wheel brakes 9.8. Braking mechanisms of the rear wheels 9.9. Pressure regulator 9.10. Brake hoses and tubes 9.11. Parking brake
10. Electrical equipment
10.0 Electrical equipment 10.1 Design features 10.2. Battery 10.3. Mounting block (relays and fuses) 10.4. Generator 10.5. Starter 10.6. Ignition switch (lock) 10.7. Electronic engine control system (ECM) 10.8. Ignition system 10.9. Lighting, light and sound signaling 10.10. Windshield cleaner 10.11. Washer reservoir 10.12. Electric fan of the engine cooling system 10.13. Electric motor of the heating and ventilation system fan 10.15. Cigarette lighter 10.16. Instrument cluster 10.18. Electronic anti-theft remote control system 10.19. Immobilizer 10.21. Replacing sensors and switches
11. Body
11.0 Body 11.1 Design features 11.2 Possible body malfunctions, their causes and solutions 11.3 Removing and installing windshield frame lining 11.4 Removing and installing soundproofing upholstery in the engine compartment 11.5. Removing and installing bumpers 11.6 Removing and installing the fender liner and protective wing cover 11.7 Removing and installing the front fender 11.8 Removing and installing decorative sill trims 11.9. Hood 11.10. Trunk lid 11.11. Doors 11.12. Seats 11.13. Seat belts 11.14. Rear view mirrors 11.15. Interior fittings 11.16. Instrument panel 11.17. Heater 11.20. Body care
12. Applications
12.0 Appendix 12.1 Appendix 1. Tightening torques of threaded connections, Nm 12.2 Appendix 2. Fuels, lubricants and operating fluids 12.3 Appendix 3. Nominal filling volumes 12.4 Appendix 4. Basic data for adjustments and monitoring 12.5 Appendix 5. Spark plugs used on vehicles 12.6 Appendix 6. Lamps used on a car 12.7 Appendix 7. What you need to have in a car 12.8 Appendix 8. Tools used when repairing a car
13. Electrical diagrams
13.0 Electrical Diagrams 13.1 Diagram 1. Instrument Panel Harness Connections 13.2 Diagram 2. Vehicle Front Wire Harness Connections 13.3 Diagram 3. Engine Electronic Control System (ECM) Harness Connections 13.4 Diagram 4. Vehicle Rear Wire Harness Connections 13.5 Diagram 5. Light Harness Connections license plate light 13.6 Diagram 6. Left front door wiring harness connections 13.7 Diagram 7. Right front door wiring harness connections 13.8 Diagram 8. Rear door wiring harness connections
Replacement Regulations
When do you need to change this element on a domestic “ten”? The operating instructions indicate the following figure - 25 thousand kilometers. But experts say that replacement regulations may differ significantly, depending on the operating conditions of the car. For example, if the car often drives through dusty areas, the filter resource will be only 10 thousand kilometers. But if the car is used mainly in the city, the air filter on the VAZ-2110 needs to be changed every 20 thousand kilometers.
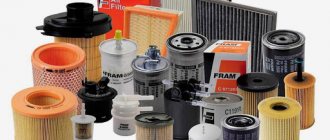
Air filter selection
Many car owners are wondering which air filter to install. It is important not to skimp on the filter, since its price is relatively low.
New Goodfil air filter for VAZ 2110
Some of the best manufacturers are Goodfil and Bosch air filters. When testing air filters, these manufacturers showed the best results in the category:
- number of corrugations and their depth
- curtain area of the filter element;
- resistance;
- resource.
You can test the filter yourself. You can see by eye where there are more and less corrugations, whether the filter bends well or not.
Signs
How to determine that the cleaning element has become unusable? This can be done visually by opening the lid. If the filter is dirty in the same way as in the photo below, it can no longer be used.
Along with this, the driver will feel third-party signs indicating an upcoming replacement. If the filter is clogged, it will have difficulty passing air through it.
Accordingly, more fuel than oxygen will enter the cylinders. In reality, this means increased gas consumption. Usually it exceeds the norm by 5-7 percent. But that's not all. Due to the supply of a different fuel mixture and lack of oxygen, the car will literally “suffocate”. The driver will feel a drop in acceleration and power. It also becomes more difficult to start the engine in winter.
How to install an air filter on a VAZ-2110 injector?
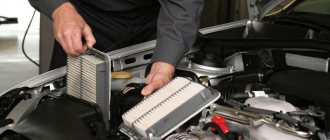
First you need to disassemble the case. We need to unscrew the four screws with a Phillips screwdriver. It is also necessary to remove the sensor plug that goes into the plastic case. Press the release button and set the element aside. Next, take out the old VAZ-2110 air filter. After that, we proceed to installing a new one.
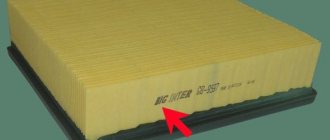
It is mounted in such a way that its stripes coincide with the arrow that is located on the bottom of the case. By the way, if there are dirt, they should be cleaned with a dry soft cloth. This will make the new filter last a little longer. After that, close the lid and tighten the four screws back. Don’t forget to connect the sensor, otherwise “Check” may light up on the dashboard. That's it, the procedure for replacing the VAZ-2110 air filter is completed. The work will take no more than five minutes. If the VAZ-2110 air filter pipe is damaged, you need to unscrew its clamps with the same screwdriver on both sides (the one that goes to the intake manifold and to the plastic housing). Next, remove the old element and install the new one.
Replacement
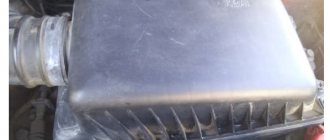
The air filter is installed in a special plastic casing. Damage to the casing is unacceptable, as well as to the rubber pipe that connects the filter system to the engine. If there are cracks, the housing must be replaced. Replacing the filter is as easy as shelling pears - anyone who has ever held a screwdriver in their hands can do it. To replace it you will need:
- Crosshead screwdriver
- New filter element
- Attention and patience
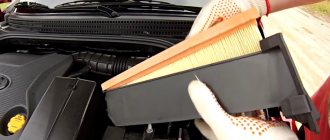
To access the filter element, remove the top cover of the filter housing. To do this, unscrew the four bolts in the corners of the housing. Next, remove the cover.
Note. If the mass flow sensor connector is in the way, disconnect it by gently pressing the latch.
The best air filter for VAZ 2112
Special attention to the body
The old filter will remain on the removed cover. We remove it, and then thoroughly clean the internal cavity of the filter housing from dust and dirt. We also carefully inspect the entire filter housing - there should be no cracks or holes on it. After cleaning, install a new one, making sure that the seal fits tightly and well. This must be done carefully, because... The filter is quite fragile (paper) and the seal is soft.
Note. Some damage to the housing, or a loose fit of the filter element can be seen before cleaning the housing by dirty traces of air flows, against a clean background.
If the filter housing is damaged, it must be replaced. For this you will need:
Note. You can leave the old fastening rubber bands, but they are quite difficult to remove from the filter housing without damaging them. In addition, rubber “dries” and “dumbs” over time, so if they are covered with cracks, then they must be replaced.
The filter housing is attached to the body with three specially shaped rubber products. Two are located at the front, connecting the body and the front of the body. The third mount is located at the back (relative to the filter housing), on the battery side (special metal bracket). In addition, two pipes are attached to the body - an inlet (paper-metal pipe) and an outlet (rubber, with a clamp). To remove them you will need to disconnect them. The procedure for removing the housing is as follows:
- Disconnect the exhaust pipe by unscrewing the clamp using a screwdriver. Then we take it to the side.
- At the bottom of the body, we disconnect the inlet pipe in the form of a metalized corrugation, simply pulling it down.
- Using a slotted screwdriver (carefully prying it by the edge), disconnect the fastening rubber bands one by one.
- We take out the body.
Note. You can remove the rubber bands from the old casing using pliers, having previously lubricated the places where the rubber contacts the casing.
Now the old housing has been removed, you can install the new one. Here the order is slightly different from the withdrawal order. We proceed as follows:
- We install fastening rubber products into the seats. Usually they can be installed simply with your fingers, but, if necessary, we can help with a slotted screwdriver.
- We put the body on the elastic bands. First, we simply place the body on them as guides, then, in turn, lightly pressing on the body, we pull on the protruding rubber part, increasing the force until the mount snaps into place (a characteristic “soft” click).
- Now we put on the exhaust pipe and tighten its clamp.
- We put on the inlet pipe by simply sliding it onto the tube.
Note. It is more convenient to immediately install the filter element into the housing while it is not installed.
How to install an air filter on a VAZ-2110 carburetor?
There is a slightly different installation technology here. The filter is located in a metal housing, which is tightened with a small nut. The latter must be unscrewed with a 8 key. It is also necessary to remove all latches from the cover.
After this, access to the filter will open. Before installing a new one, you need to clean the insides of the case from dust. The filter itself is round in shape, and it makes no difference which side it will be installed on. After replacing the cleaning element, you should put the cover back on the latches and tighten the nut.
Zero resistance filter
Some car owners change the standard filter to the Federal Tax Service. This element has a different shape (resembling a mushroom) and is installed directly at the outlet of the air pipe. To install such an element in a car, you need to completely remove the plastic filter housing. After this, secure the FNS terminal with the rubber pipe using a clamp.
Why is it important to install such a filter? This is explained by the fact that the Federal Tax Service has a large throughput. This has a positive effect on engine power. But as practice shows, the expected increase is no more than two horsepower. Along with this, the filter requires periodic cleaning, and not with a simple cleaning agent, but with oil impregnation. To make the Federal Tax Service less contaminated, the owners place it in a round metal case. But this does not significantly increase the interval between cleanings.