Trunk lid VAZ 2115
Among people living in Russia, there is an opinion that our auto industry creates, to put it mildly, not very high-quality cars. Perhaps this point of view is too biased, but it is an indisputable fact that owners of domestic cars sooner or later have to spend personal funds on car service. You can go into lengthy discussions about how it was before and how it is now, but many VAZ-2115 owners have already encountered a similar problem.
Doesn't hold up
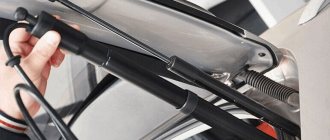
The trunk of the VAZ 2115 may have a problem with the lid not holding on. The lid is held in place by two torsion bars. However, over time they fail and will hit painfully if this problem is not corrected. There are several ways to solve this.
First, you can buy and install new torsion bars. They are not very expensive, but they are not so easy to install. You need to remove the back seat, take out the shelf and place a stick under the trunk lid - it’s easier to install it on an open trunk. It is important to install carefully so as not to break the rear glass.
Secondly, you can buy two clutch springs for the classics and make two metal strips that will be attached to the screws securing the trunk trim. We will strengthen the springs behind them. It is more convenient to install springs that are attached to the body.
Third, you can buy a gas shock absorber for the trunk of a VAZ 2108 and attach it to the trunk hinge on one side and to the body on the other. However, the lid will close tightly if two shock absorbers are installed. With one shock absorber, the trunk will warp and the hinges will fail.
Fourth, you need to drill a hole where the shelf is attached and the seat is latched. There we fix one end of the stop. Then you need to clean the welding areas. The second is installed in welded rectangles to the trunk lid levers. After welding, you need to putty and paint. The trunk will open from a button in the cabin.
Replacing torsion bars
— We place the torsion bar loosely on the plate with the grooves.
— We put the key on the end of the torsion bar.
— With our left hand we take hold of the base of the torsion bar - along the length near the bend of the torsion bar, with our right hand we hold the key.
— Remember: the key must be dressed so that the end of the torsion bar can be pulled onto the groove and at the same time so that the end does not fall off the key.
- We hold it tightly with our hands.
- Procedure. With your right hand we turn the key down, and with your left hand we hold the torsion bar in place. As soon as the end of the torsion bar becomes parallel to the glass, we thread the torsion bar into the groove. The hands must move synchronously. This is so that the end does not break out of the key!
— We turn the end of the torsion bar and thread it into the upper groove.
— We make sure that the torsion bar is fully seated.
We repeat similarly on the other side.
Adjustment
Place your car on a level surface and open the trunk lid.
Unscrew all the rod screws on the rear end sheet (indicated by arrows).
Unscrew all rod screws (arrows) on the rear end plate.
Remove the left upper cover gasket (indicated by the arrow) and...
Remove the cover gasket.
...unscrew the two buffers at the rear end of the trunk lid.
Now remove the trunk lid rotary damper and...
...align the lid hinge with the screws (arrows) on the side piece. Loosen the screws enough to allow the cover to move.
Align the lid hinge with the screws (indicated by arrows) on the side piece.
Loosen the screws on the trunk lid enough to allow the lid to move.
Close the lid and install a 4 mm thick spacer (indicated by arrow) between the side edge of the trunk lid and the side wall at the rear.
Insert a 4 mm thick spacer (indicated by arrow) between the side edge of the trunk lid and the side wall.
Once the cover is aligned with the gap, remove the spacer and carefully lift the cover. Now it should not move in the loops.
Now tighten the hinge screws to a torque of 23 Nm and...
...then loosen the hinge screws (indicated by arrows) on the body so that the cover can be moved with force.
Loosen the loop screws (indicated by arrows) slightly on the body.
Close the lid and push it down in the hinge areas until it has a 2mm gap from the sides.
Create a gap of 2 millimeters.
Carefully open the lid - the hinges should not slip - tighten the fastening screws to a torque of 23 Nm.
Screw in both rear bumpers until the closed trunk lid rests slightly.
Carry out installation in reverse order.
It's thundering
At one time I tried to adjust it with rubber bands - it helped, but not for long, it started knocking again, I changed the locks like gloves, because the body “played” on uneven surfaces and broke the latch. In general, I did this: I made a couple of cuts around the perimeter of the seal and inserted a “soft” cable inside the seal - the door began to fit more tightly and stopped rattling and leaking (I know that this is a collective farm, but this killed 2 birds with one stone). I also modified the lock; instead of the standard pin on which the latch moves, I inserted a bolt, thereby eliminating the play of the latch itself.
Adequate methods
This will surprise many, but there are much more adequate methods to get into an automatically locked car without damaging it than radical and expensive ones.
So, the car is locked from the inside with the keys in the ignition, it’s a long drive to get the keys, and I don’t want to spend money either on a special company or on subsequent repairs:
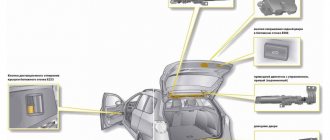
1. Open the trunk to get into the cabin. There are several methods to perform this task:
- We apply a strong impulse blow with an open palm just below the lock, and the vibration will complete everything for you and the latch will open;
- take an awl (a woman’s nail file or manicure scissors) but not a screwdriver. We insert the existing object under the seal and press the tongue.
2. Open the hood and disconnect the battery. This is the simplest of the methods:
- we crawl under the car and find the cord leading to the hood lock; if that doesn’t work, we look for the lock tongue through the radiator grille;
- press the tongue mechanically or pull the cable and the hood opens;
- We approach the battery and knock down the negative terminal, and click it several times on the mount. The car body, which is a minus, is a large consumer and turning it on abruptly will create a small soft drop. It’s better not to touch the right one, because you can burn the ECU.
3. Open the door with wire. The sequence of actions is as follows:
- we find a stiff wire and an analogue of a woman’s nail file and get to work;
- use a thin object to pry out the glass seal near the lock;
- we insert the pre-bent wire into the prepared hole and lower it until it rests;
- the wire rests against the lock latch, so we turn it and turn it until it goes around it, when it “falls through” we pry it back;
- The opening procedure will take 2-5 minutes, and the door will be open; all that remains is to hammer the seal back.
4. Open with your phone. The most interesting, and most importantly effective method of how to open the door on a VAZ 2114. It is simple and amazing:
- you need to remember who has the second keys and call this person;
- bring the phone closer to the keyhole;
- the interlocutor at the other end presses the open button and the machine is open.
Replacing the trunk lock on a VAZ 2113, VAZ 2114, VAZ 2115
Welcome! The trunk lock is responsible for closing and opening it, thanks to it the trunk is also kept in the closed position and until you want it, it will not open, but over time the lock wears out or the trunk lid is replaced with a new one, in this case the first thing will need to be adjusted the lock, if it wears out, it will have to be adjusted and replaced with a new one, otherwise either the trunk lid will not open (it will jam, this is the worst option), or on its own (When driving over bumps) there will be time time to open up.
Note! To replace the trunk lock, stock up on the following set of tools, namely: A set of screwdrivers, wrenches and spanners; in addition, you may also need adjustment plates, but this is only if the lock has to be adjusted, and a new lock must be adjusted to fit the lock!
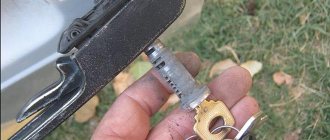
Where is the trunk lock located? Every car has a trunk lock, it alone does not play any role and is of no use, but if you also add a latch to this lock (And every car also has a latch), then when you close the trunk lid, the lock will engage with this latch and thus the lid is locked, these two parts are located as follows, namely the lock itself is located in the rear central part of the trunk lid as shown in the large photograph, and the latch is located not on the lid but on the car body (see small photo) and when closing the trunk lid, the lock enters this latch and the lid is fixed.
When should you change your trunk lock? It is changed in the case when it stops working and opening the trunk, the main reason for the lock’s inoperability is the failure of its cylinder, in some cases it simply becomes deformed (Due to a blow to it with something, it may fail) except for the above listed situations, the lock is sometimes changed to work, it’s just that when replacing the trunk lid, the lock moves to a new position and there are cases when the trunk lid cannot close and people immediately run to the auto store for a new one, although in such a situation the lock latch will simply need to be adjusted and it will last for a long time very long life, so see for yourself not to confuse in which cases the lock needs to be replaced, and in which cases it will be quite simple to adjust it.
Door opening method
If the VAZ-2109 door does not open from any side, then the cause of the breakdown is difficult to determine, since there is absolutely no access to the lock mechanism.
A somewhat simplified version of the breakdown occurs when the door does not slam shut completely and gets stuck in that position. Then it is possible to reach the latch from the outside with a sharp object.
To open a jammed door, you must first perform the following steps:
When simple means do not produce results, the door will have to be opened from inside the cabin, which will require removing its trim.
In practice, this is not easy to do, because the casing is pressed by the sash and it is difficult to pull it out without damage. But there is still no other way out: it is better to damage the inner panel than to mutilate the door itself.
To dismantle the decorative panel, you need to unscrew the armrest handle with a screwdriver, and then the storage shelf located at the bottom of the door card. Then the button that secures the lock from above is unscrewed and removed.
Lastly, the window lifter handle and the opening handle frame are removed. Now you need to carefully separate the lining from the body using a pair of flathead screwdrivers and another suitable tool.
You may be able to remove the trim without visible damage.
When the decorative panel is removed, access to the lock mechanism from the inside opens, although getting to it is inconvenient. Immediately check whether the rod running from the handle to the lock has fallen off. This is a fairly common malfunction that can be fixed with little effort. Put the rod in place and open the door.
If there are no visible reasons for the breakdown, simply try to open the door from the inside by working on the mechanism with various tools. If necessary, enlist the services of an assistant who will press or pull the door from the outside. Experience shows that such procedures for opening jammed doors can take a lot of time, so you will have to be patient.
How to lubricate ball joints before installation
Causes of malfunctions
There are several types of malfunctions that prevent the doors of a VAZ-2109 from opening from the outside or from both sides:
The latter malfunction sometimes occurs due to the fault of the car owner himself, who has decided to change or repair the door lock. Having put it in place and not fully tightened the screws, the owner of the VAZ-2109 accidentally slams the door, after which it will not be possible to open it with the handle.
Troubleshooting
If a key or silumin rod breaks, you should not immediately buy a new block with a handle. On sale you can find special repair kits for VAZ 2108-099 door handles, which contain these parts in 2 copies.
This way you will save money and easily change the key yourself by removing the handle using the following sequence of actions:
- Remove the decorative panel.
- Disconnect the rod connecting it to the locking device from the handle mechanism.
- With the glass fully up, unscrew the 2 fastenings of the handle to the door card.
- Remove the handle, replace the parts and put it back.
If the rod is disconnected, then you need to remove the inner lining and put it in place, as described above. Using the moment when the facing panel is removed, check what caused the disconnection of this rod so that history does not repeat itself when the door is slammed.
Malfunctions of the locking mechanism can only be eliminated by removing it. In a situation where the device has a lot of wear, as happens on the driver and front passenger doors, it is recommended to replace the lock with a new one.
After installing it in place, adjustment will be required to ensure precise alignment of the locking parts. To adjust, the lock will have to be fixed in different positions, achieving the optimal one.
How to replace the trunk lock on a VAZ 2113-VAZ 2115?
1) As for hatchbacks, the lock can be easily removed on them, but there will be no problems on sedans either, but the principle of replacement on two different bodies is different, first we’ll talk about hatchbacks, if you have a car with such a body, then remove them first the upholstery that is fastened inside the trunk lid with ten pistons, it can be removed very easily, all the pistons were pry off with a screwdriver and then the upholstery was put aside, for more details on how to do this, read the article: “Replacing a spoiler on cars”, point one in that Study the article in detail.
Preparation for installation
We purchase a lock kit. There are a lot of manufacturers of auto parts on the market now, but there are no special differences between the kits
It is important that the device has a warranty card and instructions for use and connection. Also in the box you will find:
Additionally, you need to stock up on a set of standard tools: pliers, screwdriver, screwdrivers, multimeter, drill with carbide drill bit. In addition to the standard accessories, immediately buy additional wires; it is quite possible that the length of those you find in the box will not be enough for you. Black heat-resistant insulating tape, corrugated tubes, and clips for fastening the trim will also be useful, since very often the trim of car elements is attached to disposable ones.
The trunk lid and its weaknesses
Among people living in Russia, there is an opinion that our auto industry creates, to put it mildly, not very high-quality cars. Perhaps this point of view is too biased, but it is an indisputable fact that owners of domestic cars sooner or later have to spend personal funds on car service. You can go into lengthy discussions about how it was before and how it is now, but many VAZ-2115 owners have already encountered a similar problem.
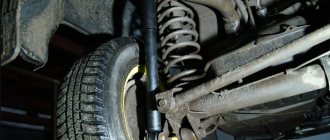
Sometimes a car brings a surprise not in the form of a breakdown of the chassis, transmission or engine, but in the form of a petty and nasty thing called a malfunction of the trunk torsion bars. For those who don't know, a little explanation. Torsion bars are shafts made of elastic material (or metal) that perform the same functions as shock absorbers or springs. The trunk lid in the “tag” is entrusted to be controlled by these devices.
During their service life, torsion bars tend to “loose their grip,” which is why while driving you can hear extraneous sounds and knocking coming from the depths of the trunk of the VAZ-2115. This is especially noticeable when driving over bumps. Due to insufficient traction, there is an additional load on the lock, and if you do not pay attention to the diagnosis of “little things” in time, you can see in the rearview mirror while driving how the luggage compartment lid copies the movements of a bird’s wing, taking off cheerfully at the moment the car hits an uneven surface.
VESKO-TRANS.RU
How to open the trunk of a VAZ 2115 desert
Motorists know it's too much. There is a problem with the lock breaking. This is especially true for Russian-made cars, the quality of which is not ideal in almost all respects. The worst thing about this is that the malfunction is unexpected when it is absolutely necessary .
, spare, pump, in other words, some kind of thing in the rear compartment
It is for this reason that it is important to know how to open a chest without a key if the passage breaks its lock. Every motorist will need this skill. for both everyday use and long trips
both for everyday use and for long trips.
We reanimate the torsion bars of the VAZ-2115
We won’t discuss the car’s designers and guess what they were guided by when they decided to adapt such unreliable devices to support the massive trunk lid of the VAZ-2115. It’s better to talk about how to find a way out of this situation.
As is customary in any civilized society, a car enthusiast, having discovered a malfunction, will, of course, try to find the right part in a car shop. But in this case, failure awaits him in advance: it is very difficult to find torsion bars on sale, and if there are no familiar craftsmen from a car service center, then you can bury the idea of making them. If a miracle happens, and the necessary copies are found on sale, then there is no chance at all of installing them on the VAZ-2115 without the help of a specialist. It is necessary to remove the rear seat, dismantle the shelf, take measures to ensure that the trunk lid is open during the entire installation process... In general, if you like to overcome obstacles, this is your finest hour!
DIY parts repair
Craftsmen with experience working with metal have found their own solution, which is effective, but completely unacceptable for those who are only used to riding. The point is this: the torsion bars used in the trunk of the VAZ-2115 have a twist of only half a turn around their own axis. If you tighten them one more turn, the problem will be solved. The only question is, do you know how to create sufficient force with the help of improvised means to carry out such an operation? That's it...
A more accessible way is to adapt the clutch springs by attaching one end to metal plates installed with self-tapping screws on the trunk lining, and the other to the lid. This, of course, is a more suitable plan, but it also has its own unpleasant moment. Firstly, the skin is not a very reliable basis, and it is better to attach the strip to the body. Here, too, you need to act skillfully so as not to drill unnecessary holes. Secondly, the springs are still not suitable for working with the trunk lid of the VAZ-2115 and have the unpleasant property of stretching. Of course, these are not torsion bars, and replacing them will not be so difficult, but it is unlikely that any car owner wants to rack his brains and spend money once again.
Another “invention” is the installation of gas shock absorbers instead of torsion bars (or in parallel with them), which are used in the trunks and rear doors of some cars. Here, too, it is important to think through everything, especially how to attach the devices to the car body. The disadvantages in this case are that two shock absorbers create such resistance, to overcome which you will have to apply significant force every time you close the lid of your VAZ-2115, and if you leave one shock absorber, there is a risk of it skewing.
Review of Manufacturer Prices
| Name/article | Price, rub.) |
| electric lock 2191-5606010-10 | from 1500 |
| 2191-5606452 | |
| 2191-5605789-00 | —/— |
| 2191-5603652 | —/— |
| 2191-5604521 | —/— |
| Vartex 56526454 | from 1700 |
| Apollo 54654 | —/— |
| FX-F 82665/22 | —/— |
| Monado fd515545 | —/— |
*prices are current as of 10/09/18.
The opinions of the service station masters agreed on the choice of manufacturer - there is not much difference. When purchasing original products, the service life of the equipment exceeds 5 years. Installation in “makeshift” conditions and poor-quality manufacturing only shorten the period of use of the equipment. Often the owner is to blame for the breakdown, violating the vehicle maintenance regulations.
Renault Logan device?
Renault Logan trunk - thanks to it, this car was able to overtake many competitors in popularity. Its displacement was developed taking into account the possibility of loading large cargo. To achieve a truly record-breaking luggage compartment capacity without compromising driving performance and passenger comfort, a truly gigantic amount of work was done! The changes affected not only the internal space. Thus, the height of the trunk lid was reduced, and its upper part acquired a kind of “superstructure”, reminiscent of a spoiler.
Renault Logan trunk
The most interesting thing is that the trunk lid does not include any torsion bars. Two springs are responsible for its raising and lowering. Moreover, it is even possible to adjust their force! To do this, you just need to move the end of the spring into the corresponding hole on the bracket, which is fixed to the body. As they say, the comparison here is clearly not in favor of Russian engineers.
However, there are disadvantages here too. For example, the luggage lid fastening loops have a fairly large radius of movement, and therefore can touch things in the compartment. The next “trouble” is the trunk lock, which, unfortunately, is quite delicate, and if handled insufficiently carefully, it can either jam or not latch at all. Fortunately, this shortcoming can be eliminated quite easily. If you have plumbing skills, fixing it will take about an hour. If you don’t have any skills, it’s quite possible to replace the “native” lock with the same or a similar one from Lada Kalina. The latter, by the way, will be cheaper. Well, for those who spare no expense on their “iron horse” and value their time, it is still better to turn to the technical center for help.
Luggage lid mounting hinges
To prevent similar, albeit minor, but nasty “surprises” from happening, the owner of the Renault Logan just needs to adhere to certain rules when using the trunk:
- periodically lubricate the lock, especially when preparing the car for the next season;
- The trunk lid must be closed without excessive force or impact;
- do not allow the trunk to be filled with cargo whose dimensions require closing with force, as well as with objects that significantly exceed the carrying capacity. The fact is that deformation of the body may occur, which will disrupt the sealing and tightness of the lid.
Preventing door jams
The main reason for the breakdown: long-term operation, but the service life of the part is reduced if the driver does not carry out preventive maintenance. Basic moments:
- Cleaning of internal parts, treatment with special substances.
- Power loop lubrication.
- Removing adhered dirt. The procedure is carried out at least twice a year: in spring and autumn. Active ingredients for treatment: Liqui Moly Schnell-Reiniger cleaner, Liqui Moly Wartungs-Spray weiss dirt-repellent white lubricant.
- Lubrication of hinges, internal parts, rubber seals, door stops.
The procedure is especially relevant before the winter season, when the treatment prevents the mechanism from freezing when moisture enters. Spring prevention minimizes damage to the door mechanism from ultraviolet radiation.
Features of the trunk lid of the Chevrolet Niva
In general, “features” is too strong a word. The lid is just like a lid, and its only “unusuality” is that it opens not like the old Niva (lifting up), but, at the whim of the engineers, to the left. And I must say, this is quite an interesting solution! An example, apparently, was the “English” Land Rover Defender, produced for safari travel. This comparison especially suggests itself after you see the spare wheel, which is held on by the lid (or, more correctly, the door) of the trunk.
Apparently, the Americans, who helped Russian developers implement the project to create a joint crossover, tried to take into account all the nuances of Russian roads, and therefore quite a lot of attention was paid to the strength and reliability of the car. Right down to the design of doors. The trunk lid here is devoid of any devices such as torsion bars, springs and shock absorbers. And this is probably its value. At least, car enthusiasts do not have to become inventors and look for solutions to the problem, simultaneously racking their brains about where to drill a hole or weld a piece of iron. In addition to the fact that the lid opens to the side, it only requires hinges.
Chevrolet Niva trunk lid
By the way, it has become more convenient to fix it - there are three positions. Quite remarkable. After all, there is no need to open it all the way if you need to take and put some small thing.
Are there any complaints about the luggage compartment door from car enthusiasts who have chosen to purchase this “iron horse”? Well, what would we do without them! Considering that the lock of the luggage compartment lid (door) is electrically driven, corresponding malfunctions also occur here. They especially often complain that the wiring is frayed. The fact is that they are a bit harsh, and fractures occur in places close to the door hinges. This can be eliminated, in general, quickly, but it is still unpleasant. You have to disassemble the connectors to find the breakdown. Many owners “sin” on the fuse box, and therefore, unable to find the true reason why the lock does not work, they spoil their nerves and mood.
The device of the tailgate
The following malfunctions that could occur in the trunk lid are related to the wiper and glass washer. However, judging by the reviews of the owners, these devices do not cause any problems. Difficulties may also arise when changing the rear door itself, when it is necessary not only to correctly connect the wires for the devices, but also to make adjustments, adjust the tightness of the seals, adjust the lock latch, adjust the location of the hinges and carry out a lot of other manipulations.
Another “little thing” that can ruin a car owner’s mood is the creaking of the hinges when driving. In principle, you can ignore it, but understand for yourself how painfully any malfunction, even a tiny one, hurts! Our “Kulibins” have been looking for a solution to this problem for a long time, but, as often happens, it lay on the surface. It turned out that you just need to lubricate the hinges with any grease - and that’s it! The squeaks instantly disappear.
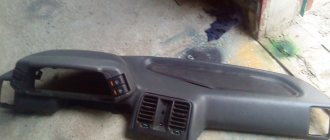
Dashboard wiring
The electrical circuit of the instrument panel is the most complex, since it contains 34 devices. But you can figure it out too. Here is a list of available devices.
The instrument panel is a complex device
- The plug to which plug 9 of the front wiring is connected.
- Plug for connecting plugs 10 and 11 of the front wiring.
- The connector to which socket 1 of the rear wiring is connected.
- Connector for connecting socket 2 of the rear wiring.
- Control unit for dimensions, low beam, emergency lights.
- Mechanical ignition switch.
- Route bookmaker mode switch.
- Wiper switch.
- Dashboard.
- Light switch.
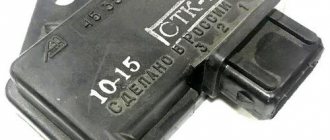
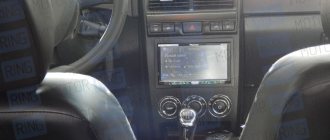
- Switch for the electric trunk lock.
- Diagnostic block.
- The connector to which the air intake box harness plug is connected.
- Rear window defroster switch.
- Emergency light switch.
- Brake light switch.
- Connector for connecting audio system speakers.
- The connector to which the car radio is connected.
- Device on the steering wheel.
- Driver's airbag module.
- Absent.
- Fuse block.
- Power steering (ESR).
- Cigarette lighter socket.
- Climate control console illumination lamp.
- Tidy light bulb.
- The socket to which the ignition system wiring plug is connected.
- Control device.
- Clutch pedal position indicator switch (only on cars with a manual gearbox).
- E-gas.
- Climate control system resistor.
- Electric motor for interior heater.
- Interior heater switch.
- Door lock control module.
Many car enthusiasts who independently “pump” their cars are wondering: how to properly connect the electrics? This question arises in almost any installation. After all, simply screwing on blocks, locks and strips is not difficult, but only properly connected electricians can make the system work
If we take into account one of the most pressing problems - the installation of remote control locks for the fifth door, then the correct wiring diagram for the electric trunk lock will help us here. You can find it either in the instructions that should be included with the device, or you can take it from a reliable source, but it is better to use proven options and ask friends and acquaintances what scheme they used
Did the VAZ-2121 have any problems with the rear door?
A multiple gold medal winner, recognized all over the world, the VAZ-2121 Niva did not have a trunk lid, but had a full-fledged rear door. By the way, this arrangement, when it rises up when opening, is very typical for SUVs. Interestingly, more than 40 years ago gas shock absorbers were successfully used to secure this door.
Rear door of VAZ-2121
Even now, car enthusiasts who have preserved “Soviet jeeps” have no complaints about their cars in terms of any unpleasant surprises. I wonder why then the designers of the VAZ-2115 did not use a device that had proven itself over many years, and preferred some torsion bars? Apparently, there is some secret in this unknown to ordinary people.
DIY installation
We adjust the cable tension for proper unlocking and locking of the trunk.
After that, we connect the button itself; for this purpose, there is a special place in the car panel under the instrument panel on the driver’s side.
It would be wrong to place a button near the cigarette lighter or a drawer for small items when there is a regular place for this in the car.
Rice. The simplest connection diagram for the electric drive of the trunk lock.
If you don’t have an additional brake signal, or for some reason you want to use it, then, as mentioned above, we pull a new wire to the bottom of the instrument panel on the driver’s side and connect it to the closer and to the battery through the fuse.
We make final checks and adjustments
You can also simultaneously open the rear door trunk lock using a button and using your alarm key fob (if your alarm has any additional channel) for this we need a relay. And the diagram of the alarm itself.
It is important that for normal operation of the electric trunk drive, when connecting to an additional alarm channel, you need to select a pulse length of 0.8 seconds
Rice. Connection diagram of the trunk electric drive via a button and relay to an additional alarm channel
And here is the relay itself connected to the button and the additional alarm channel.
Making a trunk with a button in a VAZ 2114 is much easier than it seems to many car owners. All work is carried out with a minimum amount of time and physical effort. Without resorting to the expensive services of a professional, you can quickly improve the protection of the luggage compartment of your car yourself. Having completed the work once using simple algorithms and diagrams, the owner of a VAZ 2114 will be able to calmly and easily open the luggage compartment of the car by pressing just one button located in the cabin or on the alarm remote control.
Which system is better?
To sum up, which engineering solution is better for opening, closing and fixing the lid or tailgate is difficult to answer unequivocally. Each of them has its own advantages and disadvantages. This may be a biased opinion, but gas shock absorbers undoubtedly performed the best. The mere fact that the old units, having served their time on Nivas produced in the 70s and 80s and being transferred to cars of later releases, continue to successfully perform their functions, gives a chance to think.
Use of reliable gas shock absorbers
Is it worth it to rush to use new technologies if the old ones are more reliable? However, as follows from the description above about Renault Logan, there are exceptions to the rules. In the meantime, engineers are looking for new ways to solve technical problems, numerous “Kulibins” are applying them in practice through trial and error, experimenting with components and assemblies of their cars, creating homemade test benches from them.
Replacing the trunk lock on a VAZ 2113, VAZ 2114, VAZ 2115
Welcome! The trunk lock is responsible for closing and opening it, thanks to it the trunk is also kept in the closed position and until you want it, it will not open, but over time the lock wears out or the trunk lid is replaced with a new one, in this case the first thing will need to be adjusted the lock, if it wears out, it will have to be adjusted and replaced with a new one, otherwise either the trunk lid will not open (it will jam, this is the worst option), or on its own (When driving over bumps) there will be time time to open up.
Instructions for dismantling and replacing the mechanism
- Buy a suitable device. You can choose the appropriate part for your Lada Granta car. This is a good option because it has an electric drive and a limit switch. Unfortunately, when installing a part of this option, you will have to install your own fastening; you can make it from a small steel angle, for example, 40 * 40 * 4 mm.
- The corner can be cut with a suitable tool, for example, a grinder. It is important to consider the size of the purchased device, as well as the location where it will be installed.
- The manufactured metal part must be coated with a suitable color.
- Then plug the hole from the previously installed lock. To do this, you can use the plug from the manual window lifter. It also needs to be painted the same color.
- If during installation of the product it was necessary to get rid of the wiper, you can use the wires coming from it and connect one to the drive of the part, and the second to the connector of the mounting block.
- Return the bracket and tighten the finished fixation device.
Photo gallery “Replacing a lock”
The photo provides additional information about dismantling the device.
How to replace the trunk lock on a VAZ 2113-VAZ 2115?
1) As for hatchbacks, the lock can be easily removed on them, but there will be no problems on sedans either, but the principle of replacement on two different bodies is different, first we’ll talk about hatchbacks, if you have a car with such a body, then remove them first the upholstery that is fastened inside the trunk lid with ten pistons, it can be removed very easily, all the pistons were pry off with a screwdriver and then the upholstery was put aside, for more details on how to do this, read the article: “Replacing a spoiler on cars”, point one in that Study the article in detail.
2) After the upholstery is removed, unscrew two bolts and thereby remove the lock from the car, but only when unscrewing the bolts, take into account the fact that under one of them there are several terminals, one of which goes to the tailgate wiper motor, and the other to brake light, well, that's it, the lock has been removed from the car.
Note! To adjust the lock on this type of car, take a spanner wrench (You can use a spanner if there is no spanner, there is simply a chance of breaking the bolts securing the lock) and use it to loosen the bolts securing the lock (Do not unscrew them completely, in this case, by the way, you are adjusting the position of the lock, because in a knocked down position, the trunk lid may be difficult to close, close with a blow, or it is very poorly fastened and opens at all on bumps), then move the latch in the desired direction, ensuring that the lock, when closing the trunk lid, enters the latch without strong force and that the trunk closes firmly (see photo 1), if you need to adjust the trunk lid in height (That is, the lid does not close well and there is play if you pull the lid), then in this case completely unscrew the bolts securing the latch, remove it and then the select the adjusting plates behind it (Always remember one thing, the more plates you put, the higher the trunk lid will stand and it will have a backlash, the fewer plates there are, the worse the trunk lid closes and the stronger it is pressed against the car body, and if there are no plates at all, then you simply won’t be able to close the lid, so look for a middle ground, see photo 2)!
3) As for sedans, they first remove the plastic clips using a screwdriver that secure the lock cover and then the cover is removed (see photo 1), and when it is removed, proceed to disconnect the rod, to do this, the tip of the rod (The rod is indicated in blue arrow in photo 2) remove it from the hole indicated by the green arrow, but keep in mind that the tip is bent and secured with a screw indicated by the yellow arrow, so first unscrew the screw, then straighten the bent end of the rod with pliers and only after that remove the rod from the hole in which it is is how this will all be done, remove the rod from the hole in the lock cylinder lever (see photo 3) and remove it, immediately after that unscrew the three nuts that secure the lock (see photo 4) to the trunk lid and remove it from studs and finally, unscrew the bolt that secures the lock cylinder (see photo 5) and remove it (see photo 6).
Note! The new lock is installed in its place in the reverse order of removal, when installing the nut at the beginning, do not tighten it all the way, but rather tighten it a little and try in different positions of the lock, closing the trunk lid, thereby you will adjust the lock to fit the lid and you will have it It's okay to close!
Adjusting the tailgate lock.
- We unscrew the lock lock so that it can be moved with light force.
- Now you need to close the door and look through the glass to ensure that the lock spike is opposite the latch socket.
- After this, we move the latch all the way back and slam the door. This will ensure the lock lock is in the optimal position.
- Open the door and tighten the bolts securing the clamp in the position in which it was installed.
- It is also necessary to check that the door closes. If the door does not close tightly. then you need to remove the adjusting plate from under the clamp.
- If the door closes too tightly, on the contrary, you need to add a plate under the latch.
Replacement options
The first option is banal to the point of impossibility - buy a similar lock. Moreover, you will need to buy the entire lock, and not a separate part, because the design of the mechanism is non-separable. Replacement is carried out when the old lock is completely dismantled. This solution should be considered temporary, since the production technology is the same and the problems will remain. Over time, a new lock will have to be replaced. The only positive side of this solution is that it is quite cheap.
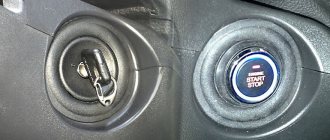
The second option involves completely replacing the mechanical lock with an electrically controlled drive. What does this give?
- Secure trunk closure.
- Possibility to control the position of the rear door from the driver's seat.
Installing such a system is not the cheapest pleasure, but the final result will really please the user. The electronic drive is much more convenient to use and is a reliable replacement for its mechanical counterpart.
Dismantling the old castle
The VAZ 2114 model will be taken as an example.
The following tools will be useful in your work:
- set of Phillips screwdrivers;
- key to 8.
The replacement sequence is as follows:
- First of all, in order not to damage the interior lining of the trunk, we remove ten plastic fasteners, and then the plastic casing from the lock.
- We remove the casing, then unscrew the nut that secures the lock in place.
- Unscrew the wires that are in the way.
- Next, you need to unscrew the right fastening nut and remove the inner part of the lock from the fastenings.
- You can inspect the integrity of the spring and core. If these parts are defective, then the problem is in the mechanism. In any case, everything will have to be changed.
If you prefer the economical option of replacing it with a new mechanical lock, then install it in the reverse order as described.
Drive installation
Adjusting the position of the trunk lid is possible if, instead of a mechanical lock, you install an electronic device, in this case a drive. To install it you will need:
- universal drive installation kit for the machine;
- metal cable with a cross-section of 1.5 mm and 500 mm long;
- two contact connection wires of 4.5 m each;
- screws with wide heads;
- opening button for the lock;
- retainer;
- fuse;
We install the drive in the prepared place, according to the instructions. Next, you will have to make several amendments to the design:
The VAZ trunk is opened by pressing a button that can be installed in the cabin.
The electronic device is adjusted according to the included instructions. All other nuances that should be taken into account when installing the device in VAZ models have been indicated.