Heater (stove) and air conditioner - design, service, malfunctions, removal and installation of the heater (stove) and radiator on a VAZ 2170 2171 2172 Priora
Many people guess what a heater radiator is for the cooling system of the Priora, but everyone probably knows it. Popularly, this heater has its own name: stove radiator. This means that it is first used in cool periods, when the air passing through the heater radiator is heated and supplied to the cabin. And if so, then they remember about this same heater radiator at the worst possible moment, when it’s already winter and cold outside, and then repair work and research begins on how to change it, and where to look and fix it. In fact, “how” and “what” are also an important factor, because without certain knowledge you cannot get into the Priora system, it will be of no use except for wasted time. So, in order to make it clearer to you what and why, and to make it easier to repair your stove on the Lada Priora, we have prepared this article. Kommersant
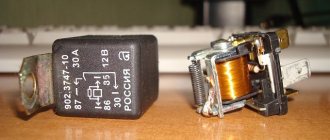
By the way, it’s not only about the stove, but also about the air conditioning system and air conditioning, so we’ll also talk about that.
1. Design features of the stove-heater Lada Priora VAZ 2170 2171 2172 (Lada Priora)
The Priora car is equipped with a stove - a heater (Fig. 1) of a liquid type, combined with the system
Main elements of the heater:
– heat exchanger of the heater (radiator), designed to heat the air entering the cabin with the heat of the water cooling the engine;
– an electronically driven fan (supercharger), providing a controlled supply of external air to the heater dampers;
– a damper for the air temperature regulator coming from the heater into the passenger compartment, the position of which determines the amount of air passing through the heat exchanger of the heater, and the amount of external air passing bypassing the heat exchanger;
– air heating distributor dampers 4, which distribute the air entering the cabin from the heater through air ducts 2, 6, 8 and 9 or for blowing the windshield.
Rice. 1. Priora interior ventilation and heating system: 1 – left side ventilation nozzle; 2 – left ventilation air duct; 3 – side window heating nozzle; 4 – air heating distributor; 5 – heater; 6 – right ventilation air duct; 7 – right side ventilation nozzle; 8 – air duct for heating legs; 9 – interior heating air duct; 10 – central ventilation nozzle.
In turn, the exposed components of the Pyrora stove can be divided into components. Let's start with the dispersal block
Now let’s take a look at what the stove heater consists of, which, like in the tenth family, is installed on the engine side, in other words, it is installed and removed from the engine side.
1, 3 — housing parts of the Priora heater, 2 — air filter, 4 — gear motor, 5 — heater radiator, 6 — sensor, 7 — heater (heater) fan.
Sketch 2 The main elements of ventilation of the central part in the Lada Priora car
Replacing the heater radiator of a VAZ 21072 Priora, in an hour
Replacing the stove radiator
VAZ
Priora without
removing the brake vacuum. This is the most important point where many became.
Replacing the radiator of the fan heater or damper of a VAZ Priora without removing the brake vacuum.
Quite a quick and less easy method to get to the stove
Lada Priora car
without air conditioning
. Saved.
Replacing the heater radiator on a Lada Priora
If the stove on your Lada Priora starts blowing cold air instead of hot air, you should pay attention to the heater radiator. There are already discussions on our website about why the stove on a Priora does not work, but we still decided to publish additional material on replacing the heater radiator with our own hands.
Features of the design of the stove on the Lada Priora
Main elements of the heater:
– heater heat exchanger (radiator), designed to heat the air entering the passenger compartment with the heat of the engine cooling liquid; – an electrically driven fan (supercharger), providing a controlled supply of outside air to the heater dampers; – a damper for the air temperature regulator coming from the heater into the passenger compartment, the position of which determines the amount of air passing through the heat exchanger of the heater, and the amount of outside air passing bypassing the heat exchanger; – air heating distributor dampers 4, which distribute the air entering the cabin from the heater through air ducts 2, 6, 8 and 9 or for blowing the windshield.
If antifreeze or antifreeze is leaking from the stove, then the radiator is leaking and requires replacement.
Let us recall that in the previous article we looked at how to replace a Priora heater fan with your own hands.
Replacing the stove (heater) radiator on a Priora
– drain the antifreeze. – remove the heater. - Prepare a Phillips screwdriver.
Video. How to remove the stove on a Lada Priora
Replacing the heater on a Priora with your own hands:
1. First of all, you need to unscrew the 3 screws that hold the heater radiator.
2. Then remove the radiator from the stove body.
Installing the stove radiator will be done in the reverse order; this requires a little sleight of hand. I spent about 50 minutes on this operation.
see also
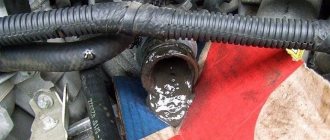
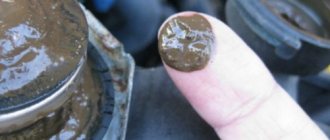
I have long noticed oil stains on the cylinder block near the breather outlet (crankcase gas pipe), it was time to replace the pipe, but since it doesn’t affect the speed, I didn’t want to go there. There was also some slight fogging at the inlet of the breather pipe into the valve cover and the upper pipe entering the throttle sleeve, and near the oil pressure sensor. The other day on Drive, the topic of engine fogging came up, and I decided not to put it off any longer and still start replacing the pipes. Since the car does not have an air conditioner, there is access to the lower clamp of the breather pipe, although it is not entirely convenient. I knew that I would rip everyone off again, but I put up with it, just so as not to crawl under the car and remove the protection, because... I have neither a pit nor a lift. Replacement is not difficult, see photos for details.
This beauty of oil and dust has grown on my cylinder block!
The breather pipe inlet into the valve cover is almost dry.
The outlet from the valve cover is also covered in oil, but the inlet to the throttle sleeve is dry.
The thin hose is also snotty.
Oil at the inlet of a thin hose into the receiver.
I bought two new pipes and a bottle for washing the engine.
The pipes were, as they say, dry. I decided to put them on sealant.
Heroes of the occasion!
I also decided to inspect the knock sensor, because... Periodically, error 0327 (low signal level of the knock sensor) appears on the on-board vehicle. I haven’t noticed any changes in engine performance yet, but I feel that the sensor will soon be replaced.
I took off the block, the terminals are dry, the wires are intact.
Before applying the sealant, all fittings were thoroughly cleaned and degreased with gasoline.
The new pipe is in place. Engine washing liquid doesn’t do a very good job with such a layer of dirt; I wiped it with a rag as best I could.
Rinse the top. There is not a lot of dirt, the engine was washed quite recently.
Another additional seal. Self-adhesive D-shaped profile (the thickest), placed on the top bar of the grille. There is a benefit from it, since the installed seal from the classics still allows splashes and dirt to pass through the center.
I washed all the snotty places, sealed the pipes and hoses with sealant. Let's see how long the engine stays dry.
https://www.drive2.ru/l/3685250/
Removal
1. We prepare the car for work.
2. Remove the air filter.
3. Disconnect the electrical fan wiring harness block.
Comment
On cars with air conditioning, disconnect the wiring harness block by pressing the latch
and remove the block of the electric fan wiring harness from the side member by squeezing the clamps of the block holder.
4. Using a 10 mm wrench, unscrew the two bolts of the left fastening of the fan casing.
5. Using the same key, unscrew the lower nut of the right fastening.
6. Using a 10 mm socket wrench, unscrew the upper nut of the right fastening.
7. On cars with air conditioning, use a 10 mm wrench to loosen the clamp securing the hose to the upper radiator pipe.
Warning!
During the following operation, a small amount of coolant will spill out. To avoid this, you can partially drain the coolant.
8. Disconnect the hose from the radiator and move it slightly to the side.
9. Remove the electric fan assembly with casing.
Disassembly
1. Using an 8 mm socket wrench, unscrew the nut securing the impeller to the electric motor shaft, holding the impeller with your hand from turning.
2. Remove the impeller.
3. Using a Phillips screwdriver, unscrew the three screws securing the electric motor to the casing.
4. Remove the wiring harness from the casing groove.
5. Remove the electric motor.
Removal
We assemble the electric fan in the reverse order.
Installation
Install the electric fan in reverse order.
How to replace the radiator of a Priora stove without air conditioning
In winter, as you know, car enthusiasts turn on the stove to avoid freezing.
Its normal operation ensures a comfortable temperature inside the car, and this, in turn, is the key to safe driving. However, there are times when this unit stops supplying warm air. The reasons can be very different, for example, problems with the radiator. Many people, including owners of Lada Priora, both equipped with air conditioning and without it, encounter malfunctions of this kind. In some cases, it will only take a minute to fix the problem because you just need to replace the blown fuse. But there are situations when more serious repair work, such as replacing a radiator, cannot be avoided. However, there is nothing particularly complicated here. Everything can be done with your own hands - you just need the appropriate desire and a little time.
Options for upgrading the Lada Priora stove
The heating system of the Lada Priora simultaneously performs several functions - ventilation of the interior, heating it in the cold seasons and cooling in the summer. A malfunction of the heating system creates significant inconvenience for the driver and passengers. Accordingly, sooner or later, every car owner comes to the conclusion that it is necessary to modify the vehicle’s heater.
High-quality modernization of the stove includes several stages of work:
- Sealing the holes in the front panel of the torpedo air ducts;
- Modification of the oven damper of the machine;
- Improved rear seat heating and driver footwells with updated corrugated air ducts.
Such comprehensive improvements will maximally solve the problem of poor-quality heating of the Lada Priora’s interior. Any person can cope with the tasks, the main thing is to treat the work responsibly and purchase inexpensive consumables.
Initially, it is necessary to disassemble the instrument panel, dashboard and air ducts of the heating system. Next, the fasteners that hold the floor tunnel lining cover and ventilation pipes are unscrewed. The glove box is removed from the dashboard and the fasteners that hold the dashboard are unscrewed through it. After dismantling all fasteners, the panel can be removed from its standard seat. For ease of operation, it is advisable to dismantle it completely, first disconnecting the connectors.
The preparatory stage of work can be considered completed. Then you can proceed directly to sealing the cracks of the dashboard.
Sealing the holes in the front panel and oven damper
The problem of blowing side windows is eliminated by sealing the holes in the torpedo's air duct system. To carry out the work you will need to purchase silicone or modelin. Sealant is used to seal around the perimeter of the torpedo contact area and the mounting holes. In this way, the gaps through which air disperses are eliminated, which will significantly affect the temperature in the vehicle interior. Also, sealing the holes will improve the quality of blowing the side windows of the car.
The next stage of work is sealing the cracks in the stove body. The stove damper has a factory seal, however, it does not close the holes tightly enough. As a result, warm air, regardless of the position of the valve, does not pass where it should. To fix the problem, you need to remove the factory seal from the damper and treat the product using modelin and double-sided tape. The damper body is glued in the same way. Thus, the loss of warm air, which is directed towards the driver, towards his feet and onto the windshield, is eliminated.
There is one more large hole left that needs to be closed. The gap at the beginning of the channel for heating the driver's window must be sealed using polyurethane foam, since the modelin in this place will be ineffective.
Improved heating of the rear seats and driver's feet
Next, the ventilation of the stove in the area of the driver’s feet and rear seats of the vehicle should be improved. There are two options for solving the problem here.
How to replace a Lada Priora radiator heater without air conditioning
First of all, let's look at the main elements of the VAZ-2170 heating system. They are, in particular:
The scheme is, in principle, traditional, and there are no particularly complex technical delights here. If you notice that warm air is not flowing into the cabin while the heater is on, you should inspect the entire system. If a radiator leak is detected, the latter will have to be removed either in order to be soldered, or to be replaced with a new one. Let's look at how this procedure can be done with your own hands on a Priora without air conditioning.
The first thing that is recommended to do before starting the main work is to remove the negative terminal from the battery.
Do not neglect this advice, because it is, firstly, about your safety, and secondly, it is additional insurance against a number of different unpleasant surprises with wiring and electrical equipment.
After the car is de-energized, you can remove the windshield trim.
It will also be necessary to dismantle the wiper arms, since they will create additional inconvenience during operation. Together with them, we also disconnect the plastic tubes through which liquid from the windshield washer reservoir is supplied to the nozzles. Now you can proceed to removing the decorative trim of the windshield. This is not difficult to do - it is attached using 7 self-tapping screws, respectively, they should be unscrewed. First you will need to remove the hood seal. Please note that in the middle of the pad there is a screw with which the halves are pulled together. After this, use a screwdriver or knife to carefully pry up the plugs covering the screws and unscrew them. That's it - the cover can be removed.
If everything went well, then you can move on. At this stage, you should remove the sound insulation from the engine compartment. To do this, unscrew the screws with which it is actually attached, and then remove the lining, left and right (the order does not matter). After this, you can move on to the pipes leading directly to the radiator. In order to remove them, you will first need to loosen the retaining clamps. Place a container to drain the coolant first.
Now you can remove all the wires that lead to the heater from the connectors. Having disconnected them, take two keys - 10 and 8 - and unscrew the 4 nuts. The wiring harness should be moved to the side so that it does not interfere, after first removing the holder. After this, we move into the car interior and take a socket wrench size 13. With its help, remove the bracket from the brake pedal, and
move it to the side. That's all - you have free access to the heater radiator. In order to remove it, you need to unscrew 3 screws using a Phillips screwdriver, after which the unit can be easily removed. All work on installing the radiator is carried out in reverse order.
As you can see, there is really nothing particularly difficult here. In order to remove the heater radiator on a Priora without air conditioning yourself, you will need some time (it all depends on your skills) and a minimum set of tools. On the other hand, you save money because you do all the work yourself, rather than turning to specialists at a car service center. Even if you have never encountered this before, figuring out how to remove the Priora radiator will not be difficult. The eyes, as you know, are afraid, while the hands do. It’s probably worth listening to folk wisdom.
Silicone pipes CS20. Unscheduled repair of the cooling system, silicone is different from silicone...
Emergency release of a logbook entry about an UNSCHEDULED repair of a car's cooling system
, where we will touch on several eternal questions,
the first
is
which pipes to choose - silicone or rubber
,
and the second question
is which antifreeze to choose -
concentrate or ready-made solution?
Why unscheduled repairs?
Because in winter an antifreeze leak appeared under the hood, when it was “cold”, while the leak stopped when the engine was warm, in other words, over 7 years of operation of the car, the FACTORY rubber cooling pipes “stiffened” and simply started leaking.
I removed the air filter box in winter - all the clamps were pulled out, it didn’t help the situation
, and as a result
, over the winter period, I “added” 1.5 kg of antifreeze to the system. By the way, constant checking and adding coolant revealed another problem with Sintec antifreeze, but more on that in the next article!
As the “classics” said, silicone pipes are different from silicone pipes!
(F.M. Dostoevsky!)
Selected KIT
silicone pipes
CS-20
(official account for review!),
Profi
series ...(I read a lot of reviews on Drive)
The advantage of “derivatives” CS-20
(
catalog
) is a large assortment of pipes, different configurations, colors (from classic black to attractive red pipes!), in addition, you can easily purchase any pipe separately at almost any auto parts store.
Set of pipes for Lada 2170 PROFI art. 11746 consists of 9 pipes
, or rather,
the package of pipes contains FIVE separately separated “sets” of pipes in the engine compartment:
Art. 11605
—
Cooling system pipe for Lada 2170 PROFI
(
4 pipes!
)
Art.
08049 —
Expansion barrel pipe for Lada 2170 PROF
I (of course,
1 unit
)
Art.
10098 —
LOWER crankcase ventilation pipe for Lada 2112 PROFI vehicles
, and also compatible for 2170/1118/2190/2180 Lada Vesta
Art.
10102 —
UPPER crankcase ventilation pipe for Lada 2112 PROFI vehicles
, and also compatible for 2170/1118/2190/ 2180 Lada Vesta
Art.
08811 —
Heater pipe for car Lada 2170 PROFI
(
2 pipes
—
2170-8101200/2170-8101208
)
Let me clarify and recommend that Lada 2170 owners think about it
—
this set
is art. 11746 consists of 9 pipes , a package of pipes for the cooling system
art.
11605 consists of 4 pipes , while this set of cooling system is UNIVERSAL and the shortest pipe is used on the VAZ 2110 family,
that is, it is not required on the Lada 2170
, and
it is more profitable to purchase a complete set of pipes art.
13156 - consisting of 8 pipes, and the “package” of pipes for the cooling system art.
10091 - save 300 rubles! ( AvtoALL
online store, a set of pipes of 8 pieces costs
3,745 rubles
!
)
I recommend not to “mess around” the pipes
, and change one by one, first trying on the pipes - in order to
cut off the excess if necessary
-
DO NOT ALLOW EXTRA FRACTURES AND CONTACTS OF THE PIPE WITH UNITS AND MECHANISMS UNDER THE HOOD!
Pay attention to the “cut” of the pipe - the NOT HOMOGENEOUS composition of the “hose” is clearly visible; the pipe is made of 2 types of silicone - the inner layer is high-temperature and chemical-resistant, denser - made to withstand coolant pressure, sudden temperature changes and crankcase gases, and then comes the 4-layer reinforcement of the pipe!
The process of reinforcement with textile thread in 3-4 layers prevents the pipes from swelling. The production technology using a screw extruder allows the pipes and hoses to withstand pressures of up to 20 bar. The diameter of the CS20 pipes is so precise that in an emergency it can be installed without clamps.
(I do not recommend installation without clamps!)
The main advantage of silicone pipes compared to rubber ones is DURABILITY, STRENGTH
, and as a bonus,
a pleasant-looking view
of the engine compartment!
I highly recommend that you carry out the procedure for replacing pipes as correctly as possible, because the main point of using silicone pipes is to install them for almost the entire service life of the car - I can hardly imagine a situation in which a silicone pipe would “go bad,” of course, except in force majeure situations.
I read a lifehack for installing silicone pipes
—
wetting the “end” of the pipe with gasoline, of course, what is recommended in the operating book for your car model!
Out of curiosity, I decided to experience this story personally.
-
I took a “cut” of the CS-20 silicone pipe and placed it in a container with gasoline for 20 hours - the pipe “swelled”, and after an hour, it returned to its PREVIOUS state!
Quality? Procedure for replacing pipes:
— Drain the coolant
(Radiator, cylinder block),
it is advisable to start repair work on a “cold” engine; unfortunately, we had to dismantle the engine protection.
For reference:
if
you need to “save” the liquid and drain it as carefully as possible, then first unscrew the radiator cap, and gradually twist the expansion tank caps to ADJUST the coolant drain!
— New pipes “sit” on the sealant!
Surprisingly, there were no problems when installing the silicone pipes, plus the sealant significantly simplifies the installation process - the manufacturer quite accurately repeats the internal diameter of the mounting holes (
The advantage of choosing pipes for a specific car model, and not a “blind” selection of possible options!
)
Please pay attention to the heater pipe
— visually it seems that it is longer than the “original”, HOWEVER,
I do not recommend shortening it
,
because this pipe is made of a complex shape to partially absorb VIBRATIONS from the motor to the stove!
— Replacing the clamps with new ones is NOT MANDATORY, but if possible it is advisable
(Kept the old clamps)
— After installing ALL system pipes, fill in coolant!
— We start it up, monitor the liquid level in the barrel, check the operation of the thermostat by “probing” the lower pipe of the cooling system!
— We check the expansion tank plug for operation!
In fact, during the 7 years of operation of the car, several cooling pipes “dried up” - they let antifreeze pass through at sub-zero temperatures, the rest were “oaky”, the LOWER crankcase ventilation pipe turned into a piece of dirty, clogged rubber!
I ordered the kit through the Emex catalog...
Installation of silicone pipes CS-20 series PROFI
MUST eliminate all problems of the cooling system for the entire life of the car!
To be continued...
Source
Replacing the radiator of a heating device in a Lada Priora car
Almost every motorist who owns a domestic vehicle discovers a malfunction of the car’s heating unit in the winter. After all, only with the onset of severe cold does a person begin to think about how to avoid freezing while driving a car. Naturally, everyone uses a stove for this. However, what should those for whom this very device has ceased to function properly do? After all, only the heater can ensure that the cabin maintains a normal temperature, allowing for comfortable movement. In this article we will look at only one reason why the heating device stops working, we will learn about the principles of repairing and replacing the heater radiator installed in a Lada Priora car.
If the motorist is sure that it is necessary to replace the heater core, it may take a lot of time to eliminate the faulty object, since most likely, in the process it will be necessary to replace not just a blown fuse, but to carry out more serious repair work. True, you should not immediately despair because of your ignorance; the material contains detailed instructions to help everyone understand how to replace the stove radiator in a Priora with and without air conditioning.
Replacement of cooling pipes, VAG self-tightening clamps
Hi all.
After winter I noticed red spots on the rims of the pipes. This means it started leaking in the cold, it’s time to change it. Seven years have passed, a long time for domestic rubber bands. At first I thought I’d buy pipes with clamps now and go install them. I came to the store, and there were no pipes for my car at all. Only on order... It turns out that Prioras with air conditioning have their own cooling pipes (the ones that come from the radiator, the rest are the same). Photo of a radiator block with pipes, HALLA system air conditioner
Catalog numbers of pipes
1) Upper pipe
21720-1303025-00
— 250 RUR 2) Lower pipe
21720-1303010-00
— 250 RUR I ordered these two pipes, because I didn’t find them in stock in my city 3) Branch pipe from the radiator to the expansion tank
21100-1303095 -00
- 100r Let's move on to the rest of the pipes
My cooling system has been slightly redesigned. Additional water pump Bosch 0 392 020 034 and modification of the coolant, so the rest of the set of pipes is slightly different from the standard one 4) Pipe from the expansion tank to the thermostat (number 29 in the diagram) 21700-1303080-00
— 2x100r=200r 5) The pipe from the thermostat to the pipe, corner (number 27 in the diagram)
21090-1303093-01
— 100r 6) The pipe from the thermostat to the heater radiator is long
21700-8101200-00
— 2x100r I took two long pipes of the stove to eliminate metal spacer from a pipe, the link shows where it was previously. After the pipes were in place
The thought came to me: shouldn’t I bother with good clamps? Which themselves will regulate the tightening. Which is especially important in the cold season, when temperature changes under the hood are regular. After studying many forums and blogs, it was decided. There will be clamps.
I will write down the number of clamps that I needed, taking into account the modification of the coolant and the installation of a 4th generation gas system on the Priora. And if you decide to install such clamps, just open the hood and count the required number. What clamps should I use? More precisely, which company - VAG, AvtoVAZ, China from Chery, OPEL. I concluded for myself that they are essentially the same thing and you should take what is cheaper. Therefore, I ended up with a hodgepodge of clamps. There will be something to compare in the future... Catalog numbers of clamps
1)
VAG N90687201, 40x12mm
- 6 pieces for 100 rubles = 600 rubles.
Installation locations: pipes from the radiator, top + bottom, pipe from the thermostat to the pipe (corner)
.
I read somewhere that this particular clamp is difficult to fit into the corner and it is necessary to file down the “nose of the limiter”. I didn't have this problem, most likely because I used special pliers during installation. 2) VAZ 21900-1300087-00, 27x12mm
- 10 pieces for 20r = 200r.
Installation locations: Stove pipes, expansion tank pipe
3)
NORMA FBS1412 14x12mm
- 10 pieces for 15r = 150r.
Installation locations: pipe from the radiator to the expansion tank (steam removal pipe), cooling pipes for the LPG reducer.
________________________________________________________________________________________
And now a short retelling of the replacement. Park the car until it cools down. Drain the antifreeze and remove all pipes.
There are no problems with removal. It's just worth the time to get to the stove pipes. You will have to remove the engine compartment trim. More precisely, just unscrew the top and bend the upholstery down.
Thoroughly degrease all connections. Degreaser 1 liter = 150 rub. To install clamps, you should use professional pliers. Easy and convenient to work with
Before installing the pipe, we put a clamp on it and stretch it a little further. We pull the pipe onto the desired place and clamp the clamps. We get
Source
Replacing the radiator of a heating unit in a Priora that is not equipped with air conditioning
Replacing the heater radiator on a Priora without air conditioning may make sense if warm air has stopped flowing into the cabin, while the heater itself is working. If, in addition to the above problem, there is also a water leak from under the Priora stove, the motorist will have to remove the poorly functioning unit in order to solder the latter. Sometimes repairs are impractical and you have to replace the old device with a new one.
So, first of all, you need to start by removing the negative terminal from the battery. The fact is that the issue here is not only about the safety of the master himself, but also about additional insurance, which allows him to avoid several unpleasant surprises that, if handled carelessly, can arise not only with wiring, but also with electrical equipment.
Installation of a new radiator in a Lada Priora with air conditioning
Replacing the heater radiator in a Priora car with air conditioning is a fairly simple process. The latter unit appeared only in newer cars, in particular, Priors began to be equipped with a HALLA or Panasonic climate control system. Thanks to the new component, you can replace any part of a non-working stove only by dismantling the frill, getting rid of the windshield wipers, the stove itself or the vacuum brake booster.
If a motorist wants to understand how to remove the heater radiator on a Priora with air conditioning, he must start by removing the sound insulation located in the engine panel. After this, you should dismantle the power unit air filter hose and remove the seal, which is located near the radiator hoses. Then you should drain the coolant and lift the radiator up towards the mechanic.
Silicone pipes vs Crazy hands
Guten tag beginner mechanics. Somehow, while surfing the DRIVE2.RU website, I came across a post from one very smart person. He outlined and showed how to decorate a regular stock pipe of a cooling system. And they seem to look like silicone. Here is the recording www.drive2.ru/l/3220061/ And somehow I, too (I won’t say that I’m a miser) wanted to try this method, to experience it myself. I want to apologize in advance that I didn’t prepare all the photos for the report (I got carried away), fortunately there is the Internet and Yandex to help. I don’t think it’s worth writing how to unscrew the old ones and install new pipes in their place. It’s clear that way. The main thing is not to rush to remove everything at once (if you are doing this for the first time), remove one, install a new one in its place, etc. Let's get started. I bought cooling system pipes for the radiator from LUZAR (St. Petersburg company)
Next, I bought heating system pipes. Stock regular
Well, for complete happiness, I bought a pipe with a subtitle, “expansion tank hose.”
Next, I purchased, with great difficulty, heat shrink (I never thought that it would be so difficult to find heat shrink of such a diameter). Moreover, on the middle pipes (going to the stove), I could only find a diameter of 30 mm and not 35 mm as the author advised, with a length of 2 meters
And I could barely find 50mm for the radiator pipes (the thickest ones) and they were red in color
Well, as described in the post, we put the pipes on something
straighten them, heat them with a hair dryer.
We get this effect
. It is very easy to treat. I placed the turned-on hair dryer on the edge of a table or any high object from which the hair dryer would not fall and simply stretched the bend with my hands. Thus allowing the heat shrink to shrink as needed.
This is what happened at the bend point
and we do this with each pipe. In the end this is what happened
Well, since I was very limited in time, I had to install everything without covering the “coolant pump hose.” I’ll say it right away and simply, the radiator pipes (thick) are changed relatively easily and without problems. But the pipes going to the stove (middle) are reluctant to come up. All bend + one turned out to be longer for some reason (it had to be cut on the spot)
Treat with the same hair dryer. I had to bend them on the spot, warm them up and wait for the heat shrink to settle.
Well, the final photo
Got my hands on a stainless steel power clamp
But as luck would have it, there was only one suitable clamp left in the store, and then only for a thick pipe. For medium pipes, I was told that they do not have clamps of this diameter. I had to put the clamps that came with the radiator pipes (thick) from LUZAR on the clamps and select the middle clamps for them. Since the inside of the clamp turned out to be smooth (which was very pleasing). And it will crimp without any additional recesses (which can lead to cracks and, accordingly, coolant leakage)
Well, all that remains is to tighten the clamps tighter, drive and tighten them again on a cooled engine (personally, after installation, nothing dripped, but after a couple of days, I had to tighten all the clamps again). So tighten it up conscientiously. Well, in conclusion, I would like to say the following. After all this hard work (tensioning, leveling and warming up), when you install the stock air filter, the radiator pipes will not be visible at all, and the heater pipes will be barely noticeable. Which makes me think. Without a zero filter, there is no point in doing this work. because no one will see this “beauty”. I don’t argue that it’s still possible as additional insulation for the pipes, but for beauty + reliability, it’s better to buy silicone pipes. Thus, leaving yourself only a headache during installation and nothing more. I don’t want to offend the author, who has done a titanic job, with my conclusion, but in my opinion, the game is not worth the candle (it takes too much time, and the result is not visible to anyone. Forceful situations arise, not only in length but also in the quality of shrinkage. And climbing under hood for smoothing out folds, let me tell you, it’s sooooo inconvenient). That’s actually the whole process in a nutshell, so to speak, write, ask, criticize, that’s your right, Auf Wiedersehen
Source
5.1 Disconnecting and replacing coolant hoses
1. On fittings and pipes of the usual type, hoses are secured using clamps. In this case, both standard clamps with a worm drive and disposable clamps of the twisted type can be used. When connecting the hose, the latter must be replaced with more practical standard ones.
2. Using a screwdriver, loosen the clamp and slide it up along the hose, completely freeing the fitting/inlet pipe. Carefully remove the hose from the fitting. New hoses can usually be removed without any problems, while old ones may become stuck.
3. You should try to free a hose that cannot be separated by rotating it on the fitting, then you can carefully pry off the section of the hose with a blunt instrument without applying excessive force - remember that the radiator inlet and outlet pipes are quite fragile elements. As a last resort, a strongly “stuck” hose can be cut off from the fitting with a knife: despite certain material costs associated with this method, it will still be cheaper to replace the hose than to purchase a new radiator. 4. When installing a new hose, first put the mounting clamps on it, and only then pull the hose onto the fittings/pipes of the corresponding components of the cooling tract. If twist-type clamps were initially used to secure the hoses, they should be cut off and replaced with more reliable screw or worm clamps during installation. To make it easier to fit rigid hoses onto the fittings, lightly moisten the ends of the latter with soapy water, or warm the ends of the hose in warm water - do not use any oils as a lubricant. 5. Pull the ends of the hose onto the fittings and check that it is correctly routed in the engine compartment. Place the clamps on the sections of the hose mounted on the fittings, leading them behind the end flare. Tighten the clamps securely. 6. Fill the cooling system (refer to Chapter Routine Maintenance ). 7. Start the engine, then carefully check the system for signs of coolant leaks.
Hoses connected to the heater heat exchanger
The influence of the cooling system thermostat on the operation of the stove and its modernization
Lada Priora is equipped from the factory with a five-hole thermostat. The thermostat is directly responsible for the engine cooling and heating system of the vehicle. A malfunctioning product can completely paralyze the operation of the stove, and in winter it will be almost impossible to heat the interior.
First, you can replace the standard product with a six-hole thermostat. Warming up the vehicle heater radiator will be more efficient, since the updated part has modern technical indicators. There are no difficulties with installing the product; they are interchangeable.
Secondly, you can additionally adjust the flow of coolant to improve heating of the interior at idle engine speed. Aluminum plates are used for this. With their help, it is necessary to reduce the diameter of the thermostat bypass channel to six millimeters. Such changes will slightly increase the engine warm-up time, but the cabin will become much warmer.
And the last element of improvement. When installing the thermostat on a standard seat, swap the hoses of the heater radiator and the expansion tank. Such an upgrade will guarantee the operation of the heating system at any time of the year.
Cooling system pipe
What is a pipe? There are often several of them in a cooling system; they connect individual parts into one sleeve and are the basis for cooling.
Pipes can be divided into two types:
From the names it becomes clear that the outlet pipe is designed to drain coolant, and the inlet pipe is designed to supply it. To cool the engine, antifreeze or antifreeze is most often used, since at very low temperatures they tend not to freeze.
It is worth recalling that two pipes of different types should not be confused or swapped, since their operating temperature conditions are different.
Most often, the supply pipe fails, since the load on it is maximum, which leads to the rubber drying out, as a result it can leak or even burst.
Why are pipes needed?
Together they serve to forcefully remove excess heat from engine parts and then transfer it to the environment. During the cooling process, a normal temperature regime is created in which the engine does not heat up and does not cool down for no reason when the operating cycle proceeds normally.
Heat removal from engine parts is necessary, since when the gas mixture inside the cylinders burns, the engine temperature reaches 2000°C, the average temperature remains at 800–1000°C. Everything is clear here, if you do not cool the liquid, the engine will overheat and subsequently fail. Therefore, to create a normal operating temperature for the engine of any car, there is a cooling system itself along with the pipes. This system also helps to quickly warm up the engine, especially in winter.
In modern cars, we use antifreeze, antifreeze or distilled water. It is not recommended to use plain water, as scale will form.
We will not consider the main elements of the cooling system, for example the block cooling jacket, cylinder head, thermostat, pump, radiator, fan, and heater hoses in detail. We will just find out the most important thing for motorists when operating a car by looking at, for example, a review of photographs of the connecting pipes of the radiator of the VAZ Kalina and Priora cars and their design numbers.
Beginning car enthusiasts and experienced drivers should not forget, remembering how they taught in driving school, that a car requires simple maintenance from time to time.
Signs of a broken cooling system pipe
The first and most common sign of a cooling system failure under the hood or under the car is wet and slightly greasy spots of coolant. These are the first signs that a pipe has burst somewhere. Also in the cabin on the instrument panel, there is a special indicator that will show the low fluid level in the expansion tank.
If the sensor fails, the engine temperature will rise rapidly, which may result in the engine boiling. It also happens that you can smell antifreeze in the cabin; this is an indicator that the pipe may burst not under the hood, but under the front panel or in the area of the interior partition and engine.
Many experienced car enthusiasts advise, from time to time, to simply check the level of antifreeze in the expansion tank. Inspect the pipes for greasy, oily stains and do not delay repairs if this is detected.
How to find a coolant leak in the system. First of all, it is worth inspecting the expansion tank for leaks. Next we move on to the radiator, since it is most often damaged. When inspecting, special attention should be paid to the joints of pipes (nozzles) and honeycombs, which are easily damaged.
Next, we inspect the pipes and hoses themselves along their entire length, since it is through them that the coolant circulates. Do not forget about the clamps at the connection points; due to engine vibration, the clamps may become loose, which means the pipe may come off the mounting point and leak.
Device and features
The cooling system of the Priora internal combustion engine has a standard set of main components:
- radiator;
- thermostat;
- electric fan;
- water pump;
- heater;
- engine jacket;
- connecting hoses;
- expansion tank.
By circulating through the large and small circuits, the coolant prevents the engine from overheating, maintaining the desired temperature. Structurally, the cooling system of the Priora is simple and no different from other internal combustion engines with an injector, with the exception of small parts.
Radiator and forced cooling fan
They mainly serve to bring the working fluid to the optimal temperature for the functioning of the engine (the operating temperature of the Priora engine with 16 valves is 90–95 degrees). The predecessor of the Priora VAZ 2110 often installed a cooler made of copper alloys, but due to cheaper prices, designers switched to aluminum analogues.
The operation of the fan depends on the engine control unit.
It receives information from the DTOZH (this is a sensor that reads temperature readings) located in the water jacket of the power unit. If the permissible temperature values are exceeded, the control unit connects an electric fan to improve cooling efficiency. A faulty fan or clogged radiator can lead to a constant increase in optimal engine temperatures, which shortens the service life and can cause costly repairs.
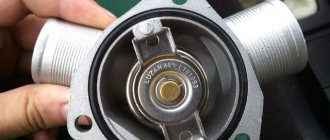
Thermostat
Its task is to promptly open coolant access to a large circle of the engine cooling system (engine cooling system) after the engine reaches the optimal temperature. In simple terms, the thermostat allows you to quickly warm up the engine and regulates the operation of the entire system. During warming up, the thermostat valve is in the closed position, antifreeze does not flow through the large circuit (the radiator is not activated). As it warms up, the valve opens slightly under the influence of rising temperature, and antifreeze begins to move through the radiator along a larger circuit.
A thermostat malfunction can result in overheating of the power unit (if the valve is stuck closed) or, conversely, the operating temperature rises very slowly (when the valve is stuck in the open position). Overheating is much more dangerous. Beginners can identify this malfunction if the engine heats up all the time and the fan on the Priora is constantly running.
Pump (water pump) and heater
Without the first part, the coolant circulation circuit in the system is impossible. If the water pump is faulty, at best there will be a coolant leak from the system. In the worst case, the pump may jam, which will lead to a broken timing belt and subsequent problems, the solution of which will result in expensive repairs.
The heater, or simply the stove, consists of a radiator, pipes and a fan. Can additionally cool the antifreeze in the system. An indispensable unit in winter. Provides the interior with warm air.
Connecting elements and expansion tank
It serves as a receiving compartment where gases and vapors are discharged when the coolant is heated. Also, the expansion tank is the level for the entire cooling system. One of the main elements in the tank is the valve cover through which air is forced out. There is antifreeze, it begins to boil when the engine temperature rises critically.
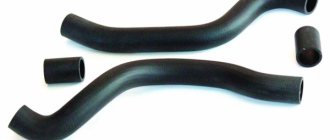
The connecting hoses serve as a pipeline for the circulation of coolant and connecting elements of all structural units, thus creating a single looped and sealed circuit.
The design of the cooling system also includes an engine temperature sensor on the Priora and an engine jacket. The sensor constantly reads information about the current antifreeze temperature and transmits it to the ECU. The location of the power plant jacket is structurally assumed in the cylinder block housing; it serves to remove heat through the coolant.
Engine cooling system
It is impossible to say that the system consists only of some elements and nothing more; modern cars are crammed with a lot of sensors and control is carried out by an on-board computer. But there are still basic components without which the system simply will not exist.
These components include:
- radiator;
- water pump;
- thermostat;
- thermostat steam removal hoses;
- radiator steam hoses;
- expansion tank;
- radiator supply hoses;
- electric radiator fan.
Such parts can be found both in the most modern cars and in the oldest domestic ones. Therefore, when starting to search for damage, you should first inspect these elements.
Description of design
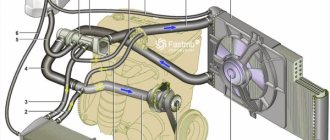
Cooling system
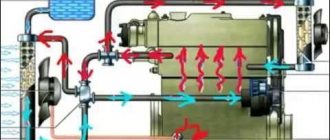
: 1 — radiator of the cooling system; 2 — steam removal hose; 3 — electric fan; 4 — fan casing; 5 — radiator supply hose; 6 — engine control system coolant temperature sensor; 7 — thermostat housing; 8 — hose for supplying fluid to the throttle assembly heating unit; 9 — hose for draining fluid from the throttle assembly heating unit; 10 - inlet hose; 11 — steam removal hose of the heater radiator; 12 — heater radiator supply hose; 13 — expansion tank; 14 — heater radiator outlet hose; 15 — coolant pump pipe; 16 — thermostat cover; 17 — coolant temperature indicator sensor; 18 - radiator outlet hose
The cooling system is liquid, closed type, with forced circulation. It consists of an expansion tank, a coolant pump, an engine cooling jacket, a throttle body heating unit, a thermostat, connecting hoses and a radiator with an electric fan. The cooling system also includes a heater core (see “Removing the heater core”).
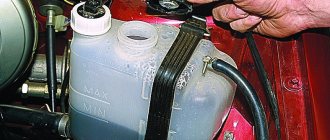
Coolant is poured into the system through the expansion tank. It is made of translucent plastic, which allows you to visually monitor the liquid level. To do this, the marks “MAX” and “MIN” are marked on the wall of the tank. In the upper part of the tank there are two pipes for connecting the steam removal hoses of the radiator of the cooling system and the heater, in the lower part there is a pipe for connecting the inlet hose of the cooling system.
Expansion tank cap with valves
The tightness of the system is ensured by the inlet and outlet valves in the expansion tank cap
Coolant pump
: 1 - impeller; 2 - pump housing; 3 - toothed pulley; 4 - control hole in the pump housing
The circulation of coolant in the system is ensured by a pump. The coolant pump is a vane, centrifugal type, driven from the crankshaft pulley by a timing belt. It consists of a housing, a bearing assembly with a seal, an impeller and a toothed pulley. There is a control hole in the pump housing to detect fluid leakage when the pump seal fails. The pump should be replaced as an assembly.
Jamming of the pump pulley due to failure of its bearing assembly or due to freezing of highly diluted coolant will lead to breakage of the timing belt and, as a result, to expensive engine repairs. The liquid enters the pump through a supply pipe located on the rear wall of the cylinder block under the catenary collector.
Direction of coolant flow in the thermostat housing and cover
: 1 — supply from the cylinder head cooling jacket; 2 - to the heater radiator; 3 - to the throttle assembly heating block; 4 - from the expansion tank; 5 - to the supply pipe of the coolant pump; 6 — from the radiator of the cooling system; 7 - to the radiator of the cooling system
From the pump, liquid under pressure is supplied to the engine cooling jacket, and from there to the thermostat housing. Two thermostat valves - main and bypass - redistribute fluid flows in the cooling system. On a cold engine, the main valve closes the channel in the thermostat cover connecting the lower (outlet) radiator hose with the pump supply pipe. The bypass valve of the thermostat is open, and the flow of liquid from the engine cooling jacket enters through the thermostat housing into the supply pipe of the coolant pump, bypassing the radiator of the cooling system - a small circulation circle. As the engine warms up, at a fluid temperature of 85±2 °C, the thermostat valves begin to move, closing the bypass channel and opening the main channel, passing the fluid flow through the radiator of the cooling system. At a liquid temperature of about 102 °C, the bypass valve closes completely, and the main valve opens to its full stroke - 8 mm, and the liquid enters the radiator of the cooling system, where it gives off heat to the surrounding air. The movement of fluid through the engine cooling jacket, thermostat housing and radiator of the cooling system forms a large circulation circle.
Thermostat
: 1 - plate; 2 — bypass valve spring; 3 - spring; 4—cylinder with heat-sensitive filler; 5 - main valve; 6 — rod; 7 - bypass valve
Fluid circulates constantly through the heater radiator and the throttle body heating unit and does not depend on the position of the thermostat valves.
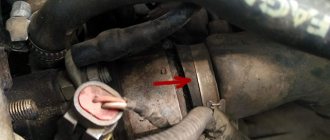
Location of the coolant temperature indicator sensor
(for clarity, the radiator hoses and ECM wiring harness blocks are disconnected): 1 - cylinder head; 2 — coolant temperature indicator sensor; 3 — engine control system coolant temperature sensor; 4 — thermostat housing; 5 - thermostat cover
Radiator
: 1 — rubber cushion of the lower fastening; 2 - outlet pipe; 3 — hole for the side fastening of the fan casing; 4 — left tank; 5 — supply pipe; 6 — steam outlet hose pipe; 7 — bushing of the upper fastening; 8 — pin for the upper fastening of the fan casing; 9 — right tank; 10 — radiator drain plug; 11 — stud of the lower fastening of the fan casing
The radiator consists of two vertical plastic tanks (the left one with a baffle) and two horizontal rows of round aluminum tubes passing through the cooling plates. The bases of the tubes are connected to the tanks through rubber gaskets. The liquid is supplied through the upper pipe and discharged through the lower. Above the inlet pipe there is a thin pipe for the steam removal hose. There is a drain plug at the bottom of the right tank. A plastic casing with an electric fan is attached to the radiator.
Fan with casing assembly
: 1 — electric motor wiring harness; 2 - casing; 3 - impeller; 4 - electric motor
The fan maintains the thermal operating mode of the engine and is switched on via a relay based on a signal from the engine control system controller.
Coolant temperature gauge sensor
To monitor the coolant temperature, a temperature gauge sensor is screwed into the engine cylinder head in the instrument cluster.
What does damage cause?
The most common cause is engine overheating. failure will occur in a very short period of time. As a result of overheating, the cylinder block becomes deformed, cracks may appear and the piston may become deformed.
But it is much worse when the piston is completely deformed and makes a hole in the cylinder block. Such a breakdown usually leads to a complete replacement of the damaged engine with a new unit.
The process of replacing the pipe
The first thing to do before replacing the pipe is to completely drain the coolant from the system. If the liquid is clean and drained into a clean container, it can be reused. Now it’s time to remove the clamps on the missing pipe. It happens that they rust, so you should prepare all the necessary tools and WD40 in advance to facilitate the removal process.
It is worth remembering that all procedures must be carried out on a cooled engine, especially draining the coolant, otherwise you may be injured.
A similar, new pipe must already be prepared in advance. The old pipe should be removed slowly and without much effort, since the radiator necks are not strong enough and break easily. If it cannot be removed, it is recommended to twist it from side to side, but not bend it in any way.
As a last resort, you can cut it to length, this way you can remove the old pipe. Taking it off is often not a problem, but putting on a new one is much more interesting. If the new pipe does not lend itself to the procedure, then its inside should be lubricated with a solution of soapy water. But in order to soften it, you need to lower the desired part into hot water.
Under no circumstances should you use oil or related materials, as the pipe may corrode over time, and oil may also get into the cooling system.
The last step is to put the clamps on the pipe, and only then put it on the radiator neck and water jacket. Make sure that the pipe is correctly positioned and not twisted. Now we tighten the clamps on the necks and begin to fill in the coolant.
After filling, make sure once again that there are no leaks in the places of replacement and repair. It is worth remembering that when draining, there may be some coolant in the heater radiator. Now we start the engine and check the serviceability of the system. After filling in the new one, you need to turn on the stove, then add liquid to the expansion tank.
If you manage to break one of the necks, you should immediately solder it using argon welding.
Replacing elements
Structurally, the Lada Priora engine cooling system has a simple design. Therefore, we will consider replacing only individual components, with which certain difficulties are possible, especially for beginners.
Replacing the cooling system radiator
This unit on cars rarely changes. Typically, this procedure is necessary when a leak occurs that cannot be eliminated. Its service life can be 10 years or more. Cases when replacing the radiator are simply necessary are as follows:
- unprofessional repairs in the engine compartment, during which the radiator cooler tubes were damaged;
- damage as a result of an accident;
- Increased pressure in the system caused the leak.
Removing the old and installing a new radiator, as well as replacing antifreeze on a Priora with air conditioning, is somewhat more difficult. Therefore, to save time and nerves, it is better to entrust this matter to professionals. If there is no air conditioning, you can change the radiator yourself.
- Unscrew the drain plug at the bottom of the radiator and drain the antifreeze into a suitable container.
- Show all the pipes that go to the radiator.
- Unscrew the fastening nut from the top and right side.
- The fan can be left on the radiator; it can be removed at any time.
- Move the radiator towards the engine and lift it up, thereby removing it from the engine compartment.
If the fan remains on the radiator, you need to disconnect the terminal from it. Installation of a new radiator is carried out in the reverse order of removal. If necessary, you can change the antifreeze.
Replacing the thermostat
Another important element of the cooling system, which can be changed independently. This is done as follows.
- The car needs to be placed on a viewing hole, or at least hang the front part so that it is possible to crawl up from below.
- Unscrew the cap of the expansion tank.
- Remove the engine protection (if there is one) and unscrew the drain plug on the cylinder block from below (not visible from above).
- Before unscrewing the drain nut, you need to place a suitable container under it. Then you can unscrew the plug and drain the coolant. Work is carried out on a cooled engine, otherwise there is a high risk of getting burns.
- Under the air filter to the right of the cylinder block you need to find the thermostat and, by loosening the clamp nuts, remove the pipes from it.
- Using a hexagon, unscrew the thermostat fasteners and remove it.
Before installing a new thermostat, you should pay attention to the rubber seal where it is attached to the block. To improve the tightness, it is necessary to coat it with a silicone gasket sealant. Next, all that remains is to install a new thermostat, connect all the pipes and fill in the coolant. After this, you need to start the engine and warm it up to 90 degrees, then inspect the thermostat and pipes for leaks. If necessary, you need to add antifreeze and remove the air lock, if any.
After replacing the thermostat, all that remains is to check its functionality. If the thermostat is working properly, the lower radiator hose should be cool when starting and running a cold engine. You need to let the engine run until it reaches operating temperature.
After the pointer on the instrument panel shows 90 degrees, you need to touch the lower pipe again. It should heat up smoothly. If this does not happen, the thermostat is faulty.