Automobile: VAZ-2112. Asks: Chuev Sergey. Essence of the question: Where is the speed sensor on the VAZ-2112, I want to replace it, but I just can’t find where it is?
Hello! Please tell me where the speed sensor is located on a VAZ-2112 with a 16-valve engine? I need to check it because the needle on the speedometer works somehow chaotically and unstable.
Types of speed sensors, their differences. Where is the speed sensor located?
- Electronic 6-pulse sensors are equipped with cars with injection engines, launched into series since 2006.
- On carburetor Samaras you can sometimes find 10-pulse EMF.
- Until 2006, VAZ cars used mechanical devices in the form of special inserts between the speed indicator cables and the gearbox gear outputs.
The key difference between different types of EMF is the absence of wires and connecting connectors. For example, GM or Yantar systems are equipped with products with round (oval) ports. At the same time, Bosh uses wireless versions with square connectors.
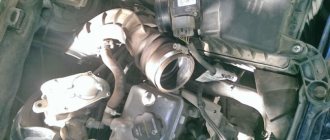
- On the VAZ-2110 (2111, 2112), speed sensors are mounted on the gearbox housings slightly to the right along the route, directly next to the oil control dipstick.
- The device is easy to find by looking in the area of the right CV joint.
- On the VAZ-2115, the electronic device is mounted on top of the front part of the gearbox (along the way) directly above the differential. The product with the connected cable is secured with one bolt on the box body.
Preparing for replacement
In order for the procedure for replacing the controller on the tenth VAZ model to proceed correctly and to obtain the expected result, namely the normal functioning of the speedometer, you should be properly prepared for this process.
Connector for connecting a VAZ 2112 speed sensor Firstly, on a VAZ 2112, replacing the DS means purchasing a new controller. When purchasing a new regulator, you need to pay attention to the fact that each connector located in the block design has certain symbols. It should contain the symbols “-”, “A” and “+”, not numbers. In principle, in this case there is not much difference between these options; when connecting the connector you will have fewer problems with pinout. If you have never encountered a process like this, this pinout will allow you to complete it correctly.
One more, no less important nuance. You need to buy a device that is equipped with a metal rod. This rod will last at least six months, which cannot be said about regulators with plastic rods.
In addition, when purchasing, you must check whether the rod rotates or not. It should not rotate, there should be no play on this element, and it should also be equipped with a washer.
Speed sensor malfunctions
Typical symptoms of failure of the electronic speed sensor may be:
- lack of electrical signals - error code P0500;
- intermittent electrical signals with EMF - error code P0503;
- the arrow moves chaotically in different directions, incorrect readings or other types of incorrect operation of the speed indicator;
- unstable operation of the engine at idle: interruptions, floating speed, etc.;
- increased consumption;
- power failures, when you press the pedal the engine does not “pick up” speed, etc.
There can also be several reasons for problems with the Electronic Speed Sensor, for example:
- power supply circuit break,
- oxidation of contacts,
- breakage of connecting wires or wear of the mechanical drive of the sensor.
How much does a replacement cost?
If the breakdown is not due to dirty contacts or broken wiring, it is better to replace the sensor. Moreover, it costs 170-400 rubles, depending on the type and manufacturer. The cost of replacing it at a service station is 100-150 rubles. Sensor part numbers:
- with mechanical drive - 2110-3843010F;
- electronic (new) - 2170-3843010.
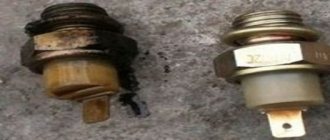
When choosing a DS, pay attention to where it was manufactured. If a mechanically driven sensor requires replacement, under no circumstances buy Asian analogues - the drive gear is made of very low quality plastic. It happens that it breaks on the third day of use. In this case, you will have to disassemble the entire box to remove its fragments.
It is better to purchase a sensor with an all-metal drive.
How to check the speed sensor
Most often, the failure of the EMF is a consequence of a break in the electrical circuit. Therefore, it is first advisable to check the integrity of the wiring and the condition of the connectors (contacts).
It is easy to check the functionality of the electronic sensor with your own hands if you have a multimeter. To do this, you must first dismantle the product. Then determine the contact through which electrical impulses are transmitted.
It is usually located in the middle of the block.
- Connect it to the positive lead of the measuring instrument.
- Having closed the negative cable to the machine body, rotate the EMF rod within a speed of 5 km/h.
- Check the multimeter readings.
- As the rotation intensity increases, the device readings (frequency and voltage) should increase proportionally.
The VAZ 2110 speedometer does not work, what should I do?
The vast majority of VAZ 2110 cars are equipped with electronic odometers. They can disturb their owners with various malfunctions, which, as a rule, manifest themselves in different ways.
A speedometer is one of the main instruments of a car, which is used to measure the speed of a vehicle. Its breakdown, of course, does not lead to serious malfunctions in the operation of the car, but when the speedometer needle jumps from one indicator to another or even hangs at some value, it deprives the driver of the ability to control the speed of the car.
This can lead to both fines and more serious consequences. Therefore, if the VAZ 2110 speedometer does not work, it is necessary to carry out repairs, especially since this process can be quite easy and fast if the cause of the malfunction is correctly identified.
Malfunctions
On VAZ 2110 cars, the speed sensor can fail for several reasons:
- Oxidation of contacts. This is the most minor damage. However, it can cause the needle to drop to zero or jump. To eliminate it, you must thoroughly clean all contacts from dirt;
- Wire chafing. The main sign of this breakdown is that the needle falls or jumps after starting the engine. Such a malfunction is not always detected visually, since in some cases the wire may outwardly appear intact, but in fact has a break. To determine the location of the damage, you need to ring it using a special tester. A broken wire is often the cause of failure of the instrument panel, and in particular the speedometer;
- The sensor has stopped working. In order to make sure that the breakdown is correctly identified, you can take a new speed sensor and connect it. If the speedometer starts working after this, then the conclusion is obvious. Failure of the speed sensor may occur due to the housing not being sealed, as a result of which dirt, dust, and moisture can enter;
- Checking the connectors. In VAZ cars they are located in such a place that they are constantly in contact with dirt and quite often this is the main reason that the speedometer needle jumps or refuses to work at all, showing incorrect vehicle speed values;
- Drive unit. Also, the reason why the needle jumps on the speedometer may be wear of the shaft. With such a malfunction, the VAZ 2110 speedometer drive does not effectively transmit torque. It is worth noting that this is one of the most common reasons why the sensor needle jumps.
If the vehicle speed indicator does not work correctly, before purchasing a new device, you need to check all possible breakdowns and only then think about replacing it.
Replacement features
The speedometer is located on the main instrument panel. And if, after checking all possible reasons why the device does not work, it turns out that all the faults lie in the device itself, then the entire panel will have to be replaced, and not just this individual element.
Today, unfortunately, spare parts for dashboards are not sold and this complicates the entire replacement process. It is worth noting that when installing a new device, you can rewind the mileage indicators.
Replacement
If during diagnostics it was determined that the needle is falling or jumping as a result of a breakdown of the speed sensor itself, it needs to be replaced. This manipulation is quite simple, but still requires certain knowledge and skills from the car owner.
To replace the speed sensor you will need special keys. It is better to carry out manipulation from above the engine. First, you need to disconnect the battery ground and contact chips, then remove the device using a key. If the rod is broken, then you cannot do without removing the drive. Here you need to be especially careful.
If the arrow jumps, lies or freezes, then repairs must be made as soon as possible. It is better to entrust such work to professionals, since without the necessary experience and certain knowledge, replacing a device can be done poorly.
Only professionals at service stations can quickly remove and install new equipment. As a rule, such a procedure does not take much time and its cost is low.
Some recommendations
- The search for the cause of the speedometer's inoperability should begin with an external inspection of the DS and the wires going to it. Wires often break in close proximity to the plug.
- If the speed sensor is covered with a layer of dirt or oily, you need to remove it, wipe it, reinstall it and check the speedometer readings again. Perhaps after this the instrument needle will again begin to show speed normally.
- If you cannot figure out the problem yourself, you should contact an electrician at a car service center.
Reasons why the speedometer does not work on the VAZ 2110
The vast majority of VAZ 2110 cars are equipped with electronic odometers. They can disturb their owners with various malfunctions, which, as a rule, manifest themselves in different ways.
A speedometer is one of the main instruments of a car, which is used to measure the speed of a vehicle. Its breakdown, of course, does not lead to serious malfunctions in the operation of the car, but when the speedometer needle jumps from one indicator to another or even hangs at some value, it deprives the driver of the ability to control the speed of the car.
This can lead to both fines and more serious consequences. Therefore, if the VAZ 2110 speedometer does not work, it is necessary to carry out repairs, especially since this process can be quite easy and fast if the cause of the malfunction is correctly identified.
Malfunctions
On VAZ 2110 cars, the speed sensor can fail for several reasons:
- Oxidation of contacts. This is the most minor damage. However, it can cause the needle to drop to zero or jump. To eliminate it, you must thoroughly clean all contacts from dirt;
- Wire chafing. The main sign of this breakdown is that the needle falls or jumps after starting the engine. Such a malfunction is not always detected visually, since in some cases the wire may outwardly appear intact, but in fact has a break. To determine the location of the damage, you need to ring it using a special tester. A broken wire is often the cause of failure of the instrument panel, and in particular the speedometer;
- The sensor has stopped working. In order to make sure that the breakdown is correctly identified, you can take a new speed sensor and connect it. If the speedometer starts working after this, then the conclusion is obvious. Failure of the speed sensor may occur due to the housing not being sealed, as a result of which dirt, dust, and moisture can enter;
- Checking the connectors. In VAZ cars they are located in such a place that they are constantly in contact with dirt and quite often this is the main reason that the speedometer needle jumps or refuses to work at all, showing incorrect vehicle speed values;
- Drive unit. Also, the reason why the needle jumps on the speedometer may be wear of the shaft. With such a malfunction, the VAZ 2110 speedometer drive does not effectively transmit torque. It is worth noting that this is one of the most common reasons why the sensor needle jumps.
If the vehicle speed indicator does not work correctly, before purchasing a new device, you need to check all possible breakdowns and only then think about replacing it.
Replacement features
The speedometer is located on the main instrument panel. And if, after checking all possible reasons why the device does not work, it turns out that all the faults lie in the device itself, then the entire panel will have to be replaced, and not just this individual element.
Today, unfortunately, spare parts for dashboards are not sold and this complicates the entire replacement process. It is worth noting that when installing a new device, you can rewind the mileage indicators.
Replacement
If during diagnostics it was determined that the needle is falling or jumping as a result of a breakdown of the speed sensor itself, it needs to be replaced. This manipulation is quite simple, but still requires certain knowledge and skills from the car owner.
To replace the speed sensor you will need special keys. It is better to carry out manipulation from above the engine. First, you need to disconnect the battery ground and contact chips, then remove the device using a key. If the rod is broken, then you cannot do without removing the drive. Here you need to be especially careful.
If the arrow jumps, lies or freezes, then repairs must be made as soon as possible. It is better to entrust such work to professionals, since without the necessary experience and certain knowledge, replacing a device can be done poorly.
Only professionals at service stations can quickly remove and install new equipment. As a rule, such a procedure does not take much time and its cost is low.
Checking induction DC and with reed switch
Note that speed controllers differ in the signal coming from the wheels. Taking this fact into account, the DS check is also built:
- WITH REED SWITCH. The signals are rectangular in shape. The cycle is from 40 to 60 percent. Switching occurs at a voltage from 0 to 5 Volts or when the battery voltage is reached.
- INDUCTION. With these speed sensors, the signal is in the form of waves, so the voltage changes based on the speed at which the wheel spins. This can be seen on the oscilloscope. Otherwise the principle is identical to what happens on the crankshaft angle controller.
9.1.6 Removing and installing the speedometer drive
1. Support the rear wheels with wheel chocks, then jack up the front of the car and place it on stands. The speedometer drive is located at the rear of the transmission, near the differential entry point of the right drive shaft. Depending on the model configuration, the drive may have a mechanical (cable) design or be an electronic sensor. 2. On models with a cable-driven speedometer, remove the fastening pin and disconnect the cable from the drive gear. On other models, disconnect the associated electrical wiring.
3. Unscrew the mounting bolt and remove it together with the heat shield (if provided).
4. Remove the drive assembly with the driven gear from the manual transmission housing and remove it along with the sealing ring.
5. If necessary, the gear can be removed from the gearbox housing (do not forget to remove the oil seal); check the condition of the gear; if mechanical defects are detected, replace it. Be sure to replace the O-ring. 6. If signs of wear or damage to the driven gear are detected, the condition of the drive gear should also be checked.
Principle of operation
The VAZ-2110 tachometer works according to the standard principle. It is part of an electrical circuit with the following elements:
- The device itself is located on the dashboard of the car and is completely electronic.
- The ignition module operates on the principle of an inductor. Necessary for converting direct current into pulsed current.
- Crankshaft position sensor or DPKV. It also converts electrical voltage into pulsed voltage.
- On-board computer or ECU. It is a receiver of pulse signals. Based on the frequency of incoming pulses, it makes calculations for the injection system, and also converts them into electrical voltage, adjusting the operation of the tachometer.
The whole circuit works as follows:
- After the power unit has started working, the crankshaft position sensor begins transmitting signals to the computer. Magnetic type crankshaft position sensor. Reacts to the absence of one tooth of the engine drive gear. As soon as an empty space passes near the sensor, it opens, thereby creating a pulse. For one revolution of the shaft, 1 pulse is created.
- The ignition module on the 8-valve version 2110 operates on the principle of generating pulse signals without rotation; it is stationary. The pulses are generated by 2 inductive coils. For one revolution of the power unit, 2 pulses are generated from the module. Due to pulses from the DPKV, the on-board computer transmits the discharge current to the ignition module.
- The pulse current transmitted from the DPKV to the ECU is converted into a constant voltage, which is transmitted to the tachometer receiver unit. The strength of the incoming current determines the strength of the magnetic field formed by the device’s coil, and therefore the angle of deflection of the tachometer needle.
The whole system is simple, consisting of a small number of elements. But any problem causes interruptions in the operation of the engine and the tachometer itself.
Next, a description will be given of the main symptoms that precede the tachometer failure.
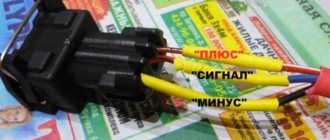
Wiring pinout, what to pay special attention to when using a multimeter
Pay attention to the pinout inside the block. With the ignition on, use a multimeter to determine which connector is connected to which wire. If you connect the wire to the “plus” connector, and the multimeter shows “minus”, then you should urgently change the polarity. Therefore, it is advisable to take a block with the appropriate designations. But if this doesn’t happen, you can take the regular one. In this case, the pinout is as follows - 1 is “+”, 2 is “signal output”, and 3 is “-“.
Examination
VAZ cars and a number of other cars have a speed sensor that operates on the Hall effect. It produces six pulses per revolution. But there are other devices - inductive or reed type.
The standard version of the controller operating on the Hall effect deserves the most attention.
The device has three contacts - pulse, ground and voltage. At the same time, car owners have three verification methods at their disposal.
First option:
- Removing the speed sensor from the car.
- Move the multimeter to the voltage change position (Volts).
- Determining the purpose of the contacts (pinout).
- Search for the pin that receives the pulse signal.
- Connect the “plus” of the multimeter to this terminal. “Minus” is connected to the ground terminal (you can use the car body).
- Rotate the shaft and monitor the voltmeter readings. The higher the cranking speed, the higher the voltage level.
To simplify the rotation process, a small piece of tube (for example, vinyl insulation) is put on the speed sensor axis.
The second method (suitable for Hall effect sensors) without removal:
- Check that the controller is connected.
- Lifting one wheel of the car. The goal is to lift it off the surface for easy rotation.
- Preparing the multimeter - switching the scale to measure voltage.
- Connecting the probes to the contacts in the same way as described above.
- Rotation of a wheel disconnected from the surface and evaluation of the results obtained.
The voltage level and frequency must change. This indicates that the speed sensor is working properly. If the readings remain unchanged, the device has failed.
The third method is with a control lamp:
- Preparing the warning lamp and turning on the ignition.
- Raising the car wheel for further rotation.
- Connecting one wire to the battery positive, and the second to the signal contact of the DC;
- Spin the wheel and watch the light bulb.
If the lamp blinks noticeably when the wheel rotates, this indicates that the speed sensor is working properly.
The fourth method is with a warning lamp and removing the speed sensor:
- Remove the controller from its original location.
- Build the circuit shown below.
- Connect the wires to the pins according to the pinout below.
- We connect one terminal to ground, the second to the battery positive. The latter can be not only for a car - you can use any 12 V power source.
- Take a piece of brake pipe and place it on the sensor rod. To make it easier to control the number of revolutions, screw electrical tape onto the tube, as shown below.
- Start rotating the rod using the tube. As a rule, the light should blink 6 times in one revolution, but it all depends on the make of the car.
We check all elements for functionality
After carrying out such work, any problem associated with the indicators on the instrument panel should disappear. If it remains, you should pay the greatest attention to the condition of the wiring of all contacts and connections.
Recently I had a problem the speedometer stopped working and I had to replace the speed sensor. I bought a new electronic one to last longer. Everything is described correctly and clearly in the article.
Even if there are problems with the speed sensor, it is replaced within 10 minutes. Everything is very simple there; the article describes the procedure for replacing the sensor.
Source
Why the speedometer does not work on a VAZ-2112: the main reasons for a 16 valve engine
When the speedometer does not work on a VAZ-2112 hatchback, the reasons may be different. Usually they try to repair the tidy, but the speed sensor turns out to be faulty. The ECU detects a malfunction of this sensor with difficulty, and the CHECK lamp does not turn on. The fact that the speed sensor is broken has to be identified by the following signs: idle speed always remains low, and the engine stalls when changing gears. These nuances will be discussed in more detail below, but we will only talk about 16-valve valves.
If all devices do not work, then one fuse is at fault. The video shows which one.
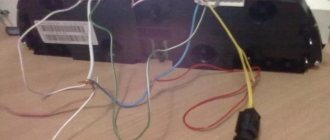
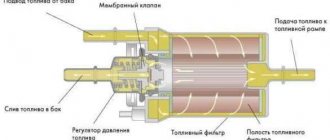
Electrical diagram
The sensor itself is powered by a voltage of 12 Volts (pink-black cord), and another pin is connected to ground. The gray wire is the sensor output. It is connected to the voltage source through a resistor (see figure).
Typical connection diagram for DS on a VAZ-2112
The diagram shows that the output is connected to the ECU terminal. Terminal number:
- 9 – block January 5.1, also BOSCH M1.5.4N (engine 21120, 1.5 l);
- 59 – BOSCH M7.9.7 module (ICE 21124, 1.6 l).
Another gray cord goes to the “red” block on the dashboard, where it connects to terminal 9.
As you can see, everything is elementary.
Instrument panel test on video (speedometer self-diagnosis)
There are some things we don't specifically consider.
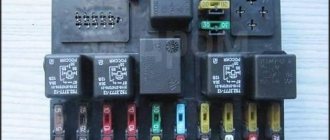
Power to the circuit shown in the previous chapter comes from main relay 6. It is also called the “ignition relay”. There is also fuse 1 in the circuit.
Additional relay and fuse box
When the ignition circuit is broken, both the speedometer and the ECU module do not work on the VAZ-2112, and the engine does not start at all. So advice about checking the relay would seem stupid.
Advice for those who have an oscilloscope
If you still decide to dismantle the sensor, connect a 1 kOhm resistor to its output (to the middle terminal). The resistor tap is connected to the “plus” of the power supply. By turning the shaft by hand, pulses can be observed at terminal 2. There are six pulses per revolution.
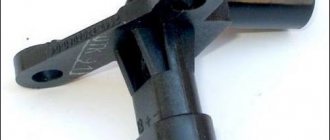
Mechanics
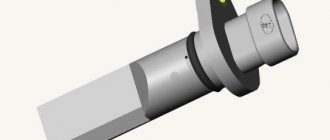
The following diagram shows exactly how the speed sensor is designed.
Speed sensor for VAZ-2112
- 2110-3843010-13 – sensor;
- 2110-3843010-18 – sensor;
- 2108-3802820-10 – speedometer drive;
- 2101-3802718 – gasket;
- 2108-3802822 – drive housing;
- 2108-3802830 – sealing ring;
- 2108-3802834-20 – driven gear;
- 2108-3802833-20 – drive gear;
- 2101-3802717 – washer;
- 15896211 – M6 nut;
- 12601271 – wavy washer;
- 11500121 – pin M6x14.
Elements 1 and 2 are interchangeable.
Dismantling
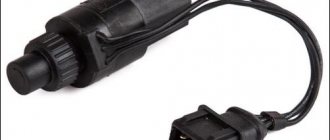
To remove the sensor from the car, you need to disconnect its connector. The sensor housing is fixed near the CV joint - the desired point is shown by an arrow.
First step in dismantling
When the connector is disconnected, take a flat key “22” and unscrew the plastic nut. Then you can change the sensor or repair it.
What you need here is a flat key
To replace the sensor drive, use a “10” key to unscrew the M6 nut and remove it together with the washer. The drive housing is rocked from side to side - you need a 14mm spanner.
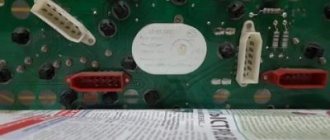
Dashboard connectors and speedometer contacts
The dashboard, as well as the speedometer on the VAZ-2112, may not work when they are disconnected from ground or power. Be aware that the speedometer receives power separately from the instrument panel. This also applies to the “mass”. Wiring:
- X2-2: +12V for speedometer;
- X2-3: speedometer “ground”;
- X1-9, X1-10: power supply for tidy;
- X1-1: “mass” of the tidy.
Connector X2 is painted red, X1 – white. Terminals 8 and 9 in connector X2 are the speedometer output and input. The output is connected to the on-board computer.
Both terminals (X1-9 and X2-2) are connected to one wire - orange. This line is protected by a fuse installed in the main mounting block (F19).
How to remove the tidy
First, disconnect the negative terminal of the battery. Then use a screwdriver to unscrew the 4 screws (photos 1 and 2) to remove the frame with glass.
Removing the dashboard
In the second step, unscrew the two screws holding the dashboard in place (photo 3). Next, compress the petal brackets to remove the tidy completely.
- If you connect the battery and turn on the ignition, the orange cord (connectors X1 and X2) should receive voltage “+12”;
- The presence of “ground” at terminal X2-2 is also a very important indicator;
- The gray cord (terminal X2-9) is usually called “+12”, and in rare cases - “ground”. When moving, pulses should appear at this terminal.
Sometimes they do this: they make a tap from terminal 9, and, without engaging the gear, move (push) the car. The engine remains switched off. Pulses will appear on the tap, detectable even with a voltmeter. The voltmeter itself must be a pointer type.
It will not be possible to fix a faulty speedometer - it will be easier to replace it. But first you need to find out exactly what the problem was.
Diagnostics
Troubleshooting begins by disconnecting the wiring block from the speed sensor harness and checking them using a test light.
To make a control light bulb, you need any car lamp that can operate at a voltage of 12 V, and two wires about 1 meter long each. One of the wires is attached to the positive terminal, the second - to the negative terminal of the lamp. The resulting device also includes a Krona battery.
To carry out the test, one wire of the warning lamp is attached to the ground of the body or battery, and the second is made with short, frequent touches to the middle contact of the DC connector. If there are no faults in the connector-speedometer section, the speedometer needle will slightly tremble or rise. If the needle shakes, the answer to the question why the speedometer does not work can be considered found - the speed sensor requires replacement.
In cases where the needle’s response to tapping on the central contact of the block cannot be detected, it is necessary to “test” the speedometer power circuit. The procedure is carried out using a multimeter (multitester), or by using the same light bulb - a control.
The wiring harness is first disconnected not only from the speed sensor block, but also from the speedometer itself. One terminal of the tester or warning lamp is connected to the end of the wire located under the hood, the other to the interior end of the speed meter current supply circuit.
If the tester in the “continuity” mode indicates a violation of the integrity of the circuit, further troubleshooting is carried out in this direction. It is necessary to check the fuses, the connection points of the wires, and their integrity inside the insulating braid.
The search area can be reduced by gradually “ringing” individual sections of the circuit. On model 2114 and other VAZ products, the cause of speedometer failure is often oxidation of the “mass” contacts attached to the car body.
In cases where the speedometer needle does not work, but there is no evidence of malfunctions in the electrical supply circuit, a logical conclusion is drawn about the malfunction of the device itself. Additional testing can be done by temporarily installing a known good instrument panel.