Make or buy
Let's start with the main thing. Namely, from the idea of modernization. The gearshift lever is usually located inside the case, and the top handle itself, which the driver grabs when changing gears, can be plastic, silicone, leather, etc.
The leather option is usually found on more expensive models. And in Soviet or old domestic cars, glass knobs with flowers, roses and other once-fashionable handle decor options are not so rare. Now some people appreciate rare solutions, trying to decorate the interior of their own car with something similar. Making a complete lever attachment from glass, plastic or silicone is quite problematic. It's much easier to buy it. But you can sew the cover yourself if you have certain skills and desire.
How to remove the cover from the gearshift lever - mechanic.
#1 Georg
- Users
- 273 messages
- petrol mechanics
- Name: Georgiy
- Top
#2 Paul
- Gender: Man
- City: Ukhta
- diesel mechanics
- Name: Pavel
Hello ! I decided to replace the boot cover from the gearshift lever, which is in the cabin. I unscrewed the gearshift knob itself, but the leather cover did not work. Spins on the ring. I tried squeezing, pulling, but nothing. Who filmed it, tell me what the secret is.
Post edited by Paul: December 20, 2012 - 01:45
- Top
#3 Georg
- petrol mechanics
- Name: Georgiy
- Top
#4 Paul
- Gender: Man
- City: Ukhta
- diesel mechanics
- Name: Pavel
Material selection
All work begins with the selection of material. Nobody forbids you to take some kind of rubber, fabric or any other option. But here the issue of practicality and operational stability should be taken into account.
It is optimal to choose one of the following materials.
- Leather. If we take practicality, quality, aesthetics and price-quality ratio, then leather cases are objectively the best. Only leather should be purchased specifically for cars, and not for haberdashery or furniture. These are materials that are completely different in quality and characteristics. Automotive leather has a polymer coating that additionally protects against mechanical damage, ultraviolet radiation, chemicals, oil, gasoline, etc. When selecting parameters, it is also worth choosing perforated leather without large pores;
- Eco leather. Fashionable and popular material based on polyurethane. Do not confuse with leatherette, which uses PVC. The latter does not breathe and has worse performance characteristics than eco-leather. Practical, inexpensive and easy to use. Although the skin is still a little inferior;
- Alcantara. A relatively new material that is very pleasant to the touch, does not fade, does not freeze, unlike leather, and does not crack. Don't be put off by the fact that Alcantara is thin. In fact, it is durable and wear-resistant. May cost slightly more than genuine leather. Plus, Alcantara is easier to work with and can be processed better.
Regardless of what you choose, each material is perfectly suited to the task at hand.
It doesn’t matter what kind of car you are going to sew a leather, eco-leather or Alcantara cover on.
Replacement of the gear lever housing and gear knob
First of all, it should be noted that on many cars, especially budget ones, the factory gearshift lever cover is made of leatherette. The quality of such material is average, that is, after 30-40 thousand km. After active use, this material becomes unusable.
The lever handle is often made of rubberized plastic. Although the material is more resistant to wear, replacement may also be necessary at 50-60 thousand km. mileage (especially if used carelessly).
In the case of the handle, there are no special problems. On many modern cars, it is often enough to remove the gearshift lever, heat the handle in hot water, after which you can twist the element without much difficulty.
The only thing is that when reinstalling a previously removed handle, you need to be prepared for the fact that the fit will deteriorate somewhat. The fastening is implemented in such a way that the rod has teeth for fixation, however, after twisting the handle, the material of the handle itself is damaged.
For this reason, when reinstalling an old handle (for example, after re-covering it with leather or restoration), special glue or liquid fixatives are additionally used.
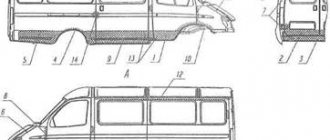
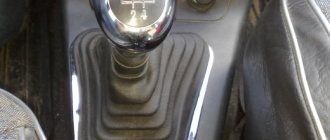
Now let's move on to the gearbox lever cover. As a rule, these products can be purchased ready-made. The material can be artificial leather or leather, suede, etc. It is important to understand that products differ in quality and wear resistance, which must be taken into account when choosing. Let's look at the replacement process using the example of a Daewoo Lanos car.
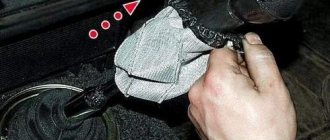
- So, before installing the cover, you should separately note the position of the tie. At first glance, it may seem that the screed is in the wrong position. Do not twist the tie, pull it, or try to put it in the correct position. After the cover is turned inside out to secure the coupler to the gearshift lever, the coupler will be in the desired position.
- To remove the old cover, you need to carry out all the work in a warm garage or room, since at sub-zero or near-zero temperatures the plastic in the interior may burst as it becomes brittle.
- To remove the cover, you need to press on one of the corners in the front, then use a plastic spatula, a ruler, or simply press the latch with your finger to unhook it. After the latch is snapped off, the second corner is raised and the second latch is snapped off.
- Now the base of the cover can be pulled forward and lifted up. Next, you need to turn the case around the axis of the box handle to reveal the plastic tie lock. The lock is cut using wire cutters, and the old cover is removed from the handle.
- Next, you need to bend the staples using a chisel from the inside (you can also use a flat-head screwdriver), after which the staples are pulled out from the outside.
- In the front part of the plastic base, the latches are located at a slightly greater distance from each other than in the rear. The case will also have slots that are slightly wider at the front and narrower at the back.
- Having decided on the front and back parts, the front edge of the cover must be attached to the base, after which, placing it on a support or on a table, the cover is attached to the base with a stapler.
- Please note that if you use a cheap stapler and low quality staples, the staples may bend. To prevent this from happening, you should try to place the bracket in the existing holes.
- Having secured the case with staples in the front, back, left and right, as well as in the corners, you need to check whether the staples have pierced the plastic through. If this is the case, the protruding ends of the staples will need to be bent inward.
- Next, you need to turn the cover inside out, making sure that the tie also turns inside out and does not twist.
To keep the tie in place, you need to hold it with your fingers while simultaneously turning out the gear lever cover itself. We also recommend reading an article about what a gearbox linkage is, how it works and what adjustments are needed. From this article you will learn about the purpose of the rocker, as well as how to adjust the gearbox rocker. - Now the inverted cover needs to be put on the handle, lowering it to the groove. The tie in the case must be aligned with the groove. Now the tie can be tightened, parallel to leveling the upper part of the cover around the handle itself.
- After tightening the tie, the excess is bitten off with wire cutters. Then you need to turn the cover to align the latches (marks). Let us remind you once again that they are wider in the front, while in the back they are narrower. At the same time, it should be taken into account that the base wall of the cover is straight, while the rear wall is beveled at an angle.
- At this stage, all that remains is to lower the cover down. While lowering, the cover will begin to turn inside out. Next you need to re-engage the rear latches.
- The same will need to be done with the front clamps. Use a spatula, ruler or finger to press the front lock, pressing the corresponding angle.
- After one latch snaps into place, the second one should also snap into place. All work should be carried out carefully, as the clamps are fragile and can break.
- Completing the installation process is the need to tuck the case at the bottom so that the case fits completely as desired.
- Next, all that remains is to check how the cover sits on the base. When changing gears and moving to different positions, the cover should not slip, twist, stretch too much, etc.
Let us add that the cover is often damaged due to the fact that under the cover, individual elements of the gearbox lever mechanism grind the material. This means that even a new case made of good and wear-resistant material will not last long. To solve the problem, you will need to find the element that is rubbing the cover, after which you should install a gasket in this place (optimally made of rubber, dense foam rubber, etc.).
When installing the gasket, it is important to achieve such a result that, on the one hand, the lever mechanism does not rub the cover from the inside during operation, and on the other hand, the mechanism itself works normally, that is, the gasket should not affect the performance and quality of operation of the gearbox lever mechanism.
Recommendations for covering
First of all, you need to remove the handle from the main long gearshift lever. It is the handle that we will tighten. If you wish, you can also replace the cover of the lever itself, which hides the metal pipe in the tunnel. But more on that another time.
The task is to obtain blanks. Here is an option:
- wrap the handle with cling film;
- or just use a plastic bag;
- wrap tape (stationery or masking tape) on top, but most importantly tightly;
- Use a marker to apply future markings on the tape;
- Use a sharp knife to cut the wound tape;
- you will receive something like a blank or papier-mâché;
- remove, level on the table;
- Apply the completed patterns to the purchased material for reupholstery;
- cut according to the pattern, but make leather blanks literally 2-3 mm smaller, otherwise the cover will hang;
- step back 5 mm from the edge of the leather and go through it with a sewing machine (stitch);
- return the pattern to the gearshift knob, treating the reverse side with glue;
- when the glue fixes the handle, you can start sewing together the pieces of leather;
- insert good quality threads into the stitches of the seams and tighten them tightly;
- if leather was used, wet the material after stitching is completed;
- Replace the gear diagram, if there was one.
But there is another option. It is suitable for those who like the old case's shape and seam placement, but the product is simply worn out. To do this, carefully remove the old trim from the gearshift knob.
It will be used as a template for a new case. Cut out blanks from the new material in the shape of the old cover, and sew them together in the same way. The convenience of this option is that you do not need to measure anything, make markings, etc.
IMPORTANT! The cover should be sewn from the wrong side so that the seams are not on the outside. Then the comfort of gripping the gearbox will deteriorate significantly.
I think we can end here. If you have personal experience with gearshift knob trim, be sure to write in the comments, share your secrets and highlight the important points of the procedure.
Thanks to everyone who reads us! Subscribe, ask your questions and invite your friends to join us!
( 1 ratings, average: 5.00 out of 5)
Did you like the article?
Subscribe to updates and receive articles by email!
We guarantee: no spam, only new articles once a week!
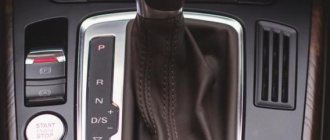
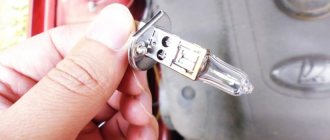
Removing the gearshift lever handle:
- To make this procedure easier, you will need to first follow the shift lever removal instructions above.
Once the lever is removed, clamp it in a vice.
We wrap the neck under the handle with tape and install an open-end wrench on the tape at “32”.
Lightly hit it with a hammer from below in order to knock the handle with the holder away from the lever.
When the handle comes out a little, remove the tape and remove the handle, first pressing the latches on the holder with a thin screwdriver. Tip: Be careful, as there is a spring under the handle, do not lose it.
How to change the gear knob on a VAZ 2114
Replacement of the gearshift knob is required only in case of mechanical damage. More often you have to remove and install it to replace a loose cardan or repair a broken lever bushing. The sequence of actions for dismantling the lever is as follows:
- remove the handle cover to open access to the handle mount;
- remove the hatch of the decorative plastic tunnel;
- unscrew the fastening screws;
- remove the plastic tunnel;
- unscrew the lever axle nut;
- remove the axle;
- remove the lever.
To install the lever in place, you need to do the following:
- insert the lever into its original place;
- apply lubricant to the lever axis or to the inner surface of the bushing;
- insert the lever shaft and tighten the nut;
- install a decorative tunnel;
- tighten the screws securing the tunnel;
- install a decorative hatch;
- put the cover on the VAZ 2114 gearbox handle and secure it.
What's the result?
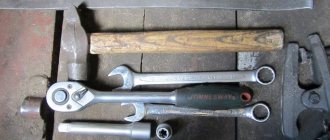
As you can see, replacing the gear shift knob, as well as replacing the cover on the gear lever, is not a complicated procedure and can be done independently. However, you will need certain skills and a minimum set of available tools (nippers, spatula, flat screwdriver, stapler, etc.).
Also, during the work, you should be careful, since the plastic of the interior is quite fragile, the clamps of the base of the gearshift lever cover, etc., break. Finally, we note that although there are different cases on sale, many owners often pay attention to cheap products made from artificial leather or cheap leather.
You can also order a cover separately in special workshops that specialize in reupholstering car interiors. As a rule, these workshops use good quality materials. Also in this case, specialists can independently install the cover on the gearshift lever, and if the cover is ordered from the same workshop, the cost of installation will not be high.
Removing the gearshift knob, replacing the gearbox lever: in what cases is it necessary to replace the lever, how to remove the specified element. Useful tips and tricks.
How to adjust the clutch pedal, what adjustment is needed for: clutch functions, clutch pedal adjustment (free play and total travel).
What is a gearbox rocker: the design of the gearbox rocker, signs of malfunctions. Adjusting the gear shift link. Recommendations.
Why gears on a manual transmission are difficult to engage: the main reasons for difficulty engaging manual transmission gears. Clutch and transmission failures.
How to eliminate the rattling of the VAZ 2114 gearbox handle
Often, the VAZ 2114 gear knob resonates with the operation of the engine and makes an unpleasant rattling sound due to the following problems with the bushing:
- wear of plastic bushing inserts;
- discrepancy between the length of the sleeve and the dimensions of the fork.
In the first case, you will have to change the plastic inserts or the bushing assembly. In the second, you will have to bring the dimensions into line. To do this you will need a file, electrical tape and a vice. Often the manufacturer installs a bushing, which with its edges touches the traction fork (stage) and knocks on it when it vibrates. To get rid of noise, you need to do the following:
- unscrew the bushing fastening;
- remove the bushing;
- clean (wash with kerosene) the bushing from any remaining lubricant;
- make preliminary markings by drawing a line 1-3 millimeters from the edge of the sleeve;
- wrap the sleeve with electrical tape along the marking line, leaving the edge open;
- Clamp the bushing in a vice and use a file to file off the edge protruding from the electrical tape.
After such an operation, all that remains is to put on the plastic inserts and put the gearshift knob in place. The edges of the bushing will no longer touch the metal fork and the VAZ 2114 gear knob will stop rattling.
Tools:
Install the gearbox in the reverse order of removal. A universal device for diagnosing any car.
Removal for subsequent replacement of the entire mechanism. But it’s immediately worth noting that a new box is installed only if the old one is completely unusable.
10.28 Removing and installing the gearbox handle and transfer case (2009-2018 onwards)
But this doesn’t happen often, only on cars with high mileage. For carrying out repair and cleaning work.
This work may include: It all depends on what was disabled. When carrying out repair work on other vehicle components, if the gearbox interferes with these activities. We won’t take a long look at what you already know, but let’s get straight to the process of dismantling the gearbox on a Chevrolet Niva.
How to change the cover on the gear lever
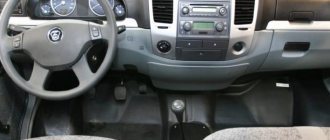
Looking into the interior of the car, its age and mileage immediately reveals the condition of the steering wheel trim and gear lever cover. On a manual transmission, the cover wears out due to physical contact with the hand much faster than on an automatic transmission. To change the cover on the gear lever, I recommend studying this article, because such little things add up to the overall picture of the condition of the interior.
Why do you need to change the gearbox cover?
The reason lies not only in the aesthetic component. The fact is that through a torn cover, dust and dirt get onto the parts of the gearshift lever, which over time leads to loosening of the gear shift drive. We get squeaks, play and breakage of plastic parts of the rocker because of one problem with a worn gearbox knob boot.
Eliminating rattling
Some people don’t even realize that eliminating the rattling of the gearbox lever in a VAZ 2110 is a completely feasible task, and does not even require special skills. Replacing the VAZ 2110 generator bearing and its. Release the shift knob from the cover in the cabin; Gearbox VAZ 2110. Can be replaced. Of course, you will have to tinker a little, but then being in the car will become much more pleasant. We also remember: what helps one car may not be useful for another car. Therefore, we experiment.