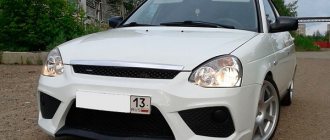
1. Complete sound insulation of Priora in Moscow - cost 2. Task: installation of sound insulation of a Lada Priora car in the “Gold” configuration 3. Vibration insulation of the floor, trunk and rear arches of a Lada Priora photo 4. Solution: sound insulation of the hood, engine shield and fender liner of a Lada Priora car in the “Gold” package
5.Results: sound insulation of doors in the interior of a Lada Priora car in the “Gold” configuration at a price of 29 thousand rubles
The car was brought in with complaints about extraneous noises in the VAZ hatchback, which greatly irritated him, as well as an unpleasant clanging sound when the doors slammed. The car owner was satisfied with the complete sound insulation of the Priora at the “Gold” tariff. Additionally, he asked for a dashboard wrap and asked how much it cost. Answer - the service is not included in the price and is paid separately.
Full sound insulation Priora in Moscow - cost
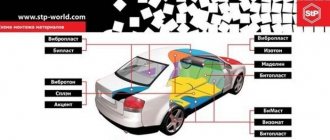
How much does it cost to install complete noise protection for the VAZ Lada Priora hatchback in our studio in Moscow, using the best materials? To achieve the effect, we offer three configuration options for soundproofing the vase. The price of the service depends on the preferred option. Tariffs vary depending on the quality of materials and the amount of work performed on the vase. It is distinguished by the use of denser materials and a more powerful effect. Unlike the most expensive “platinum” option, its cost does not include additional sound insulation of the internal arches, doors, door trim, rear parcel shelf, floor, and trunk of the Lada Priora. Therefore, the latter tariff is more expensive in cost, at least 6 thousand rubles. “Silver” differs from Golda in that the cost of the service does not include car fender liners and outer wheel arches.
Possible inconveniences associated with a quiet muffler
The car will now be quieter, which is what we wanted to achieve, but there may be some disadvantages - an increase in the overall weight of the exhaust system. Therefore, it is necessary to hang stronger brackets so that the exhaust pipe does not come off on rough roads. There are also cases when rubber shock absorbers are hung. But in fact, a homemade resonator will weigh about 2-3 kg.
It is also necessary to test in action how the exhaust system works so that gases exit normally through the exhaust pipe. Therefore, it is necessary to check at higher speeds, then it will be possible to draw the right conclusions. But as a rule, gases will escape through such a resonator without difficulty.
And then in the video there is another way to reduce the sound of the muffler, making a really very quiet exhaust system:
Problems with the exhaust system send drivers to maintenance. Whatever muffler you install, it will burn out over time - no matter how much it costs. The muffler, also known as the exhaust, of a Priora sedan, hatchback, and station wagon is the same and also burns out over time. Of course, the main muffler on the Priora is better made of stainless steel - despite the fact that it is more expensive. The price for example is STT - 4950 rubles, and Mute stainless steel - 4500 rubles, Stinger (stinger) - 4100 rubles. Replacing a muffler, although not a common thing, car enthusiast forums are regularly updated with fresh articles devoted to the problems of the Lada Priora car exhaust, operation, and replacement of the middle part of the car exhaust system, clearly indicating the relevance of the issue. The exhaust system is the exhalation for a car - it is important, just like the intake system. In this article we have collected most of the most pressing consumer questions.
Task: installing sound insulation for a Lada Priora car in the “Gold” configuration
The first thing we decided to do for complete sound insulation was to cover the roof of the VAZ car. We carefully remove all unnecessary elements from the roof, including the sheathing on the roof of the vase. Now you can make the first layer of sound insulation on the car ceiling. We install a high-quality damper from SGM Alumast Alfa to neutralize vibration on the vase roof. How much work does this cost us? You yourself can guess by the appearance of the roof in the photo and the effect achieved. The roof of the Lada Priora is not only protected from vibrations, but has also become stiffer. The use of vibration on the roof significantly reduces the overall sound background in a hatchback car. Then you need to make another layer on the roof. For this purpose we use a thick layer of Violon WELL sound insulator. It eliminates unwanted sounds. After installing it, it is almost impossible to push through the roof of the car, and raindrops will definitely not cause any discomfort to anyone. After assembling the upper part of the interior and hatchback of the car, all we have to do is take on the lower part to achieve a similar effect.
Soundproofing a VAZ 2170 panel without removing it
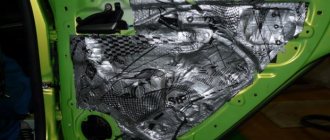
All the crickets in Priora are due to cheap plastic, so our main task is to glue all the joints and contact points of the plastic with anti-squeak. The anti-creaking agent can be modelin (for narrow spaces), or bitoplast 5mm-10mm for large cracks.
First of all, we remove all the plastic from the panel (central trim, instrument cluster, windshield pillar trim, central tunnel, glove compartment, air ducts, mounting block cover, etc.).
First, you can make the plastic elements of the interior a little heavier by gluing vibration material to them. But the most important thing is to cover all the edges with modelin, and in some places with bitoplast. Here is an example of where and how the model is glued: Or this is how you can get rid of squeaks in the instrument cluster:
The wires under the Priora panel also add quite a few crickets. If you can reach them through the bottom, then you can try wrapping them in the same anti-squeak. Now all that remains is to reassemble in reverse order.
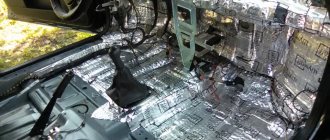
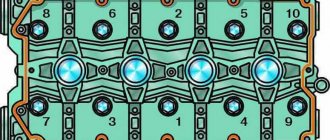
Vibration insulation of the floor, trunk and rear arches of the Lada Priora photo
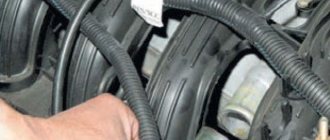
Now we disassemble, thoroughly clean and degrease all surfaces on the floor in the cabin, after which we install noise and vibration insulation on the floor, trunk and arches. How many layers will be required for this installation? This tariff involves installing Shumka on the floor and arches in the cabin in two layers. At the first level, we lay the material on the floor of the Lada Priora hatchback that we have been working with for a long time and successfully. The properties of Alumast Alfa are worth talking about separately. It is plastic and fits tightly to the floor of the car hatchback. That's why we roll it everywhere, even in the most problematic places on the car floor. On top of it we install another layer of insulation. The most suitable material for this purpose, Bibiton, is laid on top of the vibration on the floor. It is worth saying about it that it is a special foam rubber impregnated with polymers and mastic. On the mounting side it has silicone protection. It absorbs as much airborne noise penetrating through the arches and floor of the car as possible. It has high anti-corrosion characteristics, so the car is now protected from rust. This equipment does not require additional sound insulation inside the interior and hatchback of the Lada Priora. The next step will be to cover the arches and trunk of the Lada Priora. Carefully disassemble the lower part of the hatchback car to get to the arches. Then we wipe and degrease the surfaces of the arches. To dampen the arch, we use the same Alyumast, which does not put extra weight on the trunk and arches of the car. We cover the arches and trunk with another layer of Shumka, for which we use an adhesive-based vialon. The arches and trunk should be well worked on to make the interior of the vase almost silent. For the arches here we did everything we could, and we also covered the niche for the spare tire with Uniton. Now the arches and trunk are completely protected from fungus. And visually, as can be seen in the photo, the arches are in harmony with the trunk. We cover the trunk lid of the vase in the same way as the hood. How the materials are cut can also be seen in the photo.
Causes of unpleasant sounds
Noise in the car - loud extraneous sounds, vibrations that distract and irritate the driver:
- They arise as if from external sources - the hum from cars passing by, music and screams from the street
- So in the car itself - the roar of the engine, the vibrations of the body and the rustling of tires, the sound of rain on the roof and pebbles on the bottom of the car.
- The cause may be internal malfunctions of the engine, transmission units and their mountings (pillows), steering and even brake discs or drums
- This noise and vibration can only be eliminated by repairing units, tightening fasteners, and turning discs (drums)
- Therefore, for Priora, sound insulation begins with car maintenance
- The remaining noise is dampened by comprehensively applying sound insulation to the machine
Also check out
- Remove dirt from the floor and degrease it with white spirit. Thereby preparing the surface for gluing sound insulation .
- Place “Bimast Super” in the area of the front arches behind the pedals, “Bimast Bombs” - behind the glove compartment. You can use a hairdryer to heat it, but everything can be done faster using a blowtorch.
- We lay the 2nd layer of Splen 8 mm and 2 mm near the center console and sills; it is better to put Splen 2 mm on the console itself.
- Put back the carpets and upholstery and reassemble the center console.
When and why to soundproof the fender liner?
Service station technicians and people with experience in similar work are confident that proper sound insulation of fender liners is a guarantee of solving the following problems:
- Reducing noise from stones that fly out from under the wheels and hit the arches.
- Protection from salt and snow that gets into the nooks and crannies of the metal and accelerates the corrosion process.
- Reducing the destructive effect on the body.
- Increased comfort in the cabin by eliminating extraneous sound.
For greater efficiency it is recommended:
- Carry out noise insulation of the fender liner along with the treatment of wheel arches and the bottom with vibration and sound-absorbing material.
- Use high-quality products that can absorb extraneous sounds and vibrations, as well as withstand elevated temperatures.
Soundproofing
The stages of sound insulation are divided into several types: double and triple.
Classification:
- The first option involves applying a double noise-insulating layer: vibration material + insulating/noise-absorbing material.
- The second option involves applying the materials listed above and vibrating material is used as the third layer.
Immediately before soundproofing the floor, it is necessary to dismantle all interior elements that will interfere with the process. In this case, these are: seats, center console and carpet. The exception is the panel (torpedo) and its components.
Sound insulation of decorative engine cover
The plastic casing, which is attached to the top of the engine, is a decorative element. In some cases, this screen is soundproofed from the factory. If it is not there, you can stick it on yourself. Before using material to install it on the engine casing, make sure that it is non-flammable and can withstand the operating temperature of the power unit. Choose a material that does not burn, does not melt, and does not emit odor.
We talked in more detail about this modification earlier.
Do-it-yourself step-by-step soundproofing of the Priora floor:
- Factory sound insulation is rarely observed after carpet removal. If there is one, then it must be dismantled. If the materials are in good condition, they can be applied after applying the main two layers.
- We clean the floor surface from dirt, dust and rust.
- We degrease the cavities using White Spirit solvent. Leave for two hours to allow the surface to dry.
- We attach the bimast sheets using a technical hair dryer in the glove compartment area, behind the pedals (where the front arches are located). The material is heated to a plastic state; the side of the fastening with the body must be adhesive. When applying bimast, it is necessary to level the layer with a roller to prevent the formation of bubbles (corrosion can form in them).
- The next layer is from splen. Installation of the material does not require heating with a hairdryer, as it has a self-adhesive base. Splen 8mm wide is applied to the sills, and 2mm wide in the area of the center console.
- Applying factory soundproofing layer and carpeting.
- Install parts in reverse order.