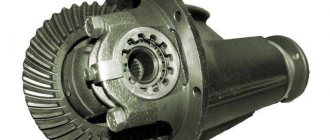
The VAZ 2106 rear axle gearbox is the main device that transmits the generated power from the engine to the wheels. This design is used on almost all domestic Soviet-style cars. It has proven itself to be a fairly strong part, but breakdowns still occur.
Timely and high-quality maintenance will help to extend the service life as much as possible.
Despite the fact that there are a large number of cars on which the gearbox is installed, in most cases its structure is the same. Its main task is to transfer force from one device to another. At the same time, the speed of its movement can change the intensity and direction. This is the main purpose of the device in the rear axle system.
Rear axle VAZ 2106 - purpose
The rear axle (RAR) plays an important role in the design of the vehicle. Through this unit, the drive wheels are connected to each other, and also attach them to the body and transmit torque to them. The device consists of several individual components that wear out over time and require repair or replacement. Therefore, the design of the rear axle of the VAZ 2106, its shortcomings and repairs deserve detailed consideration.
Drive axle gearbox
Today there are two types of drive axle gearboxes: wheel and central. The main gearbox of the drive axle (central) is designed to reduce the angular speed of the driven shaft and increase torque.
A wheel-type drive axle gearbox is used to further increase torque while maintaining the basic technical characteristics and dimensions of the central gearbox. Thanks to this, it is possible to increase ground clearance and unify the axles of trucks.
Drive axle gearbox for VAZ cars
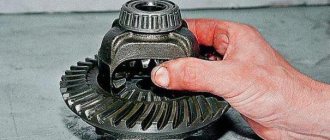
The main gear of the drive axle gearbox of VAZ 2101 - 2107 cars and their modernized versions is represented by a pair of bevel gears with an unusual spiral tooth. The type of gearing is hypoid.
The main difference between this type of gearing is that the gearing is crossed at a right angle, while with the standard gearing an intersection is performed. This is done due to the fact that the location of the axis of the drive gears is slightly lower relative to the axis of the driven gear.
Due to this design, in addition to the transverse sliding of the teeth, it was also possible to obtain their longitudinal slipping. Based on this, the process of running in and lapping of gears during operation under load has been improved.
In addition to this, hypoid gearing makes it possible to obtain a maximum overlap coefficient, which maintains ground clearance and ensures quiet transmission, which has a positive effect on the directional stability of the vehicle.
The main gears are formed in pairs, so when performing repair work on the drive axle gearbox and discarding one of all gears, it is necessary to replace them. Gear steaming is carried out in the factory using appropriate equipment.
The principle of selecting a pair of gears for the central gearbox of the drive axle
During selection, the driven and driving gears move along their axes, which causes a violation of the theoretical mounting size. Based on the data obtained, the first amendment is made. Next, measurements are taken of the drive gear head.
The result, which is within the acceptable limits, is the starting point for identifying the second amendment. The amount of corrections, or, in other words, the sum of deviations, is recorded using an electrograph on the plane of the shaft of the drive gear of the main pair and is recorded as a general correction to the theoretical mounting size. These indicators are intended for specialists who repair and assemble the drive axle gearbox.
Rear axle specifications
In terms of the design and characteristics of the leading axes, all classic Zhiguli cars are the same. The only difference is in the ratio of the main pairs.
Table: characteristics of the rear axle "six"
| Parameter | Factor |
| Serial part number | 21062402010 |
| Length, mm | 1400 |
| Crankcase diameter, mm | 220 |
| Hopper diameter, mm | 100 |
| Weight without wheels and oil, kg | 52 |
| Tool type | hypoid |
| Gear ratio | 3.9 |
| Required amount of lubricant in the crankcase, cm 3 | 1,3-1,5 |
Oil seal replacement process
First you will need to arm yourself with the necessary tools. In particular, you need to prepare:
- flat screwdriver;
- calipers;
- a regular mount or some convenient strong metal rod;
- keys for 13 and 24;
- torque wrench;
- dynamometer;
- durable cord.
On a VAZ 2106, the rear axle oil seal is replaced after the oil is drained from the crankcase. In this case, you must not forget about the oil drain cap, which should be screwed into place.
Removing the axle shafts
Let's get started:
both rear axle shafts will need to be removed from the rear axle beam.
To do everything correctly, you need to strictly follow the instructions. So:
- dismantle the wheel;
- remove the brake drum;
- we see four nuts that will need to be unscrewed (to avoid problems, you will need to turn the axle shaft until the large diameter holes coincide with the two brake shield locking nuts):
- unscrew the nuts;
- remove the spring washers;
- turn the axle flange 90 degrees so that the large-diameter holes and the brake shield mounting nuts coincide;
- We secure the brake drum with two wheel bolts (you can tighten them by hand).
Note. These wheel bolts do not need to be tightened, leaving approximately 5 mm to ensure acceleration of the drum. But you need to be extremely careful not to damage the brake drum.
The axle shaft is abruptly removed from the rear axle beam.
Advice. There is a special impact puller that will allow you to remove the axle shaft much faster.
Special impact puller for removing axle shafts
Removing the old cuff
After both axle shafts have come out, you need to do the following:
- holding the cardan from turning with a pry bar (see Repairing the cardan on your own) from turning, unscrew the four nuts securing the hinge flange;
- remove the bolts;
Replacing the rear axle oil seal on a VAZ 2106
- disconnect the flanges using a flat-head screwdriver;
- now you need to wind a strong cord, which was stored in advance, onto the flange of the drive gear (when winding it, you need to make several turns and wind it);
- We use a dynamometer to check the moment of resistance to turning or the RPM of the drive gear (this value must be remembered or written down).
Note. MSP is the product of the dynamometer readings, expressed in kgf, and the force application lever, expressed in cm.
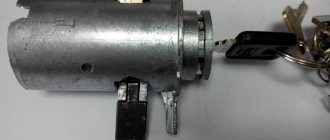
- Now you will need to unscrew the flange mounting nut, holding the drive gear with a special wrench;
- remove the flat washer.
Advice. There is a special wrench to hold the pinion flange. You can even make it yourself from a piece of metal pipe of the required size and two bolts and nuts.
Homemade key for holding the pinion flange
Replacement of the oil seal in the rear axle of the VAZ 2106 continues:
- the drive gear flange is removed;
- we find the drive gear oil seal and remove it from the neck using a screwdriver;
- install a new cuff.
Installation
Note. Before installing a new oil seal, you need to lubricate its working edge with Litol-24.
Light blows with a hammer through a special frame will help to correctly install the oil seal in place.
It is recommended to watch this video, where everything is described in detail.
https://youtube.com/watch?v=_MHYhEGwT84
Note. It must be remembered that the new oil seal should be pressed into the gearbox housing to a depth of 2 mm, counting from the end of the gearbox housing. As a mandrel, you can use some old bearing, or rather its ring, or even a piece of pipe of a suitable size and diameter.
- put the drive gear flange in place;
- put the required washer;
- tighten the flange mounting nut, while holding the drive gear with a special wrench.
Note. The tightening torque of the nut must be equal to a certain value depending on the resistance torque of the drive gear. When tightening the nut, you should start with a smaller torque and periodically check the resistance torque. If, at the moment of tightening the nut, it is discovered that the moment of resistance is too excessive, then this indicates unacceptable deformation. You will have to replace the bushing by disassembling the gearbox and then adjusting the engagement of the main gears. It will be difficult to carry out such work on your own; a highly qualified specialist is needed.
We assemble all the components and parts in reverse order.
The oil seal replacement process is complete. During the process, you should try to compare the methods for dismantling and installing a new oil seal with photos and diagrams. It is not difficult to carry out this operation with your own hands; it will be enough to follow the advice and notes given in the instructions. Replacing it yourself will help you avoid unnecessary expenses and save a lot of time, because at good car services there is now a long queue and the price of services is high.
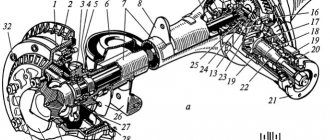
Rear axle structure of VAZ 2106
The design of the “six” gear consists of the main components: cast, gearbox and driveshaft. Each of them is an integral part, without which the normal functioning of this mechanism is impossible.
Frame
The rear axle housing or support beam consists of two extruded tubular housings connected by welding. On the outside of the housing, flanges with drilled seats for bearings and propeller shaft bushings are welded to prevent lubricant leakage. The flanges have 4 holes for the brake disc bolts on which the brake cylinder and pads are attached. These bolts also hold the oil slurry and plate holding the bearing axle shafts in place. In the middle of the body there is an add-on, which is the oil pan for the rear gearbox. The crankcase has holes for the breather, as well as for filling and draining lubricant. Brackets for attaching rear suspension elements are welded directly to the skin.
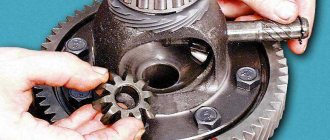
Gearbox
The main function of the rear gearbox is to reduce and transmit torque from the cardan drive to the wheels of the rear axle. Structurally, the unit consists of a housing, a pair of main gears, and a differential with rolling bearings. Only the number of teeth on the buffer and planetary gear depends on the gear ratio of the unit. On the VAZ 2106, the number of driven teeth is 43, and the pitch is 11. The gear ratio is set as follows: 43/11 = 3.9.
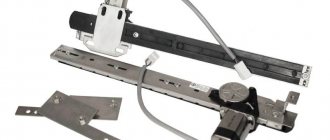
Half shafts
The main task of the driveshaft is to transmit the torque converted by the gearbox to the wheels of the car. On the one hand, half of the axle has splines that connect it to the gears in the gearbox, and on the other, there is a ball bearing that allows the mechanism to rotate, and a flange for attaching the brake drum and rear wheel.
↑ Diagnostics of gearbox parts
We thoroughly wash the gearbox parts in kerosene and carefully inspect them. If at least one tooth is damaged (chipping, waves, scratches, scuffs on the working surfaces), we replace the gears with new ones.
The edges between the tops and working surfaces of the driven gear teeth must be sharp. If the slightest nicks or roundings are visible, replace the main pair with a new one.
Minor damage to the satellite axle, axle pinion journals and their mounting holes can be eliminated with fine sandpaper followed by polishing.
How bridge malfunctions manifest themselves
The rear axle of the VAZ “Six” is endowed with its own characteristic problems that arise one way or another.
Excessive noise from rear wheels
There may be several reasons for the appearance of strong noise from the wheels of the rear axle:
- The wheel mount is loose. In this case, check and retighten the screws;
- Damage to the propeller shaft bearing. The axle bearing wears out over time, which leads to the appearance of characteristic noise. Inspect the axle shaft and replace the damaged component.
Constant noise from the rear axle while driving
Noises that are not typical for the normal operation of the gearbox are in most cases a sign of a malfunction. The main reasons for failure include:
- deformation of stockings. If the case is deformed, you can try to repair it, but it is better to replace it with a working one;
- driveshaft bend and excessive beating. In this case the part is replaced;
- Increase in multi-storey consumption. Requires managing gears and multi-story shots, and then replacing damaged elements;
- The gearbox is not adjusted correctly, the gears or bearings are worn or damaged. Requires complete disassembly, defect and repair of the mechanism;
Noise when accelerating the car
Noise during vehicle acceleration may be due to the following reasons:
- Worn or incorrectly adjusted differential gear bearings. Requires disassembly, inspection and repair of the differential mechanism;
- Incorrect engagement between bevel and planetary gear teeth. The problem is solved by proper regulation;
- Consumption of bearing beds. Damaged shoes must be removed and the bearing replaced;
- Insufficient lubrication. This problem can be resolved in the same way as in the case of constant noise.
Noise when accelerating and braking the engine
If there is noise on the gearbox side when accelerating and releasing the engine, the cause may be as follows
- Excessive consumption or damage to shaft bearings. Requires disassembly and diagnostics of gears;
- Incorrect bevel and planetary gear injection settings. Corrects this by checking the integrity of the parts and installing the correct screw.
Video: identifying the cause of noise in the rear axle
Noises when cornering
External noise can occur not only when driving straight, but also at corners. This may lead to the following reasons
- Difficulties in rotating satellites on axes. Disassembling, checking suitability and replacing elements whose condition does not allow them to continue their use;
- Gear axles. If the gears and the surfaces they contact are slightly damaged, they clean noisily. Otherwise, damaged items must be replaced;
- Incorrect setting for differential mechanism expansion. Diagnosis and correct correction of weak corrections are required;
- Damage to shelf bearings. Damaged items must be replaced.
Knock when starting to move
If the rear axle on the chest "six" (RZM) loses clamping when the car starts to move, this may mean that:
- Excessive play between collar and Wielegapust. Requires multi-layer joint inspection and replacement of used parts;
- Increasing the gap between the stem and the planetary gear. Removed by adjusting the gap;
- Increasing the landing space for the satellite axis. If this error occurs, replace the box;
- It abandoned the field beam attachment while hanging backwards. Check and tighten screws if necessary.
Oil leak
Transmission leakage may occur due to the following reasons:
- Bevel gear collar consumption. If the leak is from the stem side, replace the oil gasket;
- Damage to the throttle axis. If there are traces of grease on the brake rotors, this means that the axle shaft spacer is used and needs to be replaced;
- The mounting gears in the transmission housing are loose or the gasket is damaged. In this situation, it is necessary to tighten the screws or replace the gasket.
↑ Adjusting the gaps
We adjust the gap in the main pair and preload the differential bearings simultaneously, in several stages:
- tighten the nut from the side of the driven gear until the gap in the mesh is completely eliminated;
- Using a caliper we measure the distance between the covers;
- screw the second nut until it stops and tighten it by 1-2 teeth of the nut. The distance between the covers should increase by approximately 0.1 mm;
- By rotating the first nut, we set the required gap in engagement of 0.08–0.13 mm. This is minimally noticeable play in the engagement, accompanied by a slight knock of tooth against tooth;
- We control the constancy of the gap in the engagement with our hands and gradually tighten both nuts until the distance between the covers increases by 0.2 mm. This will ensure the necessary bearing tension.
Slowly turn the driven gear three turns and at the same time feel the play in the meshing of each pair of teeth.
If it is uniform in all gear positions, then install locking plates.
A decrease (increase) in play in any sector indicates deformation of the differential housing and the need to replace it or trim it on a lathe.
There are two types of locking plates: single-claw or double-claw.
Depending on the position of the nut slot, we install one of them.
Rear axle oil
On the VAZ 2106 side, the friction of the internal components of the rear axle is reduced due to the use of GL5 gear oil with a viscosity of 85W-90. The volume of this substance is 1.3 liters. Currently, there are many similar oils, but for Zhiguli cars you can use cheaper ones, for example, TAD-17.
It is recommended to change the lubricant in the rear axle every 50 thousand. km.
Checking the oil level and adding oil
A 17 wrench and a special syringe are needed to check the lubricant level and top up. The procedure consists of the following steps:
- Park the car on a level surface.
- Unscrew the oil filler cap and use your finger to check the oil level: it should be level with the bottom edge of the filler hole.
If the oil needs to be changed, simply pour it into a suitable container, drain well, and then add new oil in the required volume.
The rear axle of the VAZ “Six” is a fairly reliable unit and does not require special attention. The need for repairs, if any, is rare. The most common problems are leaking shaft or shaft seal. Replacing them is simple and does not cause any problems. A more complex procedure is replacing the axle bearings or repairing the gearbox. However, these mechanisms can be repaired in a workshop by carefully reading and following the step-by-step instructions.
Important nuances in work
- When driving the oil seal using a mandrel, do not overdo it. Apply gentle blows and control the depth of the oil seal. If you hit it hard, you can easily damage the oil seal;
- Before installing the oil seal, lubricate the rim and sealing edge with fresh oil;
- Before installation, inspect the flange for wear in the area where the sealing lip of the oil seal meets. If there is a “groove,” the flange must be replaced.
As you can see, the process of replacing the VAZ 2107 gearbox seal is quite simple and does not take much time. The most important thing in this job is to properly tighten the rear axle flange nut.
A little anatomy
In the last years of its life on the AvtoVAZ assembly line, the classic Zhiguli remained perhaps the only passenger car in the world with a rigid drive axle. This design is simple and technologically advanced in production, but has serious disadvantages in operation:
- large unsprung mass of the bridge, which negatively affects the smoothness of the vehicle;
- tendency to steer when one of the wheels hits an obstacle - at this time, due to the misalignment of the bridge, both wheels tilt from the vertical and tend to roll in the direction of the tilt;
- reduction in the useful volume of the trunk, because there must be free space between the axle and the car body for the axle to move during the compression of the suspension.
The advantage of a rigid axle, in addition to manufacturability, is its better adaptability to bad roads: the ground clearance under the axle practically does not change depending on the load, and the wheel drive is reliably protected from external influences by the axle housing.
The Zhiguli bridge consists of a stamped-welded bridge beam (such beams are called “Banjo” for their characteristic shape), a main gearbox with a differential, and axle shafts. The gearbox is made in a separate open housing, the flange of which is bolted to the crankcase. A drive gear with a driveshaft mounting flange and a differential with a driven wheel are mounted in the housing on bevel bearings. The main gears are hypoid, that is, their axes are located at an angle of 90 degrees to each other, but do not intersect (they are crossed). The amount by which the axis of the drive gear is offset relative to the axis of the driven gear is called hypoid offset. Such a transmission, if it is precisely manufactured and well adjusted, operates smoothly and with the least noise, but due to the intense sliding of the curved teeth, it is very sensitive to the quality and quantity of oil in the bridge.
The design of the bridge is relatively simple and technologically advanced, although it is not without its drawbacks
Reasons for replacing the oil seal and symptoms of malfunction
The seals in the gearbox are changed for one reason: they begin to leak. The oil seal may become old, tear, or be of poor quality from the very beginning, which will inevitably affect its service life. In addition, the tightness of the gearbox may be compromised due to improper installation, as a result of which the seals are compressed too much. The malfunction can be identified by the following signs:
- Small drops of oil appeared on the rear axle, near the gearbox.
- After leaving the parking lot, an oil stain remains on the asphalt.
- A small radial play appeared on the gearbox shank.
It is easy to determine: just move the shank up and down with your hands. As a rule, such play indicates not only torn oil seals, but also worn bearings. It is there that you can detect the backlash
Article on the topic: Do-it-yourself repair and restoration of car batteries
Let's go to the store
So we did everything we could, but the leak didn't stop. This means it's time to change the seal. Actually, according to GOST, these products are called “Reinforced rubber cuffs for shafts.” Or simply - cuffs. If a store offers you a part with that name, don’t be surprised. Factory part designation: 2101–2402052. Further, its variations can be written through a dash: -01, -02 and so on. All of these products are interchangeable and differ in the nuances of their design and manufacturer.
Perhaps the most important thing when choosing an oil seal is the manufacturer. Choose products from famous factories
No name details, in principle, should not attract your attention, because not only according to ours, but also according to Western standards, the cuff must be marked with the manufacturer’s trademark, cuff size, and type of material. Domestic GOST also provides for marking the year of manufacture. As a rule, these are two digits of the year when the mold was made, and next to them are dots, each of which indicates one year of operation of this equipment. You count the points, add their number with the numbers and find out in what year your part was manufactured. The year of manufacture is important because over time, any rubber compound “ages”, losing its shape and elasticity.
The type of mixture from which the oil seal is made is also important. The most expensive and most durable - fluorine rubber
It works well in aggressive environments and at high temperatures. It is usually marked with the Latin letters FBR. Nitrile butadiene rubber (NBR) is considered optimal in terms of price and quality for automobile transmissions. ACM acrylate polymer seals are also available, but they are usually used in components that should not be directly exposed to water. Chemists are constantly improving their products, so the fundamental differences between mixtures are becoming less and less, due to additives introduced into them that improve the weaknesses of certain recipes. Read reviews on the Internet, listen to the seller’s recommendations and make a decision based on your financial capabilities.
When examining externally, first of all pay attention to the quality of the working edge: it should be even and smooth around the entire circumference. You can use a magnifying glass
It will be a big plus for the gearbox seal to have an external boot - like a second edge, but without a spring and with a hole of a slightly larger diameter. The boot, as the name suggests, protects the work area from dust and dirt. The presence of an inclined notch on the boot or near the working edge indicates that the oil seal is designed for shafts rotating in the same direction.