Is there any point in redoing it?
The carburetor engine has long been “morally obsolete”. Back in the second half of the 90s of the last century, VAZ cars were equipped with an injector. Nevertheless, carburetor engines still have a lot of “fans” who claim that the carburetor is not so bad. Before we begin converting the car, let’s look at it in detail, is everything so clear? Maybe it’s too early to consign the carburetor to the dustbin of history? Let's paraphrase Hamlet and ask ourselves: “Carburetor or injector, that is the question?” This is, of course, a joke. But is it really worth investing so much effort?
- To re-equip a VAZ-2109 you will need to invest at least $500. It is unlikely that the savings from using an injection engine will pay for such costs. Maybe only in the long term.
- The environmental performance of a car can be improved much more easily. Install a vortex aerodynamic device. It’s easy to buy such a unit, it’s inexpensive, and it installs quickly.
Why change the carburetor?
Let's start with the fact that no one has been installing carburetor engines throughout the civilized world for a long time. Entry into the countries of the European Union in such vehicles is prohibited for reasons of environmental safety. There are a number of other significant arguments:
- a significant drop in engine power at high speeds;
- problems arise when overtaking. Passing cars on the highway in a car with a carburetor engine is, in general, a complete nightmare (especially taking into account the modest capabilities of the VAZ-2109);
- significant fuel consumption compared to an injector;
- “minor” inconveniences, for example, manual control of the air damper, etc.
Of course, you can treat everything philosophically and find positive aspects even where there are none. For example, with the same manual damper control. Some drivers claim that in winter conditions this “function” is a plus, it allows you to “feel” the engine. But only an incorrigible optimist can agree with such a statement.
Injector advantages
Having considered the disadvantages of the carburetor, one cannot help but ignore the positive aspects of the injection engine. Among the obvious advantages are the following:
- fully complies with the requirements of environmental legislation on emissions into the atmosphere;
- engine power increases significantly (especially at high speeds);
- servicing the injector is much cheaper;
- fuel consumption is reduced (up to 6 liters per 100 km);
- It is possible to install gas cylinder equipment (GBO).
Pros of switching to an injector
There are quite a lot of positive aspects when switching from a carburetor to an injector. The main reasons are the following:
- Saves fuel by supplying it directly to the engine cylinder.
- Engine power increases, especially at low speeds.
- Increases stability at idle speed.
- Carbon dioxide emissions into the atmosphere are reduced by using 90% of the total potential of the fuel mixture.
The injection system is considered more modern and environmentally friendly. It ensures compliance with Euro-2 standards, which a carburetor engine cannot boast of. Due to the presence of a special controller, even when running cold, the car will start easily and operate stably.
It is worth noting that the injector also has its drawbacks. Among them:
- demands for good fuel;
- more complex diagnostics and maintenance;
- high cost of repairs.
Comparative characteristics for VAZ-2109
| Specifications | Injection engine | Carburetor engine |
| Cylinder diameter (mm) | 83 | 76 |
| Motor power (kW) | 78 | 64 |
| Average fuel consumption (l/100 km): | ||
| around town | 9 | 10 |
| along the highway | 7 | 9 |
| Acceleration to 100 km/h (sec.) | 13 | 16 |
| Maximum speed (km/h) | 160 | 145 |
Perhaps there are also personal reasons to convert your VAZ-2109? For example, there was a desire to rummage through the car for my own pleasure. One way or another, if you firmly decide to change the carburetor to an injector, move on.
Selection of necessary parts
Let's start the “remodeling” with the selection of a good injection system. Of the options on the market, the best one today is Bosch M 1.5.4. Acceptable both in price and quality. It is better to install the system without any additions. You can install an external fuel pump, but such an operation will require additional investment. You will need to buy additional parts, but they are quite expensive.
To install the injector, buy parts from serial car models. Such spare parts are well tested and, as they say, “tested by time.”
- air filter box;
- collector;
- gas tank;
- receiver;
- Consumables.
We start by removing the old generator, thermostat, pulley and all belts. We also remove the hoses and pipes of the cooling system.
The gas tank needs to be replaced. You can “borrow” from the VAZ injection model or buy a new one. Before installation, the unit is washed and dried. When installing an electric fuel pump, make sure that the arrow on it matches the similar marking on the gas tank. Check that the sensor float accurately detects the fuel level.
For the conversion you will need a tank from the injection version of the VAZ-2109
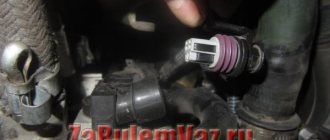
To install the ignition module and cylinder block sensor, we make two holes for installing the units under the bracket (20 and 16 mm, respectively). To carry out this operation, you need to drain the antifreeze and dismantle the radiator.
It is necessary to re-equip the cooling system to function in new conditions. To do this, we change the pipe and temperature sensor. Additionally, you will need to drain the oil and remove the pan. We install a new damping pulley instead of the standard one.
For an injection system that is demanding in terms of energy consumption, we install a more powerful generator. You can choose the right option in any specialized store.
What to prepare to change
The whole process will take you about a week, provided you work 3-4 hours a day. Therefore, prepare your garage in advance and buy everything you need. You can assemble the injector on different ECU controllers, but in the case of the VAZ-2109, the January 5.1.1-71 model is better than others. Available domestic spare parts can be used for it, and it does not use an adsorber and an oxygen sensor.
List of components required for replacement
| 1 | Oil pump (with mounting for PCV sensor) |
| 2 | bracket |
| 3 | V-belt |
| 4 | Wiring |
| 5 | Thermostat |
| 6 | Ignition system module |
| 7 | Upper and lower air filter housing |
| 8 | Fuel and air cell |
| 9 | Intake manifold |
| 10 | Two air filter supports |
| 11 | Throttle pipe |
| 12 | Receiver |
| 13 | Gasket for throttle pipe |
| 14 | Fuel pressure control |
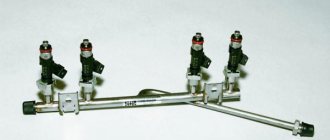
| 15 | 4 nozzles |
| 16 | Injector ramp |
| 17 | Intake manifold gasket |
| 18 | Mounting kit for receiver and air filter |
| 19 | Ramp tube set |
| 20 | Throttle cable bracket |
| 21 | Throttle cable |
| 22 | Hose |
| 23 | Air flow sensor |
| 24 | Fuel hose kit |
| 25 | Electric fuel pump |
| 26 | Controller January 5.1.1-71 |
| 27 | Knock sensor |
| 28 | Crankshaft pulley |
| 29 | Crankshaft position sensor |
| 30 | Gas tank |
| 31 | Plug with gasket |
| 32 | temperature sensor |
| 33 | Fuel pump pressure ring |
| 34 | Generator with mountings |
Also pick up bolts, nuts and clamps from the store that you will need for the job.
Tools
The repair will consist not only of dismantling some components and mechanisms. In some cases, it will be necessary to make changes to the design of cylinders and other parts.
From the tool you will need:
- Set of wrenches.
- Flathead and Phillips screwdrivers.
- Good drill.
- Hammer and chisel.
- Rust remover.
We lay wires and connect devices
We carry out preparatory work in the following sequence:
- drain the fuel (lighten the tank);
- disconnect the terminals and remove the battery;
- dismantle the distributor with elements;
- remove the fuel pump;
- remove the carburetor;
- disconnect the ignition wires located under the hood;
- remove the fuel pipes;
- dismantle the gas tank and vacuum booster hose.
- We close the cables remaining from the fan relay together with the device switch-on sensor;
- we install fuses, relays and controller in their standard places;
- connect the fuel pump to the dashboard;
- install the collector.
How to remake: step-by-step instructions
Before starting work, wash the car thoroughly and remove dust and dirt from around the engine.
- In the rear of the car we remove the old carburetor fuel system.
- Pull out the gas tank and fuel pipes.
- We screw on the new bracket and use it to secure the new injection lines.
We install the bracket in its original place and secure the lines - We install the fuel filter along with hoses.
We fix the fuel filter with hoses - We attach the fuel pump to the injection gas tank.
- We go into the engine compartment and remove the ignition.
- We disconnect the wires that go from the sensors to the ignition braid.
- We pull out the old ignition tee and install an injection tee in its place.
Before doing this, completely drain the antifreeze from the system. We install the injection ignition tee in place of the carburetor - In place of the distributor, we make a plug with a seal and treat it with sealant.
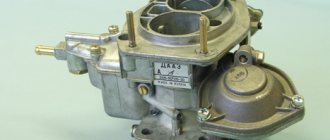
- Remove the carburetor along with the intake manifold.
We dismantle the old carburetor along with the manifold - We replace the gasket and install a new injection manifold.
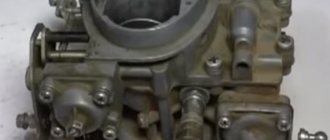
We install the injection manifold in place of the carburetor - We install the injectors on the ramp and secure it to the manifold.
- We connect the hoses and install the receiver.
We install the injection receiver and connect the hoses to it - If your model has an oil pump without a casting, then it also needs to be replaced.
- The generator on the nine must be replaced, but the pulley itself is suitable for the new system and can be left.
- Instead of a carburetor ignition cable, we install an ECU wiring cable.
- We connect the wiring to the controller and the motor.
- In our case, the fuel sensor will remain the same; you just need to connect it to the new pump.
- Turn on the ignition and check the operation of the fuel pump. The entire fuel system must be sealed and leak-free.
- We replace the carburetor module with an injection one.
We remove the carburetor ignition module and install the injection module in its place - We install a new ignition system (spark plugs and module).
- We install the air filter.
- Drill a hole for the knock sensor (depth 16 mm).
- We start the engine and check its operation.
Conclusion
No matter how much debate there is about the “good old” reliability of the carburetor or the progressiveness and efficiency of the injector, in any case, of course, the choice is yours. In order to properly re-equip your machine, at all stages, follow the operating instructions and technical data sheet for each component and unit. Remember that a car is an object of increased danger and thoroughly check every action you take.
Perhaps you have experience converting a VAZ-2109 from a carburetor to an injector? Share your experience with our readers in the comments. Any information and, of course, your personal opinion will be very useful.
Carburetor engines have been obsolete for quite some time. But today on our roads it is not difficult to find cars equipped with this type of engine. The VAZ 2109 model is no exception.
Nine engine
Having a nine carburetor at your disposal, you can even convert it into an injection car on your own.
Before you decide to take such a step, be sure to study the strengths and weaknesses of each engine type, and also determine in which mode you use your car most actively. Your final decision largely depends on this.
How does an injector work?
Any modernized design has features that affect its advantages and disadvantages. The operating principle of the injection configuration is to constantly monitor the pressure in the rail and supply gasoline precisely to the cylinders. The signal to the injector is supplied by the control unit, which reads the piston position from the crankshaft position sensor. The principle of operation is based on the interaction of many sensors, indicating to the electronic sensor of the car the state of components and assemblies.
The main features are noted before converting the injector into a VAZ 2109 carburetor:
- The emission of harmful substances into the environment is significantly less; the car does not need to be configured or serviced before a technical inspection.
- The maximum torque is produced upon reaching a certain number of revolutions; modern engines have higher revving speeds, which allows you to save gasoline during moderate urban use.
- The absence of mechanical traction during a cold start of the internal combustion engine makes it easier to start in winter. Warm-up speed is controlled by a computer.
- When installing gas equipment of the latest generation, it is better to convert a VAZ from a carburetor to a VAZ injector than to adapt it to an older installation.
Like all parts, there are certain drawbacks to the point supply of gasoline to the cylinders, even in the factory version. Faulty injectors can only be determined through computer diagnostics, which will require certain financial costs. Also, replacing the gasoline supply element will cost more; tuning to a certain octane number allows you to achieve the desired results, but will require investment.
Carburetor. Advantages and disadvantages
Let's start with the negative points. These include:
- Such engines have not been installed on production cars for a long time. In Europe, due to environmental requirements, carburetors are blacklisted. That is, they are prohibited because they heavily pollute the atmosphere;
- At high speeds, the engine's capabilities drop significantly. Torque does not reach the desired levels. But at low speeds it is effective and allows you to accelerate well from zero to hundreds;
- When overtaking, the carburetor is a pain. It is problematic to overtake cars normally and confidently. Especially considering the power of the carburetor nines;
- High fuel consumption when compared with injection engines. On average, a nine with a carburetor in normal mode consumes about 8.5-9 liters of fuel per 100 kilometers;
- The air damper is controlled manually. The exception is some versions of the latest samples, where automatic devices have been installed. Some motorists claim that manually controlling the throttle in winter has its advantages, as it allows you to feel the engine. But only experienced drivers can understand this.
Nine carburetor
But let's not just talk about the bad. The VAZ 2109 with a carburetor also has positive qualities:
- The cost of a carburetor is much cheaper than an injection engine;
- Engine maintenance costs less, and the work itself is easier to perform if you repair it yourself;
- Fans of carburetors claim that the absence of control units and microcontrollers is an undeniable advantage. Although one can argue with him;
- If the engine fails even 100 kilometers from the nearest settlement or service station, it is not a problem for experienced drivers, since repairs can be carried out even in the field. But this will require the availability of appropriate tools and passenger assistance.
Injector. Advantages and disadvantages
In short, all the advantages of the injector are the disadvantages of the carburetor, and all the disadvantages are the advantages of the carburetor.
Injection nine
The key features of injection engines include:
- Injectors are more environmentally friendly and meet the requirements for emissions of harmful substances;
- Although the torque is insufficient at low speeds, it makes overtaking easier at high speeds. The engine seems to get a second wind;
- Injector maintenance costs are higher;
- For normal operation of such an engine, clean fuel is needed. The carburetor “feeds” on everything;
- To check faults, it is necessary to perform diagnostics, which is time-consuming and expensive;
- The injector consumes less fuel. The average is 6-7 liters per 100 kilometers;
- Almost all systems function through computer control, therefore, when working correctly, the engine operates as efficiently and economically as possible;
- It is possible to install HBO on the injector. But with a carburetor, such a step is fraught with a number of difficulties.
Converting the injector into a carburetor
Let's start with the fact that the decision to install a carburetor instead of an injector is not very popular and usually arises when serious problems begin with the power supply system of an injection engine (fuel pump, injectors, etc.), as well as the ECU itself and ECM sensors.
If malfunctions affect several expensive elements of the system, then the cost of purchasing spare parts can be relatively high. In other words, the owner does not want to change these elements, preferring to immediately install a carburetor dosing system that is simpler and cheaper to maintain and repair.
As mentioned above, most often such work is carried out on old foreign cars with a mono-injector and VAZ models, which allows us to consider the experience of refining these cars as a clear example.
- To install a carburetor, you need to remove the injector and its elements, and also install the intake manifold from the carburetor internal combustion engine.
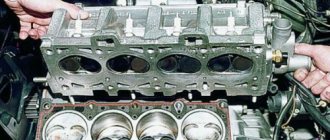
- To remake the engine, you do not need to completely change the cylinder head, as it might seem at first glance. The only thing is that there is a possibility that the camshaft will need to be replaced. Such a replacement is necessary if there is a special pin for the sensor. In this situation, the camshaft is replaced with a conventional version.
- Work on the fuel supply system also in some cases does not involve replacing the gas tank. It is enough to disconnect the standard electric fuel pump, after which a fuel pump from the carburetor version is installed. It is also common practice to install an electric low pressure pump.
- As for the ignition system, you will need a distributor, high-voltage spark plug wires, fasteners, etc.
- You also need to connect the throttle and choke cables, and perform a number of other additional works (manipulations with the cooling system, removing the catalyst from the exhaust system, laying wiring, etc.).
Let us also add that the total costs of such an engine alteration may approach the amount of high-quality repairs of an existing injection system
It is also important to consider that after replacing the injector with a carburetor, the car will become less economical and environmentally friendly, detonation may occur, the vehicle may noticeably lose dynamics if the carburetor is incorrectly configured, etc.
Note that in the process of replacing electronic injection, it is also desirable to separately integrate injection ignition on a carburetor engine. Often, we are talking about installing a microprocessor ignition system MPSZ.
Proper implementation will allow you to achieve stable spark formation, as well as avoid frequent and widespread problems with the standard coil and a number of other problems with the ignition system, which in practice are characteristic of outdated carburetor internal combustion engines.
Rework
To replace a carburetor with an injector yourself, be sure to arm yourself with the following components:
- Cylinder head from VAZ 2112 with receiver and manifolds;
- Knock sensor;
- Throttle pipe with throttle position sensor;
- Mass air flow sensor and a number of other elements.
Replacement kit
When everything is ready, you can get to work.
- Remove the old cylinder head. Plus, remove all attachments in the fuel assembly, gas tank and ignition system.
- Remove the alternator, thermostat, pulleys and belts.
- Install a new gas tank with a pump, borrowed from a donor - an injection VAZ.
- Remove the carburetor and ignition system components that need to be replaced.
- Disconnect the cooling system pipes and hoses. Here, install a completely new kit from the injector.
- Remove the pan.
- Install new pistons from an injection donor and connecting rods at 10. Standard carburetor components are not designed for an injection compression ratio. Plus there are special recesses for other valves.
- Install a new unit with an underflow on the cover for the DPKV, replacing the standard oil pump. If you can remove the cover, then only that will be replaced.
- After removing the old cooling system pipes, install new ones. The best solution is to replace the entire set. Buying it won't really impact your overall budget.
- Prepare everything necessary to mount the 16 valve head. The fasteners match, only the bolts from the old head are long and need to be shortened. Plus, don’t forget to make a size 12 hole in the new head.
- Install new fuel lines from the donor.
- Connect your new gas tank to the lines.
- Route the wiring from the control unit to the fuel pump. You can use old fuel level regulators from a carburetor car.
- Cut a hole in the wall of the engine compartment through which the wiring will be routed. This way you won't have to make the standard wires longer.
- Install the knock sensor by drilling a hole in the block and tapping a size 8 thread.
- Be sure to replace the water pump using a unit from donor 2112.
- Get a new crankcase breather and oil dipstick. Install them instead of the previous ones.
- Install a new cylinder head. Just don't forget to change the gasket, which corresponds to a different head.
- Install a thermostat borrowed from a VAZ 2112.
- Connect the coolant pipes.
- Remove the rear timing cover and rollers. The pulleys from 2112 are dismantled. The belt must be installed in accordance with the marks.
- Install the new generator along with the drive. For the new generator, the upper fasteners will remain intact, since they are not provided for by the design of the carburetor VAZ 2109. Therefore, fasten the pair of lower mounting bolts as securely as possible.
- Place all the sensors in their new places.
- Seal the valve covers with a good quality sealant.
- Assemble the ignition module, wires, spark plugs and other components.
- Install the air filter.
- Get your exhaust system back to normal. The muffler is often left stock, but the resonator and other components are taken from the donor.
- The wiring is connected to the dashboard and the lock.
- Fill in new oil, refuel the car with high-quality fuel.
- Start the engine and take it for a test drive.
What you can get
By converting the carburetor into an injection car, you can get improved technical and dynamic characteristics. We offer you a comparison of the parameters of the two motors.
Domestic cars do not have an ideal design, but they provide a lot of opportunities for successful modification of many components and endless tuning. That's why the VAZ-2109 is considered a good option for those who like to repair, modernize and make their dream car come true.
In skillful hands, the good old “nine” will sparkle with new colors, and all this can be done with your own hands in your own garage.
Converting a carburetor to an injection car
A word from the author or arguments and facts.
So, before you start all these alterations, think about it: do you need it? Take a good look into the future and decide whether you will drive this car for half your life or change it to another unit in half a year! I also advise you to start this alteration only if you are satisfied with the engine itself - I was stupid and stuffed the injector into a car with a 1.3 engine, as a result, most likely, I will soon change the engine, cylinder head and injector to 124 anyway. Of course, we don’t forget about the body, because no matter what your engine is, etc., but if you can slow down with your feet, and the sunroof appeared over time and without the owner’s initiative, then it’s hardly worth bothering with such a car.
In general, what we came to:
1) a car for the soul or for everyday life for a long time. 2) we are satisfied with the engine and you will not change it. 3) body without problems.
Well then you can try it.
PS I rebuilt the following unit: VAZ 2109, 1.3, 8V, 1993.
Goals and their achievement.
So, what goals did I set and what did I achieve, as well as goals that you can set:
1) Trouble-free engine starting in any weather - done. 2) Forget about adjusting the ignition and the quality of the fuel/air mixture - done. 3) Forget about the engine jerking - done. 4) Reduce fuel consumption - done. 5) Increase power - not done, or rather, could not be done! 6) Improve throttle response - done, but not by much.
Of the minuses, I note the following:
1) A bunch of sensors that can fail, and you will rack your brains for a long time about what exactly went wrong. Don't forget, we are complicating the design, not the other way around! Moreover, mechanics are often easier to understand than electrics. 2) I spent about 18 thousand. Consumption will decrease by a maximum of 2-3 liters. Think about how much you will win and when will this change of yours pay off?
Necessary equipment, tools and parts.
Equipment:
1) A garage with electricity and light is a very useful thing ;). I worked in a garage without both, moreover, the “gate” (a sheet of iron that was stupidly applied to the entrance) did not close completely, so snow and rain flooded me on your back, thanks to our climate.
2) An overpass, which would be nice (or rather, very necessary) to rent for two days and one night. Or the garage from point 1 must be equipped with a pit. You can do without this, but I STRICTLY do not advise you to work under jacks or without any equipment at all - it is not convenient and life-threatening! By the way, if the three of you or at least two of you do all the work, and from 5-6 in the morning until 10 in the evening, then you can limit yourself to one day.
3) The second car can also be very useful to you because... Some of the parts may turn out to be defective, some will have to be purchased in addition, and other force majeure situations will most likely accompany you.
4) A book for engines 2111, or simply injection engines 2108, 09, 099, 14, 15. I recommend the books “Behind the Wheel” and “The Third Rome”
5) A friend, an enthusiast, an optimist, a straight man, and don’t yell! =) If you do it with three or two people, the process goes much faster ;).
Tool:
1) a set of screwdrivers, keys and heads (including a wrench), which you of course have =) 2) A 5-point hexagon (do not confuse with heads and keys, this is a key that is also used in foreign bicycles, a “stick” with six edges. In general, I don’t know how to describe it =) ) 3) VD - 40 is our best friend when tightening the nuts! I highly recommend it, or any other effective solvent. 4) A thin hose, 3-4 meters long, for draining antifreeze. 5) Containers for antifreeze and oil. 6) A chisel, drill and grinder can also help you in difficult times. 7) The metal pipe is thick and long (1.5 meters), with an internal diameter such that a wrench handle or even a key can fit inside! I HIGHLY RECOMMEND YOU TO HAVE WITH YOU! Remember: it should not bend with any small force, i.e. A pipe from a vacuum cleaner is unlikely to suit you! File 9) A set of devices, feeler gauges and shims for adjusting valves. 10) A set of various clamps.
And now we come to the spare parts that you will need. First, I’ll tell you where you can buy them:
1) The store is more or less reliable, but expensive. However, it is better to buy sensors and various tubes and hoses, fuel lines and the like there. 2) Disassembly at the market - it’s three times cheaper there than in the store, but no one will really give you a guarantee. Although I now have a familiar seller there, who, in case of any complaint about his product, exchanged it for me without any problems. 3) According to advertisements, from people's hands - even cheaper than at a disassembly site, but you have to look, and the price and quality depend on the person from whom you buy it all.
So, for spare parts (everything for the 2111 engine, or just injection 2108, 09, 099, 14, 15):
1) Gas tank and gas pump from 2114.15 (electric gas pump, located inside the gas tank on the top) 2) Fuel lines back and forth, various hoses and tubes. See the book. 3) Gasoline filter. 4) Four-pin connector for the fuel pump. 5) Intake manifold. 6) Receiver. 7) Injector ramp. 8) Injectors. 9) Wiring harness to injectors (with connector) 10) Throttle with throttle valve 11) fuel pressure regulator. 12) Air filter with a box for it and corrugation from the box to the throttle. 13) Camshaft from 2110-12, with a key for the phase sensor. 14) Phase sensor. 15) Distributor plug with a hole for the phase sensor. 16) Idle speed control. 17) Throttle position sensor. 18) Mass air flow sensor. (DFID) 19) Generator 2112 20) Oil pump with mounting for DPKV. 21) DPKV – crankshaft position sensor. 22) The crankshaft pulley is damping. 23) Alternator belt 24) Ignition module with mounting for it 25) Injector spark plugs (I recommend A17DVRM 1.0) 26) Explosive wires for the injector. 27) Upper and lower generator mountings. 30) Thermostat and tee with a hole for DTOZH 31).DTOZH – coolant temperature sensor 32) Hoses for the thermostat and tee. 33) Air filter support. 34) Throttle cable. 35) Bracket for fastening the throttle cable. 36) “Pants” with a hole for a lambda probe 37) Lambda probe. (CO potentiometer) 38) Knock sensor. 39) Speed sensor with a connector for the speedometer cable. 40) Controller (preferably Ya.7.2) 41) Wiring harness for the controller. 42) 5 meters of ordinary wire (not very thick, not very thin) 43) Adsorber sensor. 44) Injection resonator (its type depends on what kind of pants you buy)
That seems to be it. But I'm not sure. You can also partially look at sites like this www.chiptuner.ru/content/old-karbinj/
As for what and where to buy, the choice is yours. BUT I HIGHLY RECOMMEND you to finish reading this article and the one on the link, as well as everything that you find in our World Wide Web and in the minds of Russians! Decide on the choice of controller, a lot follows from this: for example, which braid of wires to take, or which ignition module to take - a new model or an old one, or which mass air flow sensor to take, etc. and so on.
And so he said: “let’s go!” and shit started going through the pipes.
Where do we start? Well, first of all, a couple of rules:
- The article was written by me (I’m 18 years old, I’ve only had half a year of car repair experience), so don’t judge too harshly even with those. When making mistakes, don’t throw bricks at your head.
- If we disconnect wires that are then not attached anywhere, then we ISOLATE them! or better yet, disconnect it altogether!
- When I say “13 mm wrench”, this means that we take a 13 mm wrench, and not the inner diameter of the nut is 13 mm.
- Please think with your head! Various complaints like: “why didn’t the author warn that you can’t fry pancakes in drained oil?” or “why isn’t it written which way to unscrew the nut and which way to screw it in?” NOT ACCEPTED!
- Use the Internet, books and advice from knowledgeable people. For example, I will not describe the process of adjusting the valves because... it’s in almost all books and on the internet! Sorry, I’m not Tolstoy to write a book for 25 years.
- It is better to buy new gaskets for all joints. Their cost is not so high, but the result can be quite significant!
So here we go:
1) “roll out” gasoline from the tank. You don’t have to bother, but I personally don’t like washing my hair with gasoline, especially without shampoo! =) 2) We drive the car onto the overpass. Better right side a little closer to the center! Just the main thing is not to fly away - believe me, this is not the best impression! It’s good if the overpass is level, with a rosette, a roof and shoulders! We put the handbrake on all the way and into gear. 3) Disconnect all hoses from the gas tank. There are three of them in total, if my memory serves me correctly. We climb into the cabin, fold back the rear sofa, remove the rectangular cover in the middle (attached with two bolts) and disconnect the lines from the tank. 4) Remove the gas tank mounts and remove it. 5) Free the lines from the hoses and fasteners and remove them. 6) Remove the carburetor. To do this, unscrew the pan from the top. Next, I highly recommend removing the top part of the carb, this will make it easier for you to unscrew the 4 nuts that secure the carb to the manifold. We remove the carb. AHTUNG! Make sure that nothing gets inside the collector! It is better to plug the manifold hole with a clean cloth after removing the (careful) carb. 7) Next, drain the oil from the pan by unscrewing the bolt from below. Unscrew the tray from the block around the perimeter. 9) Remove the timing belt protection. 10) Align the pulleys according to the marks. To do this, the mark on the camshaft pulley must align with the protrusion on the left. We also remove the rubber plug (located to the right of the engine, under the distributor on the box) and make sure that the mark on the flywheel matches the mark on the crankcase (everything is located under the plug). 11) Remove the flywheel protection. And block the flywheel with 2 screwdrivers. + Our car is still in gear. 12) Next, unscrew the nut that holds the pulley. For convenience, it is better to turn the steering wheel all the way to the right. Then the nut becomes easily visible. Personally, I needed the tube from step 7 of choosing a tool in order to unscrew it. 13) Remove the pulley that turns the generator belt. 14) Remove the pulley that turns the timing belt. ATTENTION! It is locked inside with a small key in the shape of a circle cut in half. When you remove the pulley, do not lose it! 15) Unscrew and remove the oil pump. 16) We install a new one with a mount for the DPKV. 17) Put the timing belt pulley in place. Again, for me it didn’t fit with this damn key, so I had to process it a little with a file from step 8 of choosing a tool. 18) Install a new generator damping pulley. Tighten with the nut from step 12. 19) Remove the old generator and its mountings. We install a new one with new fasteners. We put on the belt (rivet). Adjust the tension. By the way, when replacing the generator, TURN OFF THE POWER! And then don't mix up the wires. 20) Disconnect the wires from the spark plugs and from the distributor. Remove the distributor cover. We remove the distributor by unscrewing the internal bolt with a hexagon from step 2 of choosing a tool. You will also have to unscrew the fuel pump. 21) Remove the cylinder head cover. 22) Unscrew the nut securing the camshaft pulley and remove the pulley. Unscrew the shaft fasteners and remove it. You can also replace its oil seal. 23) install a new roller with a key under the DF. We put the roller mounts back. 24) We put on the cover-plug of the distributor and insert the phase sensor. By the way, when installing the plug, I advise you to coat the joint with heat-resistant sealant. 25) adjust the valve. 26) Put the cylinder head cover in place. 27) We put on the pulley and tighten it tightly with a nut (or a bolt, I don’t remember what it was). We set it according to the marks. (It is better to do it before step 25) 28) We put on the timing belt, adjust it with a tension roller, remove the screwdriver block from the flywheel and turn it a couple of turns. After this, the marks must be aligned again on both the crankshaft and the flywheel. 29) We put on the flywheel protection and engine sump. 30) We put on the timing belt protection 31) We remove the intake manifold. 32) Remove the resonator, pants and exhaust manifold. 33) We screw the pants to the exhaust manifold, screwing the lambda probe into them. Let's put it in place. We install a new resonator. 34) Install the speed sensor and screw the speedometer cable into it. The sensor is placed in the place where the speedometer cable itself was previously screwed in. Those. he's like a transitioner. 35) Drain the antifreeze, preferably completely, using the hose from step 4. choosing a tool. We replace the tee with the thermostat with a new one with a hole for the DTOZH. Attention, I’ll share my bitter experience: I HIGHLY recommend screwing the tee to the block with ordinary nuts WITHOUT collars. One of my tees was cracked because of the collars (( 36) Next, using the book, we connect all the hoses. ACHTUNG! Don’t skimp on the hoses! If the hose is short and does not fit in length, then install a new one! The hoses should not be under tension! On the contrary , it is better that they sag even a little. Otherwise, it is possible that after some time you will see an unpleasant, abundant flow of steam under the hood! 37) We install a new gas tank and lines. Various pipes and gas filter. 38) Unscrew the intake manifold and install a new one. 39) Next we install the receiver, injectors, ramp, pressure regulator and throttle. 40) We connect the lines and the ramp with hoses. DON'T MIX WHAT CONNECTS WHERE! 41) We install all kinds of sensors. The knock sensor must be firmly attached to the block, and not just anywhere! And if I'm not mistaken, in the area of the first cylinder. The crankshaft position sensor should NOT rub against the pulley, but it does. the part should be at a distance of about 1.5 mm from the pulley. The adsorber sensor is attached to any space. Do not confuse the provisions of the RKHH and TPS. The mass air flow sensor is attached to the corrugation coming from the throttle. 42) Fasten the ignition module using a bracket. Where? See the book. 43) We change the throttle cable and attach it to a new bracket. 44) Do not forget to connect the ignition module to the spark plugs with new BB wires.
Well, it seems like everything is mechanical. Next is the electrician. T.K. I carried out the work 3 months ago, I no longer remember what went where, so look at the diagrams! And also, forgive me Dima, please contact the site administrator www.lada-samara.com Atomic. He is our electrical brain and, to my surprise, he remembers what goes where. As a reminder, I’ll continue with something myself:
45) Connect the controller to the braid of wires. 46) we drag the corrugated part FROM THE PASSENGER INTO THE UNDER-HOOD SPACE, and not vice versa, through the hole, which is located under the noise and heat insulation on the passenger side and is sealed with a rubber plug. Generally speaking, the hole there is standard and in theory there is no need to widen it, but still I had to cut it out with a chisel, hammer and pliers. 47) Connect everything to the sensors. 48) Find a black wire at the end of the braid (under the corrugation at a distance of about 20 cm from the end it turns red) and throw it on the battery positive. 49) In the cabin we find two brown wires and throw them to ground. 50) Next, we find 4 contacts at the fuel pump. We don't need blue. Here I can confuse it, but it seems like we connect it like this: a black wire to ground, a pink wire to the pink wire going to the old tank, and a gray wire to the pink wire on the spit. To which? See the diagram. 51) connect the battery. Let's fill the tank with gasoline! If you don’t fill it, the pump will catch air and become unusable! I think 10 liters is enough. 52) We find a blue wire with a pink stripe (I think) on a square block of 9 contacts. On the diagram it is number 8 if my memory serves me correctly. Now we cut it off (preferably not at the root) and connect it to the contact that goes to the ignition switch. To which? I don’t remember exactly here, but the gist is the following: key to 0, on wire 0, key to ignition, on wire 12V, key to starter, on wire 10V (or so). 53) turn the key to the ignition (NOT STARTER) and if we hear a buzzing sound, i.e. the pump is pumping, then it is connected correctly, if not, then swap the gray and pink contacts! Let's check again. Did it work? Hooray! It didn’t work: it means either the author or you are not smart enough =). By the way, on the instrument panel, if the connection is correct, the arrow should rise slightly! 54) There is also a wire that is responsible for the operation of the fan, but here see the diagram or Atomik. I don't remember which one. 55) Don’t ask about the immobilizer either: I still don’t understand the purpose and essence of this beast ((
How does a carburetor differ from an injector?
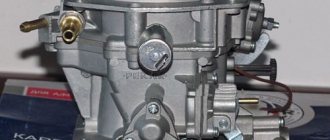
Increasingly, on forums and blogs of car enthusiasts and VAZ-2109 owners, you can find discussions on how to equip a carburetor with an injector. A beginner is unlikely to know the difference between these vehicles, so experienced specialists provide explanations. Both devices “cook food” for the engine, “mixing” gasoline and air in the correct proportions. The carburetor has a special float chamber built into it, which “sucks out” the fuel and sprays it into droplets at a certain speed.
It would be hard to call a carburetor a simple mechanism. In this regard, certain difficulties arise in its work, which can also be called disadvantages:
- setup difficulties;
- not always optimal and effective composition of the mass;
- difficulty starting at sub-zero temperatures;
- the need for frequent cleaning, otherwise blockages will lead to breakdown of the unit.
The injector, in turn, is a valve whose opening duration is controlled electronically. As soon as the valve takes the open position, fuel is immediately sprayed under pressure.
The only nuance that can cause an injector malfunction is clogging of the channels through which gasoline is supplied.
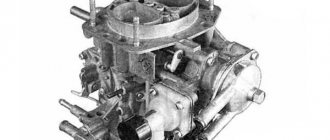
The design of a simple carburetor
Today there is practically no conveyor production of carburetor internal combustion engines left. Some car enthusiasts are supporters of the carburetor, because. in an environment remote from service stations, it can be serviced independently, which cannot be said about the injection system. The disadvantages are reduced torque parameters at high speeds and increased consumption of the combustible mixture.
The simplest carburetor: 1 - air; 2 - fuel; 3 - needle valve; 4 - float; 5 - float chamber; 6 - sprayer; 7 — fuel jet; 8 - mixing chamber; 9 - working mixture; 10 — throttle valve; 11 - diffuser.
Also, older carburetors have difficulty starting in cold weather. The mechanized installation of the choke does not make it possible to use auto start, which causes many problems. On the latest models there was an auto choke, which automatically adjusted the damper depending on the coolant temperature.
Advantages that can stop the transition of the VAZ 2109 from carburetor to injector:
- The new device costs less than converting a VAZ 2109 car from a carburetor to an injector. Therefore, the unit is adopted as a budget option for maintenance.
- Maintenance and repair of components can be done independently, using available tools. It is enough to buy a repair kit of gaskets, which is sold at any automotive parts outlet.
- Fans of old configurations note the absence of a control unit and additional electronics as an advantage.
Repair of the carburetor system can be carried out without special conditions; the simplest option, if mediocre cleaning of the carburetor is necessary, is the method of rearranging the armor wires. This technique allows you to shoot through the channels using air and a combustible mixture; such repairs are not recommended with an injection system.
Instructions for converting a carburetor to an injector VAZ-2109
Step-by-step instructions for converting a carburetor into an injector with your own hands, recommended by specialists and car enthusiasts, looks like this:
- Buy a new tank to hold the fuel. Before alteration, it must be thoroughly dried and an electric fuel pump installed. It is important to adjust the optimal values of the pump frame and tank, and also check how the fuel sensor changes.
- After the new tank is prepared, drain the antifreeze by placing a container of up to 5 liters under the coolant hose.
- Remove the radiator, removing all existing fasteners.
- In the place where the sensor responsible for detonation is mounted, use a drill to make a hole 16 mm deep. Prepare the installation of the modular ignition bracket in exactly the same way, but you need to deepen the hole more - up to 20 mm. What the VAZ-2109 driver should be wary of is through drilling.
- Now remove the engine pan and the timing belt. The new oil pump should be installed on the crankshaft. It is correct to replace the generator on the VAZ-2109 with a model with better power, which has a ring gear and a pulley with a damper. The belt associated with the generator also needs to be replaced.
- Remove the battery, then remove the fuel delivery compartment, wiring, pipes and other components.
- After disassembling the instrument panel, proceed to installing wires to the tachometer and the starter lock mechanism. This must be done by starting the motor unit and connecting it to the necessary detachable elements. The new ends of the wiring are fixed to the mounting unit, taking into account the polarity, which is determined based on the same shade of the edges.
- Connect the wires to the fuses. Fix to each other and adjust the correct operation of the fuel pump and fuel indicator.
How to replace the generator on a VAZ 2108-VAZ 21099?
Removal: You will need to remove the generator from the bottom of the car, but there is usually a crankcase protection at the bottom, so you will definitely need to remove it, as soon as the bolts securing the protection are unscrewed and it is removed, remove the minus terminal from the battery (How to do this, read “here in this article”, in paragraph 1) and first of all, disconnect the wiring from the generator (two terminals are attached to it and a block of wires is connected in addition, to disconnect the terminals, you will need to unscrew the nut that secures them, see the large photo, but you are near the block you will find it, you just need to pull it out by hand), immediately after which loosen the upper nut of the adjusting bar, and then the lower one a little (see small photo) and as soon as this is done, move the generator by hand closer to the engine and remove it from it the belt that is put on it, but that’s not all, and until the generator is removed, all that remains is to completely unscrew only three bolts, one is the one that secures the adjustment bar (Indicated by a blue arrow, you will have to completely unscrew it), and the other two are located at the bottom ( More on them a little later, namely in paragraph 2).
Note! When the belt is removed, take it out and inspect it, under no circumstances should there be traces of oil or other types of liquids on it, and it should not be cracked or have any obvious defects, otherwise the belt will need to be replaced with new!
2) At the very bottom of the generator (You will have to crawl under the car), you will find two bolts, but remember, one of them is long and the other is short, remember where each one is wrapped, so that later you do not match them with each other, but immediately wrap them on those places where needed, well, both bolts must be unscrewed, and when they are completely unscrewed, carefully remove the generator and place it on the ground or wherever you need it.
Installation: The new generator is installed in place of the old one in exactly the same way, but just don’t forget to unscrew the nut that secures the adjusting bar on the generator and move this bar to another one, and that’s all in essence, the replacement of the generator on the car has been completed successfully.
Additional video clip: To see in more detail the process of how the generator is checked for serviceability using a device such as a multi-meter, you can watch the video clip located just below:
How to install an updated system
To install the plug to the block system head, based on the injection mechanism, install the positive wire. Install the manifold and injectors located on the in-line rack, the receiver and the throttle component. The throttle cable is taken as an elongated sample.
The fuel structure in the new model is placed at the bottom of the body, after which pipes and purifiers are installed. Next, install a new tank and connect the product to the system. To check the operation of the nozzles and their condition in relation to leakage and damage to the integrity of the material, blow out the internal plane with a pump. Then install the ramp, sensors and all the equipment based on electrical and high-voltage activity, the starting module, to the collector.
When the installation of the air filter is completed and all operations go perfectly, the car is started. The modernization can be considered successful if the VAZ-2109 starts immediately, on the first try.
Advantages and disadvantages of the injector
To understand whether you are ready to invest effort into converting the carburetor into an injector on a VAZ-2019, you need to study the real capabilities of the car before and after modernization. Here are the advantages noted by the owners of domestic cars after the VAZ-2019 has already been converted:
- There are no problems starting the engine in any weather conditions.
- There is no need to adjust the ignition according to the quality of the air-fuel mass.
- Eliminates the risk of engine tripping.
- Requires less gasoline consumption.
- The VAZ-2109 moves better from the very beginning of the start until the end of the trip.
Now about the disadvantages of the alteration. Like any device, the injector is not immune to breakdown, then checking the condition of each part will require much more time. The good thing about an injector is that the engine starts easier than with a carburetor, it saves gas, it’s easier to drive the car, but servicing the mechanism really suffers and requires specific skills and knowledge, and the patience of the car enthusiast.
Some drivers express certain doubts whether it is worth spending so much money to convert the carburetor to an injector in the VAZ-2109. After all, fuel savings after modernization are no more than 3 liters, and the modification itself is estimated at 15,000 - 20,000 rubles. If one-time expenses are not so important to you, then do not neglect the conversion. Driving a modernized car will become more comfortable and, over a long period of use, more profitable.
The main difficulties when replacing an injector with a carburetor
The work of changing and modifying any of the engine components is quite labor-intensive and requires certain skills and time. Spare parts, as well as wiring, must be selected in accordance with quality parameters, otherwise converting the carburetor of a VAZ 2109 car into an injector may be done in vain
In the case of using parts from disassembly, it is important not to be swayed by the low price, but to pay attention to the wear of the part and demand a guarantee from the seller. It is not recommended to carry out work alone; you need to invite an assistant; it will be even better if he understands automotive technology
It is possible to do the work yourself and save a lot of money on the services of specialists with proper distribution of forces. The selected parts are cleaned of dirt and dust before installation; the transition should be done with the required regulations.
There are certain risks, for example, the amount of costs will not be compensated by fuel savings. The modification is carried out in most cases for convenient operation of the car; by installing and properly configuring the carburetor, you can achieve low fuel consumption. After modernization, you do not get a new unit that is reliable; replacing a unit that has lost its resource with a new one gives a guarantee for several years without fussing operation, and is much cheaper.
Source