How does a carburetor work on a VAZ 2105
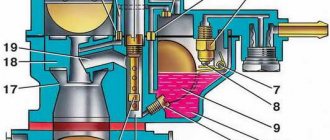
There is nothing complicated about the operation of a carburetor. The intake manifold connects the fuel system to the power unit. When the engine is running, the pressure in this manifold decreases. This causes a vacuum to form in the carburetor. It is the reason why both gasoline and air are sucked in at the same time. As a result, these two components are mixed to form a working mixture. And thanks to this mixture, the pistons begin to move.
In order for a vehicle engine to work efficiently, it is necessary to achieve ideal operation of all carburetor systems. This includes engine starting and warming up systems, idle speed, gasoline level control system, accelerator pump, elements of the main metering chamber, and econostat.
According to experts, you can adjust the carburetor even without removing it from the car.
Before you start adjusting the carburetor, you need to be sure that you know the structure of the unit. The VAZ 2105 carburetor has several most important components. It is they who will need to be regulated. This is a system that doses, starts and warms up the engine; system responsible for the level of gasoline; idle system; econostat; acceleration pump.
Functions
The functionality of the element in question is quite simple. It is designed to enrich the incoming fuel mixture with oxygen and then remove it into the combustion chamber.
This whole process can be described by the term mixture formation. Its first stage is to introduce gasoline into the air stream, atomize it and partially evaporate it. Next, the mixture enters the intake manifold and cylinders, without ceasing to evaporate. The next stage is fuel dosing. After this, adjusting to the engine operating mode, the amount of mixture changes.
Step-by-step adjustment of the carburetor on the VAZ 2105
If you are not familiar with the design of the car, you have no experience in repairing it, disassembling it or the layout of the fuel system, then it is better not to start adjusting it. Any/wrong actions can only aggravate the problems or cause a breakdown. If you have an idea about the structure of the carburetor of your car, then performing all the manipulations will be quite simple. As a result, you will increase the efficiency of your vehicle, reduce fuel consumption and increase the performance of the power unit. There is nothing wrong with such manipulations. Quite the contrary.
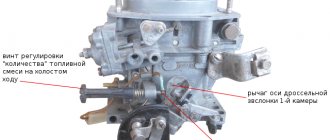
- Crankshaft speed calibration. First you need to make sure that there are 750-800 revolutions per minute. The production adjustment screw will help with this. It must be screwed all the way, and then returned three turns.
- Change oxygen content. To adjust the amount of carbon dioxide in the exhaust, you must use a quality screw. You need to screw this screw all the way in, and then unscrew it 5 turns. This will increase the fuel concentration and make the mixture richer.
- Speed regulation. To adjust the idle speed, you must use the quantity screw. Your task: to make the engine work stably at 750-800 rpm. The effect can be achieved by gradually tightening the quality screw. With such manipulations, the speed will increase and then decrease, which will lead to unstable engine operation. As soon as the power unit begins to operate unstably, start unscrewing the screw. Do this until the motor starts running stably.
- Idling. Upon completion of all actions, idle speed calibration is required. Again you need to use the appropriate screw. The rpm should be 800-900. If necessary, all actions can be repeated.
Once all the necessary setup steps have been completed and the desired parameters have been achieved, you need to test the carburetor.
Start the engine and sharply press the accelerator pedal, and then release. If everything is configured correctly, the crankshaft speed will increase temporarily. If your actions lead to the engine stalling, then you need to increase the number of revolutions. The adjusting screw will help you with this task. Check how the motor will behave under full load conditions: a working stove, light, and so on.
Expert advice
After completing the procedure for adjusting the VAZ-2105 carburetor device, experienced auto mechanics recommend paying attention to the following critical points:
- Valve location - is in the retracted position, with the idle speed jet touching the seat in the carburetor body.
- Lubricating the rubber seal with special motor oil.
- The location of the air damper intended for cold passage is in a vertical plane, while the suction handle is lowered.
- The condition of the solenoid valve - the presence of damage and malfunctions is checked as follows: turn on the ignition;
If clicks are heard during the inspection process, the part is in full working order.
Technical part of VAZ 21054 injector: characteristics
“Five” is familiar to many. There are many VAZ models; an interesting fact is that even the old models are very well known and are not inferior to new technologies. With their stability and reliability, they have held the championship for many years in a row. Although many will agree that things sooner or later deteriorate and need repair. The same goes for carburetors; their strength weakens over the years, and they simply need to be checked and cleaned. 2105 injector and carburetor in this case are no exception.
This is most often a difficulty for car owners; they must have at least some initial information in order to cope with a problem of this nature. This process takes a lot of time if this information is poorly oriented, so everyone who owns a car should be ready to resolve such issues on their own.
Removal and installation of TPS
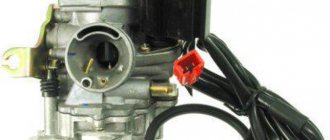
The first step is to disconnect the minus terminal from the battery, and then disconnect the chip with the power wires from the sensor, as shown in the photo below:
Now, using a Phillips screwdriver, unscrew the two screws securing the sensor to the throttle assembly.
After both screws are unscrewed, carefully move it to the side.
The seat has a special foam pad that needs to be kept intact. The new sensor is installed in the reverse order, so that the holes in it coincide with the holes in the throttle.
The price of a new TPS for injection VAZ 2104, 2105 and 2107 is about 200-500 rubles. The cost depends on the manufacturer and place of purchase.
Source
Setting the needle valve opening
Turn the carburetor cap over so that it is positioned vertically. In this case, the tail of the float should lightly touch the needle ball. Please note that even partial overlap is not allowed. Measure the distance using a paper template. Determine the distance from the plane of the float to the gasket on the carburetor cover. It should be no more than 6.5 mm. If it is larger or smaller, then adjust in the desired direction by bending the small tail on the float. The distance to the maximum degree of valve opening is measured in the same way.
How is the starter adjusted?
Trigger: 1 - diaphragm, 2 - adjusting screw, 3 - diaphragm rod, 4 - air damper control lever, 4.1 - lower profile of the groove of lever 4 for limiting the maximum opening of the air damper, 4.2 - upper profile of the groove, responsible for the mechanical opening of the air damper , 4.3 - edge of the lever to ensure the starting clearance of the throttle valve of the first chamber, 5 - air damper, 6 - air damper lever, 7 - air damper return spring, 8 - air damper drive rod, 9 - adjusting screw stopper, 10 - throttle adjusting screw dampers of the first chamber, 11 — throttle valve drive lever, 12 — throttle valve of the first chamber
If you turn the lever 4 that controls the air damper 5 counterclockwise until it stops, the air damper will close completely due to the action of the spring 7. If the damper does not close, the cause of the jamming must be eliminated.
As soon as the air damper is completely closed, you need to press rod 3 of the starting device all the way. As a result, the air damper 5 will open by 3.0 mm. If necessary, you need to adjust the gap with screw 2 .
If the air damper is completely closed, then the throttle valve 12 of the 1st chamber will be slightly open by 1.1 mm.
Replacement instructions
For the procedure, you should use an overpass or inspection hole. To raise the car, you can use a jack, lifting the front end and placing it on supports. Replacement is carried out only on a cold machine.
Required Tools
Replacing a timing belt and chain is a complex and lengthy procedure. To complete it as quickly as possible, you need to properly prepare for it and prepare in advance:
- a set of keys;
- set of heads;
- knob;
- screwdriver
To make consumables last longer, you should buy originals.
Stages
- First, turn off the power to the car by removing the negative terminal from the battery.
- If protection is installed, it must be removed.
- Then you need to drain the coolant from the system.
- At the next stage, you need to dismantle the radiator, cooling system fan, and pump pulley.
- Then you need to remove the drive belts for the power steering, air conditioning compressor, and generator.
- Next, unscrew the spark plugs.
- Then we remove the distributor protection screen and disconnect the tube connecting it to the timing belt from the air collector sleeve.
- By turning the crankshaft by the bolt securing its pulley, you should set the marks. The mark on the timing belt pulley must coincide with the casting on the camshaft; accordingly, the installation mark on the crankshaft gear must align with the mark on the oil pump housing. In the video you can see how to set the tags correctly.
- Using a special tool, you need to unscrew the mounting bolt and remove the crankshaft pulley.
- Then you need to remove the lower and middle timing protection covers.
- By unscrewing the tensioner mounting bolt and turning it counterclockwise, we loosen the tension on the timing belt and remove the latter.
- Now you should change the roller and start tightening the VAZ 2105 timing belt.
Changing the tension roller
Before doing this, all parts should be cleaned of dirt.
- The belt should first be pulled onto the crankshaft pulley, then onto the oil pump drive pulley, and lastly onto the camshaft pulley.
Pulling the belt onto the camshaft pulley
- Having put the belt on the tensioner, you need to tighten the bracket and install the spring.
When installing the timing belt, do not rotate the camshaft and crankshaft so as not to knock off the marks.
- After turning the crankshaft two turns, you need to check that all installation marks match, tension the belt and tighten the tensioner bracket mounting bolts.
- Next, assembly is carried out in reverse order.
After the procedure for changing the timing belt or chain of the VAZ 2105, you should start the car and check the performance of the engine.