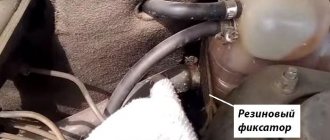
An integral element of the brake system is a reservoir with working fluid. It ensures the presence of a sufficient amount of fuel fluid in the circuit. The tank is hermetically sealed with a lid, which prevents moisture from being absorbed by the hygroscopic liquid.
Appearance of the brake fluid reservoir
Where is Toyota located?
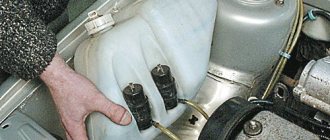
For Toyota cars, brake fluid is poured into a plastic reservoir, which is located under the hood. The tank is located closer to the windshield, slightly to the right. For some models, the tank placement may differ slightly from the above. If you can’t find the tank, look at your car’s passport or maintenance card. There are marks on the tank that show how full it is (volume is indicated in liters). In modern Toyota cars, the reservoir is equipped with a dipstick, with which you can check the brake fluid level.
Changing the fluid yourself
Before opening the tank itself, wipe the outside of the tank with a rag to prevent debris from getting inside. Make sure that the brake pedal is not depressed when you open the lid (liquid may splash out). It is recommended to work with rubber gloves, because the liquid is toxic. Hands should be washed with soap afterward.
When you add fuel fluid, make sure that its level is between the minimum and the upper mark. When performing a complete replacement, the fluid is drained from all circuits and then I pump the entire system again, starting with the most distant wheel (where the longest tube goes to the brake cylinder). If the contours are located diagonally, then the right rear wheel begins to pump. Then left in front. Then, accordingly, the left one is behind and finish on the right one in front.
If the contours are parallel, then pump the rear on the right, then on the left, then the front on the right and left. The video shows the process of replacing the tank itself. It is more convenient to perform pumping in a hole or by rolling the car onto an overpass. The tools and fluid here will depend on the make of your car.
Upon completion of pumping, you should slow down several times at low speed; if any wheel reacts weakly, which is felt by the car being pulled to the side, pump it again. After the first trip, you should check the brake fluid level again; most likely you will have to add more.
That's all, share the link with your friends, as usual, and subscribe to the site if you haven't already. I look forward to your feedback and comments, see you soon
How to find it in Hyundai?
When using a Hyundai car, you need to periodically check the volume of brake fluid. If necessary, add fluid to the tank. The reservoir into which the brake fluid must be filled is located on the main cylinder, on the left side of the engine compartment.
In order to avoid the costs of repairing the brake system, or even the entire car, in the future, change the used working fluid with a new one in a timely manner . Brake fluid is highly hygroscopic (absorbs moisture from the air). This not only increases the corrosive effect on spare parts, but also reduces the boiling point of the liquid itself. This may cause the braking system to stop working. Do not re-apply the drill. It contains too much dirt, air and moisture.
How to remove it
Remove the brake fluid reservoir to replace it or clean it from sediment and dirt. Sometimes this is done to change the rubber bushings that secure it. The sequence is:
- The tank lid is removed. Under it there is a float from a sensor that monitors the liquid level;
- It is better to carefully place the cork on a clean rag, because liquid drips from the float and you can get dirty;
- Taking a rubber bulb or a simple medical syringe with a larger volume and a jar where you will collect the liquid, pump out the liquid from the tank to the maximum;
- After this, press the tank latches on the sides, pry it up (with a screwdriver) and remove the tank from the cylinder;
- After such an operation, the rubber bushings of the tank must be replaced.
- Therefore, we pry up and remove the bushings from the holes of the cylinder.
- Now the tank is washed and, if necessary, replaced.
- Before installing the tank in its place, you need to insert new bushings: only after this can you insert the tank into the bushings all the way by hand.
- To make the job easier, wet the bushings with brake fluid before inserting the reservoir.
- After installing the reservoir in place, you need to fill it with liquid, and then bleed the entire brake system.
Here's how to change this part, now let's look at cleaning options.
VAZ - where is the reservoir for filling brake fluid located?
In the domestic VAZ car, the brake fluid reservoir is located in the engine compartment (on the left) and is secured with a clamp to the partition. A decrease in the volume of working fluid in the reservoir when the hydraulic brake drive system is sealed is a sign of worn out pads.
Knowing where the brake fluid reservoir is located, you can easily replace the brake fluid with fresh fluid. Remember to replace regularly. Thanks to this, you can maximize the operating life of your own machine.
How to check the fluid
To check the quality of TJ there are special testers, of which there are many on the market today. Before purchasing, you should study the instructions to understand what can be tested using this device. We need a boiling point, according to which a conclusion about its suitability will be drawn:
- If the temperature exceeds 175 degrees, the fluid is in good condition;
- If it is 165-175, provided that no more than two years have passed since the date of filling the liquid, it is suitable;
- When it boils at 165 degrees or lower, it needs to be replaced completely;
Video with a solution to this problem
Liquids for filling into the tank
Today's cars, built with the widespread use of new technologies, are very demanding of all process fluids, including coolant. The list of requirements is as follows:
- the liquid must boil at a temperature not lower than 110 ° C;
- freezing threshold - from minus 20 to -60 ° C depending on environmental conditions;
- no foaming upon contact with the pump impeller, minimal viscosity;
- the liquid must contain non-aggressive additives that prevent the appearance of scale on metal parts;
- the chemical composition should not change for 3 years or 60 thousand kilometers.
Antifreeze is a purely domestic product, synthesized during the USSR
All of the above requirements are met by antifreeze or antifreeze, which is the same thing. The name antifreeze comes from the English word antifreeze, which means “non-freezing”. Antifreeze is a substance created on the same basis from ethylene glycol in the former USSR. The word consists of the abbreviation TOS (technology of organic synthesis) and the ending “ol”, inherent in the names of chemical preparations.
The base of antifreeze and antifreeze is the same - water + ethylene glycol in different ratios. Differences between products from different manufacturers may lie in the package of inhibitory additives, so it is not advisable to confuse liquids. There will be no fatal consequences, but some substances can neutralize the effect of others and the anti-freeze properties will deteriorate. In this case, the color of the liquid does not matter - it is just a dye.
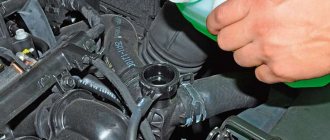
You can use distilled water to fill the tank in the following situations:
- to dilute antifreeze concentrate to the desired freezing temperature;
- in case of an emergency - complete or partial loss of coolant en route;
- for the purpose of washing.
The color of antifreeze does not affect its properties; the additive package is important
Distilled (desalted) water does not meet the above requirements: it freezes at zero temperature and boils at 100 °C. Therefore, it is poured temporarily or as a solvent for antifreeze.
It is unacceptable to pour tap water saturated with salts into the expansion tank. An exception is the breakdown and loss of antifreeze on the way and the absence of a car shop nearby. Fix the leak, fill the cooling system with tap water and get to a garage or service station, then drain it immediately. Otherwise, deposits will form on the inner walls of the water jacket of the engine and other units, impairing heat transfer.
Video: liquids for pouring into the car cooling circuit
Purpose of expansion tank
The cooling systems of various cars contain from 5 to 20 or more liters of non-freezing liquid - antifreeze (antifreeze). During operation, the engine, and along with it the antifreeze, heats up from low temperatures in winter to high temperatures in summer.
The temperature difference can reach 100 °C or more. For example, when operating a car in northern regions, where engine warm-up starts at minus 20 °C and ends at an operating temperature of 90 °C, this difference will be 110 °C.
During engine operation, a pressure of about 1 bar arises in the expansion tank
Draining liquid without dismantling
I cannot guarantee that the methods discussed will suit any car. There is only one universal method, but its use should be approached with extreme care.
First, look at the owner's manual for your car and see how the manufacturer itself recommends draining the windshield washer fluid from the windshield washer reservoir. Then decide whether to follow these instructions or use an alternative method.
Frequently asked questions from car owners
How and where to add windshield washer water?
- In the cabin, open the hood handle
- Finally open and secure the hood
- Unscrew the large cap on the windshield wiper reservoir, the one without wires
- Pour liquid into the tank. Approximately five liters will fit in this canister
What liquid is recommended to be poured into the washer reservoir of the VAZ 2114?
Different times of the year require different windshield wipers to clean glass. In winter, at low temperatures, it is recommended to fill in an antifreeze additive. It will protect the tank from freezing, and with it the parts of the windshield wiper system will not burst from temperature overloads. In summer, it is recommended to add a cleaning additive to the water. During this period, abundant sediment of exhaust gases, oils, and car paint care products accumulates on the glass.
Advice: for the best effect, you should first pour the additive into the tank, and only then ordinary water. This will allow the liquids to mix better.
How can you heat the windshield wiper reservoir in winter?
Option one: homemade
Materials: 1 meter of 8 mm copper tube, 2 meters of 8 mm wrapped hose, 2 reservoir cuffs and 4 clamps.
Heating installation technology: two holes for cuffs are drilled in the tank lid. A copper tube is already inserted into them, which must be given the reliefs of the tank in advance. At the exit, the tube should be in a horizontal position. The hoses are connected to the throttle body and thermostat.
Option two: in the form of a coil
Technology: the same copper tube as in the first option. But here it is given the shape of a coil using a soldering iron. The resulting coil is not attached, as usual, to the tank instead of a lid. It is soldered to a textolite plate. Afterwards, the homemade coil is installed in the tank as low as possible so as not to interfere with the liquid level sensor.
Holes for the thermal device are cut using a soldering iron. This way they turn out neat. Their diameter is 3 millimeters. The edges should be lubricated with sealant. The best fastening for the device is stainless steel screws. When installing, they should be heated with a soldering iron - this way they will be better fixed in the windshield washer reservoir.
Option three: ready
This is a ready-made heating system for the Geyser tank washer. Operating principle: as it passes through the coil, the temperature of the coolant begins to rise. Accordingly, the degree of liquid in the tank also increases.
Instructions for replacing and repairing the tank
Replacing the washer reservoir is usually done as a result of its failure, which cannot be repaired. In particular, if the CP is cracked and it is no longer possible to restore its integrity.
Using the example of a VAZ 2114 car, let’s look at how to remove the washer reservoir:
- First open the hood. Before removing the BO, it is necessary to drain all remaining liquid from the container. If the liquid level in the container is high, then unscrew the cap of the washer reservoir, this will reduce the pressure in the system.
- Then the BO is removed from the grooves; to do this, it can be pulled up, and placed in such a way that you can easily dismantle the electric motors.
- You need to disconnect the contacts from the motors, as well as the water supply pipes.
- Next, the electric motors are removed from the container body - for this you can use a regular screwdriver to pry them off (the author of the video is the menstimecom channel).
As you can see, there is nothing complicated in removing BO. It is much more difficult to repair the washer reservoir. If the container is cracked, it is not a fact that it can be repaired, since everything depends on the size of the crack and its location.
If you don’t know how to seal the washer reservoir, then you have several options:
- For gluing, you can use special glue or cold welding. Before applying material to a crack, the BO must be thoroughly washed, and the area to be patched must also be degreased. Glue or cold welding is applied to the crack, while it is necessary to grab a few more millimeters from each edge of the crack. Depending on the type of glue and cold weld, the waiting time for the material to dry can range from 30 minutes to several hours.
- If the crack or hole is small, you can try to treat it with regular sealant. In this case, the repair procedure looks similar - the surface is first washed and then degreased. A certain amount of sealant is applied to the hole, which should completely fill the crack and the space around it.
- Another option that is best suited for larger cracks is the use of special plaster tape. It is also installed on a degreased surface, but before installation the tape should be coated with epoxy, and the material should be applied in several layers until all the cracks are closed.
- If all these options do not help you, then you can use a soldering iron or wood burning machine. With the help of these devices, the structure of the container is softened, which makes it possible to restore its integrity if the damage is minor. Additionally, after treatment with a soldering iron, the damaged area of the BO can be covered with cold welding.
Photo gallery “Removal and repair of the container”
1. Unscrewing the container fastenings
2. Disconnecting the motor power connector
3. Treating damaged containers with sealant
Where is the expansion tank installed and its structure
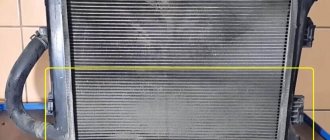
As a rule, most car manufacturers make expansion tanks from a durable plastic base, which is very resistant to temperature changes. A special scale is applied to one of the faces of the magnifying vessel, on which the measure and control of the permissible volume of antifreeze is established. The lowest mark on this scale means the minimum permissible volume of liquid to be filled. When the engine is cool, the maximum coolant level should not reach a maximum level of about three centimeters. As a rule, on most cars, the contour tank is located near the main cooling radiator and is located directly on the fender of the car body.
The center of the expansion tank and the upper edge of the cooler are at the same level and create the effect of communicating vessels into which antifreeze flows. A pipe is installed on the lower edge of the expansion tank, which is connected to the upper part of the cooler. This design allows an increased volume of heated liquid to enter the circuit tank, and when the entire mechanism cools down, it replenishes the volume of refrigerant in the general system.
The most common malfunctions of the expansion tank, where the refrigerant goes
- As a rule, tanks often break and begin to leak along the seams of the alloys. Liquid leakage may be caused by a violation of the tightness of the connecting pipes.
- It is extremely rare that the expansion tank completely deforms due to a drop in the refrigerant level, which causes maximum hot vapor pressure. If such a breakdown occurs to you on the road, we do not recommend continuing to drive, but stopping the car and having it repaired. If you do not do this and continue driving, you can overheat the engine, which will lead to inevitable consequences.
We remind you once again that you should not pour cold antifreeze into a heated tank, as you can cause a backlash, which will lead to complete destruction of the cooling system and the entire engine.
We are finalizing the VAZ 2109 washer Crafts for cars
Good afternoon. I would like to share an idea for upgrading the windshield washer on 9. The point is to install a second motor and get rid of the washer solenoid valves (which are now very difficult to find on sale, because they were installed on the very first Samaras with an old-style reservoir that had a remote pump).
What we need to have:
1) Two motors (I always buy from VAZ 2110, because they are more powerful (2.5 Atm versus the standard 2108 1.6 Atm), I advise you to buy from PRAMO, because in addition to the pump itself, the kit includes a landing sleeve and a small mesh filter for cleaning).
160r/piece
right
completeness
filterik
2) A new type tank for 2 pumps (there are ready-made ones with 2 holes on sale, but you can make a second one without any problems if the tank has a seat for a second pump, as in my case).
new
3) Carburetor check valve 2108. It is needed so that the washer fluid is constantly in the pipeline, and when the pump is turned on, it immediately hits the glass in front of the wiper, and not after it passes through the dry glass.
4) Washer hose, very short length, ~10 cm. Needed to connect the pump with a check valve.
Now let's get started:
1) Make a hole for the second pump.
cut with a knife
2) Place rubber bushings on the silicone sealant.
ABRO black
3) We install the pumps ourselves.
4) And we connect according to the following scheme: To the first pump (which is closer to the headlight) we connect a tube from the rear glass washer + a check valve with a piece of hose. And to the second pump there is a windshield washer hose. Why in this order? Yes, because when the washer fluid freezes, the second pump, which is located closer to the engine, will warm up faster, because the front washer is more needed.
Next, we connect the wires to the pumps: Black wires (double) to the “-” pumps. We connect the pink wire to the “+” terminal of the windshield pump (previously this wire was located on the front window valve). Then we connect the pink wire with a black stripe to the “+” of the rear window pump. We isolate the remaining two wires (pink with a white stripe and the third black).
For better atomization, you can also install two-jet washer nozzles or fan nozzles from the VAZ 2110.
Roof rack fine: fiction or reality
First way
. It is universal and will fit all cars without exception. The idea is to squeeze the liquid out through the nozzles themselves. Extremely simple, but with its pitfalls. It is better to use it in situations where there is very little composition in the tank, and you do not have the time or opportunity to completely drain it. The simplicity lies in the fact that here you just need to turn on the washer and wait until the reservoir is empty. But there is also a difficulty. Working without stopping, the washer motor may fail. Be sure to give him time to rest.