Icy rear window
Today, almost all VAZ models are equipped with a heated rear window, since it greatly simplifies driving; in specific conditions, owners of cars without heated glass install it themselves. Most often, of course, heating is needed in bad, rainy and cloudy weather, then the rear window begins to fog up from condensation forming on it, and even in winter, then the glass may become covered with ice. When such conditions occur, as a rule, problems with the heating of the windows begin to arise; we will tell you how to check the heated rear window of a VAZ 2110 and troubleshoot the problem in this article.
Operating principle of heating
The principle of operation of the heater is very simple - a conductive thread of strictly defined resistance is applied to the rear window, it heats up from the current passing through it. In this case, the supply voltage is provided by such components as wiring, a heater relay, a power button and a fuse (see VAZ 2110: how to replace fuses) A similar scheme is used on all VAZ cars (and on the vast majority of foreign cars), starting with the “classics” and ends with the latest models.
Malfunctions of heated rear window and their elimination
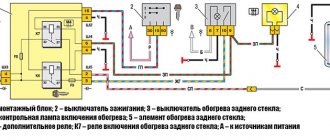
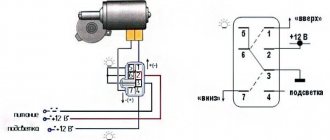
Let's look at the diagram in the photo below to make it clearer where to look for the problem:
Simplified diagram of rear window heating
- The inoperability of the rear window heater is detected almost immediately, because when it works, the fogged glass begins to clear up, literally in the first minutes after it is turned on.
- But when the heating does not work, then this does not happen, the glass was and remains fogged
Reasons why the heated glass may not work:
- When the glass does not thaw at all and the signal light (also known as the power button) does not light up, there is most likely a problem with the heating relay activation control. Here you need to immediately check (see the diagram above) - the control voltage, as well as the ground (contacts 85 and 86 from the relay and contacts 1 and 9, as well as 2 and 4 located on the block), check the fuse on the F7 diagram, and button 4
- If the heating does not work, but the control light on the dashboard (or located on the power button) is on, there is probably no supply voltage in the glass heating network. You need to check the presence of supply voltage (on pins 5, 30 of the relay, and 19 on the block), as well as fuse F4, measure the voltage and presence of ground on the heating element, as well as the integrity of this element
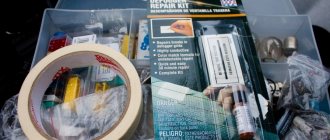
- If the glass only partially clears (in stripes). Perhaps some heating threads have failed. To restore, you will need to find the damage (visible break in the circuit), then repair it using conductive varnish (glue) or use a special repair kit for this purpose
- When everything works, the glass still does not thaw. This situation is quite possible in winter, or in cold weather, when the glass becomes covered with strong icing. Then the heating of the heater element is simply not enough, so the glass cannot thaw with its help. In such a situation, it is recommended to simply clear the ice from the glass.
Troubleshooting procedure
- We check fuses F8 (20A) and F8 (20A) (mounting block).
- We check the serviceability of the rear window heating button. Is there a “plus” on pin No. 10 of the switch button and after turning on the button on pin No. 9 (a test lamp or multimeter will be useful).
- We check +12V at the Ш5-2 output and at the connector near the rear window.
- We check the wires and their connections.
- We check the rear window heating relay - K7.
- We check the integrity of the glass heating filaments.
The algorithm for determining the cause of a malfunction is similar for most cars, the only differences are in the names of fuses, relays and connectors.
By the way, did you know that to extend the service life of the heating elements, they use a Glass Heating Regulator (DOC), and you can also install a Fresnel lens on the rear window?
Checking and replacing the heating relay
Typical VAZ glass heating relay
Problems that arise over time with heating the rear window are often associated with circuit problems, a blown fuse, as well as a heating relay:
- In VAZ model cars, the rear window heating relay is used to turn on the heating for a certain time within fifteen minutes
- This system operates thanks to a built-in timer.
- For vehicles in which a relay was installed, such a system can be located in the standard relay block or in the fuse box
- And in place of the standard relay, a new one is simply inserted and the heating is turned on with a standard button
- It is very important here that the winding of this relay is constantly connected to ground.
- The purpose of the relay is to turn off the heating when the motor is not running. The most important thing is that heating does not drain the battery
Relay replacement
If the glass heating does not work due to a broken relay, then the instructions dictate the following actions:
- First you need to disconnect the battery from ground
- Then remove the heating switch from the dashboard and disconnect its connector
- Next, you should check the condition of the circuit between the ends (terminals) of the 1st and 3rd connectors located on the relay side
- Be sure to check the status of the heater timer
- The control (test) light of the switch lights up when turned on and goes out after 12 minutes
- When the switch does not function, then it needs to be replaced
- Then the condition of the circuit from the side going to the switch connector is checked
- When the ignition key is in the off position, there will be no voltage
- We connect pins 4 and 6
- Then we check the operation of the heater
- If something does not work, then you will have to replace the switch
- The heating relay should be located in the fuse box, which is located in the passenger compartment
- It turns on only when you turn the ignition key in the lock and continues to work when the engine is running
- We turn on the heating by pressing the power button, after twenty minutes of operation the heating automatically turns off
- This heating function is very convenient and even necessary.
- You can install the relay in the rear window heating system yourself, or at a service station if you are satisfied with their price
Heated rear window of VAZ 2112 16 valves does not work
- To the beginning of the forum
- Forum Rules
- Old design
- FAQ
- Search
- Users
because if the fuse didn't blow, then the wiring shouldn't either.
in case of using the required denomination. if this is not so, then Orlovchanin
you will have to change the wires that have burned out)
Orlovchanin
The radio is probably screwed to the cigarette lighter, in any case, start digging from the CY.
And somewhere in my area there was a fire
Both front butt heaters don't work, can you tell me what fuse goes with them? Thank you
Both front butt heaters don't work, can you tell me what fuse goes with them? Thank you
something like a plastic flask with a fuse inside?
Information on icons and features
You can not
start topics You
cannot
reply to messages You
cannot
edit your messages You
cannot
delete your messages You
cannot
vote in polls You
can
attach files You
can
download files
Source
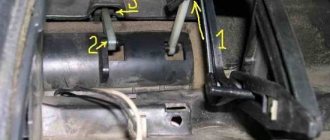
Diagram of elements of the glass heating system
A detailed diagram of the heated rear window system of the VAZ 2110 is shown in the figure below, according to it:
- The glass heating element is activated using an auxiliary relay designated K7 of type 904.3747-10, which is installed in the mounting block
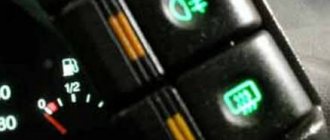
- When the heated rear window is turned on, control light 4, located next to the switch, immediately lights up, it illuminates the switch key in red or orange.
- In VAZ 2110 cars, the heated rear window can only be turned on if the ignition is turned on, because the voltage to switch 3 goes through another relay designated K6, which is activated when the ignition is turned on.
- The power supply to the glass heater is supplied from relay contacts K7 through fuse F7, connected directly to the power source
- If you turn on the heating, but the rear window is not heated, then you need to check the condition of fuse F8, as well as the wires connecting them, and also relay K7 and switch
What causes interior glass to sweat?
Why do the windows on a VAZ 2110 fog up? This is a question that baffles half of car owners. I’ll say right away that this most likely happens in cold weather due to increased humidity in the car interior, from which I’ll now explain:
- The most common reason is if the driver has a hangover, the windows sweat from fumes
- The second most common reason is that the interior heating radiator is leaking quietly, the liquid collects under the rugs, while the leak is small, it is almost unnoticeable, so it is worth checking the condition of this radiator
- Another reason for glass fogging may be the wrong direction of the stream of warm air from the stove; if the glass is blown, it dries, when it is not blown, it may begin to “sweat”, this, by the way, is the main reason why the windshield on a VAZ 2110 sweats
Doesn't work, what's the reason?
Actually, there are only two main reasons, and both of them lie in the power system:
- Fuse. YES it can really burn out. This happens for various reasons, maybe it’s just a minor short circuit and that’s all. Thus, your heating will not work completely. You need to find the fuse and check it . This is the first and mandatory step.
- If it is intact, then we need to check the voltage on the wires that go to the main “buses” (wide side strips). As a rule, they have ordinary metal contacts. We just take a multimeter and measure it, if there is voltage and it’s about 12 Volts, that means the power is suitable here, everything is fine.
- The thin lines themselves. To be honest, they can’t all burn out at once. As a rule, from one to three, or at most four, “threads” burn out. Therefore, if part of your window comes off (from fogging or ice), but part does not. It is the non-working threads that need to be looked at.
Checking and repairing the entire rear window heating system
It often happens that replacement or repair of the heated rear window is necessary due to faulty wiring diagrams. Therefore, for repair and replacement we perform the following operations:
- Disconnect the battery terminals
- When you have a stereo system connected to your car that has a security code, make sure you remember (know) the code to enter before disconnecting the terminals
- We pry and remove the heated glass switch from its mounting socket on the dashboard, disconnect the electrical wiring
- It is important to make sure that there is continuity between terminals 1 and 3 of the electrical wiring connector on the relay side
- When there is no conductivity, then the lamp must be replaced
- Using jumper wires, connect “plus” to terminal No. 2, “minus” to terminal No. 4 of the switch contact connector
- Then, using a 3.4 Watt probe light bulb, connect the “plus” to terminal No. 6
- We activate the heater, and the control lamp should shine for 12 - 18 minutes, then go out
- If a faulty switch is detected, it must be replaced
Disconnect the wiring from the switch and check the connector from the harness:
- The continuity between terminal number 4 and ground must be constant
- When the ignition key in the lock is in the LOCK or ACC position, there should be no voltage at terminal number 2 and ground, as well as terminal number 6 and ground
- And in the ON key position, voltage should appear between the described pairs of terminals
- We bridge terminals 4 and 6 from the contact connector and make sure that the rear window heating element is working
- If the switch was faulty, it needs to be replaced
- To identify a relay malfunction, you need to make sure that there is constant continuity of terminals number 1 and number 2
- We apply voltage to them, then make sure that terminal 3 and terminal 5 are open
- Replace a faulty relay
- If the points described above still did not help fix the heating, then it is necessary to replace the glass heating element itself
The check of all glass heating devices has been completed. Additionally, we suggest watching a training video.
Almost all VAZ 2110 cars have a rear window heating system. But even if this system is not provided for in some models, it is usually “finished”, since here we are talking about basic comfort today. If the rear window heating does not work on a VAZ 2110, this creates many problems.
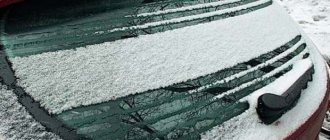
As a rule, heating is especially needed in cloudy, cold weather in autumn and early spring, when the glass becomes covered with condensation, blocking the driver’s visibility of what is behind the car.
Rear window with heating filaments
This lack of vision is especially dangerous when parking. The same can be said about winter use, when the frost literally draws patterns that you don’t want to admire at all.
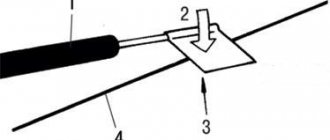
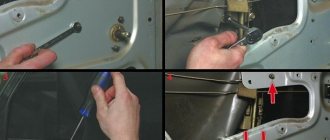
Restoring the conductive layer
First of all, purchase a special paste that conducts electricity from a car dealership. Then you need to remove the rear window. Prepare the work surface: clean it of dirt and dust, and also treat it with a degreaser. We clean the ends of the damaged thread. Apply tape and leave a small gap.
Apply the purchased paste and leave for a day. Then we remove the tape and make sure that the heating is working. If not, there is nothing left to do but replace the relay yourself. But the audible clicks indicate rather that the mechanism is in good condition. Therefore, most likely the problem in your case is with the thread.
How the system works
The operating principle of heating is very simple; it is used today in almost all cars, including foreign cars. Something simpler and better has not yet been invented. A conductive thread is applied to the rear window on the interior side, which heats up; accordingly, the glass is heated, which eliminates fogging from the inside, as well as snow and ice located on the outside.
Rear window heating operation diagram
This system is made up on a VAZ 2110:
- the thread itself, which provides heating;
- wiring going to it;
- heating relay;
- switch with signal light inside;
- fuse.
That is, nothing complicated for a craftsman. Considering that the size of the rear window of the VAZ 2110 is 121.3x67.6 cm, the heating size is usually only a couple of centimeters smaller, and essentially covers the entire surface, providing complete heating and good visibility of what is happening behind. There is no point in installing a much smaller heating system, because the driver should see the entire road behind, and not part of it.
Heated rear window of VAZ 2112 16 valves does not work
- To the beginning of the forum
- Forum Rules
- Old design
- FAQ
- Search
- Users
In the corner where the terminal is attached to the heating, touch it with your hand - if it’s hot, then the short circuit
is barely warming up; only a thin strip the size of the thread itself is warming up. And only when the interior warms up do the windows defrost.
Should be 12V. The less fall on the wires the better! Check: with a tester (multimeter) we measure the voltage between the ground and the contact on one side of the glass heater, and then on the other. If on the side on which there should be a “mass” the voltage is high, i.e. more than 0.5-1V, then it is necessary to improve the “ground”, and perhaps lay a second wire parallel to the existing one. On 2112, the ground contact is on the right, when looking from the trunk towards the raised 5th door. The ground wire passes through the rubber bushing next to the hinge - this is where the wire breaks. Correction: if the black wire coming from the heating and passing next to the parking lights (right rear) is shorted and the continuation of the same wire next to the left rear parking light is shorted to ground - there is a connector there, it also needs to be checked! - does not help, then you need to lay a 2.5 sq. mm multi-core frost-resistant wire from the heating contact, through the bushing (it can be removed and then carefully installed) and secure the wire and secure it with a bolt on the piece of iron next to the clearance lamp. Work CAREFULLY, SOLDER the connections, work with the heating contact CAREFULLY so as not to break it off. We check the other side in the same way.
After this procedure, my voltage drop across the wiring became less than 1 V, i.e. on the heater 11-12.5V. When the heating is turned on, the rear window warms up quickly (even steam comes out!). Contacting a service center, especially under warranty, will lead nowhere, because... they will fiercely convince that this is how it should be: the glass is cold, the fall is big, VAZ is to blame for everything.
To connect threads, you can use “Kontaktol with resistance 0”, it is made specifically for such repairs. Price 40-50 rubles, sold in Chip-Deep, etc.
Source
Causes of malfunctions and their identification
The heated rear window works as soon as the ignition is turned on, and the glass should clear within a couple of minutes. But sometimes it happens like this:
- The power-on signal does not light up, although the button is pressed, the glass does not defrost (remains foggy);
- The heating does not work, but the control light is on;
- The glass thaws in stripes;
- Heating is insufficient. This phenomenon occurs if the glass is heavily frozen. In this case, simply clear it of ice mechanically.
Repair work
The filament can literally be “painted” using conductive varnish or a special repair kit.
If this does not help, you may need to install a new relay.
It is located either in the standard relay box or in the passenger compartment fuse box. Installation is simple: take out the old one, put in the new one. But before this procedure, you must disconnect the battery!
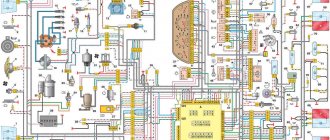
The collection contains all the necessary documentation for the electrical equipment of the VAZ-2110, the circuit itself, the seat heating system, headlight cleaner, electronic engine control module and fuse box. Diagrams for other models can be viewed here. Below is a high-quality color diagram of the electrical equipment of the domestic VAZ-2110 passenger car.
VAZ 2110 diagram
1. block headlight; 2. front brake pad wear sensors; 3. fan motor activation sensor; 4. electric motor of the engine cooling system fan; 5. sound signal; 6. generator VAZ-2110; 7. oil level sensor; 8. carburetor solenoid valve control unit; 9. heater controller; 10. recirculation valve switch; 11. illumination lamp for heater control levers; 12. switch; 13. carburetor limit switch; 14. oil pressure warning lamp sensor; 15. spark plugs; 16. carburetor solenoid valve; 17. coolant temperature indicator sensor; 18. ignition distributor sensor; 19. ignition coil; 20. starter; 21. heater fan electric motor; 22. additional resistor for the heater electric motor; 23. speed sensor; 24. reverse light switch; 25. micromotor gearbox for heater damper drive; 26. recirculation valve; 27. brake fluid level sensor; 28. blocks for connecting the rear window washer motor; 29. battery; 30. windshield washer motor; 31. washer fluid level sensor; 32. coolant level sensor; 33. windshield wiper gearmotor; 34. mounting block: 35. blocks for connecting the warning light harness; 36. outdoor lighting switch; 37. instrument cluster; 38. rear fog light switch; 39. fog light indicator lamp; 40. indicator lamp for heated rear window; 41. VAZ-2110 watch; 42. rear window heating switch; 43. steering column switch; 44. block for switching wires when installing headlights of a different type; 45. instrument lighting regulator; 46. ignition switch; 47. connectors for connecting the headlight cleaner wiring harness; 48. socket for a portable lamp; 49. lamp for individual interior lighting; 50. brake light switch; 51. interior lamp; 52. on-board control system unit; 53. fuel level indicator sensor; 54. hazard warning switch; 55. driver's seat belt sensor; 56. cigarette lighter; 57. ashtray illumination lamp; 58. glove compartment lamp switch; 59. block for connecting the on-board computer; 60. glove box lighting lamp; 61. side direction indicators; 62. switches in the front door pillars; 63. switches in the rear door pillars; 64. parking brake warning lamp switch; 65. trunk lighting; 66. temperature sensor for the heating system; 67. external rear lights; 68. internal rear lights; 69. license plate lights; 70. rear window heating element; 71. block for connecting an additional brake light.
Diagram of the VAZ engine management system with BOSCH controller - ECM 21104 1.6 16V
1 – block of the ignition coil wiring harness to the ignition system harness; 2 – block of the ignition system harness to the ignition coil wiring harness; 3 – ignition coils; 4 – immobilizer warning sensor; 5 – immobilizer control unit; 6 – spark plugs; 7 – nozzles; 8 – diagnostic block; 9 – block of the ignition system harness to the ABS cabin group harness; 10 – controller; 11 – electric fuel pump; 12 – block of the ignition system harness to the fuel level sensor harness; 13 – fuel level sensor harness connector to the ignition system harness; 14 – block of the ignition system harness to the injector harness; 15 – injector harness block to the ignition system harness; 16 – block of the ignition system harness to the side door harness; 17 – speed sensor; 18 – idle speed regulator; 19 – throttle position sensor; 20 – coolant temperature sensor; 21 – mass air flow sensor; 22 – oil pressure warning lamp sensor; 23 – phase sensor; 24 – oxygen sensor; 25 – crankshaft position sensor; 26 — knock sensor; 27 – solenoid valve for purge of the adsorber; 28 – oil level sensor; 29 – coolant temperature indicator sensor; 30 – block of the ignition system harness to the instrument panel harness; 31 – instrument panel harness connector to the ignition system harness; 32 – ignition relay; 33 – ignition relay fuse; 34 – fuse for the electric fuel pump power supply circuit; 35 – electric fuel pump relay; 36 – electric fan relay; 37 – controller power supply fuse; 38 – ignition system harness block to the air conditioner connector; 39 – instrument cluster; 40 – ignition switch; 41 – electric fan of the cooling system; 42 – on-board control system unit; 43 – starter relay; 44 – contacts of the 8-terminal blocks of the instrument panel harness and the front harness; 45 – contacts of the 21-terminal blocks of the instrument panel harness and the rear harness; 46 – trip computer; 47 – diagnostic connector.
Fuses and relays VAZ 2110
F1 - 5A - License plate lamps. Instrument lighting lamps. Side light indicator lamp. Trunk light. Left side side light lamps F2 - 7.5A - Left headlight (low beam) F3 - 10A - Left headlight (high beam) F4 - 10A - Right fog lamp F5 - 30A - Door window electric motors F6 - 15A - Portable lamp F7 - 20A — Electric motor of the engine cooling system fan. Sound signal F8 - 20A - Rear window heating element. Relay (contacts) for turning on the heated rear window F9 - 20A - Recirculation valve. Windshield and headlight cleaners and washers. Relay (winding) for turning on the heated rear window F10 - 20A - Reserve F11 - 5A - Side light bulbs on the right side F12 - 7.5A - Right headlight (low beam) F13 - 10A - Right headlight (high beam). Indicator lamp for turning on the high beam. F14 - 10A - Left fog lamp F15 - 20A - Electric seat heating. Trunk lock lock F16 - 10A - Relay-breaker for direction indicators and hazard warning lights (in emergency mode). Hazard warning lamp F17 - 7.5A - Interior lighting lamp. Individual backlight lamp. Ignition switch illumination lamp. Brake light bulbs. Clock (or trip computer) F18 - 25A - Glove box lighting lamp. Heater controller. Cigarette lighter F19 - 10A - Door locking. Relay for monitoring the health of brake light lamps and side lights. Direction indicators with warning lamps. Reversing lamps. Generator excitation winding. On-board control system display unit. Instrument cluster. Clock (or trip computer) F20 - 7.5A - Rear fog lamps
K1 – relay for monitoring the health of light bulbs; K2 – front wiper relay; K3 – repeater and alarm relay; K4 – low beam relay; K5 – high beam relay; K6 – additional relay; K7 – relay for turning on the heated rear window; K8 – backup relay
DIY heating repair
I remember distant times when this was practically impossible! Now technology has come so far - you can buy a rear window repair kit just to restore these narrow strips. I suspect that there is some kind of metallized composition or paint - but it is called conductive glue.
This glue can withstand temperatures from – 60 to + 100 degrees Celsius. This is exactly what we need to buy. The only thing I want to tell you is - don’t take the cheapest composition, now in my opinion it’s about 150 - 200 rubles, take a little more expensive one, about 300 - 400 rubles, such compositions work much longer.
Now the actual instructions for recovery:
- First you need a little, I repeat a little - to clean the edges of the strip in places where it breaks. It is necessary to remove carbon deposits and other deposits that form on the glass. Zero-grit sandpaper is ideal for this, just a couple of movements and you're done.
- Wipe with alcohol to remove all plaque.
- Now we take tape and stick strips on the sides, as thick as it is. The tape should not cover the strip, but it should not extend away from it at a large distance exactly along the width of the thread, so that there are no gaps.
- Next we take our composition, “conductive glue”. He either has a syringe or a special brush. We begin to paint the place that we have prepared. How many layers to apply will be written in the instructions. It is worth noting that you need to enter the working sections of the strip 1 centimeter to the right and left.
- Now we need the composition to dry. Remove the tape and wait. Usually about 24 hours is enough. BUT NOT SOON! After that, we turn it on and check the functionality, everything should work.
That's all, these are not complicated instructions. Now we are watching the video version.
I’ll finish this, read our AUTOBLOG
( 2 votes, average: 5.00 out of 5)
Category: Published 04/08/2014 12:02 If some devices on your VAZ 2110 or VAZ 2112 car have stopped working, fuses or relays may be to blame. At the very least, the first thing you need to do is check them, and then draw some conclusions regarding the malfunctions. Correct diagnosis of many electrical problems will allow you to accurately determine the cause of the inoperability of a particular unit.
To find out what fuses and relays do and how to find the right one, read this article. As in many other cars, in the VAZ-2112 and VAZ-2110, when the engine is turned off, the devices are powered directly from the battery. When the engine is running, voltage is supplied to the devices from the generator, which simultaneously charges the battery. If the current exceeds the permissible value or a short circuit occurs, the circuit fuse will blow.
Powerful electrical appliances are connected via relays. The fuse and relay box is located on the left, lower part of the instrument panel. It is accessible by pressing the button and folding the lid down. To remove fuses, there are special non-conductive pliers in the upper left part of the mounting block. 1 - K5 - high beam relay.
If the high beams in two headlights do not work, check this relay. If one of the high beam headlights does not work, check fuses F3 and F13, as well as the lamps and the high beam switch. 2 - K4 - low beam relay. If the low beam in both headlights does not work, check this relay. If only one low beam headlight does not work, check fuses F2 and F12, as well as the lamps themselves and the light switch. 3 - K1 - lamp health control relay.