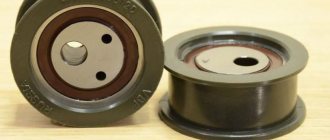
On Priora cars equipped with additional options, such as hydraulic power steering or air conditioning, due to the specific location of the units and, accordingly, the drive belt of the mechanisms, the tension of this drive is arranged using a tension eccentric. The tension roller is also used on the latest releases of the Priora car. This tensioning mechanism is modeled after the tension of the Kalina drive belt. Due to differences in design, tensioners are available in two types:
- metal plastic with options;
- plastic for standard vehicles.
How to adjust the generator roller on a Priora with your own hands
The generator belt tensioner roller is a small but very important part of the machine. If it fails, the operation of attachments and electrics is at risk. But you can diagnose, lubricate and even change a spare part yourself; it does not require much effort or serious knowledge in the automotive industry.
On Lada Prioras with air conditioning and power steering, as well as those equipped with power steering (electric or hydraulic power steering), the alternator belt is additionally maintained in an optimally tensioned state by a special roller. The Priora generator belt tension roller is an important part that ensures the operation of the attachment.
How to determine the need to replace the alternator belt on a car
As mentioned above, the alternator belt should be changed at intervals of 60 thousand km of the vehicle. Do not neglect these recommendations. Often products fail before the stated period, and sometimes they can last longer. In general, it should also be noted that the belt wears out not only during its operation, but also when the car is idle for a long time. In such a situation, the resource of the drive element is reduced, and therefore its replacement may be necessary much earlier. Experts recommend taking into account that if a car does not travel 60 thousand km within 2-3 years, then the belts should be replaced.
Various signs may indicate that the alternator belt needs to be replaced. They can be identified both visually and auditorily. First, let's determine the visual defects of the alternator belts on the Priora. These include:
- cracks;
- abrasions;
- “eating” part of the poly-wedge tracks, which occurs due to wear of the product due to its excessive tension;
- flaps begin to come out of the belt.
All these manifestations indicate the need to immediately replace the product on the car. A sign of the need to perform diagnostics of drive elements is a whistle from under the hood. If you lift the lid, this whistle can be traced in the area where the generator is located. Typically this sign indicates the following:
- Slipping of the product, which occurs due to its incorrect tension (it is weakened). It usually appears under heavy load and when the engine starts.
- Wear of poly wedge tracks. When the rubber dries out, the belt begins to slip. Only replacing the product will help correct the situation.
In any case, if atypical manifestations are detected, then you should not wait until the element fails. It is imperative to replace it in advance. In addition, such a product is not expensive at all, and its replacement on a Priora is carried out by car owners themselves without the need to visit a service station. You can verify this by reading the instructions for replacing the alternator belt on a Priora.
Where is the Priora generator roller located?
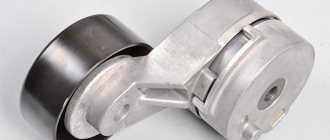
The tension roller of the Lada Priora generator belt is used to hold the auxiliary drive belt on the pulleys of the drive device; it is responsible for a tight fit and preventing slipping.
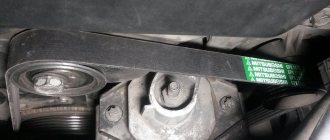
The drive belt in a Priora with 8 or 16 valves is located under the hood on the right side of the engine (along the direction of the car). If you look directly at the assembly, the bypass roller will be located on the top left, it is clearly visible. This is noticeable in numerous photos of the Priora’s engine compartment available on the Internet, and in videos with instructions for repair and replacement.
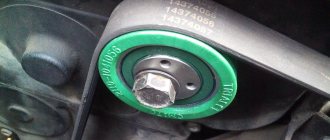
The part is of an eccentric type and is visually distinguishable due to the off-center bolt.
TENSIONER FOR PRIORA AND KALINA NOT EQUIPPED WITH OPTIONS
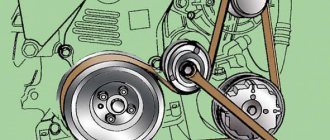
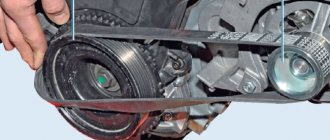
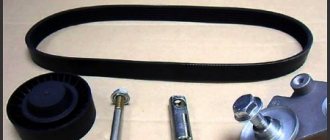
On the Priora, which does not have power steering or air conditioning, the belt is much shorter. It works on only two points: the crankshaft pulley and the generator pulley. The latest samples are equipped with a tensioning system similar to the VAZ Kalina. That is, if on other VAZ cars the tension is done by moving the generator itself, then on the Priora, a plastic roller of the tension system presses on the drive from above. A special tensioning mechanism is installed to move the roller. It consists of several parts:
The entire system is clearly visible in the photo. To adjust the drive and replace the tensioner, the following keys are needed. Slip on 19, end and socket on 13 and any wrench on 8. First, loosen the bolt and nut holding the movable platform with the roller with a wrench on 13. Then release the lock nut securing the adjusting rod using a wrench on 19. Using a wrench or socket on 8, unscrew the adjusting rod cravings The generator remains motionless. When the belt is loose, unscrew the bolt with the bushing on which the desired part is attached. Now remove the roller and install a new one in its place.
Important! Carefully monitor the installation of spacer washers under the bushing, otherwise the new roller may jam.
Check the free rotation of the tensioner for the generator drive and, having tightened the rod to the normal state of the drive, securely fix all the fasteners.
Which generator roller is better to install on the Priora?
Of the good non-original “prior guides” note:
- Hofer (HF code 608230);
- Gates (T39176);
- Lynx (PB-5039);
- Trialli (CM170);
- Marel (2110).
Alternator belt roller. Photo source: https://www.drive2.ru/l/513749832809054967
Less common are accessories from INA and Andycar. Among the inexpensive and fairly popular options for replacing the tension roller of a Lada Priora generator belt with air conditioning or power steering, we can highlight the products of the Vologda Bearing Plant - the VBF roller (catalog number 830900AKE). But reviews from car owners indicate the “floating” quality of VBF parts, and their purchase should be approached with caution. Many people advise installing Gates spare parts.
There are also drive belt repair kits supplied with this part, for example, Trialli GD613.
Which alternator belt to choose?
Today there are a huge number of companies and manufacturers on the market that produce components for cars. And as for belts, the most popular brands are:
- GATES
- BRT - Balakovo belts
- Luzar
- Andycar
The first two manufacturers can be called the highest quality of what is sold in the store, and it is they who are installed to a greater extent on the assembly line. But as for the quality of what is actually bought in a store, the difference is very big. Factory components can go two, three or even five times longer than the same “original” from the shop.
Signs of tensioner failure
The following symptoms indicate poor adjustment or failure of the unit:
- whistling, increased noise, rustling from the generator unit (extraneous sounds are not necessarily associated with the tensioner, but may indicate its misadjustment or malfunction);
- hum and buzzing that occurs when the belt roller bearing of the Priora generator wears out;
- vibration of the roller and belt, indicating a worn bushing;
- too much belt deflection (more than 8 cm) or excessive tension (less than 0.6 cm) - if detected, adjustment must be made;
- the fastening bolt begins to heat up;
- backlash in the tension roller (this, like the hum, indicates a worn bearing);
- uneven wear and stretching of the belt on one side (as a rule, this sign indicates a bend in the tensioner bracket).
Generator malfunctions on Lada Priora
The problem with the whistling generator of the Lada Priora and the entire front-wheel drive line of cars usually lies in a collapsed front cover bearing. In this case, both the bearing itself and the belt slipping along the jammed pulley can make noise. The malfunction is determined “by eye”.
In some cases, alternator drive slippage may be caused by a misaligned alternator pulley or crankshaft pulley. The belt begins to move at an angle, touching the side surfaces. At the same time, even a new alternator belt will whistle. A breakdown can be determined by severe wear on the belt drive. The drive “eats” on the sides.
What to do in this situation? The solution depends on the identified malfunction. A loose drive should be tightened. Kalina cars and other front-wheel drive VAZA models have a tension bolt that allows you to adjust the degree of belt tension.
How and with what to lubricate
If the check reveals a lack of lubricant, it can be changed. You can use Litol-24.
To lubricate the tension roller of the Priora 16 class generator, you should:
- Dismantle it.
- Remove the anthers.
- Wash the tensioner to remove any remaining old grease (this will also help to visually check the condition of the bearings).
- Apply a layer of Litol.
- Reinstall the anthers, mount the eccentric roller and check the tension.
In addition to Litol, the CRC lithium-based consistency demonstrates good qualities. It is resistant to high temperatures and rotation speeds. Chevron Delo Grease EP NLGI 2 has similar properties; the authors of repair video guides often recommend lubricating the mechanism with it.
It is important not to apply too much lubricant, otherwise it will begin to squeeze out onto the belt.
How to tighten the timing belt on a VAZ 21126 engine
Before you start tensioning the belt, you should warm up the engine so that the coolant temperature is approximately 20-25°. It is at this temperature that the marks on the tension roller should coincide; if the coolant temperature is 80-90°, the mark will shift to the right by 5-6 mm towards the radiator. However, this is provided that you use the rollers that AvtoVAZ prescribed; if you buy something of your own, adjustment according to this scheme may not be suitable.
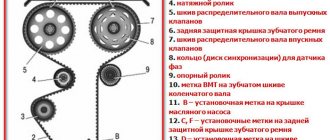
1. Align the marks on the camshaft pulleys with the marks on the rear timing belt cover. 2. Secure the pulleys using the tool shown above.
3. Align the crankshaft pulley mark with the mark on the oil pump cover, then turn the crankshaft in the shortest angular direction using a key set to “17”. 4. Tighten the bolt securing the automatic tensioner 3, which is indicated in Fig. 1, until it stops, then unscrew it 45º-90º using a key at “15”. 5. Place the timing belt on: the support roller, the crankshaft pulley, the camshaft pulleys, the water pump pulley and the automatic tensioner. 6. Install a special key for tensioning the timing belt in the grooves of the automatic tensioner support plate, then turn it counterclockwise until marks 1 and 2 coincide.
7. Then tighten bolt 3 securing the tensioner, with a bolt tightening torque of 23-36 N.m. (2.3-3.6 kgf.m.). 8. Remove the crankshaft locking device and turn the crankshaft two turns. If mark 1 deviates beyond mark 2, readjust the belt tension by first unscrewing the automatic tensioner mounting bolt by 45º-90º.
The tension roller should not move or deviate to the right or left, this will be evidence that the roller is working properly and is not overtightened, and the spring is functioning properly.
How to tension a roller
After replacement or dismantling and subsequent return to place, the roller must be adjusted for proper operation of the drive mechanism. To work you will need tools:
- Size key
- Special key for tightening. It is a structure welded to the base in the form of a pair of rods with a gap of 18 mm between them (similar to a key for an angle grinder). The rods are designed for insertion into technological holes on the roller.
How should the belt be tensioned?
- The eccentric roller retaining bolt must be loosened.
- Clamp the roller cage and turn the part counterclockwise or clockwise with the adjuster key, increasing/decreasing the belt tension. At the longest section between the pulleys and the shaft, it should bend by about 6 mm.
When the desired result is achieved, the fastening is finally tightened.
Video review of replacing the accessory drive belt on a 2170
A video review of the Priora repair was recorded especially for this site and specifically for this article. It clearly and easily shows the entire process of replacing a belt.
I hope that after watching the video there are even fewer questions left. If there are any, you can ask them below in the comments or on the channel.
How to replace or tighten the alternator belt using Priority and belt replacement technology
Hello, dear motorists! Well, let's move on to specific cars and their fans?
"PRIOR GUARDS". This is what owners of cars from one of the latest VAZ series called “Lada” call themselves. "Priora".
I like the stylish and modern car in many ways. The ingrained belief that domestic cars are useless for anything is gradually dissolving. Cars have indeed become more convenient, attractive, and their technical equipment has improved significantly.
The differences between Priora and previous modifications are noticeable immediately as soon as the hood is opened. The new owner of a new Lada will have to learn a lot from scratch. Such a simple, at first glance, manipulation, like replacing the generator belt with a Prior, will require significant effort.
A distinctive feature of new car models is the ability to choose a car with additional equipment already in the basic configuration. Thus, the Priora can be equipped with a hydraulic booster (power steering) or air conditioning.
Of course, driving such a machine becomes even more comfortable, but the price for comfort becomes a more complex design of the generator belt drive. The Priora alternator belt with air conditioning or GUR is much longer, follows a different path (alternator belt chain), and is maintained and changed according to completely different rules.
How to check the generator roller
After diagnostics with removal, lubrication, replacement or adjustment, the roller must be checked. After completing the adjustment, check the tension according to the diagram:
- manual control by pressure - a correctly tensioned belt should not bend by more than 0.8 cm;
- start the engine;
- turn on all possible energy consumers - air conditioning, heating, high beams.
If all components are working properly and there is no extraneous noise coming from the generator, the setup is correct. If there is a whistling sound, the belt is most likely under-tensioned, and if the bearings are humming, it is likely to be too tight. The procedure should be repeated more carefully, controlling the tension. Normally, the belt should bend by 0.6-0.8 cm when pressed.
Belt tensioner pulley for Priora generator 16 valves with air conditioning article number
This product was chosen by 32 customers
Designed to replace a failed standard one.
Product delivery options
Note! Below are the shipping methods available specifically for this product. Payment options may vary depending on the shipping method. Detailed information can be found on the “Delivery and Payment” page.
Parcel by Russian Post
Available payment methods:
- Cash on delivery (payment upon receipt)
- Using cards Sberbank, VTB, Post Bank, Tinkoff
- Yandex money
- QIWI
- ROBOKASSA
Shipping throughout Russia. Delivery time is from 5 to 12 days.
Parcel by Russian Post 1st class
Available payment methods:
- Cash on delivery (payment upon receipt)
- Using cards Sberbank, VTB, Post Bank, Tinkoff
- Yandex money
- QIWI
- ROBOKASSA
Shipping throughout Russia. Delivery time is from 2 to 5 days. More expensive than regular delivery by Russian Post, approximately 50%. Parcel weight up to 2.5 kg
Express Parcel EMS
Available payment methods:
- Cash on delivery (payment upon receipt)
- Using cards Sberbank, VTB, Post Bank, Tinkoff
- Yandex money
- QIWI
- ROBOKASSA
Shipping throughout Russia. Delivery time is from 3 to 7 days. More expensive than regular delivery by Russian Post, approximately 100%.
Transport companies
Available payment methods:
- Using cards Sberbank, VTB, Post Bank, Tinkoff
- Yandex money
- QIWI
- ROBOKASSA
Delivery is possible to any locality where there is a representative office of the transport company. Delivery time is from 2 to 10 days. Sending large parcels is approximately 50% more profitable than by Russian Post.
Pickup from our warehouse
Available payment methods:
- Cash upon receipt
- Credit, installments
- Using cards Sberbank, VTB, Post Bank, Tinkoff
- Yandex money
- QIWI
- ROBOKASSA
Pickup times must coincide with store opening hours.
Source
WE OPEN ACCESS TO THE TIMING BELT
The location of these bolts is shown in the photo below:
FIG 6. Upper timing cover bolts
Then use the same key to unscrew the two bolts of the lower timing cover and remove the cover.
FIG 7. Bolts of the lower timing cover
Using a 17-point head, we turn the crankshaft toothed pulley until the marks are firmly in place according to Figure 4. You also need to check the alignment of the marks on the flywheel so that they are located as shown in Figure 3. The crankshaft must be turned clockwise.
And one more important point! It is the crankshaft that needs to rotate the entire timing mechanism. This cannot be done using the camshaft pulleys. To ensure that the camshaft marks do not get lost during operation, they must be secured to each other. This is done in different ways. I once saw a mechanic insert a socket head between the teeth of a pulley. You can also take a pin and two thick plates with holes. We put plates on the stud, nuts on both sides and insert this structure between the pulleys so that the plates rest against the teeth of the pulleys and tighten the nuts.
It looks something like this! Here, however, is an engine from another car:
FIG 8. Device for fixing camshafts
We have completed the preparatory work and it is time to proceed directly to replacing the Priora timing belt.
To remove the Priora timing belt, you first need to loosen its tension. To do this, use a 15mm wrench to unscrew the tension roller nut; the support roller must also be removed. Because when the timing belt is replaced, both rollers are also changed.
Then remove the timing belt and inspect it carefully
First of all, we pay attention to the presence of cracks, fraying of the edges of the belt, and, of course, we look at the condition of the teeth. There should be 137 of them, they should be round in shape
If you find at least one of these defects or the time has come for mileage in kilometers, then the Priora timing belt must be replaced with a new one. Next, you need to pay attention to the condition of the pump. Holding the toothed pulley of the pump, you need to tug it; if there is play in the pulley, then the pump must be replaced.
Tension roller for generator and air conditioner Marel Magnum on VAZ 2110-2112, Priora
- Manufacturer Marel (Italy)
- Availability: In stock
- Length: 7 cm x Width: 7 cm x Height: 4 cm
- Weight: 0.35 kg
- Product code: 16491
- Catalog number: mr006
- OEM: 2110-1041056/2
- Upon receipt (cash on delivery)
- By bank cards online
- Electronic wallets
- According to the organization's account (excluding VAT)
- Apple Pay | Samsung Pay