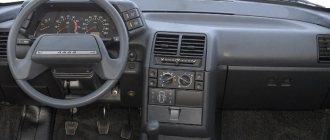
Description and location of indicators on the panel
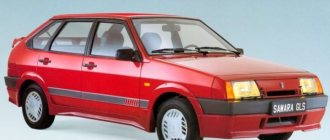
After 2006, a new dashboard was installed on VAZ 2112 cars. For reasons that are not entirely clear, any description of it includes the prefix “euro”, probably due to its modernity and quality.
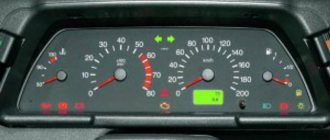
But in order to use it, you need to know the symbols, which are not always easy to understand even from the instructions. You can often only guess what this or that indicator and light bulb mean. To make this task easier for yourself, pay attention to the diagram of the instrument panel below and its explanations.
Description of the panel
- Arrow pointer. Intended to indicate the approximate coolant temperature. The data is obtained from a sensor that is installed between the cylinder head and the thermostat. This allows you to obtain accurate data. The sections have a range of 20 degrees, the lower level is 50, and the upper level is 130.
- Tachometer. Its purpose is known to any driver - to show engine revolutions per minute. Sections of 5 units, digitized every 10 units. To get the real value, add a couple of zeros to the number. Starting from 55, the engine enters the red zone in terms of revolutions.
- Left turn signal indicator.
- A similar indicator for the right turn signal.
- Speedometer. It is of the induction type and receives speed data from the sensor on the gearbox. Unfortunately, it’s definitely not very high; the error can be up to 5 km/h or even more.
- Fuel level indicator. The sensor is located directly in the tank.
- A warning light indicating a dangerously low fuel level.
- Low beam indicator.
- Lamp for monitoring the amount of brake fluid.
- High beam indicator.
- Lever for adjusting the clock.
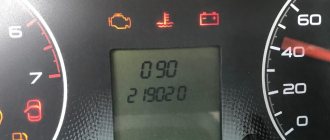
- Total (odometer) and daily mileage.
- Alarm.
- Failure of electronic systems leading to critical engine failure.
- Clock and thermometer.
- Low battery charging voltage.
- Handbrake warning lamp.
- Critical oil pressure level.
- Fuel mixture enricher indicator.
Based on the above diagram, you can easily remember what this or that alarm light means. And although this is an instrument cluster for the VAZ 2112, it is approximately the same on other VAZ cars.
Basic designations of icons on the VAZ instrument panel
The presence of icons on the dashboard plays one of the most important roles while driving a car. They are responsible not only for navigation through the vehicle systems, but also promptly inform about the occurrence of any malfunctions, breakdowns or improper operation of the vehicle. That is why every car enthusiast needs to know the location, interpretation and designation of icons on the VAZ instrument panel.
If one or another indicator suddenly appears on the dashboard, you will be able to react in time, which will save you from getting into a difficult situation. Often the indicators only serve as a kind of alarm, but when they go off, it is best to immediately go to the garage for repairs or seek help from a car service center.
Installation and repair instructions
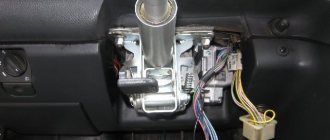
Replacing the panel, especially if you are installing it on an old VAZ 2112, is a certain difficulty. Older machines do not have some of the functions for which the panel has buttons. The wiring may need to be worked on.
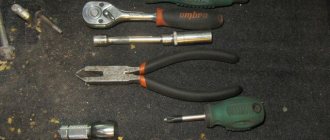
Tools and materials
Standard tools will be required.
But a certain amount of additional materials is needed:
- you will need plugs for extra buttons that are not needed on an old car;
- air duct;
- various inserts, buttons (5 pieces) and pads;
- a new wiring harness suitable for the wiring diagram;
- brackets for mounting the instrument panel;
Algorithm of actions
First you need to remove the old panel. This is done in the same way as on other models of VAZ cars.
When installing, you need to replace the ignition switch with a decimal or Kalinovsky one, depending on how many terminals there are on the block to the lock. You can leave the old one and rearrange the wires, but the new one will work and look better.
The instrument panel wiring needs to be replaced. Also, connect the dimensions with additional two wires in Ш4/13 and Ш3/13 on the mounting block. This applies to older units with 11 relay spaces.
Depending on whether it is an injector or a carburetor, the connection has its own nuances. If you bought a solid factory panel, then instructions should be included with it. Briefly, it can be noted that the injector is not equipped with a speed sensor, please take this into account when installing.
The car's electrical circuit can be of great help. If it is not there, you can find it on the Internet. There are some differences between the VAZ 21124, 2111 and other car variants, so find yours.
If the instrument panel does not work after turning it on, check that the wiring is connected correctly - this is usually the error.
Soundproofing panel VAZ 2110
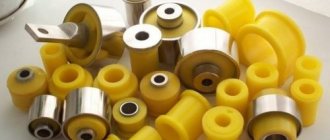
To soundproof the “tens” dashboard, they mainly use bitoplast, modelin, sealant and even polyurethane foam. Bitoplast and modelin are used to cover plastic panels on a disassembled dashboard, which eliminates squeaks and improves sound insulation. Something like this in the photo below -
Bitoplast is glued with a special glue; when installed in place in the right places, this material is compressed where necessary. It is recommended to paste over the panel naturally from the inside.
Some craftsmen turn the front panel into an impregnable fortress for vibrations and squeaks using ordinary mounting foam. However, it is not recommended to use such a radical method without some experience. As a result, this is what sticks out from under the torpedo -
In addition to soundproofing the VAZ 2110 panel, it is necessary to carry out a similar procedure with the floor, roof, and doors. Such comprehensive sound insulation will ensure maximum acoustic comfort in the cabin.
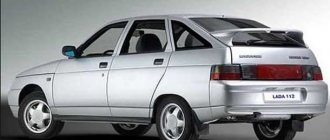
In conclusion, I would like to say that there are two panels installed on the “ten”, old and new models. Photos of the old version can be found at the beginning of our article. A photo of the new version of the panel is attached below.
The most interesting thing is that a new-style panel or a Europanel for the “ten” can be installed instead of the old-style panel. In principle, they are interchangeable, but it is worth considering that along with the installation of a new panel, you will have to install a new instrument panel assembly, another ACS unit (automatic control system for interior heating) and add an electric heater damper drive. The mounting points of the old and new panels themselves are the same, so there are no problems with installation.
Video “Europanel on VAZ 2112”
A frequently asked question is where to buy and how to install a Euro panel or dashboard trim on a VAZ 2110 with your own hands. This is not surprising, I’m already tired of dozens of ancient panels and want to somehow update the interior. In this article I will show you what is needed in order to change the old VAZ 2110 torpedo to the euro and many important issues that you will encounter when replacing the old torpedo.
First, let's define what “installing a torpedo on a VAZ 2110” means. In fact, only the panel overlay is different, and the lower part of the panel remains the same. It turns out that the torpedo is collapsible and consists of 3 parts. We are talking about the very top trim, so installing it is not as difficult as replacing the entire dashboard of a car.
Where can I get Europanel?
The fact is that europlates, as well as assembled europanels, have become in short supply, since their production was discontinued more than five years ago. Therefore, they mostly sell used ones in good condition; it is quite difficult to find a new one. If suddenly the offered product does not suit you, you can install the Priorovskaya by completely disassembling the old one.
Didn't find the information you are looking for? on our forum.
If you find an error, please select a piece of text and press Ctrl+Enter.
We recommend reading:
Expansion tank cap for VAZ 2114, which one is better Installation of the automatic transmission on a VAZ 2107, instructions for VAZ 2101 -2107 The gear knob rattles on a VAZ 2114 How to tighten the timing belt on a VAZ 2110, 8 valves How to change high-voltage wires on a VAZ 2107 injector Replacing crabs on a VAZ 2115V oil air filter corrugation, VAZ 2112, 16 valves, what are the reasons and what should be done in this case...Lada Granta, how many liters of gasoline is in the car
To change the torpedo trim, it is not necessary to remove it completely!
So let's get started, let's look at the panel overlays, which are divided into:
Euro-1, another name is “Caprice” and has an index of 21104. The features of this lining are that it does not have a passenger shelf.
Euro-2, index 2110L, cover but already comes with a passenger shelf.
Euro-3, a cover without a shelf, but under the instrument panel of Kalina, Priora, and has a climate control module with 3 knobs and an emergency stop button.
There are also exclusive panel overlays that make the interior of the VAZ 2110 similar to the Nissan Primera, where the instrument panel is in the center.
In addition to these Euro-overlays, there are overlays that are installed on top of them. For example, the overlay of the Chestnut panel.
It is not difficult to install the Kashtan overlay on the dashboard, so we will not dwell on this, but changing the old panel overlay to the Euro one is already more difficult.
The euro overlay for the panel consists of:
- On the masonry itself
- Inserts for buttons (small insert 2110L-2120031, large 2110L-2120032)
- Air ducts (2114-81080623)
- Device panel trim (2110L-5325124)
- Double button for turning on the headlights and low beam
- Key for turning on the rear fog lights (with fixation)
- Rear window heating switch (latching)
- Key pads - 2 pcs.
- Plugs instead of keys - 6 pcs.
- Wiring harness for connecting the dual side position switch and low beam headlights
- Block
- Device panel fastenings
- It may be necessary to purchase separately different keys for the VAZ-2114 and pads for them.
The cover gives the impression of a high quality product. It is softer than the old pad and, as the developers say, is more injury-proof. They also promise improved air flow to the side windows.
Now we are moving towards installation, and here we can distinguish 2 methods, each of which has its own advantages and disadvantages:
Removal and installation of VAZ 2110 panel
Below are step-by-step instructions for removing the “tens” dashboard.
- Disconnecting the battery
- Remove the steering wheel and steering column switches
- Be sure to remove the top lining of the floor tunnel
- Remove the glove compartment and unscrew the mounting screws
- Remove the headlight hydraulic adjustment handle by pulling it towards you
- Unscrew the hydraulic corrector nut and remove it
- Remove the upper side air duct deflectors by prying them up with a screwdriver
- Under the deflectors we find the panel fastening nuts, unscrew them
- We unscrew the screws from the bottom of the dashboard, next to the hood release lever, at the mounting block, in the niche of the glove box, etc.
- Now you can remove the door seals, remove the lining covering the front pillars
- Disconnect the electrical wiring terminals
- You can remove the panel by holding the steering column adjustment lever in the desired position
The fully unscrewed VAZ 2110 panel is supported by two guide pins (see photo above) with white arrows pointing to them. We assemble the panel in the reverse order.
Installing the Euro trim without removing the dashboard
In this option, you need to have a drill and screws on hand.
Rely on the lining mounting diagram and start in order:
- Remove the dashboard.
- Open the glove compartment and unscrew the three screws from the inside (positions 1,2,3 in the diagram). Trying to unscrew the screw (pos. 9) from the inside near the windshield is difficult, but doable.
- Remove the 4 keys (next to the control module) and unscrew the screws from the inside (pos. 4.5)
- Unscrew or loosen the fastening by adjusting the backlight (pos.

- Open the fuse module and unscrew 2 screws from the inside (pos. 6 and 7)
- Now the panel overlay is held in place only by screws, positions 10 and 11. They cannot be unscrewed, so we break them out or lift the overlay by the right edge and cut them off with a file. (Note: the Euro trim will cover the entire top of the panel up to the windshield, so you don’t have to worry about the appearance when you cut or break the screws)
- Remove the old dashboard trim.
Auxiliary panel
The following devices are located on the auxiliary panel of the on-board control system:
- Image of an oil can. When the light is on, you need to check the oil level;
- The icon on which the wipers are recognized lights up, this is evidence that there is not enough liquid in the tank to spray the windshield;
- Where the image with a thermometer and a container filled with liquid warns of an unacceptably high temperature of the antifreeze in the radiator;
- When the side lights or brake lights fail, the indicator with a crossed out light and an arrow pointing to it will light up;
- If the brake pads are worn out and need replacement, a signal with a picture of the pads and wheel will light up;
- In a situation where the driver does not comply with safety rules, the icon with a person wearing a seat belt will signal.
Let's prepare a new dashboard trim for installation
To do this, we cut off the remaining material of the Euro lining. There is no need to cut out any space under the dashboard, otherwise there will be a gap between the control column and the trim. In this place you simply need to make 2 cuts on the sides so that this part of the lining can be slightly bent as needed. Also, there is no need to cut off 10 mm from the sides of the lining in the area of the side air ducts; these places must be adjusted to the location.
We measure the panel overlay and adjust it as necessary. At this step, it is recommended to use anti-creak (soundproofing the panel). This way, you will insure yourself against squeaks in the future.
To install the dashboard in the Euro trim, you can use one of the methods:
- Use fasteners from the Euro lining kit.
- Use fasteners from an old lining (from drilling).
- We connect connectors and Europanel keys according to the instructions:
When the overlay is ready, let's try to install it. Fastening the Europlate in positions 1-7 of the diagram. We fix 35mm screws on top, which are then hidden under a plastic cover.
The advantage of this method is time. If you dismantled the panel, then you will spend no more than 3 hours changing the lining. If this is the first time you are faced with a similar type of work, then about five hours.
VAZ 2112 dashboard tuning with the installation of “euro” torpedoes
VAZ 2112 tuned dashboards are becoming very common, and are moving from the section of unaffordable luxury to the area of tuning available to everyone, limited only by the owner’s imagination. Now it is fashionable to install a “Euro” torpedo, instead of the standard one, in addition, covering it with leather or fashionable fabric (Alcantara), and tuning the instrument panel on the VAZ 2112 is becoming the most common and affordable, as it is simple to perform and attractive.
Installation of an instrument panel from Priora on a VAZ 2110-2112
There is another method of modifying and tuning the instrument panel, which consists of replacing the dashboard from the Priora - VAZ 2170. Of course, the appearance will be much more interesting than even the Europanel, but connection and installation require a lot of investments, both financial and physical. The main problem with this modification is that the connectors for the under-panel wiring of the Priora and the under-hood of the VAZ 2110, which of course need to be connected, are different, and the connectors simply do not fit together.
In this case, there are two ways:
- Completely take all the wiring from the Priora, including the engine compartment harness, interior harness, power window control unit, comfort unit, etc.
- Join completely two different types of wiring manually, cutting off the connectors and insulating almost every wire.
Everyone decides for themselves whether the game is worth the candle, namely whether the result obtained is worth the money and time that will be spent on all these improvements and alterations. Even if you take the price of the Europanel, you will have to pay up to 20,000 rubles for it. new or from 8000 for a used one, it’s already expensive. As for the panel from Priora, everything here will be even more expensive - the assembled panel alone can cost 25,000 rubles. new and from 10,000 rub. boo. at a car wrecker.
Installation of a “euro” torpedo
The owners of the “twelfth” vases, which were produced after 2006, are very lucky - since from this year the cars will be produced with a “Euro” panel, as well as a Kalinovsky (from the Kalina fret) steering wheel and power steering. What remains for owners of cars equipped with an old panel? Either use what you have or install a “euro” panel if the car was manufactured before 2006:
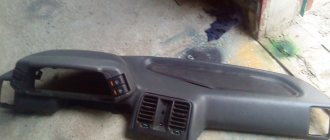
"Euro" torpedo VAZ
- The main question is whether it is advisable to change the standard panel in an old car to a “euro” one, as in the photo above
- Since the existing so-called “euro” panel contains many indicators and buttons not used in the old generation VAZ2112
- And its old steering column does not fit well with the design of the modern “Euro” panel
To install the “euro” panel with your own hands, you need to purchase additionally:
- Overlay for "euro" panel
- Special inserts for buttons,
- The buttons themselves, pads for them, plugs instead of unused buttons
- New air ducts
- Fuse box
- Wiring harness
- New brackets for the instrument panel
- Matching door trim panels
At the same time, keep in mind that standard connectors for the “brains” do not fit, so you will have to tinker to make adapters; you will also need a steering wheel from Kalina, and power steering for that matter. Of course, if you tinker a lot (the price for such tuning is high), but the result will justify itself, since the advantages of the “euro” panel are many:
- Firstly, modern design
- Secondly, ergonomics are at a high level
- Thirdly, VDO devices are already illuminated from the inside
- Built-in digital odometer, very original warning lights
- Its plastic is much softer and more pleasant to the touch.
- The “Euro” torpedo has a more precise fit of all plastic parts
Another option is that you can install a panel from a Priora, but you will also have to purchase it complete with the door trim; this is also quite expensive. Therefore, tuning VAZ 2112 tuning devices will help you avoid unnecessary emotions and solve the problem at low cost:
- Replacing the instrument cluster with a modern model
- Performing sizing of the instrument panel in order to eliminate squeaks that are unpleasant to the ear
VAZ 2110 panel, removal, installation of dashboard, sound insulation of VAZ 2110 panel
The VAZ 2110 panel or the “tens” dashboard has become a new word in the interior design of Lada cars. Despite its interesting shape and ergonomic appearance, panel 2110 eventually begins to make a lot of unnecessary sounds when the car is moving. This is especially noticeable on cars with high mileage. Therefore, very often the “tens” torpedo is completely disassembled in order to carry out total sound insulation and eliminate squeaks.
Let's say right away that disassembling the VAZ 2110 panel is not difficult in principle, but it is a very labor-intensive job that requires time and attention. The fact is that to remove the panel you will have to completely unscrew the steering wheel and disconnect a lot of electrical connectors. In order not to damage the electrics, before disassembling the VAZ 2110 dashboard, be sure to disconnect the battery. This is how the “tens” panel looks schematically.
This figure shows in detail, in the smallest detail, all the fasteners of the VAZ 2110 panel.
- 1 – panel
- 2 – side nozzle for ventilation and heating of the cabin
- 3 – instrument panel trim
- 4 – cover fastening screws
- 5 – panel fastening screws
- 6 – box
- 7 – console trim
- 8 – cover
- 9 – instrument panel panel
- 10 – mounting block cover
If you remove the panel completely, then only this should remain, look at the photo -
The red arrows indicate where the nuts and screws are attached, and the two large white arrows indicate the special mounting pins. When installing the panel, it must be installed on them; they serve to center the dashboard relative to the body.
Panel painting
You can update the appearance of the car interior by painting the plastic, the look will be tuning, and the costs will be minimal:
- And since first you will need to “get your teeth into”, we will start this work with the simplest part - the air duct
- Before painting, of course, it will be necessary to dismantle these parts
- To remove the deflectors you will need a flathead screwdriver because they are secured with special plastic latches
- However, you should act very carefully, the latches break easily, then you will have to buy new ones in the store
- Immediately after removing the necessary plastic elements, do not rush to paint them immediately
- In this case, the paint will not last very long, and you will have to repaint them again very soon
- Therefore, first you need to thoroughly wipe the surface of the plastic from dust and dirt, then degrease it using white spirit or another solvent that does not corrode the plastic.
Removed air ducts and door plastic panels
- For painting we use paint exclusively in cans; it must be painted in several layers
- And after painting, we dry the parts, and only after that we can start varnishing
- It is advisable to apply the varnish in several layers from a can or sprayer.
- In about a day you can install the painted and varnished elements in their places
- In addition, it is worth knowing that the paint for such work should be chosen that is heat-resistant, since otherwise exposure to direct sunlight can significantly damage it; harmful fumes negatively affect the health of passengers and the driver of the car.
- After that it's time to paint the torpedo
- Painting the dashboard inside the cabin will be very problematic, so we recommend dismantling it first
- We remove the dashboard, clean it of dust and dirt, then carefully degrease it
- After this we apply black paint, also several layers, but there is no need to varnish the panel
- And after drying, you can install your dashboard back into the interior.
- Well, if you are too lazy to dismantle the panel, and still decide to paint it directly inside the car, then you should try very hard
- First, you should cover the entire interior with film, then move the seats back and then start painting
- And don’t forget to use personal protective equipment, be sure to wear a respirator and rubber gloves on your hands
- After painting, it is necessary to drive the car into a dark garage to protect it from direct sunlight.
- Open all doors and windows
- The final drying of the paint will occur in about a week, but if you have a strong desire to try out a car with a self-updated dashboard, then you can do this no earlier than in a day
Removing and installing the instrument panel on VAZ 2110, 2111 and 2112
Before you begin this repair, you must do the following:
After this, you can proceed to further actions. We immediately remove and remove all the elements of the panel, such as: the standard clock, the heater control unit, the display unit, as well as the central deflector, and do not forget about the buttons with the radio. As a result, we get approximately the following picture:
Next, using a screwdriver, pry up and remove the plugs at the upper corners of the instrument panel mounting. In reality it looks like this.
On the other side, we do the same, after which, using a socket and an extension, we unscrew the nuts securing the instrument panel in the upper part.
Now let's move on to the remaining attachment points. At the bottom, in the left and right parts of the panel - in the corners, there is also one screw that needs to be unscrewed. The first one is shown below.
The second one is located on the right side of the panel in the same place - at the bottom in the corner. Also, immediately unscrew the self-tapping screw that secures the diagnostic block:
Now we move on to the side fastening points of the frame, which are located in the center on each side - the photo below shows the left side:
On the right everything will be the same. Next we move on to the internal frame fastenings, which are located in the following places. The first one is under the fuse mounting block, to get there we open the cover and look inside the panel:
The second one on the right is visible when the glove compartment lid is open:
Of course, the mounting block will also have to be removed so that it remains intact with the sub-panel wiring.
We thread it inside with the instrument panel pulled back; you will also have to cut off some of the wiring fastening clamps, for example, in this place, which is shown in the photo:
Now we are trying to remove the VAZ 2110 panel, moving it to the side on both sides, evenly, without much effort or sudden movements.
In the photo above you can see that the headlight hydraulic corrector tubes were cut off, since in my case they were simply not needed. If you need to save them, do everything carefully and remove them by pulling the control unit out of the instrument panel. Next, we finally remove the panel, of course, after first disconnecting all the wires that will interfere with this.
Installation occurs in the reverse order, connecting all wires and connectors to their places, blocks and switches, as well as other elements that were removed as a result of this procedure.
Tuning the instrument cluster
Let's look at the types of instrument cluster tuning in order:
- In many car parts stores, as well as on the Internet, you can easily find special 'inserts in the instrument cluster', with the help of which you can change not only the backlight colors, but also the design of the dials. However, in my opinion, they are unreasonably expensive, although anyone can make them on their own, the only drawback of this method is the need to remove the instrument needles
- The second option for changing the backlight is to replace the backlight bulbs with high-brightness blue LEDs, but this inevitably leads to the disappearance of red elements on the scales
- But if you simply paint the backlight bulbs blue using tsaponlak, this is a bad option, firstly, you will end up with a blue color that is not at all saturated (not bright), secondly, the red elements will disappear from view, and thirdly, the installed insert devices has a filter with a green tint
Let's make a substrate
First, change the backlight bulb to an LED in the odometer screen:
- The green filter should not be touched; it will not change the color or shade of the blue LED
- The action that will need to be performed with the LED is to grind off its bulb (since the bulb has a lens installed that concentrates the light and makes the diode shine directionally, like a flashlight)
- After this, we leave 0.5-1 mm of the inside of the LED (with the contacts on which the light element is attached), add a drop of Super Moment type glue
After this, we move on to the option of making an insert into the shield ourselves:
- It is best to have a template, download it from the Internet and print it, or take a scale from non-working instruments, remove the insert with the scales, scan it in film mode so that the pictograms of the indicator of dimensions, fuel, oil and others are visible
- Next, the CorelDRAW graphic editor will help you vectorize
- A radical change in the design of the scales is simply a waste of time, so you can easily leave the standard design, the main thing is that the readings are perfectly readable
- The base can be printed using a phototypesetting machine, you just need a good density of black color, otherwise you will have the entire panel glowing, and not just its numbers
Tuning trim for instrument cluster
To make a color base there are two options:
- Option one: take a film for a laser printer, print the outlines of the scales, setting the “mirror” mode, it is better to set the outline color to 5%
- We recommend that you first enlarge the contours (slightly) by 0.5 millimeters, in case there are any discrepancies between the tracing paper and the photo output
- We color the tracing paper with paints that are used in silk-screen printing, since such paints dry quickly, they are transparent and give a good rich color
- Option two: you can print the colored substrate on the film of an inkjet printer, however, most likely, you will have to run it several times to achieve a bright, saturated color
- To achieve the invisibility (invisibility) of the symbols of the control lights, we take a transparent film specially for an inkjet printer, print colored squares on it, which we lay according to the sample
- When the control light is not on, the designation pattern is practically invisible, and to achieve a better effect you can glue a piece of tint film onto the base
The final stage in making a “sandwich”:
- Taking into account the fact that the film from the phototypesetting machine came out glossy, we put a matte film as the first layer in order to laminate it, which has a thickness of 25 microns
- We put a base under the film
- The next layer is a laminating film to glue two sheets of paper together, instead of double-sided tape
- Then a colored substrate and again a matte film
- Film layers 1, 3 and 5 will give us additional dispersion, as a result of which we get uniform illumination
- Then we put it all through a laminator.
- Finally, carefully cut out our insert
- We use a punch to cut out holes for the shafts for the arrows
- Just a piece of iron tube of suitable diameter will do; the edge needs to be sharpened
- However, as a result, it quickly became clear that the scales glow, not so brightly, I would like it to be brighter, even worse than before (the power of the standard backlight is not enough), so we move on to a method of radically changing the entire backlight
Panel covers for VAZ 2110
Now there are several types of overlays on euro panels:
- Euro - 1, it is also called whim, that is, it is identical to the regular dashboard of the VAZ 2110, only there is no shelf on the passenger side.
- Euro - 2, and of course, you can find Euro - 3, but they are more suitable for modern VAZ cars.
But still, this version of the lining can be installed. If we talk about the quality of such linings, then they are high-quality and soft, unless, of course, you buy a fake.
When purchasing, you should pay attention to ensure that the pad has a complete package of components:
- The pad itself.
- Instrument buttons.
- Instrument panel.
- The design is different, so it is worth purchasing plugs.
- All buttons and pads.
- Air ducts.
- Fuse panel mounting.
Installation without completely disassembling the panel
The panel, as many people know, consists of three parts, but the Europanel of the VAZ 2110 is, in fact, only the upper part of the dashboard. And if the goal is only to replace it, without any modifications or other tuning, then you can safely do a partial disassembly without removing all the equipment.
You will need:
- Drill;
- Screwdriver;
- Self-tapping screws.
The dismantling process goes like this:
Remove the dashboard; Open the glove compartment and unscrew the three screws from the inside. It is quite difficult to unscrew the screw near the windshield, but still doable; Next to the ECU, pull out 4 buttons and unscrew the screws from the inside; We loosen the fastening of the backlight adjustment. You can unscrew it completely, as is more convenient; Having opened the instrument fuse box, we also unscrew 2 screws from the inside; There are still two self-tapping screws that hold the panel trim, but they cannot be unscrewed without complete disassembly. Therefore, either these screws are carefully broken out, or even cut out by lifting the overlay on the right, using a metal file. At the same time, the appearance of the future updated “face” of the interior will not be affected, since the Euro trim will cover these places; Now you can safely remove the cover. We carry out actions with the overlay according to the instructions We lay a harness at the base of the panel We stretch and tighten additional wires into bundles The connectors under the overlay are wrapped in bitoplast Installing the Euro overlay and tightening it with self-tapping screws Installing the Euro overlay and tightening it with self-tapping screws View of the assembled panel from the inside
Replacing a conventional torpedo with a “Euro” panel
VIP Member
612 messages
- Car make: VAZ 21102
- From: MO
View Garage
VIP Member
540 messages
- Car make: VAZ 2112
- From: RUS150
View Garage
#3 Bankol
VIP Member
612 messages
- Car make: VAZ 21102
- From: MO
View Garage
I’ll say right away that I have a complete euro panel with the lower part and the steering wheel, it’s all there.
I'm wondering what changes to the wiring? are there many of them?
And in what order should you remove the old panel and install the new one?
#4 Bankol
VIP Member
612 messages
- Car make: VAZ 21102
- From: MO
View Garage
This is the panel now:
I want to install this one: Steering column controls, the steering wheel itself, the instrument cluster, all the keys in the Europanel itself, it’s all there))) fully assembled, it’s shorter.
Which wire goes where?
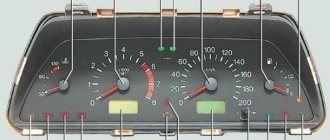
First, let's look at the back of the instrument panel. At the top there are:
- fuel level indicator;
- dashboard lighting lamps;
- control of right and left turns (separately);
- tachometer;
- block with many plugs;
- coolant temperature gauge.
As you can see, there is really nothing particularly complicated here. At the bottom of the instrument panel on the back side there are controllers:
- high beam;
- "emergency lights";
- CHECK ENGINE;
- battery charge;
- parking brake;
- oil pressure;
- air damper (for models with a carburetor);
- outdoor lighting work.