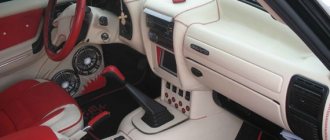
Panel VAZ 2110 or the “tens” dashboard has become a new word in the interior design of Lada cars. Despite its interesting shape and ergonomic appearance, panel 2110 eventually begins to make a lot of unnecessary sounds when the car is moving. This is especially noticeable on cars with high mileage. Therefore, very often the “tens” torpedo is completely disassembled in order to carry out total sound insulation and eliminate squeaks.
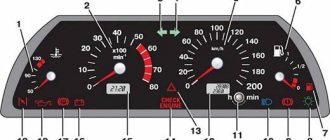
Let's say right away that disassembling the VAZ 2110 panel is not difficult in principle, but it is a very labor-intensive job that requires time and attention. The fact is that to remove the panel you will have to completely unscrew the steering wheel and disconnect a lot of electrical connectors. In order not to damage the electrics, before disassembling the VAZ 2110 dashboard, be sure to disconnect the battery . This is how the “tens” panel looks schematically.
This figure shows in detail, in the smallest detail, all the fasteners of the VAZ 2110 panel.
- 1 – panel
- 2 – side nozzle for ventilation and heating of the cabin
- 3 – instrument panel trim
- 4 – cover fastening screws
- 5 – panel fastening screws
- 6 – box
- 7 – console trim
- 8 – cover
- 9 – instrument panel panel
- 10 – mounting block cover
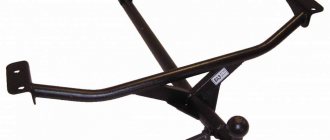
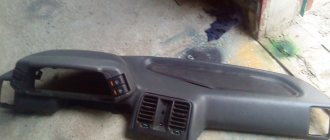
If you remove the panel completely, then only this should remain, look at the photo -
The red arrows indicate where the nuts and screws are attached, and the two large white arrows indicate the special mounting pins. When installing the panel, it must be installed on them; they serve to center the dashboard relative to the body.
Removal and installation of VAZ 2110 panel
Below are step-by-step instructions for removing the “tens” dashboard.
- Disconnecting the battery
- Remove the steering wheel and steering column switches
- Be sure to remove the top lining of the floor tunnel
- Remove the glove compartment and unscrew the mounting screws
- Remove the headlight hydraulic adjustment handle by pulling it towards you
- Unscrew the hydraulic corrector nut and remove it
- Remove the upper side air duct deflectors by prying them up with a screwdriver
- Under the deflectors we find the panel fastening nuts, unscrew them
- We unscrew the screws from the bottom of the dashboard, next to the hood release lever, at the mounting block, in the niche of the glove box, etc.
- Now you can remove the door seals, remove the lining covering the front pillars
- Disconnect the electrical wiring terminals
- You can remove the panel by holding the steering column adjustment lever in the desired position
The fully unscrewed VAZ 2110 panel is supported by two guide pins (see photo above) with white arrows pointing to them. We assemble the panel in the reverse order.
We remove the torpedo
Removing and installing a new torpedo on a VAZ 2110 takes a lot of time, we also advise you to be patient, since there are dozens of connections and wires in this part of the interior. Each action must be careful, since the VAZ 2110 mounts are very fragile and can be easily broken. After this, the panel will no longer fit properly, and the car will noticeably increase in squeaking while driving.
In some cases, it is not necessary to completely dismantle the standard panel. Our article provides a description of a complete analysis.
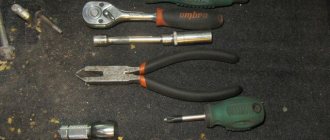
Necessary tool
To remove the case, you should have in your arsenal:
- Labels with adhesive backing.
- Marker or pencil.
- Set of screwdrivers and keys.
The main assistants in this work will be a 10 mm wrench and a Phillips screwdriver. We need a pencil or a washable marker in order to mark the removed elements. This also applies to self-adhesive labels. There are too many wires and parts, after disassembling you will already forget where each component is located. Markings and stickers will remind you of the location of wires and parts.
Preparatory work
Some people prefer to disassemble without dismantling other components of the interior, but this significantly complicates and prolongs the work. We recommend preparing the interior as you will need room to maneuver. Remove the seats and steering wheel - follow this sequence. It is also worth dismantling the floor tunnel.
To do this, you need to unscrew the screws and move the VAZ 2110 part back. We perform the same operation with the lower part. The next step is to dismantle the glove compartment, now you can remove the mounting block and relay. During the process, each wire must be labeled. You need to be especially careful when handling speedometers.
Removal - step by step instructions
- We find the central panel, on the right side of it there are two self-tapping screws - unscrew them. We do the same with the opposite side. Now we dismantle the shield on both sides, as shown in the photo.
- Next, use a flat screwdriver to pry off the plug installed on the central tunnel. Now you can unscrew the tunnel fastenings; they are located on the back and sides.
- Now this part can be completely dismantled. We now have access to the cigarette lighter - we disconnect all the wiring from it, and then remove the cover from the gearbox knob.
- We move on to the air duct - using the “tenth” key we remove it. Now we have access to the central panel, it is held in place by fastenings at the rear and front. After removing the screws, we dismantle the panel.
- We removed the glove compartment in advance, so all we have to do is disconnect the backlight and unscrew the fasteners behind it. You need to unscrew the screws on each side of the panel, after which the panel can be unscrewed using a wrench and a Phillips screwdriver - we clamp the nut with the wrench and twist the screwdriver.
- Using a flat screwdriver, pry up the air duct and remove it. There is a nut left on the dashboard that needs to be removed. Now the panel can be completely removed, lift it up and pull it towards you, the panel will then come off the pins. We mark the wiring and take out all the plugs. There are quite a lot of wires, don’t get tangled up in them - a marker will help you make this
That's it, the torpedo is dismantled, you can replace its individual components, install another panel from a VAZ 2110, or carry out tuning using a Europanel. Assembly proceeds in reverse order. Will there be an overlay installed instead of the standard panel? Then move on to the next section.
Soundproofing panel VAZ 2110
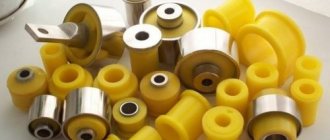
To soundproof the “tens” dashboard, they mainly use bitoplast, modelin, sealant and even polyurethane foam. Bitoplast and modelin are used to cover plastic panels on a disassembled dashboard, which eliminates squeaks and improves sound insulation. Something like this in the photo below -
Bitoplast is glued with a special glue; when installed in place in the right places, this material is compressed where necessary. It is recommended to paste over the panel naturally from the inside.
Ceiling covering
The material from which the ceiling covering in the VAZ 2112 is made gets dirty very quickly. Over time, a dark spot appears on the ceiling, directly above the driver's seat. Similar spots appear above the heads of passengers (but, as a rule, later). Re-upholstering the ceiling covering on your own is not an easy task. But finding a reupholstery specialist is not easy, plus his services are not cheap. So VAZ 2112 owners do it simpler and simply paint the ceilings of their cars using universal paint in spray cans (to paint the ceiling of a “two-wheeler” you need 6 of them).
Sequence of work
Painting the ceiling directly in the salon is not an option. First, the coating must be dismantled.
- The ceiling covering in the VAZ 2112 is held on by 10 screws and 13 plastic latches located around the perimeter. To remove the screws, use a Phillips screwdriver. The latches are opened manually.
Europanel for VAZ 2112 instead of the old one
Moderator: Rom80K
Re: Europanel on VAZ 2112 instead of the old one
Tell me kind people who have encountered this. VAZ2112 I am changing the old model panel to the euro one. Everything seems to be connected, all that remains is to connect the instrument panel wiring harness with the engine control harness. on the instrument panel harness there is a block with 13 wires, this is for the 1.6i engine, I have a 1.5i and the block from the engine has 8 wires and 1 separately (black and white). Not all wire colors match. QUESTION: Is it possible to select 8+1 from 13 wires and connect it to the engine block with 8 wires or is it more complicated?
For clarity, I showed it in the diagram.
Re: Europanel on VAZ 2112 instead of the old one
Re: Europanel on VAZ 2112 instead of the old one
Re: Europanel on VAZ 2112 instead of the old one
how much did you pay for?? sell it to me)) adapter blocks came with the panel.
Re: Europanel on VAZ 2112 instead of the old one
how much did you pay for?? sell it to me)) adapter blocks came with the panel.
there weren’t any pads (((they should be? I bought a new one in the store.. all the wiring is already screwed and prepared)) well, on the panel itself, but there weren’t any pads.. I took a new one 18900, the discount was 2 rubles
Added after 2 minutes 5 seconds: maybe there is a link to them or somewhere to look, and whether they should come with a new panel, if so, then you can come to the store, just the sales people assured me that everything will work out and there is no need to redo anything)) just before buying, I read everything about it, but I didn’t find it anywhere, apparently no one had any problems)) this forum found something similar to the truth here
Re: Europanel on VAZ 2112 instead of the old one
Re: Europanel on VAZ 2112 instead of the old one
Naturist wrote: https://photo.qip.ru/users/dd112/1289577/26837025/
Re: Europanel on VAZ 2112 instead of the old one
Naturist wrote: https://photo.qip.ru/users/dd112/1289577/26837025/
look carefully there are 2 more photos for connecting electrical equipment and installing the panel
Added after 1 minute 37 seconds :))
Re: Europanel on VAZ 2112 instead of the old one
Re: Europanel on VAZ 2112 instead of the old one
where did you get the idea that this is for the ignition?
Installation and repair instructions
View after dismantling the panel
Replacing the panel, especially if you are installing it on an old VAZ 2112, is a certain difficulty. Older machines do not have some of the functions for which the panel has buttons. The wiring may need to be worked on.
Tools and materials
Standard tools will be required.
But a certain amount of additional materials is needed:
- you will need plugs for extra buttons that are not needed on an old car;
- air duct;
- various inserts, buttons (5 pieces) and pads;
- a new wiring harness suitable for the wiring diagram;
- brackets for mounting the instrument panel;
What types of overlays are there?
If you just need a Euro pad, then there are two options:
- Euro-1 rubber, another name for which is Caprice. It has the same instrument cluster as the VAZ 2110, the only thing is that there is no shelf on the passenger side;
Panel trim VAZ 2110 Euro-1
Panel trim VAZ 2110 Euro-2
There is also a Euro-3 overlay on sale. But it is for later and more advanced VAZ cars - Priora, Kalina. The fact is that this version provides more devices, for example, there is a unit for climate control, which is not observed in the top ten. Although, in principle, if desired, installing this option is also possible.
Panel trim VAZ 2110 Euro-3
Any Euro pad mentioned above is a quality product, unless, of course, it is a cheap fake. It is softer and even, according to manufacturers, less traumatic, like the old one. In addition, after its installation, the supply of warm air to the side windows should improve.
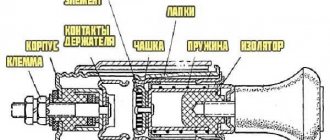
Checking the steering column switch
Checking the contacts in the steering column switch housing
In those cases, switching between the BC readings on the panel should be done with a switch on the steering wheel, but this cannot be done - you should make sure that it is working. This steering column switch is used on the panels: “VDO” 1118-3801010, “Schetmash” 2170-3801010-01 and “Avtopribor” 1118-3801010-02. To check whether the steering column switch is working properly, it must be removed and disassembled.
If it is, then everything is fine with the switch and you need to disassemble the dashboard to inspect the contacts and tracks. On VDO panels with one window produced in 2006-2007, there is a factory defect - poor contact of one of the resistors, which, during driving, cracks and interrupts the connection between the steering column switch and the panel board.
Expert opinion
It-Technology, Electrical power and electronics specialist
Ask questions to the “Specialist for modernization of energy generation systems”
Euro panel VAZ 2110 its design and replacement In those cases, switching between the BC readings on the panel should be done with a switch on the steering wheel, but this cannot be done; it is worth making sure that it is working. Ask, I'm in touch!
Components
When purchasing, you will receive what is included in the kit, namely:
- Europlate;
- Inserts for switches (buttons) of devices;
- Trim on the instrument panel;
- Since your instrument combination may differ from those whose installation is structurally provided, there should also be six plugs; they can be inserted instead of buttons;
- The buttons themselves and two pads for them: • Double – for low beam and dimensions; • To turn on the fog lights; • Heated rear window.
- Air ducts;
- Block and wiring harness designed to connect a double button for side lights and low beam;
- Brackets securing the instrument panel.
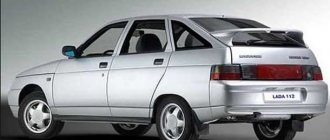
Alternative torpedo
The alternative dashboard is softer than the standard “tens” dashboard, but the main advantage is the absence of unpleasant grinding and squeaking. Motorists decide to get rid of the standard one precisely because of the squeaking. For the VAZ 2110 car there are several types of panels that differ in design.
The panel is sold as a set:
- The panel itself, which is an alternative to standard plastic.
- Buttons, brackets and inserts for blowers and instrument panels.
- A set of wires and a block for a double switch.
- Buttons for low beam, heating, dimensions and fog lights.
- Plugs for buttons are installed in places where keys are not needed.
Installation without completely disassembling the panel
The panel, as many people know, consists of three parts, but the Europanel of the VAZ 2110 is, in fact, only the upper part of the dashboard. And if the goal is only to replace it, without any modifications or other tuning, then you can safely do a partial disassembly without removing all the equipment.
The dismantling process goes like this:
- Remove the dashboard;
- Open the glove compartment and unscrew the three screws from the inside. It is quite difficult to unscrew the screw near the windshield, but still doable;
- Next to the ECU, pull out 4 buttons and unscrew the screws from the inside;
- We loosen the fastening of the backlight adjustment. You can unscrew it completely, as is more convenient;
- Having opened the instrument fuse box, we also unscrew 2 screws from the inside;
- There are still two self-tapping screws that hold the panel trim, but they cannot be unscrewed without complete disassembly. Therefore, either these screws are carefully broken out, or even cut out by lifting the overlay on the right, using a metal file. At the same time, the appearance of the future updated “face” of the interior will not be affected, since the Euro trim will cover these places;
- Now you can safely remove the cover.
Content
Immediately after the appearance of the VAZ 2112, it became very popular. This is due to the fact that the car, compared to its predecessors, has fairly good equipment and a rather attractive appearance. The car especially attracted fans of tuning.
While some thought that earlier models were not worth the investment, this one is worth the attention and money spent. When changing a VAZ car, the interior is almost always upgraded, since the build quality is terrible, as is the insulation. Let's look at all the most popular ways to modify the interior of the car in question. VAZ 2112 interior tuning can be done independently at minimal cost.
Installing a new cover
Installation of a new lining occurs after preliminary preparation:
- It is necessary to measure and trim off excess material;
- But it’s better not to cut off what seemed to be superfluous under the instrument panel, otherwise there will be a gap near the steering column, and you can make cuts to bend it a little if necessary;
- Near the side air ducts, trimming is also done during installation, measuring on site;
- We carry out fitting and adjust trimming;
- We apply anti-creak to avoid squeaking in future operation;
- We choose the method of installing the dashboard with a Euro trim: use new brackets included in the kit or drill them out from the old trim;
- All that remains is to install the instrument cluster you need and secure the Euro trim with self-tapping screws, which are then hidden under the plastic trim.
An article on self-soundproofing a panel overlay can be found here: https://vazweb.ru/desyatka/salon/nakladka-na-panel.html
Eliminating "crickets"
Almost all owners of VAZ cars know what “crickets” are. When driving at a high enough speed, a hum, noise, creaking and many other sounds appear that are very annoying. This is why moving long distances will be quite painful. Let's look at the most common problems associated with car sound insulation, as well as ways to solve them.
A fairly common problem is squeaks. This is due to poor sound insulation of the interior, which does not improve even with each generation. Plastic rattling can, as a rule, be provoked by a regular blow; periodic rocking of some structural elements of the interior trim also causes quite a lot of problems. The creaking of plastic is quite unpleasant and can make even the calmest driver nervous, and this promises big problems. There is an opinion that such sounds prevent the driver from falling asleep while driving, but this is not the case. If the driver wants to sleep a lot, then even the loudest sound will become soothing music.
Solving the problem with squeaking, which is also a VAZ 2112 interior tuning, can be done quite simply and quickly. Features of car modernization include:
1. All joints are glued with a material that can dampen vibration. 2. If necessary, the structure can be strengthened. This can be done by using self-tapping screws. 3. The material used to dampen vibration is bitoplastic, madeline and many other materials. It is worth noting that the efficiency of the work can be significantly increased with an integrated approach, which involves the use of several types of materials. 4. Silicone spray is also quite effective in this case. It is applied quite quickly and easily.
In most cases, strong noise causes vibration of internal panels made of plastic. However, aerodynamic noise can also cause discomfort. They appear at a fairly high speed and also cause significant discomfort. The causes of aerodynamic noise are as follows:
- Incorrect installation of deflectors on windows.
- Presence of through holes.
- Poorly installed antenna.
- Roof rack. In some cases, it is best to remove the trunk, as it creates additional resistance.
- Use of low-quality sealing material.
Eliminating the above problems allows us to solve the problem with aerodynamic noise insignificantly. Iron rattling also becomes a significant problem for the car in question. As a rule, steel noise can be heard when driving over bumps. The problem may lie in unreliable fastening of the door elements under the trim. The problem can be solved by tightening all the bolts and fasteners, after which the inside of the door is covered with insulating material.
A strong squeak when passing through a bumpy area may indicate door play. In order to check the condition of the doors, open them and then slightly lift them. If clicks are heard while lifting the door, you can lubricate the hinge. The most effective way to solve the problem in this case is to replace the loop. A plastic body kit can also cause squeaking. They are made using thin plastic. That is why, even with a minor impact, the attachment of the body kit can be seriously damaged. You can clearly feel the bumper rattling when driving at low speed with the windows open. Soft gaskets and increased rigidity of the fastening help reduce the noise emanating from plastic fastenings.
Unpleasant sounds quite often come from the installed suspension. There are many reasons why noise appears:
- Loose nut on the rod of the installed shock absorber. In this case, the knock is quite strong, but dull, it dries well and there is a possibility of vibration being transferred to the body. The problem can be solved by tightening the nut.
- A knocking sound from the shock absorber may be due to severe wear of the O-ring. Such a defect does not mean that the shock absorber has failed and should be noticed.
- If a very strong knock occurs and the car moves to the side on a straight section, the shock absorber should be replaced.
- The noise may come from a dead support bearing. This is because the rubber damper can wear out quite a bit over time. You can check this structural element quite simply and without special tools.
- A knocking sound from the steering tip indicates a fairly serious problem. The problem in question can be identified quite simply: the steering wheel should be turned from side to side, if there is play, then there is a problem with the steering system. The appearance of a squeak also indicates a problem.
With panel disassembly
The first stage is carried out according to the plan already described. Next, we proceed like this:
- We assemble the trim, installing our instrument cluster, air duct panels and those accessories included in the kit;
- At the base of the panel we carefully attach the wiring harness;
- We connect the wires from the Euro pad to this harness, tightening everything with mounting ties;
- We connect devices to the required buttons using connectors;
- We secure the cover with self-tapping screws.
This method, although it takes more time, provides high-quality sound insulation to eliminate all annoying squeaks.
We also recommend replacing light bulbs with high-quality analogues or LEDs. So, the updated panel will look even more solid.