Designation of icons on the dashboard of Lada 2112
| Number in photo | Interpretation of lamps and indicators |
| 1 | Coolant temperature indicator; if the light comes on at the top of the scale, the engine has overheated. |
| 3/4 | The turn signal indicators light up simultaneously when the hazard lights are turned on. |
| 7 | Empty tank indicator; if the lamp lights up, stop at a gas station. |
| 8 | External lighting is turned on and operating normally. |
| 9 | The pressure in the brake system has dropped. It is necessary to immediately add fluid to the expansion tank of the system. |
| 10 | The high beam headlights are activated. |
| 12 | The odometer display shows non-resettable mileage. |
| 13 | The hazard warning lights are on. |
| 14 | The engine control system is damaged or not working correctly. |
| 15 | The battery is not receiving a charge. In this case, you should check the battery itself for wear and the generator set. |
| 16 | The handbrake is activated. |
| 17 | The oil pressure in the engine crankcase has dropped below normal. You should add fluid to the specified level and check the operation of the pump. |
| 18 | In a configuration with an airbag, it indicates that the squib drive is turned off. In other versions the light bulb is a backup one. |
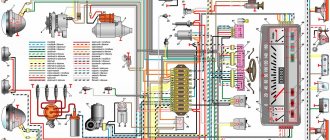
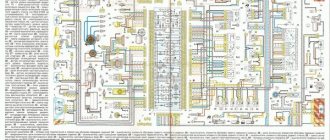
Ignition and engine control circuit
Here are the control diagrams for the following internal combustion engines:
- 21120 – January 5.1 or BOSCH M1.5.4N, Euro-2;
21120 (Euro-2) 21124 (Euro-2) 21124 (Euro-3)
| Motor | 21120 (Euro-2) | 21124 (Euro-2) | 21124 (Euro-3) |
| Injectors | 1 | 2 | 2 |
| Ignition coil | – | 1 | 1 |
| Candles | 2 | – | – |
| Ignition module | 3 | – | – |
| Diagnostic connector | 4 | B | B |
| ECU | 5 | 3 | 3 |
| Tidy taps | 6 | E | E |
| Ignition relay (6) | 7 | 4 | 4 |
| Ignition fuse (1) | 8 | 5 | 5 |
| Fan relay (4) | 9 | 6 | 6 |
| Fan fuse (2) | 10 | 7 | 7 |
| Fuel pump relay (5) | 11 | 8 | 8 |
| Fuel pump fuse (3) | 12 | 9 | 9 |
| Mass air flow sensor | 13 | 10 | 10 |
| Rough road sensor | – | – | 11 |
| TPDZ | 14 | 11 | 12 |
| DTOZH | 15 | 12 | 13 |
| RXX | 16 | 17 | 14 |
| Lambda probe main | 17 | 14 | 15 |
| Additional lambda probe | – | – | 16 |
| Knock sensor | 18 | 15 | 18 |
| DPKV | 19 | 16 | 19 |
| Canister purge valve | 20 | 13 | 17 |
| APS block | 21 | 18 | 20 |
| APS indicator | 22 | 19 | 21 |
| Speed sensor | 23 | 21 | 23 |
| Fuel pump + level sensor | 24 | 22 | 24 |
| Oil pressure sensor | 25 | 23 | 25 |
| Antifreeze thermometer sensor | 26 | 24 | 26 |
| Oil level sensor | 27 | – | – |
| Phase sensor | 28 | 20 | 22 |
| ABS connector | A | A | A |
| Air conditioner connector | B | IN | IN |
| Fan connector | C | – | – |
| Illumination of the ignition switch (to the blue-white wire) | D+E | – | – |
| Bends to the door harness | – | D | D |
| + battery | F | G | G |
| Weight | G1+G2 | G1+G2 | G1+G2 |
The elements installed in the additional mounting block are indicated in brackets.
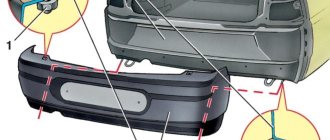
Mounting block on the right side under the dashboard
Description of the buttons on the panel
| Number in photo | Purpose |
| 10 | Additional equipment control module. |
| 18 | Steering rack position regulator. |
| 19 | Hood lock drive. |
| 20 | Horn button. |
| 22 | Trunk lock actuator button. |
| 24 | Hydrocorrector of headlights. |
| 25 | Switch for turning mode and headlights. |
| 26 | External lighting switch button. |
| 27/31 | Front/rear fog light switch. |
| 33 | Button for turning on the rear window heater. |
| 34 | Instrument lighting regulator. |
| 38 | Exhaust gas recirculation switch. |
| 39 | Air conditioner control buttons. |
| 40 | Heater damper position regulator. |
| 42 | Emergency button. |
| 43 | Switch for wipers and headlight washers. |
Features of connecting BC
In conclusion, I would like to dwell in more detail on such a point as installing an on-board computer. In the typical pinout diagram shown just above, there is only one wire leading to it - brown. But for the correct operation of this device, this alone will not be enough. Therefore, here is a complete pinout diagram for connecting the on-board computer:
- Green wire – comes from the electronic control unit, needed to obtain information about fuel consumption.
- Orange – goes to the ignition switch, to terminal 15.
- White-red - in the same place, only to terminal 30.
- The common ground wire is black.
- Brown – needed to take speed data.
- Red-green - to the positive circuit of the fuel level sensor.
- White - leads to the light control, which is responsible for the lamps that illuminate the instrument panel.
Hello everyone) A new entry is dedicated to the transition from the AutoDevice (AP) panel with one window 2110-3801010-04 to the new VDO Panel 1118-3801010. The devices are completely different, so the modifications affected primarily the pads.
I took a new 32-pin block from the VAZ 2112 harness; I haven’t seen it on sale separately yet.
It’s not possible to get the contacts out of the green block, unlike the old 13-pin ones. Therefore, the wires were cut with a margin. Then they were soldered to the ends of the wires from the white and red blocks, and covered with heat shrink for insulation.
Information that was used during electrical work: Pinout of old-style VAZ 2110 instrument cluster connectors:
Errors on the dashboard 2112
VAZ cars have always stood out for their ease of operation and maintenance. Regardless of the type of engine, injector or carburetor, here the user can independently perform diagnostics and read errors without additional equipment. Symbols may appear on the instrument panel.
| Number | Meaning |
| 2 | Critical voltage drops have been detected in the on-board network. |
| 3 | The gasoline level sensor is damaged or does not work correctly. |
| 4 | Likewise for the antifreeze temperature sensor. |
| 5 | The outdoor thermometer is faulty. |
| 6 | There is critical engine overheating. You need to stop and let the engine cool. |
| 7 | The oil pressure in the engine is insufficient for normal operation. |
| 8 | The brake expansion tank is empty and needs to be topped up. |
| 9 | The battery is not charging properly. You will need to check the generator and its wiring. |
| E | BC firmware is damaged. |
Most two-digit codes are a combination of two errors.
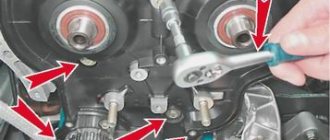
Understanding the oxygen sensor
It is necessary to determine the sensor articles not by the engine model or even by Euro standards, but only by the ECU unit.
Types of oxygen concentration sensors (OCC)
The number of oxygen sensors can be two or one - it all depends on environmental standards. AvtoVAZ also used two types of sensors - 0 258 005 133, 0 258 006 537 (BOSCH part numbers). The first of them are compatible with BOSCH M1.5.4, MP7.0 and January 5.1 controllers. Newer sensors were connected to the BOSCH M7.9.7 ECU (January 7.2). The two different types of sensors differ even in appearance.
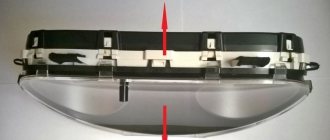
The ECU unit in “Dozens of VAZs” is located under a plastic cover. It is located near the front passenger's foot.
The red arrow marks the first, that is, the main sensor. The top photo corresponds to engine 21124 (1.6 l).
Sensor locations (21124 and 21120)
VAZ-21120 engines (1.5 l) could meet the Euro-3 standard, and then an “extended” catalyst was welded behind the main sensor. The second sensor was located behind it, that is, behind the “can”. Let's clarify:
- The Euro-2 standard corresponds to a design with one sensor (main);
- During the transition to Euro-3 standards, a second sensor was added (blue arrow).
By the way, the 24th engine can meet Euro-4 standards.
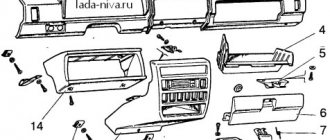
Removing the torpedo on the old model 2112
To completely remove the device from the car you will need:
- Turn off the on-board power supply.
- Remove the screws around the panel.
- Move the plastic cover of the shield aside and disconnect the wires from the buttons.
- Unscrew the panel fasteners.
- Then the device moves away from its seat and is disconnected from the on-board network.
The standard dashboard of the Lada 2112 is thoughtful and informative. The symbols on the instrument panel are easy to read and understandable even for beginners.
Specialization : Graduated from the State Automobile University, worked for 20 years at GAZ-56, now I drive a Zhiguli.
Source
Tuning ideas
VAZ 2112 with Europanel
If you have a VAZ 2112, tuning is available for a panel that is not too wide. But you can install additional instrument lighting so that you can see all the readings at night in the dark. It just looks stylish, especially if you use a tuning blue color for the lighting.
This panel has a lot of space for buttons that are not needed on an older machine. But you can install heated side mirrors and turn it on via these buttons.
Instrument panel VAZ 2112 - designations
The more modern the car, the more complex its design and the more difficult it is to control the condition of components and systems independently. For foreign-made cars, this issue has been resolved since the 80s by integrating on-board computers and other auxiliary devices into the car control system. Modern cars from Tolyatti are at the level of the 70s of the last century in terms of electronics equipment, and on-board computers can only display the time and temperature in front of the front bumper.
Designations
Despite such electronic asceticism, it is in principle possible to splurge on several dozen light bulbs and scales. Sitting at home, with a book in hand and drinking tea. But when, at a speed of 140, some indicator begins to frantically demand attention, you involuntarily get lost, and control over the car becomes, to put it mildly, not the most ideal.
Especially when you change from a penny to the wheel of a 2112, you feel like young Gagarin in an alien spaceship, when every light means something, and what exactly - go and figure it out. For these purposes alone, it was worth studying the new panel one hundred and twelfth in more detail, which we are happy to share.
Description
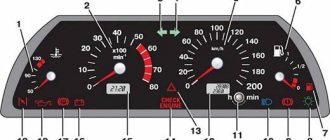
In order not to violate the informational nature of the panel description, and most importantly, so as not to redraw the arrows, we will use the factory layout of warning lamps and indicators on the instrument panel. Here she is.
- A pointer indicator that schematically shows the approximate temperature of the coolant in the cooling system. The pointer receives a signal from a sensor that is installed between the cylinder head and the thermostat, so it shows a more objective temperature. The device is divided into divisions with a value of 20 degrees. The sensor is able to recognize temperatures starting from 50 degrees, and unsafe temperature conditions begin in the red zone with a temperature of 105 degrees. The gradation ends at 130 degrees, at which the motor is almost guaranteed to overheat and jam.
- Tachometer. Shows engine revolutions per minute in real time. The tachometer scale has divisions of five units, and digitization is carried out every 10. By adding two zeros we get the real value. The red zone starts at 55 units.
- A llama with an arrow indicating which turn signal is on, in this case, the left one.
- Controlling the activation of the right turn signal.
- An induction speedometer receives data on the speed of the vehicle from a sensor located in the gearbox. The accuracy of the speedometer readings is not very high, and depending on the speed of movement, it may have an error of 5 km/h or more.
- Fuel level indicator. It receives a signal from a sensor located directly in the fuel tank.
- When the fuel level drops to critical, this warning lamp lights up.
- Low beam switch lamp.
- Brake fluid level warning lamp.
- High beam indicator.
- Clock adjustment knob.
- Odometer and daily mileage.
- Alarm.
- Critical engine failure caused by failure of electronic systems.
- Clock and thermometer.
- Low battery charging voltage.
- Handbrake warning indicator.
- Critical oil pressure.
- Fuel mixture enricher indicator.
Installation and repair instructions
View after dismantling the panel
Replacing the panel, especially if you are installing it on an old VAZ 2112, is a certain difficulty. Older machines do not have some of the functions for which the panel has buttons. The wiring may need to be worked on.
Tools and materials
Standard tools will be required.
But a certain amount of additional materials is needed:
- you will need plugs for extra buttons that are not needed on an old car;
- air duct;
- various inserts, buttons (5 pieces) and pads;
- a new wiring harness suitable for the wiring diagram;
- brackets for mounting the instrument panel;
Algorithm of actions
The shield is fully installed.
First you need to remove the old panel. This is done in the same way as on other models of VAZ cars.
When installing, you need to replace the ignition switch with a decimal or Kalinovsky one, depending on how many terminals there are on the block to the lock. You can leave the old one and rearrange the wires, but the new one will work and look better.
The instrument panel wiring needs to be replaced. Also, connect the dimensions with additional two wires in Ш4/13 and Ш3/13 on the mounting block. This applies to older units with 11 relay spaces.
Depending on whether it is an injector or a carburetor, the connection has its own nuances. If you bought a solid factory panel, then instructions should be included with it. Briefly, it can be noted that the injector is not equipped with a speed sensor, please take this into account when installing.
The car's electrical circuit can be of great help. If it is not there, you can find it on the Internet. There are some differences between the VAZ 21124, 2111 and other car variants, so find yours.
If the instrument panel does not work after turning it on, check that the wiring is connected correctly - this is usually the error.
Instrument panel device
On the instrument panel of the VAZ-2112 there is:
- Speedometer.
- Tachometer.
- Fuel level indicator.
- Direction indicator.
- Liquid temperature indicator in the cooling system.
- Control lights.
- Blocks for connecting wires.
Before you start doing any work on the dashboard, it is recommended that you familiarize yourself with its pinout. In other words, you first need to understand where each wire goes and what it is intended for.
Pinout and instrument panel diagram
Instrument panel pinout
1 — fuel reserve warning lamp; 2 — instrument cluster lighting lamps; 3 — right turn indicator lamp; 4 — left turn indicator lamp; 5 - backup warning lamp; 6 — coolant temperature indicator; 7 — indicator lamp for external lighting; 8 — control lamp for the carburetor air damper; 9 — oil pressure warning lamp; 10 — parking brake warning lamp; 11 — battery charge indicator lamp; 12 — tachometer; 13 — control lamp “CHECK ENGINE”; 14 — speedometer; 15 — brake fluid level warning lamp; 16 —hazard warning lamp; 17 — control lamp for high beam headlights; 18 — fuel level indicator.
Why you should know the pinout
But before you start this kind of upgrade, you need to understand which wire leads where. The pinout of the instrument panel of a VAZ-2110 car is a very important point when “tuning”. Without this, you risk simply getting confused in a fairly large number of wires, buttons and various sensors. The pinout will be useful in any case - both when making minor improvements and when completely replacing the instrument panel.
The process of installation and dismantling itself is quite labor-intensive, but if you know the correct sequence of actions, then there is nothing particularly difficult about it.
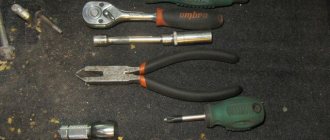
For these works you will need a minimum set of tools - a screwdriver and pliers.
For those who are doing this for the first time, it is best to stock up on self-adhesive pieces of paper, like those on which prices are written in stores, and a pen. With their help, at the time of disassembly, you will indicate, firstly, the sequence of dismantling the parts, and secondly, which wire is connected where. At first glance, this may seem time-consuming, but in fact, for beginners, such markings will help them put the panel back together faster.
At the same time, before starting work, it is best to stock up on a pinout diagram - at least conditional. After all, during the work process you need not to confuse anything and correctly understand each wire and connection during the reassembly process. It is worth noting one very important point. By and large, understanding the pinout of the panel of the “tenth” family will not be difficult even for a beginner.
But you need to remember that there are certain differences here, depending on the plant where the car was manufactured and the year of its manufacture. For example, the instrument panel may be an old model, with a mechanical odometer. If the odometer is electronic, then this is a newer version. Accordingly, there are certain differences in pinout between these panels.
Tire pressure monitoring system
Recently, in a number of countries, at the state level, there has been a ban on the sale of cars without a tire pressure monitoring system. In our country, unfortunately, there is no such ban. However, we advise you to equip your car with such technology, which, believe me, has saved many lives around the world. The fact is that the tire pressure monitoring system warns the driver of danger in case of loss of pressure in the wheel, which allows you to react in time to an emergency situation on the road and stop the car in a timely manner. So, do not regret 3,000-5,000 rubles and purchase modern and very useful technology for your car that allows you to monitor the condition of your tires while driving. Read more…
Possible faults
The panel is being installed on a VAZ 2114.
Possible problems with the panel may be due to incorrect connection. Because of this, some or even all of the indicators may not work.
If initially everything functioned normally, and then some malfunctions arose, check the condition of the wiring. After prolonged use, various buttons may fall off, but they can be easily replaced. The fuse block also burns out; replacing it will cost 1,800 rubles.
Components
When purchasing, you will receive what is included in the kit, namely:
- Europlate;
- Inserts for switches (buttons) of devices;
- Trim on the instrument panel;
- Since your instrument combination may differ from those whose installation is structurally provided, there should also be six plugs; they can be inserted instead of buttons;
- The buttons themselves and two pads for them: • Double – for low beam and dimensions; • To turn on the fog lights; • Heated rear window.
- Air ducts;
- Block and wiring harness designed to connect a double button for side lights and low beam;
- Brackets securing the instrument panel.
In addition, if you are not entirely satisfied with this combination, and you need more buttons for other devices, then they, as well as the pads for them, can be purchased separately.
Source
Installing a new cover
Installation of a new lining occurs after preliminary preparation:
- It is necessary to measure and trim off excess material;
- But it’s better not to cut off what seemed to be superfluous under the instrument panel, otherwise there will be a gap near the steering column, and you can make cuts to bend it a little if necessary;
- Near the side air ducts, trimming is also done during installation, measuring on site;
- We carry out fitting and adjust trimming;
- We apply anti-creak to avoid squeaking in future operation;
- We choose the method of installing the dashboard with a Euro trim: use new brackets included in the kit or drill them out from the old trim;
- All that remains is to install the instrument cluster you need and secure the Euro trim with self-tapping screws, which are then hidden under the plastic trim.
Where can I get Europanel?
The fact is that europlates, as well as assembled europanels, have become in short supply, since their production was discontinued more than five years ago. Therefore, they mostly sell used ones in good condition; it is quite difficult to find a new one. If suddenly the offered product does not suit you, you can install the Priorovskaya by completely disassembling the old one.
AutoNews / Reviews / Tests
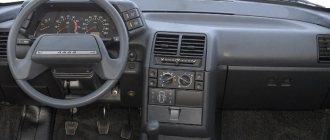
How to Remove the Top Panel of a VAZ 2110
Europanel on VAZ 2110 instead of an old torpedo
A frequently asked question is where to buy and how to install a Euro panel or dashboard cover on a VAZ 2110 . This is not surprising, the ancient panel of dozens is already tired and the hunt is to somehow update the interior. In this article I will show you what is needed in order to change the old VAZ 2110 torpedo to the euro and many important issues that you will encounter when replacing the old torpedo.
First, let's define what it is to install a torpedo on a VAZ 2110. Essentially, only the panel , and the lower part of the panel remains the same. It turns out that the torpedo is collapsible and consists of 3 parts. We are talking about the very top trim, so installing it is not as difficult as replacing the entire dashboard of a car.
Cigarette lighter failure
It is its malfunction that often causes the shield to fail. The fact is that many car owners turn on various devices through the cigarette lighter, for example, a special vacuum cleaner, chargers, pumps and other devices. Due to the fact that these gadgets require high current, either the socket itself or fuse F19 often breaks, as a result of which the instrument panel on the VAZ-2110 does not work.
In addition, the cigarette lighter may become damaged if left on for too long. In this case, you can return the instrument panel to functionality by disconnecting the socket block. But it is worth saying that such manipulation will be successful only if fuse F19 is functioning. If it does burn out, it must be replaced.
This is interesting: Why on the VAZ-2110 the stove does not work and does not blow