A cable designed to connect the shock and tilt sensor to the microprocessor module. For protection, the alarm has a control input. Call from your car! He will be able to raise the windows via the CAN bus. The alarm is resistant to various industrial interferences. Overview of the StarLine A91 equipment In this case, the hazard warning lights on the car will go off, and at the same time the key fob buzzer will play a melodic signal. The engine continues to run. How to install? In the production of the Starline A91 alarm system, the developer used the latest high-tech solutions in the field of security and effective protection. The presence of two-way communication allows you to find out about the condition of the car. Installation instructions for Starline A91 with your own hands You can install the system yourself.
installation of StarLine A91 on a table
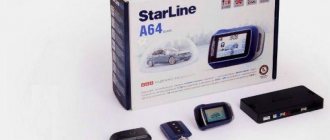
Options and prices
Complete set of Starline A91 car alarm models:
- a control module designed to receive, process and send signals;
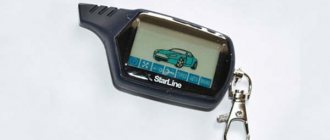
- two control panels - one is made in a housing with a display and a feedback option, the other is a spare without a screen;
- two-level shock controller;
- motor temperature controller;
- antenna adapter;
- hood button;
- case for the main remote control;
- service key;
- diode lamp for monitoring the status of the “signal”;
- manual with warranty card.
Both models have already been discontinued and are not available on the market. But you can still find new A91 car alarms on sale; their average cost is about 7–9 thousand rubles.
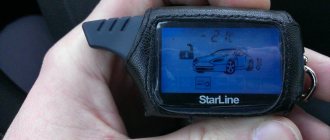
User Sergey demonstrated the range of the Starline A91 alarm in his video.
Installing a car alarm on Renault Megane 2008 - interior analysis
To access the wiring and internal cavities of the dashboard, we disassemble the interior.
Photo 1.1. We begin disassembly by lifting the sill trim in the driver's door opening to remove the left kick panel trim. Fastening - clips and hooks.
Photo 1.2. Remove the left kick panel trim - hooks.
Photo 1.3. After this, we fold back the torpedo cover, held in place by clips.
Photo 1.4. Remove the trim on the left end of the panel - clips and hooks around the perimeter.
Photo 1.5. After this, we take out the block of switches and regulators (red tips are fastening hooks) and unscrew three self-tapping screws (on the top) and a screw (on the left) with a TORX-T20 head.
Photo 1.6. After unscrewing a similar fastener on the lower right corner of the torpedo, remove the torpedo.
Photo 1.7. There is a hard clip on the upper right corner of the torpedo panel. We pull this corner carefully.
Photo 1.8. The driver's sun visor must be removed before removing the pillar trim. To do this, unclip the cover on the left and move the stop tab underneath it.
Photo 1.9. Remove the left front strut trim. The bottom mounting device is shown. Two more are located above. The hooks sit very firmly in the sockets of the platform. It was removed by inserting a screwdriver under the cover and deforming and bending the plane of the pad, pressing approximately in the center in the direction of the arrow, using the screwdriver as a lever.
Photo 1.10. We pull off the visor of the instrument board. There are clips in the front. There are hooks on the side of the windshield.
Photo 1.11. We unscrew the self-tapping screw securing the dashboard using a TORX-T20 head.
Photo 1.12. To remove the instrument panel, press the tabs on both sides simultaneously to disengage the stops and pull the board up.
Photo 1.13. Remove the central trim of the panel above the air ducts. Clips around the perimeter. We begin to lift over the air ducts.
Photo 1.14. Overlay with fully released clips and hooks. Only the front ones are visible, there are more on the sides.
Photo 1.15. We take out the pocket insert by picking it up from the side.
Photo 1.16. Upper left pocket hook.
Photo 1.17. We take out the radio and insert round puller pins into the holes to press out the stops. Rods from electric lock drives are ideal.
Photo 1.18. After removing the radio (do not disconnect the connectors - the radio is encoded!), unscrew the two screws securing the decorative trim using a TORX-T20 head. The left one is shown, there is another one on the opposite side.
Photo 1.19. After removing the OBD-II socket cover, unscrew two more screws with a TORX-T20 head from the bottom of the decorative trim.
Photo 1.20. We remove the decorative trim (without air ducts) - clips and hooks around the perimeter. There is a card reader slot and a START button on it, the control wire is pink.
Photo 1.21. We remove the air duct above the pedal assembly (it is standing open and secured with a clip on the left) - we pull out the clip on the left and “break” the air duct approximately in the middle to remove it from the mating parts.
Photo 1.22. We unscrew the screw securing the UCH unit with a TORX-T20 head. We disengage it from the upper fasteners and lower it down as far as the bundles of wires will allow.
Photo 1.23. We press the stop of the hook for fastening the fuse and relay box in the passenger compartment on the left in the sub-torpedo, disengage it and fold it down as far as the wires will allow.
If it is necessary to unlock the trunk, additionally remove the trunk lid trim (piston clips) and lift the sill trims on the left side.
When installing the fuel pump blocking relay on the gas tank, we additionally raise the rear right door sill trim and raise the right rear seat sofa. No photos were taken.
Functionality
What functions does a car anti-theft system have:
- Activation of alarm signals when a machine is broken into.
- Immobilizer. When the system is turned on, the power unit is blocked after the internal combustion engine is turned off. The device is activated after 30 seconds.
- Sending messages to the control panel about a possible break-in or other impact on the body.
- Anti-robbery function. The presence of this option allows you to carry out an emergency shutdown of the car’s engine as a result of opening the driver’s door if the driver has not been identified as the owner.
- Possibility of remote control of door locks thanks to the remote control. The presence of two-way communication allows you to find out about the condition of the car.
- Service option. If necessary, the car owner can disable the security, but leave other options working.
- Car search function. Activating it will trigger the siren, which will allow the car owner to know where the vehicle is parked.
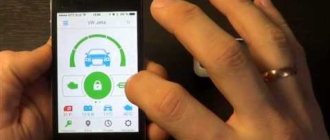
- The presence of a GSM module provides the ability to monitor and control vehicle security via a mobile phone. The device must be configured correctly.
- The engine autostart option allows you to start the engine remotely from a distance. There are two options for turning it on - press the remote control keys and start the engine immediately, or configure its activation by time, temperature or timer.
Alarm characteristics
Security functions of STARLINE A91
- silent security mode, as well as a mode with a sound signal;
- option to automatically turn on the security system;
- arming without using a key fob and with the engine running;
- performing automatic diagnostics when the security mode is turned on;
- disarming with or without sound;
- disabling engine blocking in two stages.
The main distinguishing feature of this alarm among others in the same price category can be noted:
- the presence of a convenient interactive 128-bit control code, which cannot be penetrated by any of the known code grabbers (devices that allow reading the system code);
- ergonomic and resistant to extreme weather.
- for such a price it will be difficult to find a more frost- and heat-resistant security device for your car, and the battery capacity will allow the alarm to operate in security mode for one and a half to two months;
- you can be sure that in the signal coverage area, which is from 800 to 1000 meters, there can be no interruptions in the operation of the alarm system - all radio interference that often occurs in urban environments will be bypassed using a specialized transceiver;
- the alarm and key fob work with modern software, which significantly increases the speed of the system than on more outdated models
The functionality of the Starline A91 with auto start corresponds to all the stated distinctive features - modern software coupled with hardware properties ensures productivity and a high degree of vehicle protection. All functions can be divided into two parts: security functions of the device and service functions (mainly associated with the use of a key fob). All service functions will be described in detail in the corresponding subheading.
How to connect?
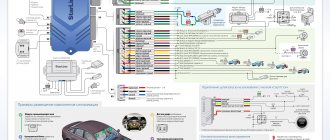
A typical connection diagram for the Starline A91 “signaling” is presented in the operating and installation instructions that come with the kit. Depending on the machine and the characteristics of the vehicle's electrical network, the procedure for connecting the wires may have certain differences.
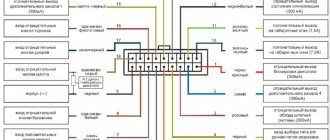
How should the 18-pin alarm control module connector be connected:
- The black contact is grounding, connected to the car body or any negative wire.
- The connector has a loop with a black cable. If the car is equipped with an automatic transmission, then you do not need to touch it. If there is a manual transmission, then the loop should be cut.
- The black-green and yellow-green contacts are connected to the turn signal lights.
- The gray contact is intended for connecting power to the siren.
- The black and blue cable goes to the limit switches mounted in the doors.
- The gray-orange contact connects to the hood limit switch. This wiring is connected to the power unit temperature controller.
- The white and orange cable is connected to the tailgate end switch.
- The pink cable connects to the negative terminal of the immobilizer bypass.
- The black-gray cable is used to control the signal from the generator device; this is necessary to implement auto-start of the motor.
- The purple-orange contact must be connected to the parking brake.
Connecting an 18-pin connector
To connect a six-pin plug designed for autostarting the engine, do the following:
- The red contact is positive, connected to the positive of the pink wire of the central locking.
- The yellow cable is the output for maintaining the ignition.
- There is no need to touch the blue contact.
- This connector has two yellow and black contacts - one thicker, the other thinner. You need to proceed with them as follows - cut the red cable at the ignition switch, after which the thick wire is connected to the starter device, and the thin wire to the lock.
- There is no need to touch the green contact, it is not activated.
When connecting, you must take into account the pinout of the lock:
- blue contact - positive output for the inserted key controller;
- black wire - a minus is formed when the doors are open;
- red contact - positive, connected to the starter device;
- blue-black output - positive, forms a plus after ignition activation;
- green contact - forms a plus in the circuit after installing the key;
- the white wire goes to the LED bulb;
- The pink contact connects to the positive terminal of the battery.
How to connect to the central locking with your own hands:
- The blue contact is connected to the white output of the lock;
- the yellow cable must be connected to the brown terminal;
- To synchronize the operation of the anti-theft installation and the lock, an activator must be installed in the driver's door.
To connect limit switches, new switches are installed instead of the installed ones; the pinout of the connector is as follows:
- the blue-white contact is connected to the switch in the driver's door;
- the black and white output is connected to the limit switch in the left rear door;
- the brown wire connects to the device in the door on the front right;
- The white/red cable goes to the rear right door limit switch.
Setting up autostart alarm Starline A91
- Move the gearshift knob to the neutral position (turn off all gears);
- Turn off the ignition and remove the key from it (the engine must be on);
- Apply the parking brake.
- Close all doors tightly, as well as the hood and trunk lid;
If any step is missed, remote launch is not possible. But with proper preparation of the car (the engine is turned off by the alarm itself), it can be started from the remote control in different ways.
- Press and hold button No. 1 for three seconds and after the sound signal quickly press button No. 3:
Periodically starting the engine from the key fob:
This function is especially relevant in winter, when periodic warming up of the engine is required. The starline a91 key fob can automatically start the engine to warm up (after 2, 3, 4, 24 hours).
How to configure autorun by time, temperature
The Starline A91 Dialog alarm can be configured in such a way that it will automatically start the engine based on air temperature (usually sub-zero) or after a specific period of time.
Activate autostart mode based on temperature
This function will work if certain conditions are met:
- if there is a temperature sensor;
- from the place of its installation;
- serviceability of the sensor itself.
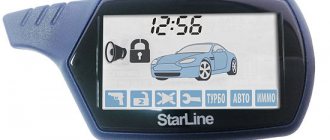
Activated by long pressing button 3 (star) until a sound signal appears from the key fob - it should beep once. The leftmost icon (1) at the bottom of the screen will blink on the display. By short pressing button 3, we move through the menu to the third position from the left (square 3) with the thermometer symbol.
After making sure that the desired function is activated, press button No. 1 on the case to activate this mode (this mode is turned off by pressing button 2 on the case), and in place of the clock readings a critical value of the engine temperature will appear after which it will autostart.
After the temperature value has been displayed, there is no need to press anything - after 8-10 seconds the remote control itself will beep and the clock will appear on the display again, and the third icon (with a thermometer) will remain dark. The state of this icon shows whether the autorun mode is running based on temperature: dark - the mode is active, light - reset.
Autostart by time
To enable this function, you need to select icon 2 on the display. The car will blink its headlights once, and a melodic signal will sound on the key fob. Now, after a time specified by the owner, the alarm will periodically start the engine.
If after the first attempt the car does not start, a second one will follow. In this case, the starter cranking time will be increased by 0.2 seconds. The timer is designed for 4 attempts to start the engine. If even after the fourth attempt the engine does not start, the sound signal on the key fob sounds. To set the engine warm-up time, the sequence of actions is as follows:
- Press and hold button No. 3 on the key fob (asterisk) for a long time.
- The key fob will beep briefly, but keep the button pressed, after the second sound signal, release the button;
- The leftmost icon (1) on the panel will blink;
- Briefly press button No. 3 to move to the fan icon;
- With one short press of button No. 1, the key fob will play a melody;
- Wait about ten seconds until the key fob beeps and the fan icon remains darkened;
- The interval start function is activated.
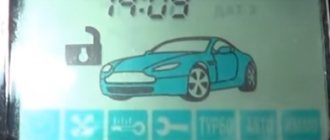
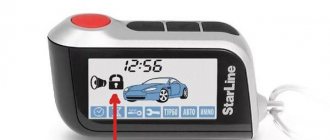
It is turned off in the same way, but the choice is confirmed by button No. 2 (open lock). When the engine starts successfully, an image of exhaust gases will appear on the screen. The car itself will blink its headlights 3 times and beep three times
Separately, it should be said about the engine start option:
- Remote engine start/stop - Remotely extend the operation of a running engine
- Automatic engine start based on temperature, alarm clock, timer every
- Selecting transmission and engine type
- Monitoring the operation of the internal combustion engine relative to the state of the generator or voltage changes
- option for automatic protection against twisting of the starter device when starting the internal combustion engine;
- determining the operating time of a running engine on the key fob
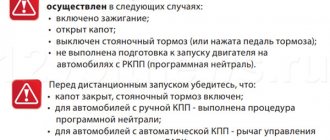
Always remember that section 12.8. The traffic rules state: “The driver may leave his seat or leave the vehicle if he has taken the necessary measures to prevent the vehicle from moving spontaneously or being used in the absence of the driver.”
Before using the StarLine A91 car alarm, follow these rules:
- Always park your vehicle in an open, well-ventilated area
- Always set the vehicle's parking brake, which must be in good condition and prevent the vehicle from moving.
- When leaving the vehicle, be sure to place the automatic transmission control lever in the “PARK” position and the manual transmission shift lever in the neutral position.
- If your car uses a manual transmission, then before turning on the remote or automatic engine start function, be sure to complete the preparation procedure for starting the engine - “soft neutral”
- Never start a vehicle without the driver present or if anyone is in front of or behind the vehicle.
- Never give car alarm control key fobs to children or other persons without first reading these instructions.
- On cars with a manual transmission, it is not recommended to perform remote or automatic engine starting if the car is out of sight and the car alarm user is not able to control the engine starting process.
- Make sure the car is in good condition (make sure there is enough fuel, oil, coolant, etc.)
How to setup?
To control a modern anti-theft system with a key fob, it must be linked to the alarm system; this procedure is performed as follows:
- Find the Valet service key. The button is usually installed in a hidden place so that criminals cannot gain access to it when trying to break into the car. It can be located under the glove box, steering wheel, in the fuse box, under the seat or center console. Before activating the remote control, the button is pressed seven times. The engine of the machine must be turned off.
- Then start the power unit. If the binding procedure is completed correctly, the siren will emit seven beeps. This means that key fobs can be added to the alarm memory.
- After that, press keys 2 and 3 on the remote control simultaneously. Hold them until the siren beeps. This indicates successful authorization of the remote control.
- With other key fobs, the procedure is performed in a similar way. After binding, the ignition must be turned off.
The Simple Opinion channel showed in a video the procedure for activating the Chinese signaling control panel.
Setting up the Starline A91 alarm turbo timer
The turbo timer can act as an independent element, which is a unit installed under the torpedo with a connection to the ignition switch. Or maybe as part of the Starline car alarm system. The latter option is considered the most convenient, since it does not require synchronization of the alarm and turbo timer, minimizing the risk of security system failure.
After installation work, it is recommended to check the functionality of the function and make the necessary settings. The turbo timer is configured according to two parameters:
- depending on the desired engine idling time;
- depending on the temperature of the turbine assembly.
Despite the uniform principle of operation, there are some nuances in how to set up the turbo timer. Even models from the same line may have differences in settings.
Activating the turbo timer
After the settings have been made, it is possible to activate the turbo timer in three different scenarios:
- automatically after applying the parking brake and turning off the ignition;
- using the key fob after applying the parking brake, locking the doors and turning on the security mode;
- after applying the parking brake.
A car enthusiast can choose how to turn on the turbo timer on Starline, based on the preferences and degree of convenience of each option.
Often the instructions do not indicate how to disable the turbo timer. It is assumed that disabling a mode is similar to activating it, but in reverse order. If the function is not needed, it is enough to deactivate the icon indicating the turbo timer using the service buttons of the key fob.
How to use the keychain?
To use it, you need to consider the purpose of the buttons.
Key number 1 on the remote control allows you to perform the following functions:
- activation of the anti-theft system with sound, the button must be pressed once;
- activation of the security function without the sound of a siren is carried out by successive clicks;
- Pressing the key twice will activate or deactivate the level strike controller;
- a single click will close the door locks when the ignition is activated.
Using button number 2 you can perform the following functions:
- deactivation of the security option with sound is performed by a one-time click on the button;
- sequential pressing will disable the security mode without sound;
- when you double-click the key, you can turn off or activate an additional shock controller by levels;
- with a single press, you can open the lock doors if the ignition in the car is turned on;
- two single clicks on the button will disable the anti-theft function;
- Pressing the key once will interrupt the siren signal.
The Michael MNS channel in a video talked about the main functions of the Starline A91 anti-theft system key fob.
Purpose of key 3 of the remote control:
- A single press will let you know about the temperature inside the car.
- By double clicking, you can activate the option of determining and controlling the temperature of the motor.
- When pressed sequentially, the additional channel number 3 is activated.
- A long press on the button can activate various functions. We are talking about autostarting the engine based on time, timer, temperature threshold. You can also enable options for service, turbo timer, immobilizer and automatic activation of the security mode. The selection of functions is carried out using control buttons.
Consecutive pressing of keys numbered 1 and 2 will activate the silent security mode. By successive clicks on the first and third buttons, the power unit will start, or the same combination can be used to prolong its operation. If you press key 2, and then immediately 1, the security option with a functioning motor is activated. Pressing must be single. If you successively click on the second and third keys, the motor will stop.
Consecutive pressing of the third and first keys will activate the additional channel number 1. To activate the second channel, buttons 3 and 2 are clicked in the same way. Simultaneous pressing of keys 1 and 2 will activate the panic mode, the ignition in the car must be turned off. If it is turned on, the anti-robbery option will be activated. Pressing the first and third buttons simultaneously will lock all keys on the remote control. To disable this option, press keys 2 and 3.
When controlling the anti-theft system, it is important to take into account the nuance of the duration of pressing the buttons on the remote control:
- a short key press should be performed quickly, in less than half a second;
- long press - when the driver presses the button until the key fob beeps;
- double click means two short presses;
- sequential - two clicks on the same or different keys.
General description of the alarm
The StarLine A91 Dialog alarm system is a modern car security system with a “Quick Dialog” radio control dialogue code and an engine auto-start function. “Quick dialogue” - a control code with individual encryption keys eliminates intelligent electronic hacking.
She is a representative of the budget family of the manufacturer. Despite this, inter-key fob communication is carried out via 8 channels from the transceiver-transmitter. Security is ensured by conversational pattern communication, the floating channel method and 128-bit code. Each time a signal is sent to the key fob or vice versa, the Starline anti-theft system automatically selects an alternative frequency.
Despite the narrow spectrum of transmission of the transceiver and channel-by-channel sending of a selective type signal, the developers of the a91 worked with the communication range of the a91 key fob with the main unit. A solution of this level, known by the technical term “frequency hopping spread spectrum technique,” is the first in the world to be used in an alarm control system and is a very significant complication of any code-breaking attempts.
The anti-theft system from Starline model a91 provides for installation on any car. We get a budget option, a very reliable, simple and universal security system.
Advantages and disadvantages
Advantages of the anti-theft installation:
- Simple installation and convenient operation. The installation procedure can be performed by a novice motorist if he takes into account all the nuances described in the installation instructions. The anti-theft system is controlled via remote controls with an interactive menu.
- Reliable machine protection. The system protects the car in several zones. During the development, solutions were used that provide maximum protection for the car.
- Extensive functionality. In the service menu, the car owner can configure more than 25 control options.
- Ability to work in extreme conditions, we are talking about areas with strong interference.
- Possibility of uninterrupted functioning of the security system when operating in harsh temperature conditions.
- The alarm system has a special antenna designed to search for key fobs. If the remote control is lost and it is within the range of the device, the car owner will quickly find it.
- Versatility. Installation of an anti-theft installation is possible on any car, regardless of model and year of manufacture.
User Stas World in his video talked about how to correctly configure the anti-theft system to automatically start the engine based on a timer or temperature.
As for the disadvantages, this alarm model is characterized by the following breakdowns:
- The automatic start option does not work correctly. The cause of the problem may be due to the absence of an immobilizer bypass device; this element is installed when installing the “signaling system”. The malfunction may be due to a lack of connection to the engine control circuit, as well as a damaged or broken power circuit. If the problem is with the contacts, they must be replaced. The cause of the problem may be a low battery.
- The car alarm siren activates for no reason. The malfunction may be due to a very high sensitivity level of the shock controller. We recommend resetting the sensor and reassigning the configuration. The problem may be insufficient fixation of the control module or impact controller. The above system components should be firmly fixed.
- The car alarm does not respond to the car owner's commands. First, the fault should be looked for in the key fob batteries; if they are discharged, then these elements must be replaced. The problem may be due to a discharge or failure of the battery. Sometimes the reason is due to failures in the key fob settings. This problem can be solved by reprogramming.
- The alarm system responds to signals from key fobs, but does not close or open the car doors. This malfunction is usually associated with the operation of the anti-theft system. It is necessary to check the wiring, the condition of the limit switches, as well as the control module.
What is a car alarm
The possibility of increased control and warning range, as well as reliable operation in extreme urban radio interference, is ensured by the use of a 128-channel patented transceiver with FM modulation and a narrow bandwidth.
Thanks to a specialized signal processing program, narrow-band filters, as well as reception and transmission channels optimally distributed along the edges of the 433.92 MHz frequency range, it became possible to improve the signal-to-noise ratio by 8-10 dB and double the range and noise immunity.
Remote starting and control of the operation of various types of engines is provided by a specialized processor. The existing key fobs implement an intuitive control principle. The pictograms on the keychain are presented in Russian.
The StarLine A91 Dialog car alarm can be installed on various cars with gasoline, diesel or turbocharged engines, with an automatic or manual transmission.
Thanks to more than 60 standard, programmable functions, not only reliable protection is provided, but also comfort when using a car alarm such as StarLine A91 Dialog.