Today I was at a friend’s garage, where I was installing a rear stabilizer in a pit. But before installing it, some preparations had to be made.
Firstly: I straightened the stabilizer itself so that its side “branches” were parallel and not tending towards each other. To do this, I clamped the stub in a vice and heated the bending points with a gas burner.
put the pipe on and slightly bent it to the desired angle
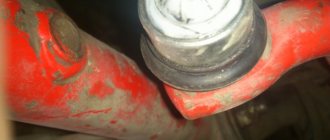
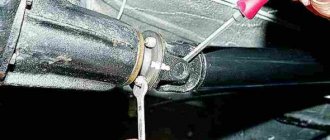
Secondly: I replaced the studs that come with the stabilizer kit with hardened studs from the cylinder head 402 of the ZMZ engine.
The photo shows the sealant, but so far I have screwed it on without it. Studs with nuts cost 200 rubles.
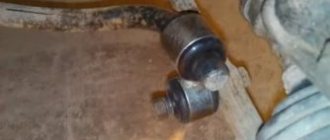
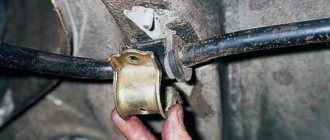
Third: After modifying the front stabilizer, the airbag brackets became free
and also went to work, that is, they replaced those that came with a stabilizer
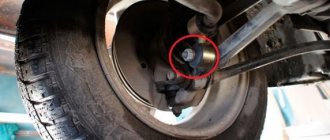
Fourth: the fastening of the clamp to the bridge stocking has been overcooked
A friend suggested welding this clamp directly to the bridge and not having to suffer)))
The installation process itself
I didn’t take a photo because... I asked to go to the garage for 1 hour, but spent the whole day there, I had to move and had no time for a soap dish)). So many letters below
I bent the brake pipes, tore off the brackets that hold them with pliers, and cleaned the places where they were welded to the bridge with a grinder.
I secured the stabilizer to the bridge, nothing complicated here.
I unscrewed the bolts of the small reaction rods and inserted the studs into the spar. There are several points here: a regular thread on a stud will fit into the metal bushing of the reactor with great difficulty, and it is easier and more convenient to insert the studs from the center of the car to the threshold. So I got it: the standard step on the heel is directed towards the cardan, the small step is directed towards the wheel.
I put the vertical stabilizer struts on the studs and put washers between the strut and the spar so that nothing would warp.
While the shock absorbers were unscrewed, I rocked the car heartily to check if the stub was clinging to the gearbox and if there were any other conflicts. All was good.
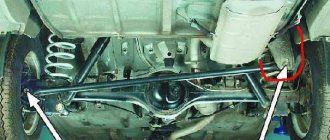
That's all. I captured the work done as best I could at home.
The VAZ 2107 has never been distinguished by increased cornering stability. Car owners, in an attempt to improve this situation, resort to all sorts of tricks. One of these tricks is to install so-called anti-roll bars on the “seven”. Is such tuning advisable, and if so, how to do it correctly? Let's try to figure it out.
Signs of a broken rear stabilizer
It’s not difficult to guess that something is wrong with the rear stabilizer of the VAZ 2107. Here's what's observed:
- a characteristic grinding or creaking noise, which is especially clearly heard when entering a sharp turn at high speed;
- a significant increase in vehicle roll when cornering and a decrease in controllability when cornering;
- the appearance of play on the stabilizer. Play can be easily detected by placing the car in an inspection hole and simply shaking the stabilizer bar up and down;
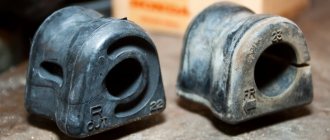
- destruction of bushings. The play mentioned above is almost always accompanied by the destruction of rubber bushings. They are squeezed out of their eyes, crack and completely cease to perform their functions.
All of the above things indicate only one thing: it’s time to repair the stabilizer. In the vast majority of cases, repairing the rear stabilizer comes down to replacing damaged bushings, since the fasteners and rod rarely need repairs. Such a need may arise only in the event of serious mechanical damage, when the driver caught a large stone or curb with the stabilizer, for example.
How should the stabilizer be positioned?
A properly installed stabilizer should be able to twist under the influence of forces on the wheels, and it should do this even when the forces applied to the right and left wheels are directed at completely different angles.
That is, stabilizers on passenger cars should never be directly welded to the frame; between the frame and the wheel mount there must always be some kind of intermediate link responsible for compensating for multidirectional forces. In the case of the VAZ 2107, such a link is dense rubber bushings, without which it is strictly not recommended to operate the stabilizer.
Strengthening stabilizing traction
Some owners of the “classic” VAZ, who love to improve their car in every possible way, have even gotten to the stabilizing unit. There is an opinion that the car behaves better on the road if you install a double stabilizer on the VAZ 2101-07. This modernization improves the car's handling, since rigidity does not allow it to sway and deviate from the trajectory.
To realize the strengthening of the stabilizer, you need to buy the following parts:
- stabilizer rod;
- set of rubber bushings;
- 4 brackets designed for attachment to the lever.
The new rod must be immediately trimmed by 80 mm on each side. Then remove the “original” rod along with the brackets. Further steps - according to the instructions:
- Remove the outer bushings from the “original” rod and clean the ends.
- Place 2 middle bushings on the new rod so that they coincide with the brackets on the old one. Pull the outer rubber bands onto the ends of the rod.
- Pull additional rubber bands on the old stabilizer that match the outer ones on the new one.
- Place the rods together and twist them with brackets placed on additional bushings on both sides.
- Install a reinforced stabilizer on the car.
A similar design can be made by welding from bushings from a Niva and stabilizer struts from a VAZ 2110. This will cost a little more, and the appearance will not be very aesthetically pleasing.
Replacing bushings for the rear stabilizer of a VAZ 2107
Worn rear stabilizer bushings cannot be repaired. They are made of special wear-resistant rubber. It is not possible to restore the surface of this rubber in a garage: the average car enthusiast has neither the appropriate skills nor the appropriate equipment for this. Therefore, there is only one way to solve the problem of worn bushings: replace them. Here are the tools and consumables you will need for this job:
- a set of new bushings for the rear stabilizer;
- set of open-end wrenches;
- flat screwdriver and hammer;
- composition WD40;
- mounting blade.
Sequence of operations
It should be said right away that it is most convenient to carry out all work in an inspection hole (as an option, you can park the car on an overpass).
- After installation on the pit, the stabilizer fasteners are carefully inspected. As a rule, all the bolts on it are covered with a layer of dirt and rust. Therefore, it makes sense to treat all these compounds with WD40 and wait 15 minutes. This time will be enough to dissolve dirt and rust.
- The mounting bolts on the stabilizer clamps are unscrewed with a 17mm open-end wrench.
Video: replacing stabilizer bushings on a “classic”
So, the anti-roll bar was and remains an extremely controversial element of tuning the classic “seven”. Nevertheless, even a novice car enthusiast will not have any difficulties in servicing this part, since the only wearable elements of the stabilizer are the bushings. Even a novice driver who has held a mounting blade and wrench in his hands at least once can replace them.
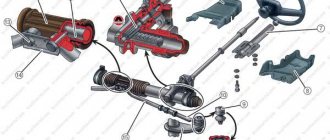
Adjusting the carburetor rods of the VAZ 2106
One of the necessary settings is adjusting the carburetor rods, which is carried out in the following sequence:
- We dismantle the housing part of the air purification filter.
- We measure the distance between the centers of the rod ends (tabular value - 80 mm).
- To change the length of the rod, use a screwdriver to release its tip and, using an “8” wrench, slightly unscrew the lock nut and adjust the carburetor rods by rotating the tip.
- We tighten the fasteners, put the rod in the seat and check the operation of the accelerator by pressing the pedal to the “floor”. If the main chamber throttle does not open completely, then the damper has a power reserve.
- We dismantle the end of the longitudinal type rod.
- We unscrew the locking nut a little, reduce the length of the rod, fasten it back and test the ability of the damper to open.
- In this case, the throttle valve must be closed completely.
- If there is a need to increase the length of the pull, then you need to loosen the damper cable.
Front stabilizer “Sport” ShS 20 mm, Tehnomaster
Anti-roll bar for VAZ 2108-2115, 2110-2112, Lada Priora cars
Installed to reduce suspension roll and improve wheel traction.
Connecting elements on rubber bushings.
Stabilizer thickness 20mm
Installed without modifications (for cars without lowered suspension)
In warehouse in Samara
Our online store tuningprosto.ru presents a range of stabilizers VAZ cars . An anti-roll bar is a part of a car suspension that connects opposite wheels using an elastic element. The stabilizer is installed on both the front and rear axles of the car. When turning, the centrifugal force tilts the car, the load on the outside wheels increases, on the inside it decreases, and, as a result, the body rolls and sways. All this can lead to the car overturning. To reduce roll when cornering, an anti-roll bar is used. When installing stabilizers , the car's handling improves, the sharpness and accuracy of maneuvering increases, which gives a high level of comfort during dynamic driving.
What's the matter?
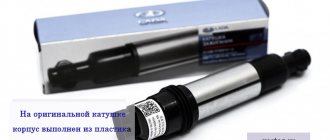
The reason for the dissatisfaction of many Newsmakers is the creaking. It is no secret that the stabilizer bushings of the domestic model very soon begin to creak, and sometimes this happens almost immediately after purchase. There have been cases when the car did not have time to travel even 1,500 km, and some manage to drive without making noise for less than 1,000 km. As for the frequency of squeaking, surveys show that this happens in approximately 60% of cars.
This creak can be clearly heard in the video.
It is also worth noting that such a squeak is rarely heard constantly. Usually it appears and then disappears. In this case, the problem is extremely clear - the quality of the material or the manufacturing of the components is not high enough.
In this case, there are two solutions:
- Contacting the dealer;
- Independent work.
In general, both options are working, however, both the first and second have certain disadvantages.
Removing old wipers
Most modern cars use a hook type mount. Its installation and dismantling is quite simple.
- It is necessary to carefully inspect the place where the blade is attached to the windshield wiper arm for the presence of a retainer or rust that may prevent removal.
- Having opened the clamp or treated the joint with WD-40 (if necessary), move the lever away from the glass to its extreme position and, holding it, pull the brush down.
- Lower the lever to its original position.
It is very important to prevent the lever from hitting the glass under the action of the pressure spring! Therefore, the operation must be performed with caution. It is also advisable to protect the windshield with a thick blanket. If your car has a different type of mount installed, you will have to use ingenuity
Some manufacturers have equipped cars with clever fastenings such as Side pin, Pinch tab, Top lock, Push button. But dealing with them is not difficult, using reasonable caution.
If your car has a different type of mount, you will have to use your ingenuity. Some manufacturers have equipped cars with clever fastenings such as Side pin, Pinch tab, Top lock, Push button
But dealing with them is not difficult, using reasonable caution.
Often, a set of new brushes comes with instructions for removal and installation. This will also help you figure out how to change the blades on wipers with non-standard mounting.
Tips for use
I would like to highlight tips for using brushes as a separate item. It is necessary to control what liquids and substances they come into contact with. Road chemicals, questionable washer fluids and solvents reduce the service life of rubber bands.
Prolonged exposure to the scorching sun and severe frost accelerates their aging and destruction. Operation in such conditions can cause premature wear of the rubber bands, even on new windshield wipers. This, in turn, entails a number of concerns about how to change the rubber bands on the wipers, if they are still new and expensive.
Types of wipers
Before changing the wipers on your car, you should determine which wipers are right for you. The range of these consumables is quite rich. The market offers framed, frameless and hybrid models from different brands. There is no clear division of brushes into “bad” and “good”.
Each type of wiper includes positive and negative qualities. Frameless and combined ones are superior to their framed counterparts in terms of durability, due to the absence of an open frame, which can rust, suffer from salt deposits, etc. Frame wipers, in turn, have an attractive price and, thanks to the rocker arm system, better bend around the windshield.
In any case, the applicability of the product on a particular car and the quality of its manufacture play a decisive role. When purchasing brushes, you must follow the recommendations of the car manufacturer. Most of them provide not only the parameters of the applicable wipers, but also specific brands indicating the catalog number. Many manufacturers of spare parts and consumables indicate on their products the models and brands of cars to which these parts are applicable.
But how to change wipers if these options are not suitable? All that remains is to select brushes similar to those installed, provided that you are satisfied with the quality of their work.
It is necessary to take measurements of both wipers
This is important, since the size of the brushes for most cars is individual. And on some, the driver's wiper is larger than the passenger's.
It should immediately be noted that the questions “how to change frame wipers” and “how to change frameless wipers” are untenable. If the shape of your car windshield is not complex, you will find suitable options for both types. The question is rather in the correct choice of fastenings of the brushes to the windshield wiper arms.
It is very important to accurately determine the type of brush attachment. This is not easy, so the best solution would be to carefully remove the blades, place a thick cloth under the wiper arms, thereby protecting the windshield from contact with metal, and go with them for new ones.
Suspension faults
It cannot be said that the VAZ 2106 suspension is unreliable, but taking into account the quality of our roads, it is still necessary to carry out diagnostics and carry out repair work from time to time. The occurrence of a particular malfunction can be judged by characteristic symptoms, based on which it will be easier to determine the damaged part.
Knocks
Knocks may appear at different moments when the vehicle is moving, which indicates the following malfunctions:
- at the beginning of the movement. Indicates damage to the rear axle rods or the brackets to which they are attached. The silent blocks themselves may also wear out. First you need to inspect the attachment points of the rods and their integrity, check the rubber-metal elements. Replace faulty parts;
- while driving. With such a manifestation of a malfunction, the shock absorbers and their bushings may fail or the fasteners may loosen. If there is severe wear, ball joints can also knock;
- when the damping system is compressed. A malfunction can occur when the rebound buffer is damaged and can be eliminated by inspecting and replacing damaged elements.
Video: reasons for knocking when starting to move
Pulling the car to the side
There can be many reasons when a car deviates from straight-line motion:
- tires are inflated at different pressures. The air needs to be checked and adjusted;
- Incorrect wheel alignment installation. This can occur when one of the levers, their axes is damaged, or the silent blocks are severely worn. It is necessary to inspect the front suspension, check that the angles are set correctly and, if necessary, adjust them;
- axle deformation. The part needs to be replaced;
- loss of elasticity or breakage of one of the springs. A sagging or faulty spring must be replaced;
- Tires wear differently. If this occurs, the tires must be replaced;
- the balance is off. It is necessary to check the balancing and eliminate the imbalance;
- damage to the rear axle rod, which led to displacement of the unit. It is necessary to inspect the rear suspension and replace the faulty element.
The car can also pull to the side for other reasons not related to the suspension, for example, when one of the wheels is not fully released. In this case, it is necessary to check the brake mechanism and eliminate the malfunction.
- The wheel bolts are loose. It is necessary to check and tighten the fastening;
- Excessive axial play of the front wheels. This sign indicates a failure of the wheel bearings or a loosening of the hub nut. Replacement of faulty elements or tightening of fasteners is required;
- spring damage. The suspension is inspected and the damaged part is replaced. It is recommended to change the right and left springs at the same time, since the height of the new and old parts will be different;
- breakdown of jet rods, free play in bushings. Replacement of faulty elements is necessary;
- wear or lack of lubrication in the ball joints. If excessive wear occurs, the ball should be replaced. If the part has no wear, but creaks, it should be lubricated with ShRB-4;
- damage or wear of the silent blocks of the front end. Rubber-metal elements must be replaced;
- The fastening of the levers or beams has become loose. Fasteners must be checked and tightened if loose.
VAZ-2106 engines and their consumption
First, let's figure out how much gasoline the Six consumes. Let's start with the fact that during production, 3 different engines were installed on this car - from a VAZ-21011 with a 1.3-liter volume (modification 21063), a 1.5-liter unit from a VAZ-2103 (modification 21061) and an engine 1.6 liters (base model VAZ-2106).
Each engine had its own amount of gasoline consumed. Thus, the fuel consumption of the VAZ-2106 1.3 in urban conditions is approximately 10.5 liters, on the highway - 7.7 liters, and in mixed mode - about 11 liters.
Modification 21061 is not far from the indicated indicators. Fuel consumption of the VAZ-2106 1.5 liters is: city - 12.0 liters, highway - 8.0 liters, mixed - 12 liters.
In urban conditions - 8.0 l, on the highway - 10.9 l. and in mixed mode - 12.0 l. – this is the fuel consumption of a VAZ-2106 1.6 carburetor.
Let us immediately note that these are approximate indicators that can vary within a fairly significant range. Some note that after a certain period of operation, consumption increased, and significantly - up to 14-16 liters in city conditions. That is, it turns out that an ordinary passenger car with mediocre engine characteristics, but consumes gasoline like a full-size SUV.