The VAZ 2107 gearbox is adjusted, author Nikolay Vladimirovich Zhdankin
We welcome car enthusiasts of classic VAZ models to the autoblog RtiIvaz.ru!
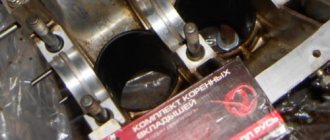
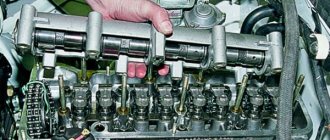
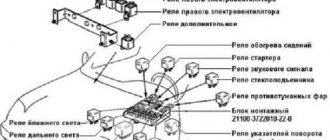
In these videos we will look at the VAZ 2107 gearbox and adjustment. Nikolai Vladimirovich dedicated the video to the owners of rear-wheel drive cars, since today the trend is towards rear axle gearboxes. As a visual aid for repairs and adjustments, we showed the rear axle gearbox of the VAZ 2107, a common domestic car. The main elements of the gearbox are the helical gears of the main gear, the so-called “pivot” and “planetary gear”, which make up the main pair of the gearbox. The plant produced four versions of the main pairs:
- Low-speed, installed on the VAZ 2102. The pair has 9 teeth on the bevel gear and 40 on the planetary gear. The torque transmission number is 4.44, this is a low-speed option. Out of production;
- On the VAZ 2101 - the famous “kopek”, the main pair had 10 teeth on the “point” and 43 on the “planetary”, with a gear ratio of 4.3, discontinued;
- VAZ 2103, respectively, 10 teeth on the tip and 41 on the planetary gear;
- VAZ 2106 - 11 teeth on the “pivot” and 43 on the “planetary”, gear ratio 3.9, is considered a high-speed gearbox.
It should be noted that the main pair with a gear ratio of 4.44 for the VAZ 2102 was, generally speaking, not produced as spare parts and was intended only to complete the VAZ 2102 gearboxes on the factory assembly line.
Transmission
- Reversing light switch M14x1.5 28.4-45.1 (2.9-4.6)
- Bolt securing the clutch housing to the engine M12×1.25 53.9-87.2 (5.5-8.9)
- Nut securing the clutch housing to the gearbox M10×1.25 31.8-51.4 (3.25-5.25)
- Nut securing the clutch housing to the gearbox M8 15.7-25.5(1.6-2.6)
- Rod clamp cover bolt M8 15.7-25.5(1.6-2.6)
- Rear cover mounting nut M8 15.7-25.5(1.6-2.6)
- Nut of the rear end of the secondary shaft M20x1.0 66.6-82.3 (6.8-8.4)
- Intermediate shaft bearing clamping washer bolt M12×1.25 79.4-98.0 (8.1-10.0)
- Bolt securing the fork to the gearshift rod MB 11.7-18.6(1.2-1.9)
Differential device
The planetary gear is mounted on the differential housing. The differential consists of two axle gears, two satellites and a pin. The main, most common differential malfunctions are wear of the pinion pin (play) and wear of the splines on the axle gears.
On a car, the play of the pin of the satellites can be determined by turning the driveshaft by a quarter or more; if there is no play, then the shaft practically remains in place when you try to turn it in one direction or another.
It's also worth noting that there is never any noise coming from the differential. When moving forward (in a straight line), the differential rotates as one unit and it turns out that there is simply nothing to make noise there.
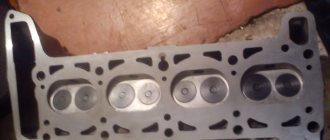
The cause of noise from the rear axle gearbox when gas is added and the noise disappears after releasing gas is (almost 99.9%) wear of the teeth of the main pair. This is clearly visible on the removed gearbox. The forward side of the teeth has significant wear, while the reverse side shows little wear.
If, after disassembling and troubleshooting the parts of the main pair, wear of the teeth is detected, then no repair will help and it will simply be a waste of time and money. Only the main pair needs to be replaced.
Home-couple
The gears of the main pair are selected at the factory based on contact patch, noise and other parameters and are marked. For example, on the planetary gears it is stamped - VAZ 2103 (model), 10 41 (gear ratio), 4091 (pair number). The main pair number 4091 is also marked on the bevel gear.
After marking these parts, they became the “main pair” and are not installed one without the other, that is, “family”. “- 6” is also marked on the “tip”; this is an amendment for assembling the main pair in the gearbox. When troubleshooting a differential, its bearings are also checked for wear and, if necessary, replaced. Bearing wear is often caused by unprofessional replacement of the gearbox seal.
For example, after replacing the oil seal, tighten the shank nut without observing the tightening torque (pull as much as possible) and the force is transferred not to the spacer sleeve, but to the differential bearings.
As a result, after a short run after replacing the shank oil seal, noise from the gearbox appears. Only in this case, the “hum” noise in the gearbox is constant and unlike the noise from worn teeth of the main gear. In this case, the hum is constant, regardless of whether gas is added or released.
Rear axle gearbox assembly video
During assembly, the gearbox is adjusted according to 4 parameters:
1. Selection of the adjusting ring
Parameters from 2.6 to 3.5. The ring serves to adjust the depth of engagement of the teeth of the “tip” and “planetary gear”, which is strictly specified. This is where the “correction -6” is needed for this main pair, which was mentioned above. Of course, this amendment will be individual for each main couple.
In this video, the main pair will be adjusted using a special device. It is clear that the vast majority of motorists do not have such a device and this is just a clear example of adjusting the engagement depth parameter. An option will also be given for adjustment without a “device”.
A “device” with a micrometer is also installed on the device, simulating the gear of the main pair. The indicator shows zero. Then the indicator leg is transferred to the bearing bed and in this case the indicator shows a value of 3.25, which is not good, since it should be within the range of 3.0. On the second landing plane it turned out to be 3.45. The arithmetic mean is 3.3. To adjust, we will use the correction at the “tip” - “-6”. In this case (– 3.3) + (-6) = 3.36. The thickness of the adjusting washer required is 3.36 mm. Using a micrometer, select the washer of the required thickness.
Note. When the shank bearing wears out, it begins to rotate on the “tip” body. As a result, the bearing end, adjusting washer and shank gear bodies wear out. It turns out that when replacing the shank oil seal, even with the correct tightening torque, the adjustment of the depth of engagement of the teeth of the gears of the main pair is lost and the “howl” of the pair is ensured, as is its early failure.
2. Adjusting the preload of the shank bearings
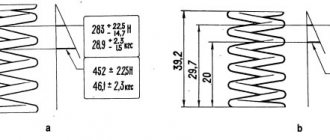
The shank bearing sits on the “tip” and a NEW spacer sleeve MUST be installed. The video clearly shows that the new bushing is smooth without any deformation, while the previously installed one is deformed. What happens is this: When the shank nut is tightened to the prescribed torque (from 12 to 26 kgf), the bushing takes on the tightening force and, when deformed, works like a spring, creating tension. The tightening force for the VAZ 2107 gearbox nut is significant and the shank must be secured against turning.
In the video we see what kind of “device” the master uses. It is necessary to tighten the shank nut until there is no play. When the nut is tightened correctly, the shank should rotate with a resistance force of 0.3-0.4 kg, therefore, the bearing preload is correct. This assembly rule applies to old (used) bearings.
The differential with bearings is installed and secured with covers (tightening torque is about 8 kgf) and the adjusting nuts of the differential bearings are tightened.
3 and 4. Simultaneous adjustment of the thermal clearance of the main pair and the preload of the differential bearings
For these purposes, another “device” with two indicators is needed. Using the adjusting nuts in the video and everything is shown well, we move the planetary gear towards the teeth of the “cone” to achieve the required clearance. Factory clearance adjustment data is from 0.08 to 0.12 mm. However, such a gap is provided for the new main pair (“tips” and “planets”). The gap is checked in 4 planes by turning the gear. The gap for the working main pair after adjustment is 0.13-0.14 mm.
After making the adjustment, the adjusting nuts are locked with special plates for this purpose, with one or two “antennae”. This completes the assembly and adjustment.
Purpose of the gearbox oil seal
All classic Lada car models, up to VAZ-2108, have rear-wheel drive. Starting from VAZ 2108 and higher, cars are driven by front-wheel drive. Everyone knows that a gearbox is a device through which torque is increased with its further transmission from the cardan to the rear wheels. All parts of the rear axle operate predominantly in an oil environment, which has a positive effect on the following factors:
- The service life of rubbing parts increases due to reduced wear.
- The heat generated by gear friction is removed.
- The friction force is reduced.
- The gears are cleaned from metal dust and shavings that are formed when metal parts come into contact with each other.
In order to transmit torque from the engine to the rear wheels, a cardan shaft is used, which is connected to the gearbox flange. An oil seal is installed on the flange axis to prevent lubricant from leaking out of the rear axle gearbox. When the cuffs wear out, oil stains and even puddles appear under the car, leaking outward. To avoid significant loss of oil in the rear axle of the VAZ 2107, the cuffs should be replaced in a timely manner when oil leaks are detected.
Checking the serviceability of the shank oil seal
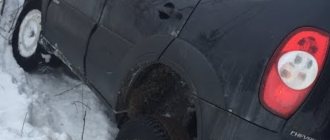
The first sign that it is necessary to replace the shank oil seal on a VAZ 2107 is the presence of traces of lubricant, dust and dirt on the outer part of the rear axle. Determining the presence of leaks on the rear axle is not difficult. To do this, you need to climb under the car and inspect the bridge.
If the oil seal is worn significantly, a puddle of oil may be found under the car. If the problem is not resolved in a timely manner, oil may leak out of the bridge, which will lead to its rapid breakdown. Despite the fact that the cuff is a small part in a car, its serviceability plays a very important role.
What will be required when carrying out replacement work
To replace the device in question on a VAZ 2107 car, you will need a number of the following tools:
- Open-end wrenches for 13 and 24.
- Calipers.
- Screwdriver.
- Flange puller. This tool is not difficult to make yourself.
- Dynamometer or torque wrench.
After all the tools are ready, you can install the car on the inspection hole, since it is much easier to carry out work on replacing the cuff.
Step-by-step instructions for replacing the oil seal on a VAZ 2107
Replacing the rear axle oil seal of a VAZ 2107 with your own hands begins with the need to find the oil drain plug, which is located in the lower part of the axle, and unscrew it, thereby draining the oil.
It is important to know! If the oil has not been changed for a long time (mileage more than 60 thousand km), then it is necessary to replace it simultaneously with the work on replacing the oil seals.
After draining, you should immediately tighten the drain plug, which will avoid unintentional leakage after repair work. Further replacement steps are performed in the following order:
- Using a 13mm wrench, you unscrew the four bolts with nuts that secure the cardan to the gearbox flange. After unscrewing, you should move the cardan to the side and hang it with a rope or wire.
- The next step is to measure the tightening torque of the nut. You can determine the torque using a torque wrench or a dynamometer. A method for measuring the tightening torque of a nut using a dynamometer can be seen in the video. The second method, using a torque wrench, involves screwing in the nut and determining its tightening force. This nut will need to be tightened to the same torque after the seal is replaced.
- After the nut tightening force has been determined, you need to pick up a 24mm wrench and unscrew the nut. When unscrewing the nut, lock the flange to prevent it from rotating. You can lock the flange using a homemade key or a handy tool.
- The flange is being dismantled. You may need a bearing puller.
- Removing the old oil seal. We don't need the old cuff, so we can dismantle it with a screwdriver or the end part of an open-end wrench. The device should be pryed up and then removed from its seat. After removing the cuff, the location of the cuff should be thoroughly wiped with a cloth.
After this, all that remains is to screw the propeller shaft into place, and pour new oil into the gearbox to the bottom of the oil filler plug, then tighten the plug. At this point, the process of replacing the VAZ 2107 shank oil seal is completed, and you can check its serviceability.
Checking the tightening of the drive gear nut of the VAZ and Lada Niva gearbox
First of all, we clean the gearbox neck, drive gear flanges and cardan joint from dirt. To get to the nut (S24 M16x1.5), you need to disconnect the flanges and move the propeller shaft to the side. It is balanced separately from the drive gear with a flange and still mark the relative position of the flanges with paint or a punch.
The nuts (S13, M8) of flange bolts with special heads that are to be unscrewed require very careful attention. Do not use a spanner or socket here. A regular open-end wrench “13” (S13) must be new or, in any case, tightly cover the edges of the nut. You can make a “dense” S13 key from an S12 key.
The fact is that the nuts of the flange bolts can be tightened to a torque of up to 3.5 kgf (with a wrench arm of 150 mm - a force of 21 kgf). If we take into account that the coefficient of static friction is always greater than the coefficient of sliding friction, the force on the key will be considerable. At the slightest “slack” in the key, the hexagon of the nut will quickly be crushed (“licked”). When rounding the corners of the nut faces, as a rule, a hammer and chisel are used. If there is nothing to replace the nut after this, you have to machine its edges for an S12 hexagon.
We begin to unscrew the nut that is in a comfortable position (then we turn the driveshaft), not forgetting about the bolt. The fact is that the conical head of the bolt has a flat, while the bolt rests against a special milling of the flange and is kept from turning. There is no point in rotating the nut and rotating the bolt along with it, thereby crushing the edges. It is better to jam the bolt head with a screwdriver in a timely manner.
Front suspension
- Nut of the lower bolts securing the cross member to the body side members M 12×1.25 66.6-82.3 (6.8-8.4)
- Nut of the upper bolts securing the cross member to the body side members M 12×1.25 66.6-82.3 (6.8-8.4)
- Nut of the bolt securing the rebound buffer bracket to the cross member M8 15.1-18.6 (1.53-1.90)
- Nut of the upper arm axle mounting bolt M 12×1.25 66.6-82.3 (6.8-8.4)
- Nut securing the upper end of the shock absorber M10×1.25 27.4-34.0 (2.80-3.46)
- Nut securing the lower end of the shock absorber M10×1.25 50.0-61.7 (5.1-6.3)
- Front wheel hub bearing nut M 18×1.5 cm, “Chassis”, p. 169
- Bolt securing the caliper to the steering knuckle M10×1.25 29.1-36.0 (2.97-3.67)
- Anti-roll bar mounting nut M8 15.0-18.6(1.53-1.90)
- Nut securing ball pins to steering knuckle M 14×1.5 83.3-102.9 (8.5-10.5)
- Nut for fastening the brace to the suspension cross member M 12×1.25 66.6-82.3 (6.8-8.4)
- Nut for fastening the extension to the body M 16×1.5 104.9-169.5 (10.7-17.3)
- Nut connecting the lower arm axis to the cross member M 16×1.5 114.7-185.2(11.7-18.9)
- Nut for fastening ball joints to suspension arms M8 20.60-25.75 (2.10-2.63)
- Wheel bolt nut M 12×1.25 62.4-77.1 (6.37-7.87)
- Upper suspension arm axle nut M 14×1.5 63.7-102.9 (6.5-10.5)
- Nut of bolts securing the swing arm M 12×1.25 66.6-82.3 (6.8-8.4)
Installation of the drive gear of the VAZ and Lada Niva gearbox.
The second sign of a loose nut is the presence of axial play in the drive gear. Grasp the flange with both hands and move it back and forth (the car is on a stand, with stops under the wheels). The drive gear nut may be unscrewed a full turn or more (1 turn - axial movement - is equal to the thread pitch, i.e. 1.5 mm). Here we are no longer talking about preload and you are lucky that the gearbox is still working.
Transfer case
- Nut securing the suspension bracket to the pillow axis M10×1.25 26.5-32.3 (2.7-3.3)
- Nut securing the suspension bracket to the body M8 15.0-18.6(1.53-1.90)
- Differential lock switch M16×1.5 28.4-45.0 (2.9-4.6) Bolt securing the forks to the gear shift rods MB 11.8-18.6 (1.2-1.9)
- Bolt securing the forks to the differential lock rod M12×1.25 11.7-18.6(1.2-1.9)
- Nut securing the propeller shaft flange to the drive shaft and to the drive shafts of the front and rear axles M16×1.5 96.0-117.6(9.8-12.0)
- Driven gear mounting bolt М10×1.25 66.6-82.3 (6.8-8.4)
- Nut for securing the rear bearing of the drive shaft and the rear bearing of the intermediate shaft M18×1.5 96.0-117.6(9.8-12.0)
Universal wrench for flanges and hubs
If tightening the nut is a “one-time event” and there is no special wrench, you can get by with two M8 bolts and a wrench (metal rod). The bolts are inserted into the flange holes, and the knob is placed between the bolts in front of the flange. If the knob is placed behind the flange, you may accidentally press on the dirt deflector, after which it will need to be secured to the flange.
After unscrewing the nut, it is necessary to remove oil from the threads of the nut and the gear shank, which will significantly increase the coefficient of friction and, consequently, the moment of resistance to unscrewing the nut. It is better to install a new nut, since the thread of the gear shank is imprinted in the nylon of the insert, which reduces the resistance to self-loosening of the nut.
The nut must be tightened, as noted above, with a torque of 12-26 kgcm; tightening is controlled by the moment of resistance to rotation of the drive gear - 4-6 kgcm. Since this moment cannot be measured “in its pure form” (the gearbox has not been removed), we measure it with the nut loosened and, adding 4-6 kgcm to the resulting value, we obtain a controlled moment of total resistance.
The easiest way to measure torque is with a spring scale (steelyard). So, if the moment of resistance is 4-6 kgf, and the hook of the scale is hooked onto the flange hole, then the force on the scale should be 1.1-1.7 kgf. Let us remember that the moment of resistance to rotation is measured, and not the starting moment, which is much higher. All these measurements may seem complicated, but they are necessary for reliable operation of the gearbox.
Diagnostics of the condition of the gearbox (bearings, gearing) of VAZ and Lada Niva cars.
Now let's look at cases where tightening the nut alone is not enough. We will also talk about diagnosing the condition of the gearbox (bearings, gearing).
- Rotating the drive gear by the flange, we feel a uniform periodic increase and decrease in the moment of resistance - “roller busting”. This phenomenon is the stronger, the greater the preload, if both wheels are raised and, of course, in the case when the gearbox is removed and the differential box with the driven gear is removed from its housing.
“Roller busting” is a violation of the geometry of the raceways and bearing rollers, a sign that if the gearbox has not yet “hummed,” then this is about to happen. In the latter case, the matter may be aggravated by the appearance of waves on the gear teeth. Then the hum will turn into a howl - and the defect (waves on the teeth) cannot be eliminated.
If, while rotating the drive gear, you notice an increase and decrease in the moment of resistance in only one place along the angle of rotation, this means that pitting has begun on the outer tracks of the bearing (or bearings) - “pitting” has appeared. This also requires disassembling the gearbox.
- The shank nut is already tightened to the maximum torque (26 kgcm), but there is still no preload in the bearings. Moreover, there may be axial play. The fact is that the preload of the bearings is “metered” by their spacer sleeve.
As the bearings wear out, the bushing may turn out to be too long, and it is impossible to “settle” it by tightening the nut with a torque of more than 26 kgcm - it will take the form shown in the figure below, i.e. will fail completely. There is only one way out - after disassembling the gearbox and assessing the condition of the drive gear bearings, make the bushing shorter.
Shank bearing spacer.
- When the nut tightening torque is less than 12 kgcm, the resistance moment increases sharply. This most often indicates that the bushing has served its purpose - it has “shattered” and needs to be replaced. It is also possible that the crushing and wear of the ends of the parts have made the entire chain and the bushing itself shorter. You can “lengthen” the bushing by using spacer washers installed at the ends of the bushing.
Preventing the nut of the drive gear (shank) of the VAZ and Lada Niva gearbox from loosening.
Is it possible to prevent the shank nut from coming loose? The locking option is shown in the figure above. The nut rests through the bushing on the flange of the universal joint. The 12 mm sleeve size may require specification (adjustment) in place. The required size can be determined using plasticine by connecting the flanges with two bolts.
The standard spacer sleeve plays the role of a spring washer (one of the means of locking the shank nut), but spring washers, as a rule, are split and perform their role much better. Instead of a spring spacer, a rigid spacer can be used. In the absence of a spring spacer bushing, it is much easier to make a rigid one. A gearbox with a rigid spacer sleeve is used on rear-wheel drive Moskvich and IZH vehicles.
If you find an error, please select a piece of text and press Ctrl+Enter.
Steering
- Steering housing mounting bolt nut M10×1.25 33.3-41.2 (3.4-4.2)
- Nut of the pendulum arm bracket mounting bolt M10×1.25 33.3-41.2 (3.4-4.2)
- Ball pin nut for steering linkages** M 14×1.5 42.1-53.0 (4.3-5.4)
- Nut securing the steering shaft bracket and ignition switch M8 15.0-18.6 (1.53-1.90)
- Steering wheel nut M 16×1.5 31.4-51.0 (3.2-5.2)
- Bipod fastening nut M20x1.5 199.9-247.0 (20.4-25.2)
- Pendulum arm axis nut M 14×1.5 63.7-102.9 (6.5-10.5)
Causes and signs of failure
As a rule, the oil seal in the VAZ 2107 gearbox is replaced because it begins to leak. Over years of use, the sealing lip may dry out or tear. A leak can also be caused by improper installation of the oil seal.
You can definitely identify a malfunction by the following signs:
- After parking for a long time, an oil stain remained on the road.
- Droplets of oil appeared on the bridge body.
- Near the gearbox shank, characteristic traces of leaking oil are visible.
Step-by-step replacement process
- We drive the car into the pit and unscrew the propeller shaft mounting bolts, having previously made a mark on the flank of the cardan and gearbox. After unscrewing the cardan, we tie it with a wire so that it does not interfere.
Using a special wrench, we secure the flange from turning and, using a wrench or a twenty-seven socket, unscrew the nut. The key for fixing the flange is shown in the photo below. You can also screw two universal joint mounting bolts into the flange and insert a powerful screwdriver between the bolts.
Unscrew the plug and drain the oil from the rear axle.
We remove the flange from the slots and take out the thin ring behind it using two screwdrivers.
- Using two screwdrivers, remove the inner race of the bearing.
- We take out the spacer sleeve. This bushing is needed to create the correct tension in the bearings. Please note that the belt of the bushing you removed is barrel-shaped, but on the new bushing it is straight. At the moment of tightening, the belt is wrinkled and the correct tension is achieved. The photo below shows a new bushing and one that was already working.
Purpose of the gearbox oil seal
All classic Lada car models, up to VAZ-2108, have rear-wheel drive. Starting from VAZ 2108 and higher, cars are driven by front-wheel drive. Everyone knows that a gearbox is a device through which torque is increased with its further transmission from the cardan to the rear wheels. All parts of the rear axle operate predominantly in an oil environment, which has a positive effect on the following factors:
- The service life of rubbing parts increases due to reduced wear.
- The heat generated by gear friction is removed.
- The friction force is reduced.
- The gears are cleaned from metal dust and shavings that are formed when metal parts come into contact with each other.
In order to transmit torque from the engine to the rear wheels, a cardan shaft is used, which is connected to the gearbox flange. An oil seal is installed on the flange axis to prevent lubricant from leaking out of the rear axle gearbox. When the cuffs wear out, oil stains and even puddles appear under the car, leaking outward. To avoid significant loss of oil in the rear axle of the VAZ 2107, the cuffs should be replaced in a timely manner when oil leaks are detected.
Checking the serviceability of the shank oil seal
The first sign that it is necessary to replace the shank oil seal on a VAZ 2107 is the presence of traces of lubricant, dust and dirt on the outer part of the rear axle. Determining the presence of leaks on the rear axle is not difficult. To do this, you need to climb under the car and inspect the bridge.
If the oil seal is worn significantly, a puddle of oil may be found under the car. If the problem is not resolved in a timely manner, oil may leak out of the bridge, which will lead to its rapid breakdown. Despite the fact that the cuff is a small part in a car, its serviceability plays a very important role.
What will be required when carrying out replacement work
To replace the device in question on a VAZ 2107 car, you will need a number of the following tools:
- Open-end wrenches for 13 and 24.
- Calipers.
- Screwdriver.
- Flange puller. This tool is not difficult to make yourself.
- Dynamometer or torque wrench.
After all the tools are ready, you can install the car on the inspection hole, since it is much easier to carry out work on replacing the cuff.
Step-by-step instructions for replacing the oil seal on a VAZ 2107
Replacing the rear axle oil seal of a VAZ 2107 with your own hands begins with the need to find the oil drain plug, which is located in the lower part of the axle, and unscrew it, thereby draining the oil.
It is important to know! If the oil has not been changed for a long time (mileage more than 60 thousand km), then it is necessary to replace it simultaneously with the work on replacing the oil seals.
After draining, you should immediately tighten the drain plug, which will avoid unintentional leakage after repair work. Further replacement steps are performed in the following order:
- Using a 13mm wrench, you unscrew the four bolts with nuts that secure the cardan to the gearbox flange. After unscrewing, you should move the cardan to the side and hang it with a rope or wire.
- The next step is to measure the tightening torque of the nut. You can determine the torque using a torque wrench or a dynamometer. A method for measuring the tightening torque of a nut using a dynamometer can be seen in the video. The second method, using a torque wrench, involves screwing in the nut and determining its tightening force. This nut will need to be tightened to the same torque after the seal is replaced.
- After the nut tightening force has been determined, you need to pick up a 24mm wrench and unscrew the nut. When unscrewing the nut, lock the flange to prevent it from rotating. You can lock the flange using a homemade key or a handy tool.
- The flange is being dismantled. You may need a bearing puller.
- Removing the old oil seal. We don't need the old cuff, so we can dismantle it with a screwdriver or the end part of an open-end wrench. The device should be pryed up and then removed from its seat. After removing the cuff, the location of the cuff should be thoroughly wiped with a cloth.
After this, all that remains is to screw the propeller shaft into place, and pour new oil into the gearbox to the bottom of the oil filler plug, then tighten the plug. At this point, the process of replacing the VAZ 2107 shank oil seal is completed, and you can check its serviceability.
We recommend watching:
- Tightening torque for the shank nut of the VAZ 2107
- Color code yellow green
- How hard should I tighten the connecting rods?
- Replacing the bearing of the rear axle gearbox of a VAZ 2107
- and there is an indicator for replacing the rear axle tail seal. You can easily repair such damage yourself.
Necessary tools for replacing oil seals:
If you decide to start replacing the oil seals yourself, prepare the following tools first:
- Screwdriver Set;
- Set of wrenches;
- Hammer;
- A small container for oil;
- A socket wrench or a 24mm socket;
- To unscrew the drain plug, take a hexagon;
- Two-jaw puller;
- Torque wrench;
- To fill the lubricant with a syringe;
- Jack;
- Body stands.
Important: all work on replacing oil seals on a VAZ 2106 should be done efficiently. Otherwise, any oversight and carelessness may lead to unpleasant consequences and lead to repair of the axle gearbox. If you doubt your abilities, it is better to contact the service. This way you will protect yourself from unnecessary costs and unexpected car repairs.
- ratchet crank;
- set of heads;
- twelve hexagon;
- two slotted screwdrivers;
- hammer;
- jack;
- wheel bolt wrench;
- mandrel for installing the oil seal;
- penetrating lubricant;
- container for collecting oil;
- torque wrench;
- digital or mechanical scales;
- fresh oil to the rear axle.
- We drive the car into the pit and unscrew the propeller shaft mounting bolts, having previously made a mark on the flank of the cardan and gearbox. After unscrewing the cardan, we tie it with a wire so that it does not interfere.
Using a special wrench, we secure the flange from turning and, using a wrench or a twenty-seven socket, unscrew the nut. The key for fixing the flange is shown in the photo below. You can also screw two universal joint mounting bolts into the flange and insert a powerful screwdriver between the bolts.
Nut tightening
Now the most important point is tightening the nut. To properly tighten the nut, you need to do the following preparatory work:
- hang up the rear of the car;
Remove the rear wheels and brake drums.
Tighten the nut until you feel a slight stop. Thus, we brought the bearings to the new spacer, but we had some play in the flange. He must be. This is normal with a new spacer. We tighten the nut 10-20 degrees and check the play. Tighten the nut until there is no play. Next, we check the force to break the flange using a digital scale. We insert the “ear” of the scale into the hole on the flange and pull it at a right angle. The breaking force should be within 1.5 kg. If the force is less than 1.5 kg, tighten the nut literally by degree and control the force.
The tightening torque of the nut should be from 12 to 26 kg/m when the required force is achieved. If, after eliminating the flange play, the force is significantly more than 1.5 kg, then you have received a defective spacer sleeve.
Next we reassemble:
- We fasten the cardan according to the marks;
- Fill in new oil (you need to pour oil with API GL-4/GL-5 approvals, volume 1.5 liters);
- We install brake drums and wheels.
The process of replacing the rear axle gearbox seal of a VAZ 2107 is clearly shown in this video:
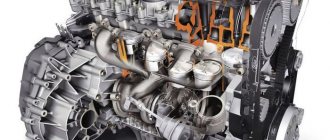
Engine
- Bolt for fastening the main bearing caps М10×1.25 68.31-84.38(6.97-8.61)*
- Oil pump mounting bolt MB 5.10-8.20 (0.52-0.85)
- Breather cover mounting stud M8 12.7-20.6(1.3-2.1)
- Breather cover mounting nut M8 12.7-20.6(1.3-2.1)
- Cylinder head bolt M8 31.36-39.10(3.20-3.99)
- Nut of the stud securing the inlet and outlet pipelines M8 20.87-25.77 (2.13-2.63)
- Connecting rod cover bolt nut M9x1 43.32-53.51 (4.42-5.46)
- Flywheel mounting bolt N110x1.25 60.96-87.42 (6.22-8.92)
- Chain tensioner shoe mounting bolt M10×1.25 41.2-51.0 (4.2-5.2)
- Bolt for fastening the head cover of the cylinder block MB 1.96-4.60 (0.20-0.47)
- Oil pump drive shaft sprocket mounting bolt М10×1.25 41.2-51.0(4.2-5.2)
- Camshaft sprocket mounting bolt М10×1.25 41.2-51.0(4.2-5.2)
- Spark plug M14x1.25 30.67-39.00 (3.13-3.99)
- Coolant pump mounting bolt M8 21.66-26.75(2.21-2.73)
- Nut for fastening the outlet pipe of the cooling jacket M8 15.97-22.64 (1.63-2.31)
- Crankshaft ratchet M20x1.5 101.30-125.64 (10.34-12.80)
- Generator bracket bolt M10×1.25 44.1-64.7(4.5-6.6)
- Generator bar mounting nut M10×1.25 28.03-45.27 (2.86-4.62)
- Nut of the bolt securing the generator to the bracket M12×1.25 58.3-72.0 (5.95-7.35)
- Nut securing the mounting bar to the generator M10×1.25 28.03-45.27 (2.86-4.62)
- Nut for fastening the front engine mount bracket M8 10.4-24.2(1.1-2.5)
- Nut securing the front support cushion to the cross member bracket M10×1.25 27.4-34.0 (2.80-3.46)
- Nut for fastening the cross member of the rear engine mount M8 15.0-18.6 (1.53-1.90)
- Nut securing the rear engine mount to the gearbox M8 28.3-28.8 (2.38-2.94)
- Nut securing the rear engine mount to the cross member M8 15.9-25.7 (1.62-2.62)
Cylinder head (cylinder head) bolt. M12×1.25:
Camshaft bearing housing stud nut M8 18.33-22.64(1.87-2.30)
Important nuances in work
- When driving the oil seal using a mandrel, do not overdo it. Apply gentle blows and control the depth of the oil seal. If you hit it hard, you can easily damage the oil seal;
- Before installing the oil seal, lubricate the rim and sealing edge with fresh oil;
- Before installation, inspect the flange for wear in the area where the sealing lip of the oil seal meets. If there is a “groove,” the flange must be replaced.
As you can see, the process of replacing the VAZ 2107 gearbox seal is quite simple and does not take much time. The most important thing in this job is to properly tighten the rear axle flange nut.
List of required tools
Set of wrenches
Attention: Unskilled replacement of the oil seal in the rear axle gearbox can lead to disassembly and repair of the entire axle gearbox, which is only possible in a workshop; the cost of the issue increases many times over. If you don’t know how to do it yourself, use the advice and help of a familiar specialist, or go straight to a service station.