The speed sensor (DS) is designed to obtain information about the number of revolutions transmitted from the gearbox to the drive wheels of the vehicle, followed by its conversion into an electronic signal and transmission to the electronic control unit (ECU). Only fuel-injected cars are equipped with DS. The predecessor of the speed sensor was a mechanical speedometer drive, which was equipped with all carburetor engines.
VAZ 2110 cars, depending on the year of manufacture, are equipped with different types of speed sensors. Older models are equipped with a mechanically driven sensor (rod and gear), new ones (after 2006) have a fully electronic design.
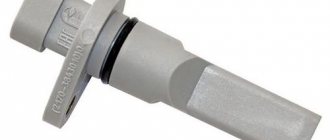
Electronic speed sensor
Replacing the speed sensor on a VAZ-2110, 2111, 2112
The speed sensor (DS) is designed to obtain information about the number of revolutions transmitted from the gearbox to the drive wheels of the vehicle, followed by its conversion into an electronic signal and transmission to the electronic control unit (ECU). Only fuel-injected cars are equipped with DS. The predecessor of the speed sensor was a mechanical speedometer drive, which was equipped with all carburetor engines. VAZ 2110 cars, depending on the year of manufacture, are equipped with different types of speed sensors. Older models are equipped with a mechanically driven sensor (rod and gear), new ones (after 2006) have a fully electronic design.
Electronic speed sensor
9.1.6 Removing and installing the speedometer drive
1. Support the rear wheels with wheel chocks, then jack up the front of the car and place it on stands. The speedometer drive is located at the rear of the transmission, near the differential entry point of the right drive shaft. Depending on the model configuration, the drive may have a mechanical (cable) design or be an electronic sensor. 2. On models with a cable-driven speedometer, remove the fastening pin and disconnect the cable from the drive gear. On other models, disconnect the associated electrical wiring.
Speed sensor malfunctions
Signs of a sensor malfunction may include:
- unstable operation and incorrect speedometer and odometer readings;
- cessation of stable engine operation at idle;
- errors generated by the computer (P0500 – no sensor signal, P0503 – intermittent sensor signal).
The problems listed above may result from:
- poor contact in the sensor connector due to contamination;
- violation of the integrity of the wiring from the sensor to the ECU;
- mechanical failure of the DS drive (in older VAZ 2110 models).
Do I need to change
Not only the speedometer and odometer readings, but also the quality of the fuel mixture supplied to the cylinders, the idle speed of the vehicle, engine stability and fuel consumption depend on the information received by the ECU from the sensor.
A failed DS will “confuse” the electronic unit, which simply will not understand whether the car is moving or standing still. As a result, the speed will begin to fluctuate, the engine will stall at idle, and fuel consumption will increase.
Checking a mechanically driven speed sensor is not difficult. On the removed sensor, we find the pin and turn it with pliers, having attached the connector to it in advance. If the speed sensor is working, the arrow on the instrument cluster will jump, if there is no reaction, then there is a problem with the drive or electrical wiring.
Checking the wiring to the instrument cluster is also not difficult, take a paperclip (you can use any other metal object) and insert it into the middle pin on the connector, then touch it to the engine housing, the arrow on the combination should twitch, otherwise you need to look for the cause in a wiring fault or sensor connector (oxidation, breakage, etc.).
Problems and their solutions
There are several common problems typical for the dashboard of the domestically produced VAZ 2110 model.
- The instrument panel lights on the VAZ 2110 do not light up. Check the contacts and the condition of the wiring that is responsible for the suspension. The fuses could simply have blown, or the light bulbs themselves could have burned out as a result of wear and tear or a short circuit. In fact, there can be many reasons, so it is not always possible to resolve the issue in a couple of minutes.
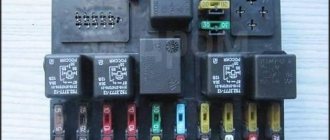
- The most serious failure for the instrument panel is a complete failure of the unit. In such a situation, all indicators stop working, the arrows fall down, and the warning lamps do not light up. To fix the problem, first check fuse 15, which is designated F6. You will find it on the mounting block. If this element is blown, simply replacing the fuse will not solve the problem. Look for the reason why it burned out. Usually this is a simple short circuit in the electrical network.
- The arrows jump up and down. This is also a common phenomenon, the cause of which in most cases is poor ground contact: This ground wire goes to the partition that separates the interior and engine compartment, from the instrument panel. To get to it, remove the radio from its seat. Check the quality of its fastening;
- Often, when installing an alarm system, the ground wire is moved to another location for more convenient access. Therefore, if you have an alarm system, but there is no wire under the radio, then look for it behind the interior trim near the driver’s left foot;
- The ground wire may be damaged when installing a new audio system. When the minus is connected, the mass is unscrewed and then often mounted back, only not as reliably as it was originally. Due to vibrations, collisions with bumps and holes, the fastening weakens and contact disappears. Hence the non-functional panel. Do not be lazy to properly wrap the bulk wire, since poor fastening is often explained by the inconvenience of performing this activity.
Problem with the instrument panel. To check if everything is fine with it, remove it as much as possible from the seat, but do not disconnect the wiring going to the pads. The white wire (X1) that goes to the first contact is checked. It would be a good idea to check the voltage on pins 10.9 and 6. During normal operation of the system, the device should give a reading of about 12 volts. Be sure to look at the back of the shield and make sure the conductive paths are intact. Cigarette lighter. It is not uncommon for the instrument panel on a VAZ 2110 to fail due to the cigarette lighter. You are probably no exception among drivers who connect all sorts of additional devices and devices through this socket. This is how many people charge their phones, connect tablets, video recorders and other equipment. By consuming a large amount of current, the devices damage the cigarette lighter or cause fuse F19 to blow. Because of this, the instrument panel turns off or does not work correctly. If the fuse is intact, simply disconnect the cigarette lighter connector. If such measures do not produce results, simply replace the fuse with a new one.
As practice shows, most problems associated with the failure of the dashboard can be solved independently. Especially when it comes to a car like the VAZ 2110.
But there is an important BUT. If you do not have minimal experience working with electronics and do not understand anything about electrics, we strongly do not recommend that you approach the dashboard wires
In this case, contact a service station, deal only with experienced auto mechanics and people who are well versed in automotive electricals
If you do not have minimal experience working with electronics and do not understand anything about electrics, we strongly do not recommend that you approach the dashboard wires. In this case, contact a service station, deal only with experienced auto mechanics and people who are well versed in automotive electrics.
Improve yourself
. Perhaps soon you will be able to change to a more expensive, modern car. Then solving the electronics problem will be much more difficult
The VAZ 2110 is an excellent simulator that allows you to carry out repairs yourself, understand the structure of the car, and experience all the delights of self-repair. It is important for any man to be able not only to drive, but also, if necessary, to repair his car.
Replacement price
If the breakdown is not due to dirty contacts or broken wiring, it is better to replace the sensor. Moreover, it costs 170-400 rubles, depending on the type and manufacturer. The cost of replacing it at a service station is 100-150 rubles.
Sensor part numbers:
- with mechanical drive - 2110-3843010F;
- electronic (new) - 2170-3843010.
When choosing a DS, pay attention to where it was manufactured. If a mechanically driven sensor requires replacement, under no circumstances buy Asian analogues - the drive gear is made of very low quality plastic. It happens that it breaks on the third day of use. In this case, you will have to disassemble the entire box to remove its fragments.
It is better to purchase a sensor with an all-metal drive.
Peculiarities
The speed counting system of the 09–99 family has several design features. They are connected to the dashboard of these cars. Over the years, manufacturers equipped these models with 3 types of panels. It is especially important to understand their nuances. The choice of components when replacing faulty parts depends on them.
Low
This dashboard was the first modification. One of its features is the absence of a tachometer. As for the speedometer, its system is completely mechanical. It works due to transmission rotation from a mechanical drive, through a flexible shaft to the speedometer itself.
Cars with a low panel were equipped with flexible shafts (cables) 80 centimeters long. The drive gear is also different. It has 8 teeth, which is 4 less than the tall panels. The correct calculation of the speed of movement depends on the number of teeth on the gear.
High
The high panel replaced the low one. The main difference is the absence of a voltmeter and the presence of a tachometer.
The speedometer system remains the same - mechanical. The difference from cars with a low panel is the length of the speedometer cable, it is 1 meter. It also uses a longer drive rod and changes the number of teeth from 8 to 12. This is a significant difference.
Europanel
This panel is already equipped with injection models of the VAZ-2109. Its peculiarity is the complete absence of mechanical drives. The speedometer system is also modernized. Now the mechanical drive has been replaced by a magnetic sensor, a flexible shaft, electrical wires, and the drive of the speedometer itself has become electronic. Complete difference from carburetor models. The work is carried out without gear rotations, which has significantly reduced the percentage of errors in calculations.
Before you figure out why the speedometer does not work, you need to understand the principle of its operation on cars with different layouts.
Replacement
The process of replacing a diesel engine is very simple, and even the most uninitiated car owner can cope with it.
- key to 21;
- key to 10;
- crosshead screwdriver.
Execution procedure for VAZ 2110 with drive sensors.
1.Raise the hood, disconnect the “-” terminal on the battery.
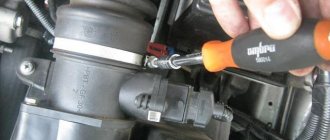
2. Determine the location of the sensor. For both old and new models, it is located on the back of the engine at the top of the gearbox.
3.If necessary, use a screwdriver to loosen the corrugation clamp, remove it, and move it aside.
4.Squeezing the antennae on the sensor connector, disconnect
5.Use your hands or using a 21 wrench to unscrew the sensor.
6.Using a 10mm wrench, unscrew the nut securing the DS drive and carefully remove it.
7.If the drive is in order, you can leave the old one, but if it has traces of mechanical stress, we replace it.
8. Having installed the drive, install a new sensor by screwing it clockwise.
9.Connect the connector, connect the corrugation, and the negative terminal.
Changing the electronic sensor
1.De-energize the vehicle's on-board circuit.
Mechanics
The following diagram shows exactly how the speed sensor is designed.
Speed sensor for VAZ-2112
- 2110-3843010-13 – sensor;
- 2110-3843010-18 – sensor;
- 2108-3802820-10 – speedometer drive;
- 2101-3802718 – gasket;
- 2108-3802822 – drive housing;
- 2108-3802830 – sealing ring;
- 2108-3802834-20 – driven gear;
- 2108-3802833-20 – drive gear;
- 2101-3802717 – washer;
- 15896211 – M6 nut;
- 12601271 – wavy washer;
- 11500121 – pin M6x14.
Elements 1 and 2 are interchangeable.
Dismantling
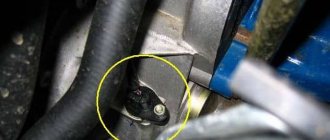
To remove the sensor from the car, you need to disconnect its connector. The sensor housing is fixed near the CV joint - the desired point is shown by an arrow.
First step in dismantling
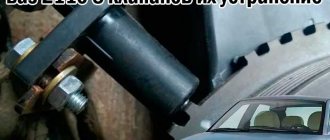
When the connector is disconnected, take a flat key “22” and unscrew the plastic nut. Then you can change the sensor or repair it.
What you need here is a flat key
To replace the sensor drive, use a “10” key to unscrew the M6 nut and remove it together with the washer. The drive housing is rocked from side to side - you need a 14mm spanner.
How to change the speed sensor on a VAZ 2110
Any car is equipped with a system that shows the speed of movement and mileage (distance traveled). It is the speedometer, which is a device for determining instantaneous speed, that makes it possible to find out what the maximum speed of the VAZ 2110 is.
Speed sensors are installed only in fuel-injected cars; where carburetor engines are present, they are not present. This device is responsible for the supply and consumption of fuel, setting the ignition timing, and monitors the quality of the combustible mixture. All data is transmitted to the electronic control unit, which controls the injector.
Before the advent of sensors, mechanical speedometer drives were installed on each carburetor engine. On VAZ 2010 cars produced before 2006, mechanical drives are installed. Newer cars manufactured after 2006 are equipped with electronic sensors.
repair of gearbox differential on VAZ 2108, VAZ 2109, VAZ 21099 cars
1. Remove the differential (Fig. 5.12) from the gearbox (see “Disassembling the gearbox and troubleshooting its parts”).
2. Turning 90° around the pinion axis, remove the side gears from the differential housing.
3. Remove the retaining ring from the pinion shaft.
4. Remove the pinion axle and two pinions from the differential housing.
5. Remove the bolts securing the driven gear to the differential housing.
6. Press the driven gear off the differential housing. 7. Inspect the working surfaces of the satellites, the axes of the satellites, side gears and the spherical surfaces of the differential housing in contact with them. Remove small irregularities with fine-grained sandpaper. Replace parts with significant defects.
8. Check the condition of the transmission driven gear. If there are chips, chipping or significant tooth wear, replace the driven gear. On VAZ 2108, VAZ 2109, VAZ 21099 cars, final drive gears with different gear ratios are installed. The number of teeth of drive gear 1 and the number of teeth of driven gear 2 are stamped on the driven gear.
WARNING The final drive gears are selected in pairs at the factory based on noise and contact patch. Therefore, when replacing the driven gear, also replace the drive gear: the driven and drive gears are sold as a pair. To check, count the number of teeth on the drive gear.
9. Inspect the bearing seats on the differential housing. If these areas are significantly worn out, replace the differential housing. If there is pitting (sinks) on the raceways and rolling elements, traces of indentation of the rolling elements on the raceways, or damage to the cages, the bearings must be replaced.
10. To replace the differential bearings, use a puller to press the bearings off the differential. In this case, the bearings are destroyed. Then…
11.... press out the outer rings from the gearbox and clutch housings with a special puller. If there is no puller, press out the axle seals first. Please note that in this case the seals are damaged and the seals must be replaced (for more details, see “Replacing gearbox seals”). Press out the bearing rings from the outside of the crankcases with a punch.
12
Please note: there may be an adjusting ring under the ring installed in the gearbox housing, which must be re-selected before pressing in new rings (see “Selecting a differential bearing adjusting ring”)
13. If it is necessary to replace the speedometer drive gear, you can press the bearing (without destroying the bearing) using two screwdrivers, applying force to the inner ring of the bearing. The gear will be destroyed, but the gear still needs to be replaced.
14. Assemble the differential in the reverse order of removal, having first lubricated all parts with transmission oil. In this case, the driven gear is installed with the teeth marked outward.
Rice. 5.12. Gearbox differential of VAZ 2108, VAZ 2109, VAZ 21099: 1 - speedometer drive drive gear; 2 — satellite; 3 — semi-axial gear; 4 — driven gear of the main gear; 5 — satellite axis; 6 — differential housing; 7 — differential bearing
Speed sensor VAZ 2110 16 valves signs of malfunction
Damage may occur:
- the presence of interruptions in operation, false data in the readings of devices for determining speed and measuring the number of wheel revolutions;
- lack of stable engine operation at idle;
- a lit Check Engine light on the dashboard;
- stopping the computer from issuing errors about the absence or interruption of sensor signals (P0500 and P0503).
These problems arise for various reasons: the sensor connectors are dirty, the contact or integrity of the wire connecting the computer to the sensor is broken.
Description of DS
As we have already said, the main purpose of the speedometer drive sensor is to accurately determine the speed of the vehicle. Thanks to this device, the model can always know at what speed his car is moving. As for the varieties, DS can be of the contact or non-contact type. Today, most of our compatriots prefer contactless options. Contact DS, despite all the advantages, have one significant drawback - they are prone to contamination, which in turn will lead to inaccuracy of the displayed readings.
Design and principle of operation
Structurally, according to the diagram, this part consists of:
- speedometer drive;
- housings;
- as well as the controller itself with a connector for connecting to the on-board network.
As for the principle of operation, it is based on measuring the frequency level of signals from the controller, which is located on the gearbox housing or transfer case. At the output of the device, while driving, rectangular pulses are formed, the minimum value of which should be at least 1 volt, and the maximum value should be at least 5 volts.
According to international standards, the controller must generate about 6 thousand such pulses over one kilometer. The pulses themselves are subsequently converted into current, which is measured by a magnetoelectric device. It should be noted that the current value directly depends on the number of signals supplied per certain unit of time. That is, this value will be directly proportional to the speed of the vehicle.
In addition, thanks to the electronic circuit installed in the dashboard, the operation of the stepper motor is ensured by counting incoming signals. The latter is designed to rotate the counter reels, after which it displays the relevant information on a small screen, where the total and daily mileage of the car is shown. If we are talking about daily mileage, then this value can be reset to zero if necessary.
Symptoms of a problem
If the DS for some reason fails, this will lead to the control unit being unable to determine the speed of movement. However, this is not the only problem, since malfunctions in the performance of the power unit may also occur.
We suggest that you familiarize yourself in more detail with the signs of a malfunction, by which you can determine the failure of the DS:
- the speedometer on the dashboard has either stopped working altogether or displays incorrect readings;
- malfunctions appear in engine operation, in particular at idle speed;
- fuel consumption increased;
- engine performance has deteriorated, the power unit cannot reach the required speed;
- the engine may stop spontaneously while idling, in particular when the driver tries to press the clutch to change gear;
- if the car is equipped with an on-board computer, a Check indicator may appear on the dashboard;
- if the car is equipped with an electric power steering, this unit may also fail;
- in some cars, for example, Lada Kalina, failure of the diesel engine can also lead to increased sensitivity of the fuel level controller in the gas tank (the author of the video is the Autoelectrics HF channel).
https://youtube.com/watch?v=qiDmZLUuTMI
As for the reasons, as a rule, they are caused by damage to the car's electrical wiring, so checking the functionality should begin with diagnosing the condition of the contacts and electrical circuits. Perhaps the problem lies in oxidized or dirty contacts, so they will need to be cleaned and treated with a lubricant, for example, Lithol. A broken wiring should be looked for first of all near the connection connector, since in this place the wires are bent and usually frayed.
Also, the cause of the malfunction may be a violation of the integrity of the wiring insulation in the area where the exhaust manifold is installed. At elevated temperatures, the insulation may melt, causing the device to short out. Also, the DS may transmit incorrect readings due to a worn speedometer cable. Over time, cracks and tears form on it, which contributes to the failure of the controller.
Is replacement always necessary?
The information transmitted by the speed sensor to the ECU is very important; the readings of the instruments discussed above depend on it.
This information also affects the quality of the fuel mixture supplied to the cylinders, the idle speed, the stability of the engine and the amount of fuel consumed. If the sensor malfunctions, the electronic unit will not be able to determine whether the car is moving or stationary. In this case, floating speeds are observed, the engine begins to stall, and fuel consumption will become much higher.
Carrying out a vehicle inspection is available to every car enthusiast. To find a fault, you need to know where exactly it is located in the VAZ-2110. The sensor is located in the engine compartment under the hood, in the engine compartment. Nearby is the exhaust manifold (and on the VAZ-2112 there are 16 valves, it is located in the upper part of the gearbox, fully visible and accessible from the engine compartment).
The wires rub against the commutator and this can cause damage. Sometimes it is sufficient to isolate them and position them so that there is no contact with the collector.
Don’t forget about a broken cable, which can cause a breakdown. If this problem is absent, then you need to look for it in the sensor itself or in its drive.
To successfully replace the VAZ-2110 speed sensor, the speedometer's functionality is first restored.
Why does the speedometer break?
It is worth noting that in some cases it is not difficult to repair the speedometer yourself.
In others, you will need the help of specialists. Thus, oxidation of contacts is considered a fairly easy to fix fault. It is characterized by the “jumping” of the arrow, despite the fact that the speed of movement remains stable. The problem is resolved by cleaning the contacts.
The wires are frayed. This reason can be suspected by the chaotic movement of the needle when starting the engine. Meanwhile, experts note that sometimes the problem does not manifest itself for a long time. It can be identified using a tester.
Sensor failure. A speed control device whose performance is questioned is replaced with a known good one. If the speedometer begins to function normally after this procedure, then there is no point in further looking for damage. Often sensors become unusable after their housing is destroyed and water or dirt gets inside.
Connectors. They are located in the VAZ-2110 in a place where they are constantly exposed to dirt. As a result, the contact is broken and the speedometer needle moves chaotically. The connectors must be completely cleaned and the connection must be checked for reliability.
Often the speedometer also begins to malfunction due to shaft wear. In this situation, it will be possible to get rid of the problem only after completely replacing the above-mentioned part.
How much does a replacement cost?
If the wiring and contacts are in order, the sensor must be replaced. Its cost varies from 170 to 400 rubles. They will also charge a little for a replacement, from 100 to 150.
To purchase, you need to know the sensor numbers in the catalog. Part number 2110-3843010F corresponds to a mechanically driven sensor, and number 2170-3843010 corresponds to an electronic one. It is advisable to choose sensors with the designations “–”, “A”, “+”, and not 1, 2, 3, this will help you make the pinout faster. It is necessary to pay attention to the manufacturer so as not to purchase a low-quality product. The drive must be completely metal.
Every measuring device has an error
This is an immutable rule of metrology. Absolutely every device can lie, not just the one located in the car. For example, any pilot will tell you that airplane instruments regularly do not show the truth, so they have to take into account various corrections to the instrument readings. Otherwise, pilots simply will not be able to be confident in the reality of the values.
Therefore, the question will not be whether the devices deceive people in principle, but what is their error? How important is this for the driver? Should this be taken into account? If yes, then how? Most people do not need abstruse formulas and diagrams, and those who still need it can easily find it on specialized sites
Any more or less attentive driver has noticed at least once that on trips, especially long ones, there are always inconsistencies. You can find a simple and understandable explanation for this, without unnecessary details that are of little interest to anyone, such as mathematical formulas and complex calculations based on them
However, first of all, we need to discuss a few points that are considered common to everyone.
Step-by-step replacement of the VAZ-2110 speed sensor with 8 and 16 valves
In order to change the speed sensor yourself, it is enough to have two or three keys (10, 21, 22) and a Phillips screwdriver on hand.
- The current in the car is turned off; to do this, remove the connector from the battery.
- The wire connector is disconnected from the sensor; it is recommended to remember the pinout.
- The sensor can be unscrewed manually, or using keys 21 or 22 (depending on the design).
- The condition of the drive is studied. After the sensor is removed, using a 10mm wrench, unscrew and remove the nut that secures the sensor drive.
- A drive with mechanical damage must be replaced; if there is none, you can leave it the same.
- Installation of a new device should be done in reverse order.
- The new drive has a rubber attachment that needs to be lubricated with transmission oil.
- After installation, it is recommended to check the polarity of the wires using a multimeter. If the contacts are suddenly mixed up, they are swapped.
- It remains to be checked. This is done either with the car running or with the wheels suspended.
Causes of breakdowns
The causes of breakdowns are usually associated with mechanical damage to one of the drive parts, but some malfunctions can occur due to contamination or lack of lubrication. The main manifestations and signs of a malfunction will help you diagnose the specific cause of the breakdown.
- If the arrow lies at zero and does not respond to acceleration, then, most likely, a broken drive cable is to blame for the breakdown. In this case, it will have to be replaced. However, such a malfunction can also be caused by other reasons, for example, a loosening of the nut securing the flexible shaft to the speedometer. In this case, a simple tightening of the nut will “cure” the speedometer needle from its vagaries.
- The speedometer making a knock may be due to dirt getting into the socket for attaching the flexible cable to the transmission secondary shaft, or to loosening of the fastening. In such a situation, it is necessary to inspect the seat of the drive gear to the drive shaft and eliminate the cause of the breakdown.
- The operation of the speedometer needle with an uncharacteristic sound is most often associated with a lack of lubrication of the flexible cable and, accordingly, its additional friction. Such a malfunction can be “treated” simply - the cable is coated with lubricant, after which the malfunction is eliminated.
- Cases when the speedometer needle goes off scale and lies motionless in this position are associated with a rupture of the opposing spring in the drive shaft. In this case, the drive changes completely.
- The high error in speedometer readings is associated with incorrect attachment of the flexible cable to the secondary shaft of the gearbox, which is why the speedometer receives incorrect impulses and, accordingly, rotation data. This problem can be corrected by adjusting the cable fastening.
Problems with the speedometer are not always associated with drive failure. For example, a malfunction of the electric motor of an electromechanical speedometer will also lead to malfunction of the device. To check the operation of the drive, you need to start the car, first hanging one wheel and supporting it so that when you engage the gear, the car does not move spontaneously. If in this case the drive rotates, then the problem is associated either with a malfunction of the speedometer itself or with a break in the drive cable. Otherwise, the drive is to blame and will have to be replaced.
Replacing the electronic sensor
The onboard circuit is de-energized, the clamp is loosened and the corrugation is removed. Then the wires from the speed sensor are disconnected and the latch is removed. Next, using a 10mm wrench, unscrew the nut that secures the sensor.
The old sensor is replaced with a new one, the nut is tightened, the corrugation is connected, and the ground terminal is connected.
After this, the engine should begin to operate in its usual mode, which means that the replacement of the VAZ 2110 speed sensor was successful and normal operation of the devices has been resumed.
Source
Principle of operation.
The principle of operation of the VAZ 2110 speed sensor is based on the Hall effect: by transmitting electrical impulses (in VAZ cars, by the way, only 6 such impulses are used) to the ECU, the sensor informs it about the rotation speed of the driving rollers of the machine, on the basis of which the control unit not only acts to the speedometer needle/mileage display, but also monitors engine operation by sending the necessary signals to the idle speed controller and throttle position sensor.
Speed sensor on a VAZ 2110 - how to determine the fault, replace it yourself
The speed sensor (DS) is designed to obtain information about the number of revolutions transmitted from the gearbox to the drive wheels of the vehicle, followed by its conversion into an electronic signal and transmission to the electronic control unit (ECU). Only fuel-injected cars are equipped with DS. The predecessor of the speed sensor was a mechanical speedometer drive, which was equipped with all carburetor engines.
VAZ 2110 cars, depending on the year of manufacture, are equipped with different types of speed sensors. Older models are equipped with a mechanically driven sensor (rod and gear), new ones (after 2006) have a fully electronic design.
Device
In this case, the instrument cluster on the VAZ 2110 includes:
- Tachometer;
- speedometer;
- Fuel level indicator;
- Coolant temperature gauge;
- Indicator lamps in the amount of 12 pieces;
- 6 instrument panel suspension lights;
- Reserve socket for control lamp;
- A pair of terminals for connecting wires.
We must add that the red block on the electrical diagram is designated X2, and the white block is marked as X1. Therefore, it will no longer be possible to confuse them. If you remember, of course.
As for the instrument panel, two types are used for the VAZ 2110 model.
It all depends on the year of the car as there is an old version and an updated version.
- In old panels, devices are located symmetrically.
- The new instrument panel is characterized by two indicators being shifted to the right side - the coolant temperature and the fuel level in the tank.
Before you begin to solve the problem yourself, we recommend that you familiarize yourself with the pinout of the instrument panel
and VAZ 2110. In other words, you need to understand where which wiring leads, what it is intended for, what fuses are available, and so on.
All this can be easily found out using the information from the instruction manual. Having such visual literature at hand and the car in front of your eyes, you can correct typical dashboard faults without the help of specialists and special knowledge in electronics.
Symptoms of a problem
Typical signs of a malfunctioning speed sensor on a VAZ 2110 car are as follows:
- unstable operation and incorrect speedometer and odometer readings;
- cessation of stable engine operation at idle;
- errors generated by the computer (P0500 – no sensor signal, P0503 – intermittent sensor signal).
The problems listed above may result from:
- poor contact in the sensor connector due to contamination;
- violation of the integrity of the wiring from the sensor to the ECU;
- mechanical failure of the DS drive (in older VAZ 2110 models).
When is diagnostics needed?
Due to the limited number of pulses and for many other reasons (motor oil, dirt has gotten on the sensor, contacts or wires located near the speed sensor have oxidized, there is mechanical damage to the part, etc.) in the “tens” it is often possible to observe flaws in the operation speedometer or its complete inoperability. At the same time, most often, problems arise when coasting at idle and the “CHECK” system lamp turns on (error code “24”). Be that as it may, any of the mentioned signs requires the car owner to mandatory diagnose the speed sensor, because the causes of malfunctions may lie in it, or they may lie in a completely different place.
Do I need to change it?
Not only the speedometer and odometer readings, but also the quality of the fuel mixture supplied to the cylinders, the idle speed of the vehicle, engine stability and fuel consumption depend on the information received by the ECU from the sensor.
A failed DS will “confuse” the electronic unit, which simply will not understand whether the car is moving or standing still. As a result, the speed will begin to fluctuate, the engine will stall at idle, and fuel consumption will increase.
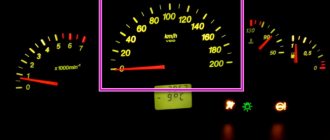
Checking a mechanically driven speed sensor is not difficult. On the removed sensor, we find the pin and turn it with pliers, having attached the connector to it in advance. If the speed sensor is working, the arrow on the instrument cluster will jump, if there is no reaction, then there is a problem with the drive or electrical wiring.
Checking the wiring to the instrument cluster is also not difficult, take a paperclip (you can use any other metal object) and insert it into the middle pin on the connector, then touch it to the engine housing, the arrow on the combination should twitch, otherwise you need to look for the cause in a wiring fault or sensor connector (oxidation, breakage, etc.).
Niva Chevrolet speedometer does not work
Modern cars have a large number of sensors that correct the operation of the car. And they are all very strongly interconnected. If the Chevrolet Niva speedometer does not work, then there may be several reasons for this, ranging from the speed sensor to the electronic control unit. This, in turn, can lead to improper engine operation, increased fuel consumption and other problems. Therefore, a non-functioning speedometer is not only a problem with traffic control, but also a possible cause of major malfunctions. This means that it is urgent to diagnose the car.
In the Niva Chevrolet, the speedometer needle is driven not by a cable, as on old cars, but by an electronic control system, which is controlled by a magnetic sensor. The speedometer needle is an ammeter driven by the difference in current transmitted by the sensor.
If, as a result of diagnostics, a problem is identified with the instrument panel, then in most cases it may require a complete replacement, since it is non-repairable and its components are located on one board.
The speed sensor transmitting the impulse to the instrument panel is installed on the transfer case. These signals are transmitted to the ECU, where they are processed, engine parameters are read and transmitted to the instrument panel.
It is quite simple to determine problems in the operation of the speedometer: these are inflated indicators, for example, when a car shows clearly inflated speed indicators, the needle twitches during uniform movement or does not rise from the zero mark.
There are several main reasons that can affect the operation of the speedometer:
- Mechanical damage to the instrument panel
- Damage to wiring or contacts
- Short circuit
- Speed sensor failure
- ECU failure
Some problems can be determined by connecting an OBDII sensor to the panel
If problems with the speedometer are accompanied by a Check Engine error, then in this case the problem will be related to the ECU. By checking it with a sensor, you can most likely detect error 0500.
First, you should conduct a self-diagnosis of the instrument panel. To do this you need to follow a few simple steps:
- Turn off the ignition and hold down the button to reset the daily mileage
- Hold the button to turn on the ignition
- Release the button
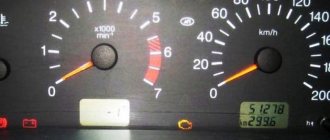
- If the instrument panel is working properly, then the instrument arrows should rise to the maximum division and return to their original position.
If the speedometer needle does not move or there are malfunctions in their operation, then the problem is in the instrument panel. You should disconnect it and check the condition of the contact blocks. It is possible that during operation due to vibrations, the contacts in the block became disconnected from the common bundle to the instrument panel.
Pin 9 is used to connect the speedometer. In some cases, for example, when repairing an instrument panel, it may be installed skewed, which may subsequently affect the operation of the system.
If these steps do not help, then you need to check the contact block on the speed sensor. To do this, you need to install the car on an inspection hole or overpass. It is located at the bottom of the transfer case and water and reagents used to treat roads can get on it.
After this, you need to check the wires leading from it to the speed sensor. The wire may fray or suffer other mechanical damage. The car body carries a negative charge - mass. And if the wire sheath is damaged, a short circuit may occur.
It is also necessary to pay attention to its condition. It is often made not only in a metal case, but also in a plastic one, which encloses a core with a winding and a rotor
Depending on the rotation speed, the level of current generated and, accordingly, the position of the speedometer needle depend.
This element is not repairable, since it is enclosed in a solid body. Therefore, if malfunctions occur, it must be replaced. You can check its performance using a multimeter. Before doing this, you need to remove it:
- The terminals are disconnected from the sensor
- The sensor is unscrewed
- An inspection and assessment of its condition is carried out.
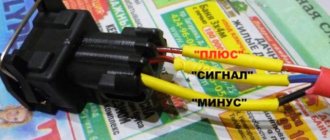
- There are three terminals suitable for the sensor: minus, plus and central pulse. When checking, the multimeter is connected with a negative probe to ground, and a positive one to the central connector
- A tube is placed on the sensor roller and the multimeter is switched to minimum measurement mode
- Using the tube, the sensor rotates, and if it is working properly, the multimeter should show deviations from the rest state.
If the multimeter does not show the operation of the element being measured, it means that it is faulty and requires replacement.
How to check the speed sensor of a VAZ 2110?
There are only 3 ways to check the tens speed sensor. One of them involves the use of a control lamp, the other two are based on a circuit.
But before moving on to any of them, make sure that there is grounding and voltage on the contacts; to do this, disconnect the electrical connector from the sensor by simply squeezing the “antennae” and removing the chip, and ring each of them. One of the contacts should show a voltage of 12V. If everything is fine with the power supply, proceed directly to the diagnosis itself.
How to remove the tidy
First, disconnect the negative terminal of the battery. Then use a screwdriver to unscrew the 4 screws (photos 1 and 2) to remove the frame with glass.
None A little test:
- If you connect the battery and turn on the ignition, the orange cord (connectors X1 and X2) should receive voltage “+12”;
- The presence of “ground” at terminal X2-2 is also a very important indicator;
- The gray cord (terminal X2-9) is usually called “+12”, and in rare cases - “ground”. When moving, pulses should appear at this terminal.
Sometimes they do this: they make a tap from terminal 9, and, without engaging the gear, move (push) the car. The engine remains switched off. Pulses will appear on the tap, detectable even with a voltmeter. The voltmeter itself must be a pointer type.
How much does it cost to replace a speed sensor on a VAZ 2110?
If the breakdown is not due to dirty contacts or broken wiring, it is better to replace the sensor. Moreover, it costs 170-400 rubles, depending on the type and manufacturer. The cost of replacing it at a service station is 100-150 rubles.
Sensor part numbers:
- with mechanical drive - 2110-3843010F;
- electronic (new) - 2170-3843010.
When choosing a DS, pay attention to where it was manufactured. If a mechanically driven sensor requires replacement, under no circumstances buy Asian analogues - the drive gear is made of very low quality plastic. It happens that it breaks on the third day of use. In this case, you will have to disassemble the entire box to remove its fragments. It is better to purchase a sensor with an all-metal drive.
Video.
Schematic electrical diagrams, connecting devices and pinouts of connectors
The speed sensor is an element of the vehicle's electronic control system. It depends on its readings how much fuel will be supplied, how much air will bypass the throttle valve when idling, and what the speedometer readings will be.
The speed sensor of a VAZ car is based on the use of the Hall effect, that is, a stream of pulses is transmitted from the device to the car's ECU, the frequency of which is proportional to the speed of the car. Auto electronics, analyzing incoming data, selects the required idle speed and sends a signal to a device that regulates the engine idle speed, which optimizes the composition of the air-droplet mixture entering the combustion chamber, bypassing the throttle valve.
During a distance of one kilometer, the speed sensor transmits over 6000 pulses to the ECU. Based on the parameters of the time analysis of inter-pulse signals, the on-board computer transmits data to the dashboard, thereby determining the speedometer readings.
As in many other cars, the VAZ speed sensor is located in the upper part of the gearbox housing, not far from the engine oil level dipstick. You can get to it from two sides: from above, by opening the hood and disconnecting the adsorber, and from below, using the inspection hole for convenience.
Step-by-step instructions for replacing the speed sensor on a VAZ 2110
The speed sensor on VAZ 2110 cars comes in two types:
- with mechanical drive
- and electronic
Next we will look at the replacement process for both of these types:
How to replace the speed sensor on a VAZ 2110 with a mechanical drive
- In order to replace the speed sensor on a VAZ 2110 with a mechanical drive, perform the following steps:
- Raise the hood and disconnect the “-” terminal on the battery.
- Determine the location of the sensor. For both old and new models, it is located on the back of the engine at the top of the gearbox.
- If necessary, use a screwdriver to loosen the corrugation clamp, remove it, and move it away
- Squeeze the antennae on the sensor connector and disconnect
- Unscrew the sensor by hand or using a 21 wrench.
- Using a 10mm wrench, unscrew the nut securing the DS drive and carefully remove it.
- If the drive is in order, you can leave the old one, but if it has traces of mechanical stress, we replace it.
- Having installed the drive, install a new sensor by screwing it clockwise.
- We connect the connector, connect the corrugation, the negative terminal.
- Let's check.
How to replace an electronic speed sensor on a VAZ 2110 step by step instructions
- To replace the electronic speed sensor with tens, do the following:
- We de-energize the vehicle's on-board circuit.
- Using a screwdriver, loosen the corrugation clamp and remove it.
- We disconnect the wires from the DS by moving the latch.
- Using a 10mm wrench, unscrew the sensor mounting nut.
- We remove the old sensor, install the new one, tighten the nut.
- We connect the corrugation.
- Connect the ground terminal.
What else is the reason for the speedometer not working?
However, often the reason for the speedometer malfunction lies elsewhere:
- Oil and dust get into the speed sensor, which is located in the engine compartment under the hood of the car.
The malfunction is eliminated after removing dirt and oil by washing the sensor. If the DS fails and needs to be replaced, any car owner can perform this simple operation independently. The replacement sequence is as follows:
- place the machine on a flat horizontal surface;
- open the hood and find the speed sensor on the gearbox;
- by pressing the latch bracket, the plug is disconnected from the DS:
- to remove the sensor, use a 22 mm wrench, turning it counterclockwise;
- The new part is installed by screwing it in by hand. The use of a wrench is not recommended, as you may miscalculate the rotation and break the thread;
- install the connector, as evidenced by the click of the fixed part.
The driver should buy a new DS with similar markings. Otherwise, the speedometer needle will display incorrect readings.
- For some unknown reason, the VAZ 2110 speedometer stopped working. First of all, you need to check the most accessible elements associated with the speedometer. Since the car compartments are not ideally clean, dirt and moisture can damage any part, including wires and contacts.
Under the influence of moisture and dirt, wires and contacts can oxidize. Eliminating this cause is simple: the contacts must be removed, cleaned of oxidized deposits, wiped dry and reinstalled. It is also necessary to check the integrity of the wires.
Externally good wires may have broken sections of cores inside. Checking the serviceability of the wires involves ringing their surface with a tester.
During operation, the splines and elements that rotate the speedometer cable may be damaged. Such a defect may impair the operation of the instrument panel. You can verify its serviceability by testing it.
- The third, very important defect is the malfunction of the speed sensor. This device is located on the gearbox, adjacent to the exhaust manifold. This factor leads to heating and chafing of the DC wires.
The reasons for the sensor being out of working condition, the fault can be determined at the service center. The technician will perform this procedure in the presence of the car owner. To troubleshoot the problem yourself, you should do the following:
- The speed sensor must be removed by unscrewing it from the gearbox;
- connect the DC wire to a screwdriver or drill, set the rotation counterclockwise;
- turn on the ignition.
The movement of the arrow indicates that the sensor is working properly. The weak link is most likely located in the vehicle's transmission. It is difficult for a driver without experience to cope with this task.
In this case, the problem must be solved by car service specialists. If the speedometer needle on a VAZ 2110 does not work, the speed sensor must be replaced.
The speedometer on a VAZ 2110 with an injector is an important element of any car, not excluding the “top ten”. VAZ 2110 drivers even with little experience can check and find the source of the malfunction of this device.
However, if you cannot determine the source of the speedometer problems, you need to draw the attention of technical service specialists to this problem.
As you know, devices installed in a car allow you to monitor the situation while driving on the streets and monitor the operation of the engine and all other systems. Among others, the speedometer occupies a special place. It is located on the dashboard directly above the steering wheel. With its help, the driver finds out at what speed the car is moving.
In a situation when the speedometer and the injector installed on the VAZ-2110 do not work properly, the person behind the wheel puts both his own health and the lives of passengers at risk. At the same time, he can easily “earn” a fine from a traffic police officer for speeding too high. Thus, a working speedometer allows you to avoid a considerable amount of trouble.
Pinout DS 2109, 2110, 2112, 2114, 2115
If you understand how to connect the speed sensor, then there is the following pinout that you should follow. At the same time, it is important to understand the essence of the operation of the DS to study the circuit diagram of the sensor, which is attached to this article.
The factory speed sensor of VAZ cars is manufactured with some differences in connections to the block connector. The square-shaped connector is used in Bosh electronics systems. The circle-shaped connector is used in electronic systems such as January 4 and GM.
When connecting a sensor, you should choose devices with contact group digitization such as “-”, “A”, “+” (internal designation on the block contacts) instead of digital designations such as “1”, “2”, “3”. In addition, preference should be given to devices with a metal-type rod, since plastic rods are very short-lived.