After installing the new device, you need to return the air pipe to its place.
After replacing the device, all signs of its malfunction disappear. Thus, it is not difficult to change the speed sensor on Kalina. Even a novice car enthusiast can handle this, thereby saving on visiting a service station.
Video “Replacing the speed sensor”
This video demonstrates how to replace a speed sensor with your own hands (the author of the video is Alexandr V).
Schematic electrical diagrams, connecting devices and pinouts of connectors
The speed sensor is an element of the vehicle's electronic control system. It depends on its readings how much fuel will be supplied, how much air will bypass the throttle valve when idling, and what the speedometer readings will be.
The speed sensor of a VAZ car is based on the use of the Hall effect, that is, a stream of pulses is transmitted from the device to the car's ECU, the frequency of which is proportional to the speed of the car. Auto electronics, analyzing incoming data, selects the required idle speed and sends a signal to a device that regulates the engine idle speed, which optimizes the composition of the air-droplet mixture entering the combustion chamber, bypassing the throttle valve.
During a distance of one kilometer, the speed sensor transmits over 6000 pulses to the ECU. Based on the parameters of the time analysis of inter-pulse signals, the on-board computer transmits data to the dashboard, thereby determining the speedometer readings.
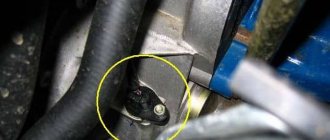
As in many other cars, the VAZ speed sensor is located in the upper part of the gearbox housing, not far from the engine oil level dipstick. You can get to it from two sides: from above, by opening the hood and disconnecting the adsorber, and from below, using the inspection hole for convenience.
List of main faults
Signs of failure of the sensor we are considering are quite easy to determine. Even a novice owner of Kalina can cope with such a “task”.
Symptoms include the following:
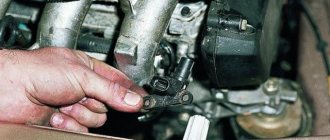
If these signs are present, the owner of the Lada Kalina should take preventive measures or replace the reader. The element itself is fixed to the gearbox housing with one screw. Three cables fit into its connector. You can get to the element after preliminary dismantling the adjacent elements of the engine compartment. If we have a 16-valve version of the engine in front of us, then to provide access we should move the reservoir with the washer fluid. When the owner has a Lada Kalina with an 8-valve engine, the speed sensor will be accessible if you remove the corrugated pipe of the air intake system, which fits into the housing of the filter component.
To purchase a similar sensor, you will need to read the number printed on the surface of the product. Here you need to show restraint and not run to the store for a new element just yet. We recommend checking your contacts. Sometimes they can oxidize or there is a break in the supply wiring. A fairly common cause of sensor failures is the ingress of metal shavings, which are present in any well-worn transmission unit.
Pinout DS 2109, 2110, 2112, 2114, 2115
If you understand how to connect the speed sensor, then there is the following pinout that you should follow. At the same time, it is important to understand the essence of the operation of the DS to study the circuit diagram of the sensor, which is attached to this article.
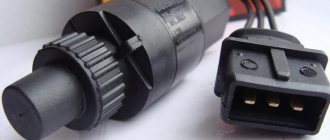
The factory speed sensor of VAZ cars is manufactured with some differences in connections to the block connector. The square-shaped connector is used in Bosh electronics systems. The circle-shaped connector is used in electronic systems such as January 4 and GM.
When connecting a sensor, you should choose devices with contact group digitization such as “-”, “A”, “+” (internal designation on the block contacts) instead of digital designations such as “1”, “2”, “3”. In addition, preference should be given to devices with a metal-type rod, since plastic rods are very short-lived.
Ground points in the car interior
- GND7 - ECU ground
- GND8 - ground on the engine panel
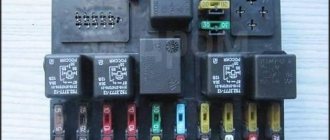
- GND6 - ground above the fuse box
- GND5 - tunnel mass
At the rear of the car, the “grounds” are located near the lights:
How to check the VAZ speed sensor
A failed speedometer sensor in a VAZ car is easily determined - in this case, the speedometer stops working, and it may also show some signs of life, but display incorrect information.
Using a tube, pliers or other available tools, rotate the sensor axis. In this case, you should see the voltmeter readings changing: the higher the speed, the higher the voltage (from 0.5 to 10 V). If this does not happen, the sensor requires replacement.
Automatic transmission check
In cars with automatic transmission, it is better to trust the professionals. The reason is that such cars have many electronic components that are closely interconnected with each other (directly or through the ECU).
An attempt to independently check the speed sensor can lead to even greater damage and breakdown of the automatic transmission system.
There are many cases where attempts at self-checking ended in expensive repairs or the need to sell the car.
Replacing a car speed sensor
As for its location, look for the DS in the engine compartment in close proximity to the exhaust manifold. To be honest, the place where it is installed cannot be called ideal. While the car is running, the manifold heats up. The sensor wires rub against it, which over time leads to malfunctions and short circuits. Therefore, experts recommend that the first step is to properly insulate the wiring, and also use some kind of clamps so that the wires do not come into contact with the collector. This significantly extends its service life.
If the check shows that the DS is faulty, it needs to be replaced. Repairing sensors and similar small electronic devices is a thankless task. In a garage environment, this is unlikely to be possible, and the only thing that can be done is to clean the contacts from oxidation (this can be a problem).
It doesn’t matter whether you have an injection car or a carburetor with a Europanel - the connection of the speed sensor to the instrument cluster is identical.
Replacing the VAZ speed sensor: step-by-step instructions:
- Drive into the pit - it will be more convenient to work from below - and wait until the engine cools down.
- Locate the speed sensor on the transmission. Clean it and everything near it with a rag to remove any dirt.
- By pressing the spring clip, disconnect the wire block from the sensor.
- Dismantle the sensor itself by unscrewing it counterclockwise - with your fingers or an open-end wrench to “22”.
- Carefully, so as not to break anything, install a new part in place of the removed part. Connect the wire block to it and the procedure for replacing the speed sensor can be considered complete.
Turn off the vehicle's power by removing the cable from the negative terminal of the battery. Do not close the hood after this, this will provide you with lighting.
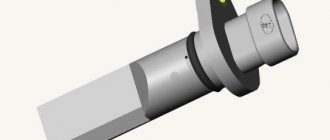
How to properly connect a new DS? It is important here that the device rod fits correctly into the fixing sleeve, otherwise rotation will not be transmitted to the sensor. If the sensor fits into the socket the first time, then everything is in its place, and if something prevents it from moving, then the rod did not fit into the bushing.
Any modern car is equipped with a variety of sensors to ensure comfortable and convenient use of the car. Sensors determine various parameters of the car’s operation, for example, engine temperature, the amount of fuel remaining in the tank, etc. In this article we will look at what the Kalina speed sensor is, where it is located, what malfunctions are typical for it and how to change the device.
Types of controllers
Initially, the car was equipped with three types of DS. After 2011, the plant began installing “Prior” sensors. They are all very similar in appearance, fit in the seat, but are not interchangeable. No specialist will be able to correctly say which DS is installed on a given vehicle. Therefore, you should buy a new Kalina speed sensor only after the old one has been removed.
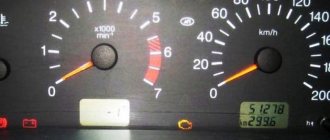
It all started when the speedometer needle began to behave strangely - periodically jumping up and down. Then she just lay down and didn’t get up again. It became clear that the speed sensor needed to be changed. It cannot be repaired, since it is a solid, molded piece of plastic; you can only break it and see what’s inside.
You can, of course, drive without it, but this is fraught with consequences - when driving (40-60 km/h and above), the electric power steering stops turning off, the steering wheel becomes very sensitive and, if you are not used to it, you can end up in a ditch. Also, during prolonged driving, the electric amplifier, on the contrary, is completely turned off. So whatever one may say, it will have to be replaced.
Description of the speed sensor
Some car enthusiasts confuse the speedometer sensor with the reverse speed sensor, but this is incorrect. Where is the speed sensor located on Lada Kalina 8 or 16 valves, what is the pinout of the connector, how to check the device? First, let's look at the main theoretical points.
Location, purpose and device
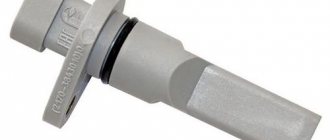
The speed controller in the Lada Kalina car is a device made in a plastic case in the form of a cylinder. Inside the body there is a sensitive component that determines the speed of movement. As you can understand, the main purpose of the device is to accurately determine the speed limit.
As for where the sensor is located, it is located on the car's gearbox, on top. To access it, you need to open the hood - in the engine compartment, an air hose connects the throttle to the air filter. If you remove this pipe, you will be able to see the controller directly below it, on the top of the transmission.
Possible malfunctions: signs and causes
A controller failure can be identified by the following symptoms:
- The speedometer located in the dashboard shows incorrect readings. The pointer arrow can move chaotically, sometimes jumping up sharply, sometimes falling just as quickly. In some cases, the speedometer may not work at all, that is, the needle does not rise.
- The fuel consumption has increased.
- If the car is equipped with an electric booster, it may refuse to work. The fact is that, according to the principle of operation, the ESD should automatically turn off when the speed exceeds 60 km/h. If the sensor does not work, then the electric power steering control unit will not be able to calculate the speed, and accordingly, the power steering will simply stop working.
- The Check Engine indicator appeared on the dashboard, indicating the need for engine diagnostics.
- Another sign - the odometer (mileage counter) - does not show the mileage traveled.
- An indirect sign of a malfunction may also affect the fuel level sensor. The sensor needle may fluctuate, which will not allow you to accurately determine the amount of fuel remaining in the tank.
- A sensor malfunction may also be indicated by a decrease in power unit power. The engine may lose throttle response.
- Sometimes the power unit may stall when idling (neutral gear).
These symptoms may also indicate other problems. We also suggest that you familiarize yourself with the main causes of failure.
- There is no contact between the device and the vehicle's electrical network. The contact may be broken in the device connector itself; you need to check the quality of the plug connection and, if necessary, clean the contacts from oxidation. Sometimes the contacts are damaged, then they need to be changed.
- The reason may be a violation of the integrity of the electrical circuit. Damaged wires are more susceptible to oxidation and corrosion, so if the insulation breaks down, it is advisable to replace them immediately, since this will have to be done in the future in any case.
- Regular use in harsh environments can cause dirt to accumulate on sensitive components of the device. This will worsen signal transmission to the speedometer and control unit. Cleaning the device will solve the problem.
- The sensor itself has failed; we are talking specifically about its sensitive element. There is no way out other than replacing the device (video published by the VooDoo channel).
Causes of breakdowns
The cause of the DS malfunction may be:
- poor contact in the DS connector or its complete absence;
- violation of the integrity of the wiring, the wires oxidize and rust over time;
- contamination on sensitive elements;
- sensor element malfunction.
The first three reasons can be corrected without replacing the DS; in the latter case, the device must be changed.
Checking the cleanliness of the connector
Diagnostics
Checking the controller can be done in several ways; we recommend that you familiarize yourself with each of them in more detail. For the first two methods you will need a voltmeter.
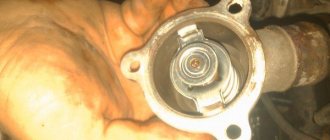
- First, the sensor must be removed. Find its installation location, disconnect the connected connector, unscrew the fixing nut and remove the device from the mounting location.
- Then take a voltmeter and figure out the pinout of the connector. The connector has three contacts, the first of which is usually a positive contact, the second is an output signal, and the third is a negative contact. One of the tester probes should be connected to contact number 2, and the second probe should be grounded - connected to the engine body or car body.
- Afterwards, you need to rotate the controller to determine whether there are pulses in the operating cycle and measure the output voltage. To do this, you need to install a piece of pipe on the sensor axis and rotate the device at a speed of approximately 3-5 km/h. The voltage and frequency in the tester depend on the rotation speed of the controller (the author of the video is Artem Kulzhanov).
The second diagnostic option is performed without dismantling the sensor:
- You need to put the car on a jack. You need to jack up the front of the car so that one of the wheels is hanging out and not in contact with the ground.
- After this, the tester probes must again be connected to the contacts on the device connector.
- The hanging wheel must be rotated and at the same time monitor the readings on the tester display. If, as a result of rotation, voltage and frequency appear, measured in hertz, then this indicates the operability of the device.
There is another checking option; to perform it you will need a light bulb or control.
Diagnostics is performed as follows:
- First of all, you should disconnect the plug and wiring from the sensor.
- Using the control, you will need to find the plus and minus, before that you need to turn on the ignition.
- Next, as in the previous method, you need to put the front of the car body on a jack and hang one wheel.
- Now you should connect the control pin to the pulse contact of the sensor (usually it is the middle one) and rotate the wheel by hand. If at the same time the minus lights up on the control panel, this indicates that the device is working. Alternatively, instead of a control, you can use a light bulb with a connected wire, one of which is connected to the battery, and the second to the signal connector. If the light begins to blink when the wheel rotates, then the controller is working (video shot by Alex Kov).
Checking the drive
Sometimes you only need to check the DC drive. Algorithm of actions:
- Raising one wheel using a jack.
- Search for the speed sensor drive (it is easy to find, thanks to its “sticking out” from the gearbox).
- Rotate the wheel with your free foot.
It is easy to determine by tactile sensations whether the drive is working or not. If the device does not function, it is worth disassembling it and assessing the condition of the teeth on the gears. If you lack experience, it is better to entrust the work to a specialist.
Removal and replacement instructions
To replace the device, you will need:
- two screwdrivers - with a Phillips and a flat tip;
- wrench or socket wrench 10;
- rag.
You will also need a new sensor - Kalinas may use different controllers, so before purchasing, find out exactly which one you need.
So, how to replace the sensor yourself:
- First, you need to turn off the power to the device and put the car on the parking brake by lifting the lever in the cabin.
- Open the hood. At this stage, you need to gain access to the sensor; for this, as we have already reported, you will have to remove the air duct going to the air filter. Alternatively, you can try to move it to the side. To remove, use a flat blade screwdriver to unscrew the clamps.
- Having seen the controller at the installation site, you will need to disconnect the wiring connector connected to it.
- Now take a wrench or socket and unscrew the nut that secures the sensor in its mounting location. The nut itself is located in an awkward place, so unscrewing it may take time. It may be that the nut is stuck to the mounting location, although this rarely happens. To unscrew it, treat the landing site with WD-40.
- Then take a flat-head screwdriver and disconnect the device from the transmission, and then remove it. Using a rag, clean the installation area; this can also be done before removing the sensor. Clean the surface thoroughly to prevent dirt from getting into the box itself.
- Now you can begin installing the new controller. Install the device and connect the connector with the wire to it. Don't forget to reinstall the air pipe.