Print this article Font size 16
Any car intended for public roads has a reverse gear. It allows you to drive the car in reverse. In order for other road users to know about your intentions, the corresponding signals - the reversing lights - must be activated on the rear optics.
Reverse sensor for VAZ 2110
It is in this case that the reverse sensor on the VAZ 2110 comes into play. It transmits information, the voltage to the lights is turned on, thereby the drivers around you see that you are about to reverse. For safety purposes, having a working reverse sensor is incredibly important.
Where is the reverse sensor located on the VAZ 2110?
Any car intended for public roads has a reverse gear. It allows you to drive the car in reverse. In order for other road users to know about your intentions, the corresponding signals - the reversing lights - must be activated on the rear optics.
Reverse sensor for VAZ 2110
It is in this case that the reverse sensor on the VAZ 2110 comes into play. It transmits information, the voltage to the lights is turned on, thereby the drivers around you see that you are about to reverse. For safety purposes, having a working reverse sensor is incredibly important.
Car lighting VAZ 2110, VAZ 2111, VAZ 2112
- — Lighting scheme
- — Removing and installing headlights
- — Headlight hydraulic corrector
- — Replacement of the hydraulic corrector master cylinder
- — Adjustment of headlights
- — External and internal lighting
- — Direction indicators
- - Fog lights
- — Replacing the side turn signal
- — Replacing the reverse light switch
- — Replacement of reverse lights and brake lights
- — Replacement of rear license plate lighting
Headlights and lighting VAZ 2110, VAZ 2111, VAZ 2112
Dismantling and assembling headlight unit, replacing lamps VAZ 2110, VAZ 2111, VAZ 2112
Hydrocorrector of headlights VAZ 2110, VAZ 2111, VAZ 2112
Removing and installing the main cylinder of the headlight hydraulic corrector VAZ 2110, VAZ 2111, VAZ 2112
Adjusting the headlights of VAZ 2110, VAZ 2111, VAZ 2112 cars
Brake and reverse lamps, interior and trunk lighting of VAZ 2110, VAZ 2111, VAZ 2112
Direction indicators VAZ 2110, VAZ 2111, VAZ 2112
Replacement of side and fog light of VAZ 2110, VAZ 2111, VAZ 2112
Removing and installing the side direction indicator VAZ 2110, VAZ 2111, VAZ 2112
Removing and installing the reverse light switch VAZ 2110, VAZ 2111, VAZ 2112
Removing and installing a brake light and reverse light for VAZ 2110, VAZ 2111, VAZ 2112
Removing and installing the rear license plate lamp for VAZ 2110, VAZ 2111, VAZ 2112
Simultaneously with switching to reverse gear in a VAZ-2110 car, special white lights must be turned on. They perform several important functions at once. Firstly, they make the parking process much easier for the driver, secondly, they indicate to pedestrians that the car will back up, thereby ensuring their safety, and thirdly, it eliminates the occurrence of an emergency situation.
Principle of operation
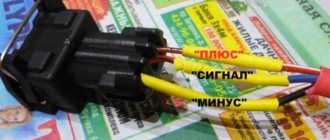
Connection
This regulator works more than simply:
- You shift the gear stick to reverse;
- Simultaneously with turning on the reverse speed, the shift fork is pressed against the sensor;
- A wire short to ground is created;
- The light turns on, indicating that the car is starting to move in reverse.
Symptoms of malfunctions
Of course, it is very easy to suspect that the reverse sensor is not working - when you engage reverse gear, the lights do not light up.
In such a situation, there are only three options for the development of events:
- The light bulb itself has burned out, so the element itself may be intact.
- The power fuse has stopped working. It’s not uncommon for him to simply burn out.
- The sensor itself does not work. This does not happen so often, but you will have to check its condition.
Is it because of the sensor?
Indeed, how can one determine that it is the one that has failed and not a fuse or light bulb that has blown? Everything is quite simple.
- You will have to remove the fuse and check it for integrity. For a VAZ 2110 car, it is planned to install a fuse number 19, the rated current of which is 7.5A. It is located in the mounting block, and the mounting block is under the dashboard.
- Check the condition of the lamp. If everything is fine with it too, then there is only one option left - the reverse sensor has broken.
Device and principle of operation.
The principle of operation of the sensor is quite simple: when reverse gear is engaged, voltage is supplied to the lamp, causing it to light up. This happens thanks to a special switch ball, which, when reverse gear is engaged, comes out of the rod and closes the contacts. At the moment the “rear” is turned off, the contacts open under the action of the return spring, and everything returns to its original position.
You often hear (or even see on the road) that the signal does not work or the lights do not turn on when moving in reverse. Such a malfunction, by and large, will not affect the vehicle’s progress on the roadway, but it may well cause discomfort while driving or even create an emergency situation on the road. The reason for such a discrepancy with the normal condition of the car can be a number of options, the only correct one should be found out at the inspection hole or overpass. The most common of them are considered to be the following.
Where is it located and how to check it
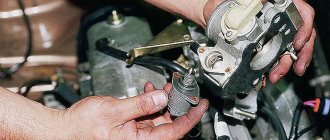
To begin replacing the reverse sensor on a VAZ 2110, you must first determine its location.
Device location
But really, where is he? There is nothing difficult in finding this element.
- You will need a trestle or pit. One way or another, you should end up under the car.
- Now look towards the rear wheels of the car and raise your eyes to the gearbox. To the left of it is your desired sensor.
- Can it be confused with other devices? Hardly. Only for this element is provision for wiring from the gearbox. Therefore, you definitely won’t find other similar devices nearby.
Let's start checking. We need to make sure that the sensor has failed, and that replacing it will actually produce results.
To check, do the following:
- Disconnect the terminal from the meter;
- Connect a multimeter to the connectors and turn it on in resistance measurement mode;
- Put the gearbox in reverse mode;
- Start the engine;
- Look at what the device produces;
- If the device shows a resistance of 0 Ohm, plus a beep sounds, then everything is fine, the sensor is working;
- It's bad if the meter shows infinity. This indicates that the sensor has served its purpose and needs urgent replacement.
How to determine the cause?
At the first stage, the motorist needs to make sure that it is the controller that is damaged, and not the lamp or fuse. Therefore, you need to check the integrity of the fuse. On the “ten” it is located in the mounting block, directly under the dashboard. The switching device is designed for 7.5 A and is installed at No. 19. Then you need to check the light bulb and wires. If everything is in order with them, then you need to move on to checking the controller.
Before replacing the device in question, you need to determine its location.
To find the sensor you need to:
- drive onto the overpass;
- pay attention to the gearbox. On the left side of this assembly is the reverse controller;
- in this place there is only one sensor with wires from the gearbox. The motorist will not find any other elements in this unit.
Thus, finding the element you are looking for will not be difficult. But before replacing it, you need to make sure that there is no loss of performance.
To do this, you need to perform a number of actions:
- disconnect the terminal from the controller;
- use a multimeter, having previously turned it on in resistance measurement mode;
- connect a multimeter to the controller connectors;
- engage reverse gear;
- start the power unit.
Next, you need to act based on the readings of the device. If the resistance corresponds to 0, then everything is in order with the sensor. If the measuring device shows infinity, then the controller needs to be changed.
Replacement
We remove the plug.
The procedure for replacing the reverse sensor on a VAZ 2110 does not involve anything complicated. Even a car owner without much experience and skills can handle it.
By following the step-by-step instructions, you can quickly and efficiently change the meter and continue driving in a fully functional car.
- Clean the unit of any accumulated dirt, as during removal, all this debris can get into your gearbox oil. Nothing good will come of this, so think about the safety of the checkpoint.
- The machine is placed on a pit or overpass. Again, you need access to the bottom.
- Remove the crankcase protection. This is done by unscrewing several fasteners.
- Take a small container into which the lubricant will be poured. The fact is that when you remove the sensor, a small amount of oil spills out along with it. It’s unlikely that you want it to end up on the floor, under your feet.
- Disconnect the wiring from the reverse sensor.
- Unscrew the meter from its seat.
- Clean the socket a little so that the new unit fits well into its new place.
- Place the purchased high-quality reverse sensor in place of the old one that has served its purpose.
- Add the required amount of oil. Just see how much lubricant has leaked out and pour the same amount back in. Although the oil level may be lower than expected as a result of operation. Take appropriate measurements to determine the missing amount of gear lubricant.
- Return all wires to their original places. If you have problems finding the location of the connections, mark them when disconnecting the wires. Although it is actually difficult to get confused there.
- Check the functionality of the new reverse sensor.
If all the manipulations were performed correctly, you made sure that the fuse and the light bulb are working, then a simple procedure for replacing the reverse sensor can return the functionality of the gearbox to its previous level.
With a careful approach, even for a beginner, such repairs will take a maximum of 30 minutes. You don’t have to spend a lot of time, and even more so, you can get by with minimal financial costs compared to going to a car service.
Let's hope that now the sensor will work for a long time and effectively, and your maneuvers on the road will always be safe and understandable for surrounding road users. Plus we wish the same for the motorists and pedestrians already around you.
How to change?
- Place the VAZ 2110 in a pit or drive it onto an overpass.
- Remove the engine protection, if any.
- Find a small container for the oil. Because when you unscrew the sensor, oil will begin to flow out.
- You crawl under the car and disconnect the wires going to the part.
- Unscrew the old sensor, immediately replace the container and screw in the new one.
- Add leaked oil to the box.
- You plug in the wires and wipe the surfaces that got oil on them.
- Start the car and check if the lights come on when you put the vehicle in reverse.
What to do if the reverse lights do not light up
In a situation where the reverse lights of a VAZ-2110 car do not light up, it is necessary first of all to identify the cause of the problem. For this purpose, you can either contact a specialized car service, or save money and do everything yourself. This is not difficult, since breakdown of the rear lights can occur for just a few main reasons:
- the lamp burned out. This part needs to be replaced, but first we recommend checking the voltage in the circuit and making sure that the risk of a short circuit is completely eliminated. Otherwise, the lights will remain on continuously;
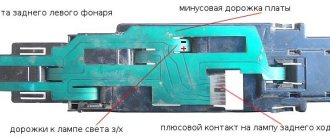
- no voltage is supplied to the flashlight board;
- The fuse that protects the circuit from short circuit has blown. If this is the case, it is necessary to “ring” all elements of the system to find out which one is causing the problem;
- the contacts on the headlight film are broken or burnt;
- The electrical cable is damaged. Its break can be detected by visual inspection or using a digital multimeter;
- as a result of prolonged use and exposure to moisture, the contacts have oxidized, which is why the reversing lights do not want to work;
- the gearbox mechanism, which should turn on the rear light, does not work properly;
- The reverse sensor has failed. You can check its serviceability yourself, without resorting to professional diagnostics. To do this, remove the wires from the sensor and connect them to each other. If the light comes on, then the problem is either in the device being tested or in the gearbox.
Why does the reverse gear sensor break?
Any moving mechanical system is designed for a certain number of cycles of use. Therefore, this device has a service life and can break simply due to mechanical aging.
Important: The cause of the reverse lights going out may not be the sensor at all. No one is immune from light bulbs burning out or wiring being broken. The failure may be in the control relay or in the safety unit.
We will look at the reasons relating specifically to the sensor:
- Corrosion of internal contacts due to a leak in the seal and moisture entering the housing. It occurs due to temperature changes and the appearance of deformation gaps.
- Oxidation of connector contacts, up to complete corrosive destruction. The reason is the lack of protective lubricant inside the connector.
- Mechanical destruction of internal parts due to manufacturing defects.
- Fracture or loss of the switching rod from the housing. Occurs in counterfeit products.
- The control rod is jammed into the “on” position. The reason is oil seal wear or internal corrosion.
- Grinding the surface of the slide clamp to the sensor rod.
How to restore normal operation of reverse lights
First of all, you will need to dismantle the reversing lights, as follows:
- open and empty the trunk of the car;
- carefully removes the casing to prevent damage during repair work;
- unscrew the protective casing made of plastic;
- We remove the back panel, which gives access to the sensor, lights and control board.
If the problem lies in a burnt-out lamp, it can be easily replaced without resorting to any additional actions.
If the problem is caused by a damaged fuse, you will also need to find it in a special block located under the steering wheel of the car, then carefully remove the broken part and install a new one.
A more difficult task is replacing the sensor, which has stopped responding to gear shifts and turning on the lights. To perform this operation you will need:
- drive the car onto the overpass and put it on the handbrake;
- remove the protective cover;
- place some container for transmission oil;
- remove the sensor and disconnect it from the electrical circuit;
- install the correct part. After this, it is necessary to check the oil level and replenish it if there is not enough lubrication in the gearbox;
- the last stage is assembly of the unit, performed in reverse order.
The safety of vehicle operation directly depends on the performance of the reversing lights. That is why it is necessary to promptly identify any malfunctions described above and efficiently eliminate them either on your own or with the involvement of experienced car service specialists.
The reverse lights of the VAZ 2110 do not light up - what to do?
Leaving your garage one evening, you notice that nothing lights the way. The situation, frankly speaking, is unpleasant and makes you think about it. After all, the rear lights of a VAZ 2110 should be on in normal mode. This means that there is some kind of malfunction that needs to be found and eliminated. Who knows what the reason is, we will have to figure it out. If the reverse lights of a VAZ 2110 do not light up, then, in all likelihood, it is possible that they have simply burned out. Maybe it's a simple failure of a fuse or sensor.
Diagnosis of the reverse light switch
To do this, disconnect the wires from the frog and connect the two contacts of the plug together. Then turn on the ignition and reverse gear. Let's see if the lights are on at the back. If they burn, then there is a 99% chance that the cause of the malfunction was the frog. If the reverse lights do not light up, then the reason must be looked for elsewhere (fuses, open circuit, problems with light bulbs, etc.).
We will need a 22 mm wrench:
Reasons why the reverse lamps do not light up
It is not difficult to see that when the reverse light on a VAZ2110 does not light up, the reasons can be of a very different nature. But be that as it may, everything needs to be corrected, and for this the cause must be eliminated.
To do this you need to do the following:
- It is necessary to determine the condition of fuse No. 19. It is designed for a power of 7.5 A. Its location is the rear light board of the VAZ 2110 mounting block under the dashboard.
- Next you need to make sure that the light bulbs are working properly. If it turns out that there are no problems with them, you need to check the reverse sensor.
In the latter case, the question of its location may arise. When viewing the car from the front, it is on the right side. If we consider it in projection in the direction of travel, then it will be located in the gearbox, in its lower left part.
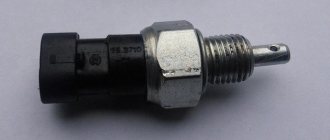
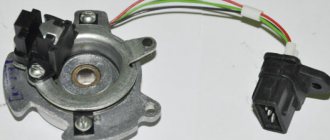
Car enthusiasts gave this sensor its name, calling it a frog. It is nothing more than a regular switch. The gearbox has a hole where this sensor is placed. Its working surface looks inside the box. From the outside, in the normal position, the contacts are open. When reverse gear is engaged, a special shield presses on the working surface of the sensor, which leads to the closure of the contacts. This provides power to the reversing lights. The sensor differs from a conventional switch in its special design. The device is sealed and resistant to significant mechanical loads.
How the system works
The sensor itself is a limit switch with normally open contacts. Under external influence, the contact group begins to move and closes. A special feature of this device is its aggressive operating conditions, as it is located in the engine compartment. That is, the electrical part must be sealed and protected from vibration.
The body of the device is metal, on one side there is a movable rod with an oil seal, on the other there is a contact group. The connection between the plastic dielectric and the metal main body is protected against the penetration of liquids.
The sensor is screwed into the gearbox in a strictly defined place. When moving the mechanism (scene) for engaging reverse gear, a special protrusion sets the sensor rod in motion. The contacts close and current can flow through the wires.
What the car electronics do next:
- activates the relay coil for turning on the reverse lights;
- gives a signal to turn on the parking assistance system;
- when a rear view camera is installed, it supplies power to it (again, through a relay).
The return spring is located inside the housing. After the impact on the rod has ceased, that is, the reverse gear has returned to a state of rest, the contact group returns back and opens. All involved electrics are switched off:
- The reversing lights go out;
- rear parking sensors are disabled;
- The rear view camera turns off.
Advice: If you install additional electronics on a VAZ 2110 or 2112, such as parking sensors or a rear view camera, then it is not recommended to connect to the contacts of the reversing lights.
It is better to find the primary circuit from the sensor using the electrical diagram of your car, and route this signal to a new device. Of course, you should use a relay rather than connecting the device directly. A fuse must be added to the circuit.
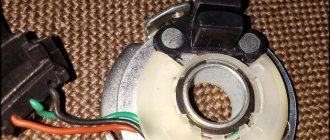
Checking the functionality of the sensor (frog)
When you manage to find it, you need to check its performance status:
- The wires connected to it must be disconnected.
- A tester is connected to their ends. The device is switched to “resistance” mode and the measurement is carried out.
- Then reverse gear is engaged.
- The ignition is switched to the on state.
- The instrument readings are taken.
The device may show 0 Ohm. This means that there are no problems with it. If there are other indicators, it needs to be replaced. This must be done not only when the VAZ 2110 does not have reverse gear on, but also when the lights are on and reverse gear is not engaged.
We turn on the brake lights forcibly
Relay K1 is successfully replaced with a pad with jumpers. In Fig. 1 just shows its diagram. If there is no such platform, you can temporarily close contacts 4-5. First, check everything mentioned above.
Have an observer watch what happens to the lamps. Press the pedal with one touch and release it. If the lamps do not turn on, check that the fuse is working properly. It's burned out, which means you're looking for a short circuit.
How to and how not to check the “0 Volt” potential
Let’s agree right away that we only work with a voltmeter. Voltage “+12” is caused by connecting one probe to ground. The presence of potential “zero” is checked differently: any of the probes is connected to a terminal with positive voltage, and then the second probe is connected to the wire being tested.
Consider the error: one probe is connected to ground, the second to the terminal being tested, and vol. Here they conclude that there is a “mass” potential, but this is wrong! If the contact with ground is broken, the device will also show “0”. That is, the number “0” does not contain information.
Algorithm of actions when replacing a sensor
Changing it is not particularly difficult, but you need to do the following:
- To replace the car, you need to put it in a pit or drive it onto an overpass.
- If there is engine protection, it must be removed.
- You should first prepare some kind of container for the oil, since the moment the sensor is unscrewed, a certain part of the oil will leak out.
- Then you need to unscrew the wires that are connected to the sensor.
- The old sensor must be removed and a new device installed in its place.
- The oil that leaked out during the sensor replacement process must be added to the box.
- Next, the wires are connected. They must first be wiped dry to remove any oil that has got on them.
- Then you should start the car and check for light from the bulbs when reverse is engaged.
Such measures are one of the options for eliminating the problem in which the reverse lights of the VAZ 2110 do not light up.
How to change?
- Place the VAZ 2110 in a pit or drive it on an overpass.
- Remove the engine protection, if any.
- Have a small container for the oil. Because when you open the sensor, oil will begin to flow out.
- Get under the car and disconnect the wires going to the part.
- Open the old sensor, immediately insert the container and screw in the new one.
- Add the leaked oil into the box.
- Stick in the wires, wipe the surfaces on which oil has gotten.
- Start the car and check if the lights come on when you put the vehicle in reverse.
Other causes of rear light malfunctions
But it may also happen that the reverse light on the VAZ 2110 does not light up, and the sensor is not the reason for this. Then it might be a nutritional issue. It also needs to be checked. When turned on, no power is supplied, which means you should look for a break in the wiring. Check the area where the fuse is connected to the sensor and the section where the sensor is connected to the lamp.
When reverse gear is engaged on a VAZ 2110, the white light bulbs should light up at the same time.
Their purpose is to perform the following functions:
- parking is much more convenient with lit lights;
- burning lights give pedestrians an indication that the car is about to reverse;
- Reversing lights are used to prevent emergency situations.
If a problem arises in which the reverse lights do not turn on, you can try to fix the problem yourself, or contact a car service center.
The problem can be resolved on your own, since the reasons for this, as a rule, are the following situations:
- The light bulb just burned out. In this case, it must be replaced. But before replacing, it is recommended to check the integrity of the wiring in order to eliminate the possibility of a situation in which a short circuit occurs.
- The reason may also be that there is no voltage on the flashlight board.
- The fuse that is installed to protect against short circuit has blown. It just needs to be changed. The fuse doesn't just blow. This means that this is due to some problem in the circuit. To do this, you need to “ring” each section and determine the location of the problem.
- Contacts may burn. Because of this, the light bulb will stop lighting. In this case, the burnt contacts should be cleaned.
- It is possible that the electrical cable is damaged. A malfunction can be detected by visual inspection or instrumentally using a multimeter.
- If the car is operated for a long time in conditions of high humidity, this can lead to oxidation of the contacts. As a result, the reversing lights will no longer work normally.
- The reason may lie in the incorrect operation of the gearbox mechanism. It is this mechanism that should lead to the inclusion of the rear lights.
- The malfunction may be caused by a broken reverse sensor. It is not at all necessary to take your car for professional diagnostics. You can check its performance yourself. To do this, the sensor must be removed and the ends of the wires connected to each other. If the light starts to light up, then the problem is in the sensor.
Common problems with brake lights
There may be several reasons:
- blown fuse;
- faulty sensor;
- frayed or broken power cord.
The most common cause is a blown fuse responsible for protecting the signal light circuit. This fuse is located on a block built to the left of the steering column. This capacitor can withstand a current of 7.5 amperes, as evidenced by the inscription on it. It is located in the bottom row, fourth from the right edge.
If after replacing this circuit element the problem has not been resolved, other possible causes of failure should be considered.
The next troubleshooting point is to check the brake light sensor. To do this, you need to check whether voltage is entering and exiting the sensor. In this case, you need to use a control lamp. If the lamp does not light up when connected in front of the sensor, then the problem may be in the wires going to the sensor. If the lamp works before the sensor, but not after, then the problem lies in this part. You can also simply disconnect the input and output of the sensor and close it “directly” using a copper wire; if after these manipulations the lights in the brake lights light up, then the reason is precisely in the sensor. The sensor cannot be repaired, and the only way out is to replace this part with a new one.
Modification of the rear lights of the VAZ 2110
Often, to fix the problem, it is necessary to modify the rear lights of the VAZ 2110. To do this, you first need to dismantle the old reverse lights. If the lamp simply burns out, then replacing it will not be a problem.
It won't be difficult to replace a blown fuse. But replacing a failed sensor is much more difficult. The algorithm of actions has already been announced within the framework of this article. But to replace it, you will need to drive the car into a pit or overpass. Without this, fixing the problem will be problematic.
Having read this review, the reader now has an idea of what could cause the reverse lights to turn off. If practical skills allow, this problem can be solved independently. Anyone who is not very familiar with the structure of the car and does not have practical repair skills is recommended to contact a service center, where qualified specialists will help solve the problem.
Where is the reverse sensor located on the VAZ 2110?
Any car intended for public roads has a reverse gear. It allows you to drive the car in reverse. In order for other road users to know about your intentions, the corresponding signals - the reversing lights - must be activated on the rear optics.
Reverse sensor for VAZ 2110
It is in this case that the reverse sensor on the VAZ 2110 comes into play. It transmits information, the voltage to the lights is turned on, thereby the drivers around you see that you are about to reverse. For safety purposes, having a working reverse sensor is incredibly important.
Principle of operation
Connection
This regulator works more than simply:
- You shift the gear stick to reverse;
- Simultaneously with turning on the reverse speed, the shift fork is pressed against the sensor;
- A wire short to ground is created;
- The light turns on, indicating that the car is starting to move in reverse.
How to check its functionality?
- Disconnect the wires from it. Just take them out.
- Connect a tester to them and set it to the mode: measure resistance or continuity.
- Engage reverse gear.
- Turn on the ignition.
- And look at the resistance the tester shows.
If 0 Ohm, then everything is fine with him. If not, then it needs to be changed (by the way, it definitely needs to be changed if the reverse lights are on even when the reverse gear is not engaged). Just further you will find out...
Symptoms of malfunctions
Of course, it is very easy to suspect that the reverse sensor is not working - when you engage reverse gear, the lights do not light up.
In such a situation, there are only three options for the development of events:
- The light bulb itself has burned out, so the element itself may be intact.
- The power fuse has stopped working. It’s not uncommon for him to simply burn out.
- The sensor itself does not work. This does not happen so often, but you will have to check its condition.
Is it because of the sensor?
Indeed, how can one determine that it is the one that has failed and not a fuse or light bulb that has blown? Everything is quite simple.
- You will have to remove the fuse and check it for integrity. For a VAZ 2110 car, it is planned to install a fuse number 19, the rated current of which is 7.5A. It is located in the mounting block, and the mounting block is under the dashboard.
- Check the condition of the lamp. If everything is fine with it too, then there is only one option left - the reverse sensor has broken.
And if it is ok, where to look for a problem?
My lights do not light up (reverse gear) and the thermostat does not work.
Yesterday evening it happened - all the glass was frozen, the temperature dropped. In addition to the fact that you will receive detailed instructions on what to do, you will know what happens if the carburetor is not adjusted.
From this article you will learn why you cannot operate the engine if the chain tension is loose, how to determine that the chain has stretched, and how to tighten it. By the way, you will learn 3 ways to restore chain tension.
How and after what period of time replacement is carried out. A couple of tips that will help you do everything right.
Reverse sensor VAZ 2110 - location of the sensor on VAZ cars, checking its operation, replacing the sensor.
It happens that when the car is moving, the rear lights do not light up or are on constantly, it is possible that the problem is in the lighting devices themselves, but if everything is in order there, it is worth checking the VAZ 2110 reverse sensor, which is responsible for the operation of the rear lights of the car.
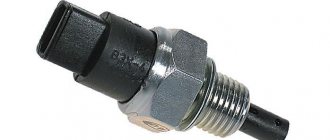
In the event of such a breakdown, you should not immediately rush to the store and buy a new sensor - try cleaning the old one from dirt, if this does not help, then you need to change it. The reverse sensor of the VAZ 2110 is located in the engine compartment, in the gearbox housing, on the left in the lower part.
Where is it located and how to check it
To begin replacing the reverse sensor on a VAZ 2110, you must first determine its location.
Device location
But really, where is he? There is nothing difficult in finding this element.
- You will need a trestle or pit. One way or another, you should end up under the car.
- Now look towards the rear wheels of the car and raise your eyes to the gearbox. To the left of it is your desired sensor.
- Can it be confused with other devices? Hardly. Only for this element is provision for wiring from the gearbox. Therefore, you definitely won’t find other similar devices nearby.
Let's start checking. We need to make sure that the sensor has failed, and that replacing it will actually produce results.
To check, do the following:
- Disconnect the terminal from the meter;
- Connect a multimeter to the connectors and turn it on in resistance measurement mode;
- Put the gearbox in reverse mode;
- Start the engine;
- Look at what the device produces;
- If the device shows a resistance of 0 Ohm, plus a beep sounds, then everything is fine, the sensor is working;
- It's bad if the meter shows infinity. This indicates that the sensor has served its purpose and needs urgent replacement.
Location and details of checking the sensor
Many novice car enthusiasts do not know where the reverse sensor is located. In fact, everything is simple here. It is necessary to drive the car onto an overpass (pit) and go under it.
A sensor will be installed on the left side of the gearbox (looking towards the rear wheels of the car).
It is very difficult to confuse it with any other unit, because only this element of the gearbox has wires. Now let's move on to the verification.
The sequence of actions is as follows:
- Discard the terminal from the sensor;
- connect a multimeter to the connectors and set the switch to measure resistance;
- move the gearshift knob to the reverse gear position;
- turn on the ignition;
- look at the multimeter readings.
If the display shows a resistance of 0 Ohm and the beeper rings, then everything is normal. If the multimeter shows infinity, then the VAZ 2110 reverse sensor needs to be replaced.
Replacement
Should I rush to replace the reverse sensor? And how. After all, this device ensures traffic safety on the road. If other motorists do not know about your intentions to back up, then accidents and collisions cannot be avoided. You need to think not only about yourself, but also about others.
We take out the plug
The procedure for replacing the reverse sensor on a VAZ 2110 does not involve anything complicated. Even a car owner without much experience and skills can handle it.
By following the step-by-step instructions, you can quickly and efficiently change the meter and continue driving in a fully functional car.
- Clean the unit of any accumulated dirt, as during removal, all this debris can get into your gearbox oil. Nothing good will come of this, so think about the safety of the checkpoint.
- The machine is placed on a pit or overpass. Again, you need access to the bottom.
- Remove the crankcase protection. This is done by unscrewing several fasteners.
- Take a small container into which the lubricant will be poured. The fact is that when you remove the sensor, a small amount of oil spills out along with it. It’s unlikely that you want it to end up on the floor, under your feet.
- Disconnect the wiring from the reverse sensor.
- Unscrew the meter from its seat.
- Clean the socket a little so that the new unit fits well into its new place.
- Place the purchased high-quality reverse sensor in place of the old one that has served its purpose.
- Add the required amount of oil. Just see how much lubricant has leaked out and pour the same amount back in. Although the oil level may be lower than expected as a result of operation. Take appropriate measurements to determine the missing amount of gear lubricant.
- Return all wires to their original places. If you have problems finding the location of the connections, mark them when disconnecting the wires. Although it is actually difficult to get confused there.
- Check the functionality of the new reverse sensor.
If all the manipulations were performed correctly, you made sure that the fuse and the light bulb are working, then a simple procedure for replacing the reverse sensor can return the functionality of the gearbox to its previous level.
With a careful approach, even for a beginner, such repairs will take a maximum of 30 minutes. You don’t have to spend a lot of time, and even more so, you can get by with minimal financial costs compared to going to a car service.
Let's hope that now the sensor will work for a long time and effectively, and your maneuvers on the road will always be safe and understandable for surrounding road users. Plus we wish the same for the motorists and pedestrians already around you.