After successfully installing a 2nd generation LPG on a car, and passing a test to ensure the functionality of its components and the absence of leaks of the propane-butane mixture (detected by “soaking” the connections or using a gas analyzer), the time comes for the need to adjust the equipment for further successful operation. The HBO adjustment is carried out sequentially in several steps, let's take a closer look.
Setting No. 1 - working, but not the best
And so, the sequence is as follows. There are 3 points in total that need to be manipulated:
- idle screw;
- aperture screw (can also be called a quality screw);
- greed screw (its normal name is unknown).
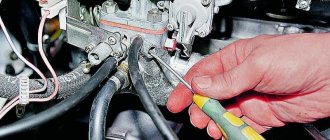
Their location can be seen in the video below. The gearbox is Tomasetto, but others often have the same designs.
Work is carried out with the engine warmed up to operating temperature. It is also important that the carburetor itself is properly configured for driving on gasoline, because... it also affects the settings of the HBO.
First of all, unscrew the greed screw almost completely, tighten the diaphragm screw completely, and unscrew the idle screw by 3-5 turns. Next, you need to start the car. It won't start well, don't hesitate to use the gas pedal. Did you start it? You can proceed to screw XX. We turn it and look for the maximum engine speed, the “slide” (by ear, with a tachometer, or maybe someone has even more accurate meters).
Let's move on to the diaphragm screw. We unscrew it until the speed begins to decrease. After this, we return a little back to the position with maximum speed XX. Now we recheck the slide with the idle speed screw and, in principle, you can already drive.
But we also have the screw of greed! It was his turn. It is set up like this - ask an assistant to get into the car and press the gas so that the revolutions increase to 3000, and fix this position of the foot. We begin to tighten the greed screw until the speed begins to decrease. We return a little back and we can finish here.
What does the equipment consist of and how does it work?
2nd generation LPG (propane or methane) is used in cars with injection and carburetor engines. Such equipment is best suited for cars up to the 3rd environmental class (Euro 0,1,2). Starting from Euro 3, it is more rational to install the 4th generation of gas equipment.
Device on the carburetor
HBO 2 kit for carburetor
Second generation kit includes:
- filling valve;
- gas cylinder with multi-valve and level sensor;
- filling, consumable lines;
- reducer with a coarse filter (sometimes a remote filter with a solenoid gas supply valve);
- fuel type selection button;
- gas mixture dispenser (power register);
- device for mixing gas with air (mixer);
- an electromagnetic valve that blocks the access of gasoline to the power unit when switching it to gas.
The operating principle of 2nd generation equipment on a carburetor engine is as follows:
The engine starts and warms up using gasoline. Next, the key is moved to the neutral position to produce fuel from the carburetor float chamber. Thus, the solenoid valve is activated, which shuts off the gasoline supply.
After which the switch is set to the gas supply position, activating the gas valve. So the gas, which is in a liquid state in the cylinder, flows through the multivalve and the main pipeline to the reducer. At this stage, the mixture undergoes preliminary rough cleaning.
When the gearbox warms up from the engine coolant, the liquefied gas is converted into steam. In the vapor phase, the fuel, passing through the power register, mixes with air in the carburetor.
To do this, in the 2nd generation HBO system, an injection mixer (spacer) or gas inserts are installed on the carburetor.
Then the finished gas mixture, entering through the intake manifold and cylinder head valves, is ignited by a spark in the combustion chamber of the engine cylinder.
To switch back to base fuel, the LPG button is moved to the position of working on gasoline, bypassing the neutral position.
Diagram on engines with injector
Second generation gas equipment kit for injection internal combustion engines
Here the equipment differs in several components:
- the button is specifically for the injection system, but there are also universal ones;
- a mixer with an anti-popping mechanism is installed in front of the throttle valve;
- petrol injector emulator;
- lambda probe emulator (installation is not required on all machines).
There are no radical differences in the operating principles of both gas equipment schemes. Major changes have been made to the design of the gas equipment due to the presence in a car with an injector of injectors for supplying fuel (or a mono injector - one nozzle for all cylinders). Which are controlled by the standard engine control unit (ECU).
The engine can switch to gas in semi-automatic mode (middle position of the toggle switch). Until the engine reaches a given number of rpm (1500-2000), gasoline is supplied to the combustion chamber. Then the switch to gas occurs automatically.
An injector emulator is needed to turn off gasoline injectors; it also sends a signal to the controller (ECU) simulating their operation. Due to this, the control unit does not display an error (“check engine”) about non-working injectors through an alarm on the instrument panel.
The lambda probe emulator (oxygen sensor) blocks the engine control unit from outputting a false error about a lean fuel mixture. Sensor advantages:
- facilitates setting up HBO due to the display of an indication of the quality of the mixture (poor green, rich red);
- reduces gas consumption by an average of 7-10%;
- allows you to detect real errors in engine operation.
Due to possible malfunctions in the ignition system (missing sparks) or gas distribution mechanism, popping noises occur in the engine. The reason for this is the ignition of fuel in the intake manifold, which can lead to its rupture.
If the engine has a plastic manifold, it is recommended to install the 4th generation of equipment. Or replacing the intake with a metal one.
The second generation gas equipment is equipped with an “anti-pop” valve, which is installed in the gas mixer or may be additional in the air filter housing.
Or maybe differently...
Over time and experience, my adjustment technique changed - what if there are simpler or more economical adjustment options? Yes, and they needed to be tested at least for themselves.
First of all, I tried the adjustment option with the idle screw fully tightened, i.e. only on pure diaphragm operation. There were no problems with starting, but there were problems with idling. If you go down a long hill in neutral at speed (for example, on a highway), the engine will definitely stall. Or when I sharply released the gas pedal in acceleration mode while squeezing the clutch, the speed dropped to zero and also stalled.
And all because, as I suspect, we are setting up and searching for a hill on a stationary, warmed-up car, which has a fairly high air temperature in the engine compartment. And when driving, warm air is quickly blown out and cooler air comes in, which greatly affects the concentration of air in the fuel-air mixture - the mixture becomes too lean and the engine stalls. The change in air temperature outside also had a very strong effect, which is why the diaphragm screw had to be constantly adjusted. Perhaps the reason is not this, but some peculiarities of the diaphragm, but the result was unsatisfactory.
The second test option was the opposite - the idle speed screw was turned out to maximum engine speed, and the diaphragm screw was tightened stronger than in Setting No. 1 - into a range where it no longer had any effect on idle. The problem with this option is that the car didn’t start well; I had to help it with the gas pedal every time. Well, if you tighten the diaphragm all the way, then the car may refuse to move at all due to lack of fuel in the mixture, although XX will be normal.
It became clear that both the idle channel and the diaphragm channel must be involved in idle operation!
Installation of HBO 2nd generation
After selecting the components, the connection diagram for the 2nd generation LPG to the injector and carburetor will consist of several stages:
- Preparing the location for attaching the cylinder. Here you need to provide ventilation holes, you will have to drill the bottom for the tubes, as well as securely fasten the cylinder. In this case, you should stock up on a drill and a drill bit of the required size. Next comes the installation of the cylinder, then the multivalve.
Setting No. 2 - fast and correct
The technique I settled on ultimately leads us to a result similar to Setting No. 1, but faster and does not allow for the possibility of making a mistake and tightening the aperture screw too much (this happened in the first option).
So:
- unscrew the greed screw to the maximum (but do not pull it out and make sure that there is no air leak through it);
- tighten screw XX completely;
- using the diaphragm screw we find the position in which we can start the car;
- Now we begin to turn the diaphragm screw clockwise (tighten) until the idle speed becomes minimal;
- Then, using the idle screw, we find the “slide” with maximum speed. Tighten this screw a little until the speed drops to a minimum. Those. our task is to stop at the very beginning of the maximum.
This completes the main part of the setup. All that remains is to set the greed screw according to the same principle as described above, i.e. use the gas pedal to fix the engine speed in the region of 2-3 thousand and tighten the screw until the speed begins to decrease.
Setting the “response” to pressing the gas pedal and the amount of gas supplied
Once the idle speed has been set, it is necessary to ensure that the engine responds quickly and picks up speed when you press the gas. To do this, you need to gradually unscrew the sensitivity adjusting screw until the idle speed begins to change. As soon as a change in idle speed has been noticed, the specified screw must be screwed back 2/3 of 1 full turn or one and a quarter turns (depending on the particular internal combustion engine, etc.).
When finished, you need to press the gas pedal, first smoothly, then you can press it sharply. The main thing is that if the setting is done correctly, there should be no failures, the engine should quickly exit the idle mode, respond adequately to pedaling, rev up well and respond quickly to any pressing of the gas pedal.
- After the settings have been completed and the response to the gas pedal is satisfactory, you need to move on to the settings of the dispenser itself. To do this, you should raise the speed, on average, to 3 or 3.5 thousand rpm without suction. For these purposes, it is better to invite an assistant who will press the gas.
Next, tighten the screw on the dispenser until the speed begins to change. To make sure that the revolutions really change, it is recommended to loosen and tighten the screw half a turn or more at the approximate “point” of the speed change.
So, when the position of the screw leading to a change in speed has been found, the screw should be unscrewed from this position by half or 3/4 of a quarter of a turn. Please note that if a dispenser is installed that has two sections, then all the manipulations described above are carried out with the first chamber.
We also recommend reading the article about the advantages and disadvantages of HBO. From this article you will learn about the pros and cons of gas equipment for cars, what effect gas has on the engine, etc.
The second chamber is set to 1/3 of the first. If the reducer also has the ability to adjust the pressure of the first stage, then additional actions will be required.
Let us immediately note that such work is explosive! Without proper experience and skills, it is not recommended to perform the steps described below on your own! Seek help from qualified specialists!
- First of all, the engine must be turned off, after which the gas line is closed. Then a pressure gauge is connected to the cavity of the first stage. The connection itself is made through a control hole, which is closed with a screw.
- As for the pressure gauge, the device should have a scale of 1.5 kgf per square centimeter. After connecting, open the gas supply and start the engine. In idle mode, the pressure in the first stage is adjusted using the pressure gauge.
- The indicator should remain 0.38-0.42. Having set the pressure, adjustments to the idle speed and sensitivity of the gearbox should be carried out again.
Advantages
Correct adjustment of Lovato 2nd generation LPG in the injector and carburetor can be done with your own hands. In comparison with the new type of gas equipment (4th and 5th generations), the 2nd generation gas equipment gearbox has somewhat lost its relevance. However, this does not indicate that there is no point in using it. Not at all. The present systems have been preserved on almost all cars. And some experts advise using them. The “blame” for this is the outstanding qualities of 2nd generation HBO:
- availability and proven quality of the system. As a result, installation work can be carried out on your own;
- virtually complete absence of electronic components, which radically simplifies adjustment;
- the ability to repair individual components without leaving the garage. Having identified a malfunction, it is not necessary to rush to the service station. Having basic knowledge, you can do all the necessary work with your own hands;
- reasonable price for equipment. The purchase and installation of gas equipment of a higher class is much more expensive. The situation is completely different with 2nd generation gas equipment. Purchasing and further setting up gas equipment for a 2nd generation car really helps out in the current circumstances.
Stages
Adjusting the 2nd generation HBO consists of several simple steps:
- Adjusting the sensitivity of the gearbox.
- Adjusting the propane-butane mixture dispenser.
- Adjusting the idle speed when operating on a propane-butane mixture.
- Delay in the operation of the automatic shutdown when switching the operation of the car engine from gasoline to a gas mixture for carburetor cars. Or the number of revolutions at which the engine will switch from running on gasoline to running on a propane-butane mixture, provided that the fuel type switch button is set to the “automatic” position.
Before starting the adjustment, check:
- There is a sufficient level of coolant in the vehicle's expansion tank. If necessary, liquid must be added.
- Check and, if necessary, adjust the operation of a car engine on gasoline.
- Since the engine, when running on a propane-butane mixture, is very sensitive to air filter contamination, the air filter is replaced with a new one or blown out.
- No gas leaks. It is checked mainly by applying soap foam - by washing all gas compounds. If leaks are detected (in such places soap bubbles form from the foam), the connection is disassembled and the leak is eliminated. Then the reassembled connection must be checked again.
- Reliability of fastening of all clamps and nuts.
- Reliability and correct connection and absence of short circuits of all electrical appliances of HBO2 (electric valves, buttons).
- Check the presence of gasoline in the gas tank.
- Fill the cylinder with a propane-butane mixture.
How is the work carried out?
How is it possible to adjust 2nd generation HBO with your own hands? In fact, the 2nd generation HBO differs slightly from its predecessor (1st generation HBO). The only difference is that an electromechanical system was introduced. Through its use, it is possible to coordinate the force of the gas flow.
Speaking about how to adjust the 2nd generation LPG, it is important to note that the creators managed to significantly reduce the load on the engine (gas burns much more slowly), increase the capabilities of the power unit (oil is stored on the surface of the cylinders), reduce the amount of carbon deposits and reduce the harm from exhaust emissions. By the way, it is the last moment described that allows the catalyst to last much longer. If necessary, when setting up the 2nd generation Lovato gas system with your own hands, the gas supply remains at a certain level.
Attention! The lambda probe emulator is a very useful product. It thoroughly helps with setup, but only if it is in good condition.
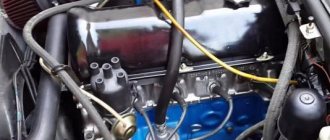
HBO for carburetor
Gas is cheaper than gasoline, but is it worth installing gas equipment on a carburetor car such as a VAZ-2106 or VAZ-2109? Cars are quite popular, so you need to figure out which LPG to choose and how to connect it.
Which gas pump to choose for a carburetor?
Any 1st or 2nd generation gas equipment is suitable for a carburetor engine. A more modern one is not needed here - it is distinguished by the presence of electronics, for which there are no sensors on a carburetor engine and, accordingly, because of this, all the bells and whistles of a 4th generation LPG on a carburetor engine turn into a regular 1st - 2nd generation gas engine without any bells and whistles.
HBO of the first generation is not much different from the second. The gas hose is connected to the carburetor through a spacer-mixer or directly through an insert into the carburetor. Under the influence of vacuum in the intake manifold, gas from the gearbox enters the carburetor through the dispenser. The only difference is the gas dispenser. On the first generation, the gas dispenser is manual, is set to the desired position once and requires adjustment no more often than a carburetor; and in the second generation, it is electronic, with a valve that is driven by a stepper motor depending on the readings of the oxygen sensor and the position of the carburetor throttle valve.
This second generation system is installed on cars with electronic carburetors - all sorts of Japanese ones from the 80s. We don’t need such bells and whistles on classic Soviet-designed carburetor cars, because they are more than completely useless. We throw away the electronic dispenser, install a mechanical one, and from an LPG of any generation we get a 1st generation LPG. What you need for a carburetor.
Standard equipment for gas equipment for carburetor engines
- Gas cylinder
- Multivalve
- Refilling device
- High pressure gas line
- Gas filter
- Gas valve
- Reducer-evaporator
- Dispenser
- Mixer (if no insertion was made into the carburetor)
- Gasoline valve
- Fuel switch
Operating principle and connection diagram
A gas cylinder is usually installed in the trunk, although on larger cars, like a GAZelle, the cylinder can be installed in other places without taking up useful space.
A multivalve is installed on the gas cylinder , which connects the cylinder with all other equipment. Through the multivalve, gas enters the cylinder, through which the gas enters the main line and then into the engine.
The remote filling device is installed in an easily accessible place so that it can be easily reached at the gas station, and a copper pipe line is laid from the VZU to the multivalve.
The high pressure gas line is the same copper tube leading from the multivalve towards the engine. But before that, the gas needs to be purified. Therefore, further along the line, a gas filter and a valve appear, stopping the gas supply when switching to gasoline or when stopping the engine.
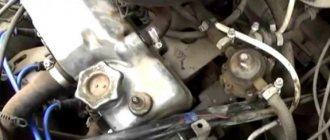
The already purified gas enters the evaporator reducer , in which the gas pressure is reduced to just over one atmosphere. The peculiarity of gas evaporation is that it is cooled to sub-zero temperatures, passing from liquid to gaseous state, thereby cooling the gearbox. Therefore, sometimes you can see an icy gearbox.
Such gas does not evaporate well and certainly cannot be used in the cold season. To solve this problem, the gearbox is heated with coolant from the cooling system. This is why the car is started on gasoline, and then switched to non-gas - to warm up the coolant to heat the gearbox.
And the gearbox is connected to the cooling system in front of the stove so that the coolant is hotter in winter.
Mechanical dispenser. Such a structure will be made in every village from available materials.
After the evaporator there is a dispenser that regulates the amount of gas supplied to the engine. In our case with a carburetor engine, the dispenser will be mechanical. The dispenser has a gas inlet, an outlet, an adjusting screw and a hole for a vacuum tube (not visible in this photo). Using a vacuum tube, the metering device is connected to the manifold, so the higher the vacuum in the intake manifold, the more the metering device will open and the more gas will enter the engine. The feed can be adjusted using the adjusting screw.
Gas is supplied to the carburetor using a mixer , which is placed on top of the carburetor (first picture on this page), or using a direct insert into the carburetor, in both cases the gas is supplied directly to the carburetor chamber.
In order to turn off the gasoline pump, they place a valve on the gasoline line, and in injection systems they simply turn off the injectors (the gasoline then constantly circulates and all returns to the tank through the return line) or turn off the power to the gasoline pump.
The selection of the gas/gasoline power system is carried out using the gas/gasoline fuel switch, the switch of which is installed on the driver's seat. The operating principle is to shut off one type of fuel while simultaneously opening the supply of another type of fuel by opening/closing the fuel supply valves installed on the lines.
Features of installing 1st generation gas equipment on a carburetor car
From the gas valve a high pressure pipe goes to the reducer.
Here you can see that there is a high-pressure gas supply tube to the reducer, it is copper, and a low-pressure rubber hose comes from the reducer. The cooling system pipes are also connected (on the right). We disconnect the coolant supply pipe from the heater, connect it to the gearbox, and from the gearbox to the heater. So we powered the gearbox from the cooling system. Next, a regulator should be installed, for example, like this.
And from the regulator, gas flows to the carburetor through a spacer-mixer.
You can do it differently and do without this spacer, and simply cut the gas pipe into the carburetor.
Results
Regulating gas equipment on your own takes half an hour. And replacing a gas filter with a 2nd generation Lovato gas filter is also not a source of difficulties. It is extremely important in this matter to maintain attention and concentration, avoid haste and strictly follow the practical guidance.
The release of more modern cars forces manufacturers of gas systems to develop, moving with the times. Although the number of obsolete vehicles is inevitably decreasing, in pursuit of savings on fuel and car maintenance costs, 2nd generation LPG does not lose popularity among car owners. Its installation and adjustment does not require special equipment. Therefore, it is possible to install gas equipment on a car yourself in the conditions of an average garage.