Setting up music in a car can be done even by a beginner if you spend a little time and figure it out. Understanding the principles and operation of acoustic equipment in a car will save you money and effort. Any driver will be pleased to just get into the car and drive in comfort, without being distracted by the audio system every time.
adjusting the sound in the car
If you want the same, you only need to spend time once on high-quality car audio setup. Music in a car is so voluminous and pleasant for those inside mainly due to the correct placement of the speakers. If they are not there, then the sound will more likely resemble a radio, but not the result of a full-fledged audio system.
Setting up music in a car is easy with your own hands
You can handle the settings on your own, even if this is your first time working with audio systems in a car. First, you need to understand your needs. If you listen to music in the car exclusively for yourself and don’t like the bass rattling meters away from the car.
car audio system
There’s no need for an expensive Car Audio, the basic components are enough:
- The radio itself is built into the car. All you need to do is connect it with the rest of the elements and check the maximum power.
- Front acoustics - sound from the front.
- Rear acoustics - sound from behind.
- Frontal acoustics - peripheral sound.
All these devices must match in power, otherwise the “lagging” equipment will simply burn out. There is nothing complicated about how to connect speakers in a car correctly. No more than an hour of work will give you pleasure from music for years to come.
Demo mode
After purchasing the long-awaited device, the user needs to find out how to reset the settings on the radio from demo mode. In general, it is intended to preview the operation of the device in a store, but this mode is in no way suitable for stable operation. It can, of course, be used, but a constantly blanking screen and scrolling information are unlikely to be enjoyable.
The mode is turned off using the following technology:
- you need to go to the hidden menu and turn off the radio while simultaneously pressing a special button called SRC.
- Move the joystick to the DEMO item and move the arrow to the shutdown mode.
Car Audio Basics
If you have already decided what you want from the sound, then setting up the audio system in your car has already begun. You, as a customizer, are required to achieve the highest possible quality combination of all system elements.
Advice to all beginners - if you are starting to set up for the first time, you should not buy expensive speakers in large quantities.
For good sound, it is better to have up to three good speakers than 5-6 - the sound “at odds” will not please anyone.
Types of car acoustics
Today there are two types of speaker systems on the market:
Coaxial acoustics are made in the form of speakers. It consists of 2-3 speakers of different frequencies. The main advantage of the technology is ease of installation. There is no need to drill anything or make additional holes in the panels. But due to the desire to simplify the design, the main drawback of such systems “comes to light” - low quality of workmanship. But there is no certainty here. If you choose acoustics from a well-known brand and at an affordable price, then the design and quality will be excellent
The main thing when choosing is to pay attention to the technical characteristics, material and workmanship of the speaker base.
This is what coaxial car speakers look like
This is what component acoustics looks like
But there are also advantages - with proper installation, you can achieve purity and maximum sound power
The main thing is to pay attention to the sensitivity and power of the device. An important issue is the dimensions of the speakers, which should look good in the interior of the cabin
Taking into account the size of the car
Unfortunately, large systems with a variety of bass are only relevant for large cars - SUVs, crossovers, etc. It's not about the model and status, but about the size of the interior.
For beginners, installing an extensive and complex audio system in a small salon is not an easy task.
The installation will most likely end up like this:
- the sound will be too loud for the enclosed space of the cabin and driving with music will be uncomfortable (especially for passengers in the back seat, where the bass set is mostly present);
- in a small cabin there simply isn’t enough space to accommodate all the elements of the audio system, so the balance will be broken.
For a small car, it is better and more practical to get by with a basic set - a radio, a front speaker and two rear ones.
Amplifier
High-quality car sound tuning is impossible without a powerful amplifier. Therefore, when purchasing equipment, you need to consider the following nuances.
The power reserve ensures good sound quality, as it eliminates background noise and nonlinear sound distortion that occurs due to overloads. There is no such thing as too much power, but this parameter should not be confused with sound strength, especially considering that high-quality sound does not mean high volume.
Peak drive voltage or same volume. In this case, it seems that the higher the indicator, the better. But many people forget that vibrations of over a hundred decibels create severe pressure on the eardrums, causing migraines and headaches, as well as partial hearing loss. Therefore, experts recommend choosing models whose characteristics vary between 90-95 dB.
The amplitude-frequency response throughout the entire audio range (20 - 20,000 Hz) should remain linear, completely eliminating noticeable rises and/or dips. In this regard, a technique with a range extended to 32 kHz is more preferable. However, the linearity of the frequency response is still more critical, since the human ear can rarely perceive above 18 kHz.
We understand the basic settings of the radio
Not all drivers consider it necessary to understand the technical settings of radio tape recorders. Considering that they work fine on their own after factory settings or the previous owner. It is not always so. Even if minimal sound is provided. Either a powerful or otherwise individual sound that suits you, you will have to do it yourself.
You can balance the sound of the speakers using the radio. This only applies to modern models. After connecting, the device will “see” all the speakers that you have connected and will offer to configure their interaction. This cannot be done without practical testing.
Be prepared to play comparison music even after very minor changes.
The main task is to make sure that all speakers play in unison. Of course, they have different roles and sounds. But you don’t need to have an ear for music to detect desynchronization.
Step-by-step verification instructions:
- Sit in the driver's seat, this is the place where the sound should be optimal. Since you are there most of the time.
- We set the bass to 0 Db - it is in the low frequencies that the causes of discomfort from sound usually lie.
- Let's switch to balance mode; you will find it on any modern radio. And using any melody we adjust the sound in real time.
- You can stop tuning when you are completely satisfied with the sound.
Sometimes the opinion about the sound changes - after tuning, you can drive for several days. And then want to make additional changes. For a more objective look at the state of the audio system, you can try different types of music. For example, very different from each other in the number of bass or high sounds.
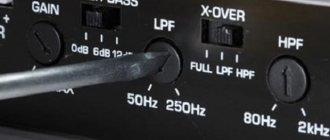
Working with frequencies
Music consists of several types of frequencies. The higher the frequency, the louder the sound. Thanks to the capabilities of modern radio tape recorders, the driver can independently select music at those frequencies that suit him best. Emphasis on high and mid frequencies is the simplest and cheapest. A way to make the music sound as loud as possible.
The thing is that low frequencies themselves are not loud, this does not mean that they are not needed. But a large number of them makes the composition generally quieter, even if you have excellent acoustics. Manual tuning of car audio through frequencies has long existed. Using the radio - frequency cutoff mode.
This mode allows you to “prohibit” the device from reproducing frequencies below a certain minimum that you set. We recommend setting the lower threshold to 125 Hz (or frequency 78). In this way, the resources of the speaker system are redistributed. And the overall sound volume increases significantly.
Video: creating a budget combination of car radio + subwoofer for a car
Next, using the twist wheel or the movement arrows (depending on the model), we look for and go to the SW Kontrol item. After this, we find ourselves in the sub-item EAR SP FUL, which must be changed to SW using the arrow or knob, after which we turn off the radio.
After this, it is necessary to further configure the subwoofer, for which we turn on the radio again and go to the preset menu, where we look for and enter the SW SETTING1 item. Once in this submenu, you need to select one of three types of settings: NORMAL, REV and OFF. As practice shows, most users choose REV.
Next, you need to go back to the preset menu and select the SW SETTING2 sub-item, where we first indicate the frequency (recommended value 50 HZ), and then the power level (ranging from -6 to +6). In this case, you should choose the ranges based on the characteristics of the installed speakers and your hearing perception.
The last action in this paragraph is to regulate the loudness of the radio, for which we go to the menu and look for the LOUDNESS item, where we select the HIGH value.
How to set up the radio
There are three types of radio settings in Pioneer radios:
- Press or look for the FUNC button/menu in the menu, and then look for the BSM sub-item, which is responsible for automatically searching for radio stations. The search is activated by pressing the up or right key, after which the first station found will automatically turn on.
- While in receiver mode, which can be accessed by pressing the BAND button, hold down the right key and hold it for several seconds, then release it, thereby starting the process of scanning radio stations. After the station is found, scanning will be paused, after which the user can remember the radio station by pressing and holding the corresponding key - for example, 1. If the station is not needed, press the button to the right again, and the scanning process will continue.
- While in the radio station menu, briefly press the key/joystick to the right or left until the required wave of the radio station is found, then press the button (1–6) to memorize it.
Vibration isolation - what is it and how to install it?
All lovers of loud music have a problem in their car - vibration. Loud music, especially with a lot of bass, makes the car literally shake from the inside. The driver is faced with the choice of turning down the volume or continuing to pick up objects that have fallen due to shaking.
Noise-vibration insulation as a procedure is an additional lining of your car from the inside - such
“Rattling” sound and other unpleasant effects appear on top of the original sound. Because vibration from sound transfers to the materials of the machine - metal, plastic, etc., without encountering any obstacle. This can be corrected by purchasing a soundproofing layer for the car, which will not only improve the quality of the music sounding in the car. But it won’t allow extraneous noise from the street to interrupt it.
Musical preferences
There is no specific taste for adjusting the equalizer. Each person chooses certain modes according to his hearing, depending on what kind of music or what genres he likes. But if there are doubts, then I would like to give a few tips for tuning to a specific musical style:
- For heavy music, it is recommended to increase the bass frequencies to 80 Hz. Don't overdo it, it's better to leave it in the range from +1 to +3. Rhythmic or percussion instruments should sound at approximately 250 Hz.
- For opera lovers, the joystick on the radio should be turned to 250-800 Hz. It is also worth noting here that it is recommended to place male voices lower, and female voices higher.
- For connoisseurs of electronic music, a frequency of 2500-5000 Hz is suitable.
At the end of the section, I would like to note that setting the equalizer is an important procedure, and with the help of this tool you can perfectly adjust the sound, even if you have weak acoustic equipment in your car.
Principle of correspondence
There is no single sound system that would be ideal for every car. The explanation for this fact lies in the need to select a system in accordance with the volume of the cabin. To do this, you need to select speakers not only by size, but also by type. There are two types of speakers: coaxial and full-range. The first type of speakers is more popular due to the division of the playback range into a number of parts. This feature allows you to achieve surround sound. Accordingly, their price is higher than that of their broadband counterparts. It’s not for nothing that these types of speakers are installed in crossovers. The secret to perfect sound inside a car is hidden in such expensive speakers.
Third stage
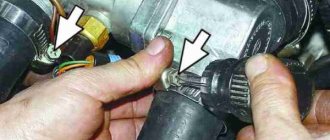
After all the preparatory steps, you can proceed directly to the installation of the system itself. The head unit must be connected to the standard location. As a rule, the power wire is taken from the cigarette lighter or from the ignition switch. It is necessary to install a fuse so that in the event of a power drop, the radio remains intact. The mass of the radio must be in contact with the car body. After this, you need to lay all the speaker cables.
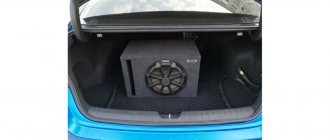
Now, as for the installation locations of the acoustics. As already mentioned, there is only one option from the front - into the door podium. At the rear, you can go into the podium of the rear doors, or you can go into the rear acoustic shelf. Tweeters are usually installed in the windshield pillars. Subwoofer - in the luggage compartment. After the audio system has been completely installed, let's move on to the last stage.
Soundproofing issue
Having finally decided on the location for the car audio system, you need to address the issue of noise and vibration insulation. This work will be long, painstaking and exhausting, but without it, the car audio will not be good enough and all your costs for purchasing expensive equipment will be reduced to zero. The point of sound insulation is to remove the interior covering and replace it with a material with sound insulation properties. The thoroughness and completeness of the work determines the sound quality.
When this work is finished, you can install car audio
Particular attention should be paid to carefully attaching the speaker to the body to eliminate the possibility of additional resonance.
Nobody says that it will be easy and inexpensive. Still, making good car audio is a big job, with which even an experienced specialist will spend a long time fiddling around. But the person who really wants something and does everything possible and in his power to achieve it, will definitely be able to achieve what he wants. Your hard work will be fully rewarded, and your car will have the best car audio imaginable.
Level three. Upgrade without replacing the standard head unit
If all these “flowers” with speakers seem frivolous to you, it’s time to move on to the “berries” - touching on the amplification part of the system. The main problem that has to be solved in this case is where to get the original uncorrected linear signal from which to start building a new audio system.
In fact, you won't find it anywhere just like that. And there is simply no single recipe for all cars; in any case, you will have to turn to professionals who specialize in “voicing” cars. By and large, it all comes down to four options.
The first option is to “pull out” the linear signal from the electronic bowels of the head unit. For many models, this process, by the way, is well established, and for a relatively small amount your standard head unit will acquire a tail with RCA connectors on the rear side.
In many head units it is not difficult to get a line signal. Sometimes, however, its level is low, and in order not to pick up interference on the way to the amplifier, you have to add a small output buffer. But for an experienced master this does not cause any particular difficulties.
The second option has to be used when it is not possible to display “linear lines”. In this case, we leave the standard amplifier in the system, decisively disconnect the standard speakers from it and connect its outputs to the inputs of the new amplifier. The only requirement for the latter is the presence of so-called high-level inputs.
High-level inputs are a feature exclusively of car audio equipment; at home, it would hardly occur to anyone to connect one amplifier after another. In a car this is a necessary measure, and although technically it is not very elegant, it still makes sense. After all, it is no longer low-impedance speakers that will be connected to the standard amplifier. Its output stages will operate in a completely different mode, with lower currents, so the signal quality will be somewhat different. In any case, you will get better sound than in the state.
But this option is also not always applicable. A little higher, I already said that many systems introduce intentional signal correction. In this case, there is no point in simply passing the “crooked” signal from the standard amplifier to a new one. And if the standard system has channel-by-channel amplification, then you won’t even find a curved signal - only frequency “cuts”.
For such cases, there is a third option, using a digital processor like Audison bit One, Audison bit Ten, Helix DSP, etc. The trick of these devices is that they can combine the original audio signal from these separate frequency pieces, remove the correction (or rather , adjust the signal “in the opposite direction”) and send such a restored signal to a new amplifier. In the right hands, by the way, it’s quite an effective thing.
Typically, automotive processors are configured from a laptop or tablet
Well, the fourth option is applicable in cars in which the standard system is built using the MOST bus (Media Oriented Systems Transport). By the way, there are quite a few of them these days. The peculiarity of the MOST structure is that all devices (source, amplifiers, monitors, changers, etc.) are united by a single digital bus through which data circulates around the ring. It is impossible to take and remove anything from such a system; the data transfer is interrupted and everything simply stops working.
Despite the apparent complexity at first glance, this option is actually one of the most convenient for installing a new system. All you need is a MOST adapter. It is included in the MOST ring as another device, pulls the digital audio signal out of the bus and gives it to us “on a silver platter” - in the form of the usual SPDIF.
If the standard audio system uses a MOST bus, then using an adapter allows you to get SPDIF without surgical intervention in the head unit or wiring
And then we can do whatever our heart desires with it - from an economical “processor + amplifier in one package” solution (MD.Lab AM-60.6DSP, Audison Prima AP8.9 bit, Helix P SIX DSP, etc.) and to extravagant systems with an external DAC and other audiophile tricks.
Principle of correspondence
There is no single sound system that would be ideal for every car. The explanation for this fact lies in the need to select a system in accordance with the volume of the cabin. To do this, you need to select speakers not only by size, but also by type. There are two types of speakers: coaxial and full-range. The first type of speakers is more popular due to the division of the playback range into a number of parts. This feature allows you to achieve surround sound. Accordingly, their price is higher than that of their broadband counterparts. It’s not for nothing that these types of speakers are installed in crossovers. The secret to perfect sound inside a car is hidden in such expensive speakers.