A carburetor is a component that prepares the fuel mixture for the engine. Its task is to ensure the correct proportions of mixing air with gasoline. The ideal ratio is: 1 portion of gasoline per 15 portions of air. During operation, the adjustment of the VAZ 2106 carburetor gradually gets lost, which leads to excessive enrichment or depletion of the fuel mixture with gasoline. On the VAZ 2106, the manufacturer installed an “Ozone” carburetor produced by the Dimitrovgrad Automotive Assembly Plant (DAAZ). The operation of the device is based on the principle of jet propulsion. A powerful jet of air through the jets located in the diffuser carries fuel from the float chamber. As a result, a fuel-air mixture is formed in the proportions necessary for its ignition in the combustion chamber.
Design and principle of operation
The legendary “six” - a model from the VAZ concern - was produced from 1976 to 2006. Over the entire period, more than 4 million cars of various modifications were produced. The car was equipped with engines ranging from 1.3 to 1.6 liters. Fuel type: gasoline. Both mechanical and electronic ignition were used. The fuel system had a carburetor.
How to adjust the carburetor on a VAZ 2106
They were installed from different manufacturers, but the most popular were:
- carburetors from the Dmitrov Automobile Unit Plant (DAAZ);
- Ozone carburetors. Better quality and more productive. They began to install them instead of the old ones from DAAZ. They had simpler settings and lower fuel consumption.
In addition to those presented, Solex carburetors were also installed. They were a modified version of the DAAZ, but with much better characteristics.
Any carburetor is a special device that is installed in a car to create the highest quality fuel-air mixture. This happens by mixing fuel and air in a certain proportion and supplying the finished mixture to the cylinders of an internal combustion engine. Maximum combustion efficiency of gasoline can be achieved if the mixture ratio is 14.7:1. In this case, the first number is equal to the amount of air, and the second, respectively, to the fuel. However, the presented ratio may be different, it all depends on the mode in which the power unit operates.
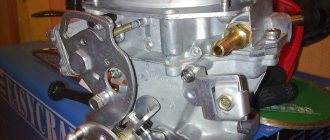
Carburetor "Ozone", VAZ-2106, design and adjustment
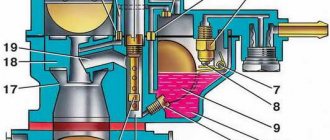
Any carburetor for a VAZ-2106 car consists of the following parts:
- float chamber;
- econostat;
- idle system;
- accelerator pump;
- launch system.
Important! Each part consists of many elements. In this regard, there are practically no fundamental differences between carburetors of different brands.
As for the adjustment, during the process it is necessary to adjust each element presented.
Troubleshooting carburetor problems
Regardless of whether EMC is installed or not, the procedure for cleaning the idle fuel jet is the same.
- Unscrew the cap of the holder or EMC.
- Unscrew and remove the fuel jet XX.
- Clean the center channel of the injector.
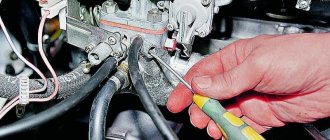
To remove the XX jet from the radiator body, a 13mm wrench is required, but depending on the model, you can also use a 14mm wrench. Turn the EMC to remove the jet. If the center hole is clogged, carefully clean it with a thin thread or blow it out with compressed air.
After cleaning the center passage of the fuel jet, reinstall it. Screw in all the way, carefully tighten with a wrench. Connect the "positive" wire to the EMC power terminal. Start the engine.
To make it easier to work with the carburetor, you need to disassemble the air filter. Turn on the ignition after disconnecting the power cable from the EMC terminal. Connect the power cable to the valve terminal. An audible click indicates that the EHR input is receiving power. In this case, the cause of the malfunction must be sought in the jet or in the carburetor itself. If there is no click, there is a problem with the solenoid valve or fuse. To check the valve, connect the “plus” of the car battery to the EMC terminal, and the “minus” to its body. If there is no click, the solenoid valve is faulty and needs to be replaced.
If the EMC input does not receive power, the cause may be a wiring fault or the need to replace the 8A fuse. If you have a standard fuse box, this part is installed in the ninth cell.
If the fuse, wiring and the valve itself are in good condition, then the cause of poor idling of the VAZ 2106 may be a clogged fuel injector XX. In this case, it must be cleaned.
Adjustment process
The VAZ-2106 carburetor can be adjusted personally by the car owner or at a specialized station. It should be remembered that the operation of the vehicle in any driving modes, in any weather and under various conditions will depend on the quality and correctness of the procedure performed. Therefore, before starting repairs, it is important to acquire certain skills. You need to know well the structure of the carburetor and the principle of its operation. You also need to have a certain set of devices and tools:
- various screwdrivers;
- keys of various sizes;
- drills and probes (round);
- toothpicks;
- rubber bulb;
- ruler;
- tweezers;
- calipers;
- rags;
- special containers for washing.
If you have a full set of tools, you can make high-quality adjustments quite quickly.
Device adjustment devices
Adjusting the starter
The starting device is adjusted by opening or closing the air damper. This operation can be carried out directly on the car; you just need to remove the air filter. In addition, you will need:
- Unscrew the plug of the starter, since there is a special screw under it.
- Press the three-arm lever. To do this, pull out the choke lever in the cabin, then close the damper and push the rod into the body of the starter all the way.
- Using a drill with a diameter of 5.5 mm, check the size of the gap from the lower edge of the damper to the chamber wall.
- Using a thin screwdriver, turn the adjustment screw, thereby changing the clearance value.
- Next, you need to hold the air damper by the three-arm lever in the closed position and use a 1 mm drill to check the gap between the chamber wall and the throttle valve.
- Adjust the gap by installing the lever in another hole or by bending the rod.
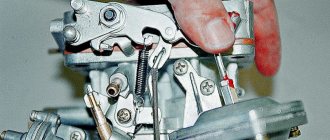
Shifting the lever to adjust the gap
Float adjustment
This stage is one of the most important processes of general configuration. The carburetor float is an element of the so-called float chamber. If an increased amount of air or gasoline in the mixture enters the combustion chamber, the engine will run unevenly. This increases both gasoline consumption and its toxicity when there is a lot of fuel supplied. Conversely, there will not be enough fuel for normal combustion if there is little supply. The correct amount of mixture requires adjustment of the float. It is recommended to set its stroke to 8 mm.
In addition, before installing the indicator, it is advisable to remove it and check for the absence of various violations, defects and other problems.
If a car enthusiast suspects poor quality work, the float needs to be replaced altogether.
Mixture adjustment
All actions are carried out using control screws. They have a factory press-fit made of plastic, which limits their speed in the range from 50 to 70°. If the presented range is not enough, you can break off the press-on and set the required value. However, this must be done on a warm engine.
Adjusting the throttle valves
Idling
Sequencing:
- Start the engine and wait until it warms up to a normal temperature of 90 °C. After this you need to turn it off.
- Find the screws on the carburetor and tighten them completely. After that, unscrew the quality screw by five turns, and loosen the quantity screw by three.
- Start the engine and use the speed screw to set the speed on the tachometer to 800 rpm.
- Tighten the quality screw until the number of revolutions begins to drop. Periodically you should stop and add half a revolution.
Adjusting the rods
Before carrying out any actions, you need to measure the distance between the ends of the rods. This is done using a caliper. According to the original factory settings, this distance should be 80 mm. To adjust the length, you will need to loosen the clamps.
After this, you should check the filter. The shut-off valve needs to be cleaned and dried. It is responsible for loss of power and problems with the supply of gasoline, so it is recommended to thoroughly flush the entire carburetor.
As a final step for adjusting the rods, it is recommended to check the tightness of the locking needle. For this you will need a pear. If air loss is heard, the needle needs to be replaced.
The engine does not idle: the main reason
The first thing you should pay attention to is the solenoid valve. However, it is not installed on all VAZ 2106 carburetors. It is this small device that most often falls into disrepair. In principle, it is analogous to a solenoid relay: there are windings, an armature, and a return spring, but the dimensions are slightly smaller.
The function of the solenoid valve is to open the path of gasoline (with the throttle valve closed) when the contact is turned on. And they close when turned off accordingly.
The most common breakdowns of the solenoid valve, as a result of which the minimum disappears:
- The winding is destroyed, the armature with the needle does not move, fuel is not supplied.
- A clogged fuel jet is located on the edge of the valve.
- The valve armature is blocked due to deformation.
You can check this device very quickly; you will need a small piece of wire, stripped from both edges. Connect one end to the battery positive, the other to the solenoid valve output. A fairly loud click should be heard, but otherwise the winding will most likely be destroyed.
If there is a click, remove the previously connected cable and turn on the ignition. Place the power connector onto the valve. If there is no click, the wiring is destroyed. There can be three ways out in case of failure; you can use any of them:
- If the solenoid valve is completely destroyed, it would be reasonable to unscrew it and remove the tip (fuel jet). And this way you can easily get to the nearest store. The price of a new VAZ 2106 solenoid valve is about 100 rubles, so repairs will not be expensive.
- Temporarily connect the solenoid valve wire to the positive terminal of the battery - if the wiring is damaged. But in this case you will have to get rid of the thread every time you stop.
- It will be much more efficient to connect a wire from the output of the solenoid valve to the “+ B” contact of the ignition coil. The fact is that voltage appears on it only after the ignition is turned on.
Adjusting the carburetor VAZ 2106 first stage
Unscrew the 3 nuts with an open-end wrench (10) securing the upper cover of the filter housing and remove the air filter.
Using a tubular wrench ( we will give 4 nuts from the studs securing the lower part of the body to the carburetor.
Then let's see how the air intake draft works and whether the air damper moves freely. It is possible that the bolt securing the choke cable to the bracket (the “three-arm lever” on the carburetor) will be tightened, then the damper will jam, which is not allowed.
Then, using a Phillips screwdriver, unscrew the bolt on the fuel hose clamp and pull the hose out of the tube and drain the remaining gasoline into any container.
Adjusting the drive
- Checking the length between the tips. The required size is 80 millimeters.
- If you deviate from this size, remove one tip.
- Loosen its lock nut and by rotating adjust the distance to the desired size.
- Tighten the nut and return the rod.
- You need to check the adjustment. To do this, our assistant presses the gas pedal. We observe the throttle valve to see if it has opened completely.
- If not, then you need to remove the tip from the lever and reduce the length of the rod.
- Now you need to see what position the damper is in when the gas pedal is released: does it close completely. If not, the pull needs to be lengthened a little.
- Next we work with the air damper. We weaken its drive. In the cabin, we completely recess the damper.
- Press the three-arm lever so that the flap opens all the way. In this position, tighten the locking screw.
- Checking the adjustment. To do this, we completely close and open the door from the passenger compartment again. If the damper has not opened completely, we carry out the adjustment again. If the outcome is positive, fully tighten the screw.
The second stage of carburetor adjustment
We work in order:
- Using a Phillips screwdriver, unscrew the 5 screws of the top carburetor cover and remove the assembly with the float;
- Let's drain the remaining fuel and see if there is dirt there;
- Using an open-end wrench, we will stretch the 4 nuts securing the carburetor to the bottom; these nuts become loose due to constant heating;
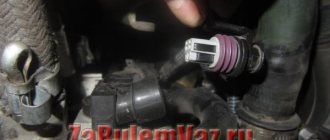
- Unscrew the solenoid valve with your fingers (see photo below);
- Use the flat blade of a screwdriver to pull all the jets through; there is no need to completely disassemble them.
The textolite “thick” gasket presses well over time and air leaks in this place rarely occur. You should not grind the seat on the emery wheel unless absolutely necessary.
Then use a wooden toothpick to clean all the jets and holes and blow with compressed air. The jets were selected at the factory so that fuel consumption would not increase and engine power would not be reduced. Install jets according to your numbers, such as those recommended by the manufacturer. In the injection chamber, a diffuser with a larger diameter nozzle is placed with a larger hole diameter and vice versa.
The starting jet, which gives maximum power, must be put in its place, look at the photo to see how it is installed correctly.
Then we will unscrew the 2 jets in the float chamber and check the condition to see if they meet factory manufacturing standards. Carburetor repair kits contain aluminum jets instead of brass and copper, which is not recommended for car operation.
On the solenoid valve, check the presence of the rod, the condition of the rubber ring of the gasket, blow it with air and screw it back, put the positive wire “female” on the terminal “folder”. The functionality of the “finger” can be checked by connecting the positive terminal to the positive of the battery, and the body to ground; if the rod clicks, this means that the valve opens.
Then we will check the operation of the starting device, everything should work perfectly here.
We will also check the correct installation of the rod to the lever on the throttle valve axis of the first chamber.
There should be a washer on the traction lever that comes from the accelerator pedal, be sure to check, if the washer is missing, then replace it. All parts must be assembled as originally intended and repeatedly tested in practice.
Then we pump gasoline into the float chamber through the fuel hose using a gasoline pump, install the top cover with the float and, after tightening 5 bolts, start the engine. Let it run a little and, turning off the engine, unscrew 5 bolts.
Let's remove the top roof again to check the fuel level in the float chamber; the jets should be submerged in gasoline.
Setting the gasoline level in the float chamber
To adjust the float in the DAAZ carburetor, it is not necessary to remove the entire assembly, but partial disassembly is required. To make adjustments, perform the following steps:
- turn off the engine, open the hood;
- remove the air filter cover (unscrew the three nuts);
- remove the filter housing itself (four more nuts);
- disconnect the suction cable;
- remove the telescopic trigger rod;
- unscrew the five screws securing the carburetor cover (they need to be carefully removed and reassembled, it is important not to drop the fasteners into the manifold);
- for ease of operation, disconnect the fuel supply hose;
- turn the lid over and determine the gap between the float and the cardboard spacer, it should be from 6 to 6.5 mm;
- if the gap differs from the required value, adjust it by folding the tongue;
- It will also be necessary to align the float itself in a plane; it may have a chamfer relative to the surface of the cover.
When adjusted correctly, immediately after removing the cap, the gasoline in the float chamber is approximately level with the center of the beveled surface of the carburetor body, and the float stroke is approximately 14 mm.
The third stage of carburetor adjustment
Then use a Phillips screwdriver to finally tighten the top carburetor cover with five bolts, not too tightly, but not too loosely, so that the cover does not hang loose and the threads are not stripped. Install the fuel hose and tighten it with a clamp.
Pay attention to the drainage tube of the INTAKE manifold, whether it is in its place, air is sucked through it in a dosed manner.
The tube is correctly installed in the letter “G” so that gasoline does not get into the EXHAUST manifold...
On the new VAZ 2107 “OZON” carburetors (DAAZ 2107-1107010-20) there is no drain tube on the intake manifold.
Then we start the engine to check proper operation. Use a screwdriver to adjust the idle speed and starting system; this adjustment should be done 1-2 times a year.
Design of DAAZ units
Detail on a car
A standard carburetor consists of the following parts:
- mechanism for maintaining a constant fuel level;
- engine starting and warming up system;
- idle system and transition system of the second chamber;
- accelerator pump;
- main dosing system;
- econostat system.
Large and small carburetor diffusers have some differences: a small diffuser marked 3.5 goes to the primary chamber, and 4.5 goes to the secondary chamber. The original diffuser has a membrane inside, which is designed to better separate the mixture. It must be remembered that drops of fuel will always collect on the exhaust channel membrane.
The difference in diffusers lies in the difference in pressure distribution: if the diffuser is smaller, then good vacuum near the atomizer itself is achieved at low speeds, and if it is larger, then mixture formation is achieved at higher speeds. This means you can install 3.5 marked parts to keep the sprayer running at low speed. This solution will be especially relevant for small-volume engines.
The production of carburetors such as DAAZ 2105 and DAAZ 2107, sometimes called “Ozone,” was mastered in 1979, when the Soviet automobile industry began producing the famous VAZ-2105. Although the VAZ 2105 is not currently in production, carburetors for these models continue to be produced, and their use is still relevant. The DAAZ 2105 carburetor model was produced for engines with a displacement of 1300 cc. cm, and model type 2107 is for 1500 cc engines. cm. They differed in the diameter of the mixing chambers and the size of the nozzle holes.
Differences between the 2105 carburetor model and previous families.
- Autonomous idle system with double emulsion.
- Availability of forced idle economizer.
- There is a pneumatic drive for the throttle valve of the secondary chamber.
- Vacuum operation.
- Availability of automatic engine start and warm-up.
The final stage of carburetor adjustment
If the threads on the 4 studs securing the air filter housing are broken, you need to replace them with repair ones and tighten them, dripping a little special liquid fixative onto the threads.
We place the lower filter housing and fasten it with 4 HIGH by 7 mm nuts with nylon so that it does not get sucked into the cylinders if it spins spontaneously due to engine vibration.
Important point! If you find that the nuts are 3 mm low, be sure to buy high 7 mm self-locking nuts from the auto store and install them yourself...
In winter, you cannot operate the car without a corrugation to heat the air supplied to the filter from the exhaust manifold.
Breather pipe Niva VAZ 2106-07 (2121-1014056).
And also, according to environmental laws, you cannot drive without a rubber hose of the engine breather; the most harmful gases come out from there, which you breathe. Don't poison yourself and your family.
It is important to know! The engine will not jerk or jerk when the spark plugs are in working condition. It is advisable to change one contact spark plug every 25,000-30,000 kilometers.
Don’t neglect to replace consumable parts on time and you won’t pay twice...
Computer diagnostics shows errors and deletes them, shows parameters, adapts. In case of complex failure, a motor tester, a gas analyzer, a smoke generator, a compressometer, an endoscope and other instruments and devices are used.
Correct selection
Fans of tuning VAZ classics and simply wanting to improve its performance characteristics most often opt for Solex
.
Initially, models from front-wheel drive cars DAAZ 2108 and 21083
. It is impossible to install them on classics without minor modifications. Let's look at such work in more detail. When choosing a device for your car, you need to take into account the engine displacement. For engines with a volume of 1.3 liters, the DAAZ 2108 fits well, and for 1.6 - the DAAZ 21083. These devices differ in the diameters of the cross-sections of the diffusers, as well as the fuel and air nozzles. To install any of these models on a classic engine, you must additionally prepare the following components. A new set of gaskets for the carburetor, a piece of hose to ensure its heating, a tee to the fuel system, a valve and a set of rods for the gas pedal. To get the most out of this undertaking, it would be advisable to replace the ignition system with an electronic one. Now let's look at the procedure for installing the carburetor:
- On a cold engine, you need to remove the standard device along with the gaskets;
- The next step is to install new gaskets. The first is paronite, then plastic and then cardboard on top;
- A new Solex is placed on top of these gaskets, but the fasteners are not yet clamped;
- Under the nuts closest to the engine on the carburetor, place a bracket from a set of rods for the gas pedal;
- The double-arm pedal drive lever, which is removed from the valve cover, should be placed on the bracket;
- The rod on it, the one that is shorter, is replaced with a new one from the purchased kit, and if necessary, the length is adjusted;
- The pedal return spring should be placed closer to it;
- Now you need to ensure heating of the device; to do this, connect it to the outlet pipe on the intake manifold.
Adjusting the idle speed on Ozone carburetors
Before you begin adjustment work, you should warm up the internal combustion engine to operating temperature; it is also important that the carburetor is clean, without clogged channels. Next we proceed as follows:
- start the engine at idle speed (XX);
- using the quantity screw, unscrewing it, we increase the speed by 100 more than the normal norm;
- we begin to tighten the quality screw until the engine begins to work less steadily, then we turn it back a little, achieving stable operation;
- we find the optimal operating mode of the motor at idle with the quality screw tightened as much as possible, while 850 rpm is considered the norm (from 800 to 1000 is allowed).
With proper adjustment, gasoline consumption in urban areas averages 8.5-9.5 l/100 km, but the engine must be in good working order and the ignition must be set correctly. Even on Ozone carburetors, the solenoid valve jet often becomes clogged; before adjusting the idle mixture, it should be checked and, if necessary, cleaned.
Setting idle speed
The process involves two screws that set the quantity and quality of the mixture. For high-quality settings, having a gas analyzer will not hurt. Before adjusting the carburetor on a VAZ 2106, you need to know about the restrictive plastic bushings that are pressed onto the adjusting screws. These plugs do not allow you to violate the factory settings. If this factor prevents you from setting XX normally, then you should break them out with a slotted screwdriver.
Idle speed control technology:
- With the air damper open, set the crankshaft speed screw to 800-900 rpm.
- Rotate the quality screw to set the maximum engine speed.
- Using the quantity screw, set the speed on the tachometer to 950-1030 rpm.
- Use the quality screw to set the maximum speed again.
- Repeat these operations until the speed of 950-1030 rpm does not coincide with the maximum speed set using the quality screw.
- After the moment of coincidence, return the quality screw to the position where the engine speed was 800-900 rpm.
If you have a gas analyzer, use a quality screw to achieve a CO concentration in the exhaust gases of 0.5-1.2%. The final position of the screws must be secured with plastic sealant to prevent spontaneous unscrewing.
Do-it-yourself carburetor adjustment on a VAZ
Before adjusting the VAZ-2106 carburetor or its equivalent, you should perform the following operations:
- Check the timing valve clearances for correctness:
- eliminate malfunctions of the ignition system, if any;
- clean or replace spark plugs if necessary:
- clean the carburetor;
- adjust the position of the float valve.
Carburetor adjustments are made with the engine preheated. First, with the engine not running, both adjusting screws must be tightened until they stop. After this, unscrew the screw that regulates the amount of fuel mixture three turns. Then we unscrew the screw that regulates the fuel quality by 4-5 turns.
To make further adjustments, start the engine. By rotating the fuel quantity adjustment screw, we set the speed within 800 rpm. After this, using the screw that ensures quality, we lean the air-fuel mixture (to do this you need to tighten it) until the speed begins to drop. In this position, fix this screw, and then unscrew it in the opposite direction by 1-0.5 turns, achieving stable operation of the engine in idling mode. It is recommended to revoke the engine and make sure that the engine speed in idle mode is within 800 ±50 rpm.
Setting the Ozone carburetor trigger
A situation often arises when a VAZ-2106 car does not start well in cold weather; the main reasons for this problem are an unregulated starting system or a broken diaphragm. Here you need to know that when the air intake expands, the air damper closes completely, but when starting under the influence of vacuum, it opens slightly at a certain angle.
On DAAZ carburetors of models 2105, 2107, for cold starts, a pneumatic valve is installed that provides a starting gap for the air damper, and this valve has an adjusting screw closed with a special plug. If the throttle valve angle is set incorrectly with the screw, the fuel mixture of a cold engine will be disrupted and starting problems will arise.
There are several ways to adjust, this can be done with the carburetor removed by closing the shock absorber and simulating the force of a vacuum by pressing with your finger. In this case, the gap between the housing wall and the lower edge of the “air duct” should be within 5-5.5 mm; probes, drills or other objects of a certain diameter can be used for measurement. The initial gap between the throttle valve (bottom) and the carburetor body is also set; its recommended value is 0.7-0.9 mm, and the adjusting screw is located at the bottom.
Nuances and main malfunctions of Solex carburetors
Despite all the positive aspects and advantages, Solex carburetors have their disadvantages and characteristic “diseases”; one of the main disadvantages is problems with idling due to clogging or airing of the channel. Air enters the XX system mainly due to the tight fit of the cover to the body, since over time the metal is deformed, and such a defect can be corrected by replacing the gasket and grinding the adjacent surfaces.
Another common problem with idle speed is a clogged channel, which can only be cleared if you remove the quality adjustment screw. But the whole difficulty lies in dismantling this screw, since it is located deep in the “body” of the carburetor and is held in place by a rubber seal.
Even a completely unscrewed screw does not simply come out of the channel; it can be dismantled using a piece of hollow tube, for example, taken from an old radio. To use the tube as a puller, we make two cuts at the end, then insert the device into the channel, and remove the part we need by twisting it out.
Another typical drawback of Solexes is failure while driving when accelerating the car, which occurs due to the accelerator pump. To correct this defect, car owners most often upgrade the accelerator pump nozzle (“spout” or “elephant” in common parlance), transferring the injection of both tubes to the primary chamber. Solex practically does not cause any other troubles; it serves for a long time and reliably.
The work applies exclusively to the idle speed of the VAZ 2106. The setting does not affect other engine operating modes. There are two screws for regulation: a large one for the number of revolutions and a small one for the quality of the mixture.
Before starting work, make sure that the ignition system is working properly. Adjust or repair it if necessary. The engine must also be in good working order.
Separate elements of six carburetor repair
Qualified carburetor repairs are carried out in specialized repair shops and car service stations in the presence of professional stands. However, some repair work can be done with your own hands if you have basic plumbing skills.
Thus, a number of malfunctions in the functionality of the product consist of clogging of fuel lines and small channels of small caliber carburetor jets, incl. and the presence of resin deposits from the fuel composition in them. This can be eliminated by washing the calibrated components and internal surfaces of the product with acetone or its analogues and blowing with a compressor under a pressure of about 4 kgf.
The idle system is most often subject to adjustment work and is usually carried out after traveling 8-10 thousand km. This type of work is carried out by establishing the positions of 2 bolts, the position of one of which determines the composition of the fuel mixture, and the second - its volumetric value. Requirements for starting adjustment: engine temperature – 85-90°C, antifreeze – 90-95°C, cylinder head valve clearances are adjusted, the throttle valve is closed, the ignition timing is determined according to the standard.
- The frequency value of the rotation of the crankshaft with the amount of fuel mixture is set within the range of 0.8-1 thousand rpm.
- The percentage concentration of CO in the exhaust gases using the fuel mixture quality screw is set within the range of 0.5-1.2 cents.
- The rotation speed value that was knocked down when setting the carbon monoxide level is regenerated within the limits of 0.8-1 thousand rpm.
- It is also possible to restore the parameters of CO concentration.
- Next, you need to sharply press the accelerator pedal and then release it from the force. The following picture should be observed: an increase in frequency occurs without interruption, a decrease in frequency leads to the fact that the power plant operates at low crankshaft speeds. If the engine stalls, you will need to re-adjust the engine crankshaft speed with a value of 0.8-1 thousand rpm.
Another common defect is that the VAZ 2106 carburetor does not start for the following reasons:
- if the fuel lines are clogged, it is necessary to pump them with a compressor unit, and the gas tank should be washed and steamed;
- If the fuel pump or carburetor mesh filter components are clogged, they must be cleaned, and if they are defective, they must be replaced.
There is also such a defect in the fuel system of the “six”, when the VAZ 2106 carburetor shoots at If the carburetor and fuel pump are checked and are functioning correctly, then the VAZ 2106 is “to blame” for this malfunction, the glow element of which is dirty or oily. They need to be cleaned, degreased, and, if necessary, replaced.
Sometimes, as an element of modernization of the “six”, a turbine is used on the carburetor, which, with the correct installation of this device, increases the power of the power plant
It is very important to correctly install and connect this device to improve the dynamic performance of the car.
Any VAZ 2106 carburetor, the price of which will differ depending on the manufacturer’s brand, is mounted on a vehicle with basic knowledge of plumbing. Therefore, carburetor installation is easy for car enthusiasts; it is much more difficult to make the correct adjustments to this product.
As a last resort, if the old spare part does not meet environmental requirements, allows increased fuel consumption, does not maintain idle speed and cannot be repaired, the carburetor must be replaced with a new product and then adjusted.
Which carburetor model to choose
For any VAZ car, starting from 2101 to 2107, only certain carburetor models are suitable.
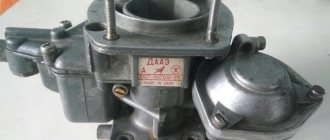
DAAZ carburetors
Carburetors DAAZ 2101, 2103, 2106. They were produced at the Dmitrov Automotive Unit Plant, which bought a license from the Italian company Weber, therefore these carburetors can be indicated under both names. The devices were not distinguished by the complexity of their design, but they could please their owners with the rapid acceleration of the car and good speed. One of the biggest problems in installing these models is their virtual absence on the market.
In addition to speed and simplicity, Weber carburetors also provided incredibly fast fuel consumption - these “monsters” consumed 10–14 liters per 100 km. fuel.
The powerful but resource-intensive Weber carburetor was produced by the Russian Dmitrov plant using Italian technology
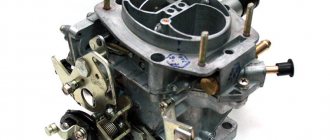
Carburetors "Ozone"
More technologically advanced models, which were already installed in VAZ 2105 and 2107 cars, were also produced at the Dmitrov Automobile Unit Plant. However, they were not only more advanced and improved, but also more environmentally friendly. This is why they received the name “Ozone”. This carburetor made it possible to reduce fuel consumption to 7–10 liters. 100 km, while maintaining the dynamic characteristics of its predecessors. The downside of the device was the complexity of its assembly and constant contamination in one of the chambers, which led to the fact that the acceleration of the car noticeably deteriorated, the speed decreased and the engine began to act up.
“Ozone” is an environmentally friendly model of DAAZ carburetors
Solex
A little later, DAAZ 21053 carburetors appeared. They were produced under license from the French company Solex, hence the name of the models. These carburetors were not much similar to previous DAAZ models. The updated design with a fuel return system made it possible to save 400–500 ml of fuel per 100 km. These carburetors were distinguished by good power and low gasoline consumption. The disadvantage of the device was the narrow fuel and air channels, which very often became clogged.
The Solex carburetor successfully combines the power and environmental friendliness of its predecessors
Solex carburetors came in many variations with different auxiliary systems. In the CIS, the most popular option has become an electric idle air valve.
Custom carburetor Solex 21073
Often, inquisitive car enthusiasts resorted to replacing the carburetor on their own. One of the suitable models turned out to be Solex 21073, famous for its fairly wide jets and channels. Such a carburetor increased the car’s power, but at the same time increased fuel consumption - 9–12 liters. per 100 km.
Solex 21083
The second non-standard carburetor, which with some modifications fits the VAZ 2106 and 2107 models, is Solex 21083. After expanding the diffusers and installing jets, this device allows you to significantly increase the dynamics of the car without much fuel consumption. However, the process of upgrading a carburetor is very complex and time-consuming.
Let's sum it up
Taking into account the above information, it becomes clear that the carburetor of the VAZ 2106 car must be properly and promptly serviced. The quality of internal combustion engine operation, carburetor service life, fuel consumption, acceleration dynamics and a number of other indicators and characteristics depend on this.
If any malfunction occurs, do not delay repairs. Moreover, even if there are no malfunctions in the operation of the engine and dosing system, the carburetor should be adjusted every 20-25 thousand km. mileage
We also recommend reading the article on how to clean the carburetor yourself. From this article you will learn about the features of cleaning a car carburetor, as well as what you need to consider when performing this procedure.
It is also recommended to periodically clean the carburetor. Cleaning the carburetor is quite simple and quick; all work can be done independently, without resorting to the services of a service station.
As a result, the owner receives not only a fully functional, but also a “correctly” functioning dosing device, which will allow him to operate the car with complete comfort and maximum efficiency from the power unit.
Reasons for adjusting the VAZ 2106 carburetor
If the mixture coming from the carburetor to the engine is too rich in fuel, it can flood the spark plugs. If the mixture is too lean, engine power will noticeably decrease. The main symptoms of suboptimal mixture composition are:
- difficulty starting a cold engine;
- unstable engine operation at idle;
- dips when pressing the accelerator pedal;
- loud pops from the muffler.
In most cases, the problem can be solved by timely adjustment of the mixture composition using quality and quantity screws. By rotating these screws, you can change the clearance of the emulsion channels, the fuel level in the float chamber and provide additional fuel to compensate for the excess air. This procedure will only take a few minutes.
The car won't start
The cause of difficulties when starting a cold engine, when the crankshaft rotates but the engine does not start, may be the ignition system and carburetor. If the ignition is working properly, most likely the nozzles, strainer or other elements are clogged, making it difficult to supply fuel to the float chamber. You can fix this problem as follows.
- It is necessary to clean clogged channels and jets with a special aerosol carburetor cleaner, and then blow them out with a stream of compressed air. Using aerosols to flush the carburetor will eliminate the need for dismantling it.
- If there is no fuel in the float chamber, the strainer and needle valve should be flushed. To do this, the filter will need to be removed from the carburetor. Flushing the fuel filter eliminates the possibility of oil deposits preventing fuel from penetrating into the float chamber.
- It is necessary to check the presence of gasoline in the float chamber using the accelerator pump (AP). When you sharply press the accelerator lever, you should be able to see fuel being thrown into the mixing chamber from the nozzle channel.
When the throttle valve is pressed, the lever through the drive sector acts on the diaphragm pusher, and fuel is instantly injected through the nozzle into the diffuser.
Car stalls at idle
In idle mode the valves are closed. A vacuum is formed under them, ensuring the flow of fuel through the hole under the damper of the first chamber. The cause of a situation in which the engine starts but runs unstably is most often the carburetor. Depressurization of its housing may occur. This will lead to excess air entering the carburetor, leaning the fuel-air mixture. The settings of the quality and quantity screws that regulate the composition and quantity of the combustible mixture may also fail. In addition, the lack or absence of fuel in the float chamber leads to a lean mixture entering the engine.
The current situation will require the car owner to perform the following actions.
- To eliminate depressurization of the housing, replace the sealing gaskets between its individual parts.
The Ozone carburetor uses a heat-insulating gasket as a sealing element - Tighten all bolted connections.
During operation, to prevent depressurization, the screw connections of the carburetor parts should be periodically tightened. - To prevent depressurization, replace the rubber ring of the solenoid valve and quality screw.
- Check the condition of the ignition timing vacuum regulator hose for wear and mechanical damage.
A loose connection in the vacuum ignition timing regulator hose allows excess air to enter the carburetor. - Set the optimal gasoline level (in the Ozone carburetor it is located in the middle of the inclined wall of the float chamber) by bending the float mounting tab. The float gap (distance between the float and the gasket adjacent to the carburetor cover) should be 6.5 ± 0.25 mm.
The optimal fuel level is in the middle of the inclined wall of the float chamber - Use the quality screw to adjust the free movement of the fuel emulsion through the idle system, and use the quantity screw to adjust the volume of the mixture supplied to the cylinders.
Rotation of the quality screw changes the size of the fuel channel, reducing or increasing the flow of fuel emulsion
The smell of gasoline appears in the cabin
In any case, the appearance of a fuel smell in the cabin is due to its excess in the float chamber or a loose connection of the housing elements as a result of wear or mechanical damage to the sealing gaskets and rubber hoses.
The appearance of a smell in the interior of a VAZ 2106 is a sign of a high fire hazard. In this situation, you should immediately turn off the engine and take all measures aimed at identifying the malfunction. Starting the VAZ 2106 is possible only after eliminating the causes that led to the penetration of gasoline vapors into the vehicle interior.
To eliminate the causes of gasoline vapor entering the cabin, you should:
- Check fuel lines for leaks.
- Replace the carburetor sealing elements.
Periodic replacement of sealing elements to eliminate malfunctions in the carburetor during long-term operation - Measure with a caliper and set the optimal height of the float position, ensuring complete shutoff of the needle valve (6.5 ± 0.25 mm). The location of the float in the chamber must ensure complete closure of the needle valve
Dips when pressing the accelerator pedal
When you press the accelerator pedal, the throttle valve opens. Next, the accelerator pump comes into operation through an articulated lever. If it is faulty, then pressing the pedal will lead to interruptions and engine stop. This most often manifests itself when starting from a stop and suddenly accelerating. When you sharply press the accelerator lever, a powerful jet of fuel should be observed from the nozzle channel into the emulsion chamber. A weak stream may be due to:
- clogging of supply channels, spray nozzle and discharge valve;
- depressurization of the housing;
- a broken tube of the vacuum ignition timing regulator.
To resolve this problem you must:
- Replace the carburetor sealing elements.
- Tighten bolted connections.
- Replace the rubber o-ring of the solenoid valve.
- Check the vacuum ignition timing regulator tube for wear and mechanical damage.
- Repair the accelerator pump (rinse the supply channels, clean the spray nozzle of deposits, replace the diaphragm).
The causes of interruptions when pressing the accelerator pedal are often faulty elements of the accelerator pump.
Video: repair and maintenance of the VAZ 2106 accelerator pump
Popping sounds in the exhaust system
The appearance of loud sounds in the exhaust system is a consequence of the fuel-air mixture being too rich. Such a mixture with a high content of the liquid phase, without having time to burn out in the working cylinders and having heated up to maximum temperatures, ends the cycle with an explosion in the exhaust system. As a result, loud popping sounds are heard from the muffler. In addition to the carburetor creating a mixture with an excessively high concentration of fuel, the reasons for this situation may be:
- late ignition;
- loose fit of exhaust valves;
- mismatch of valve timing.
To eliminate possible causes of this malfunction, you must:
- Remove the valve cover, measure the thermal clearance of the exhaust valves and adjust it if necessary. A correctly set thermal clearance of the exhaust valves prevents the valves from being pinched and the unburned mixture being thrown into the muffler.
- Adjust the fuel supply to the carburetor by setting the required clearance of the shut-off valve in the float chamber. The distance from the float to the carburetor cover with gasket should be 6.5 ± 0.25 mm. Correctly set float clearance ensures optimal fuel level in the chamber
- By rotating the quality screw and thereby changing the cross-section of the fuel channel, achieve free movement of the fuel emulsion along the idle circuit. Use the quantity screw to adjust the volume of mixture supplied to the cylinders. The composition and quantity of the mixture coming from the carburetor is regulated by quality and quantity screws: 1 - quality screw; 2 - quantity screw
- Set the ignition timing. To eliminate the possibility of late ignition, loosen the octane corrector mounting nut and turn the housing 0.5 scale divisions counterclockwise. The ignition of the mixture is greatly influenced by the correctly set ignition timing: 1 - housing; 2 - scale; 3 — nut for fastening the octane corrector
Signs of trouble
Symptoms of the development of a rich mixture are:
- increased fuel consumption;
- increased engine temperature;
- loud exhausts and black smoke from the muffler pipe;
- reduction in machine power.
Signals about the arrival of a lean mixture are:
- loss of power characteristics;
- popping sounds under the hood;
- sudden heating of the engine.
Video tutorial for setting up a VAZ 2106 carburetor
All components of the car mechanism require careful care, regular maintenance and periodic preventive repairs. Prevention and maintenance consist of disassembling the housing, thoroughly cleaning and rinsing the internal and external surfaces of the parts.
After disassembling the carburetor, an external inspection of the parts is carried out and faulty components are rejected. You can start setting up only if all elements are in working order. After all defective components have been replaced and the carburetor assembly has been reassembled and installed, adjustments can begin.
Adjusting the float of the VAZ-2106 carburetor
The basis for setting up the unit is the adjustment of the float. Exceeding the standard filling level of the internal chamber leads to oversaturation of the fuel with oxygen and an increase in gasoline consumption without improving the dynamic characteristics of the car.
In terms of setting the float position, the adjustment of the 2106 carburetor is carried out in several stages:
- Removing and installing the top cover of the housing in a vertical position.
- Correction of the needle position, the result of which should be contact of the needle ball with the surface of the float.
- Control of the gap between the float and the cover, the adjusted gap should be 6 mm with a tolerance of +0.25 mm. A tool for eliminating excess or insufficient clearance is a float tongue, by pressing which the adjustment is made.
- Control of the float stroke, which in the adjusted state is 8 mm with a tolerance of +0.25 mm.
Adjusting valve clearances
The gaps are checked on a cold engine using a 0.15 mm gauge. Based on the results of the inspection, the need to refine the gaps is determined.
Ignition timing setting
The ignition timing is set by aligning the control marks on the gas distributor cover and the flywheel.
Debugging the idle speed mode
This stage of work requires preliminary preparation of the mechanisms. It is required to warm up the car's power unit to 900°C, achieve starting and stabilize the engine by rotating the qualitative and quantitative fuel screws, if this does not happen automatically.
Adjusting the VAZ carburetor at idle speed:
- By rotating the screw, which regulates the quantitative characteristics of the fuel, set the crankshaft speed in the range of 800-900 rpm;
- By rotating the screw, which is responsible for the quality of the fuel, achieve stable and smooth operation of the power unit at the maximum possible number of revolutions;
- Reduce the speed by tightening the quantity screw to speed values in the range of 950-1030 rpm;
- Increase the rotation speed again to maximum by unscrewing the quality screw;
- Consistently repeat steps 2-4 until the number 950-1030 rpm coincides with the maximum number of revolutions achieved by rotating the quality screw;
- Having achieved a coincidence of indicators, return the quality screw to the position corresponding to the number of revolutions of 800-900 rpm.
If not the valve, then what?
Dirt, low-quality fuel, malfunction of the ignition system - all this separately and in the compartment can affect the idle speed disappearing or becoming unstable. If you have already decided to carry out a full diagnosis, then start with the filters - air and fuel.
If they are heavily clogged, then gasoline or air (these are the main components of the air-fuel mixture) will not enter the carburetor normally. To be more precise, they will hit, but only after overcoming great resistance. And don't forget about the thimble-shaped filter that is installed at the inlet of the carburetor.
Cleaning the jets
Before adjusting the carburetor, it is necessary to clean the channels and jets of dirt and deposits. To do this you need:
- unscrew the fuel and air jets;
- soak them in acetone or some other carburetor cleaner for ten minutes;
- blow out the jets with compressed air;
- Install cleaned and dried jets into the carburetor.
Before adjusting the carburetor, it is necessary to remove and wash all air and fuel jets.
Working with a carburetor is associated with an increased fire hazard. All precautions should be taken before starting work.
The VAZ 2106 carburetor is a rather complex device consisting of many small elements. Nevertheless, any car owner can wash the jets and strainer, as well as adjust the supply of the fuel-air mixture. To do this, you just need to consistently follow the instructions of the specialists.
When is adjustment needed?
Adjusting the carburetor unit is no more difficult than adjusting the clutch drive on a VAZ 2107, since it only involves adjusting the jets. In some cases, they need to be cleaned of resins and other contaminants; the presence of contaminants is felt by power dips in the process of accelerating. Many car owners claim that Ozone carburetors are not a very good option and recommend replacing them with Solex.
However, the signs that the device has begun to prepare an enriched mixture and needs to be adjusted are the same for both types of units:
- Increased fuel consumption.
- Frequent overheating of the motor.
- Black smoke from the exhaust pipe and pops.
- Loss of power.
The preparation of a lean mixture is characterized by the following characteristics:
- Popping sounds in the carburetor.
- Loss of power.
- Engine overheating.
Of course, you don’t always need to immediately grab a screwdriver and turn the adjusting screws - perhaps it’s something else. For example, when the idle speed floats, air may leak through the intake manifold gasket, or there may be a breakdown of the brake booster diaphragm. But even the reasons listed are not all the options, so specific recipes for eliminating certain problems cannot be given. The issue should be addressed comprehensively, taking into account the connection between vehicle systems.
Common causes of carburetor failure and their solutions
If one of the system elements in the carburetor fails, you may not notice it immediately. Failures appear gradually. Often, unstable idle speed is explained by a failed solenoid valve. Not all carburetors have such a device.
To test the solenoid valve, you will need to disconnect the wire connected to it. A positive contact is supplied to it from the battery. Correct wiring is indicated by a slight click.
You need to check the voltage on the wire that connects to the solenoid valve. If there is no voltage in the line, the wiring has failed. It will be necessary to completely replace the network from the ignition switch to the solenoid valve.
Unstable speed can also be observed when the spark plug electrodes are covered with a large layer of soot. The spark power is insufficient. It cannot ignite the fuel mixture. The poor condition of the spark plugs is due to incorrect carburetor settings. In this case, it supplies too much fuel to the combustion chamber.
The cause of this malfunction may be a burnt-out intake valve. It is responsible for the amount of fuel that is supplied to the combustion chamber of the engine. To ensure this, you need to adjust the carburetor. If this does not help, the inlet valve will need to be replaced.
What do we have after proper adjustment of the carburetor unit of the “six”?
Checking the adjustments of the fuel mixture preparation unit is the same important maintenance step as monitoring the condition of the car battery. An integrated approach to setting up the carburetor guarantees not only a comfortable mode of movement, but also a lot of useful points:
- An increase in power and a confident increase in speed.
- No failures in the operation of the internal combustion engine in the low and medium speed sector.
- Improved dynamic characteristics - the car picks up speed faster and accelerates in a short time.
- Optimal engine response, which is expressed in the responsiveness of the gas pedal.
The listed qualities make it possible to effectively use the combustible mixture, which is necessary both in urban traffic jams and on country roads. Therefore, proper adjustment of the carburetor unit will help the car gain speed in a timely manner and complete the planned maneuver.
From the history of power supplies for VAZ
On the first Zhiguli models, which were Fiat models improved and adapted to the roads of the USSR, devices that were produced by the Dmitrov Automobile Unit Plant were installed in the fuel system of their engines. For their production, a license was purchased from the French company Weber
.
They were assigned the index DAAZ 2101, 2103 and 2106. They are still called DAAZ-mi or Webers. Many owners still continue to use them on their cars, as they give good dynamic performance, and their design is simple, without any special design frills . However, these DAAZs have one significant drawback: too much fuel consumption. These models have long been discontinued, since with the advent of the VAZ 2105 the era of “ Ozons
” came. This is already the own development of engineers from Dmitrov, which differs significantly from its predecessor in design and operational characteristics. The name “Ozone” was not given in vain; at that time they were the most environmentally friendly models available. Reviews of such products are very favorable, but they also have problems. This is how failures of the pneumatic drive of the secondary chamber damper sometimes occur.
The “leaky” diaphragm of the forced idle economizer system causes unnecessary problems for drivers. But, despite such “punctures”, their reputation is still only positive. This carburetor model is capable of providing good dynamics, with a fuel consumption of approximately 7 liters per hundred kilometers, you just need to monitor its condition and carry out maintenance on time. The next stage in the evolution of products from DAAZ was the production of front-wheel drive cars, which were called “ Sputnik”
" Their power unit began to be equipped with a fundamentally new design of carburetors. Their production was also based under a license from France, which was provided by Solex. This model was the most economical of all previously produced, and also capable of providing good dynamic and power performance of engines.