Lada Granta has become a popular car in Russia from the first days of sales. The automaker offers three configurations that drivers are happy to buy and use every day. Adjusting headlights on a Grant is rarely required; the procedure is carried out with special equipment in a car service center, as well as with your own hands using a minimum number of tools.
When using a special circuit and certain requirements, adjusting the Granta headlights will take 20-30 minutes.
When should you adjust the light in Lada Granta?
During the annual technical inspection, station employees always check the angle of light using a device. If during the work deviations from the established requirements are discovered, then the Granta headlights must be adjusted.
Also, surgery may be required after replacing burnt out lamps. The settings are easily lost when there is strong pressure on the base. You can raise the headlights using the corrector washer located in the cabin. However, if the height of one beam is off, you will have to open the hood and adjust the angle manually.
Checking and adjusting Lada Granta headlights
Adjusting headlights, both left and right, is necessary both on a new car and after repair.
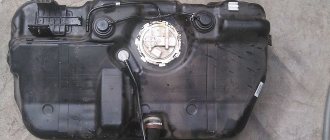
Left headlight of Lada Granta
The methods used for checking and adjusting the light are identical for different car models. The Lada Granta has two headlights with halogen lamps. The function of adjusting the light of the lamps from the interior of the Lada Granta is performed by a hydraulic corrector; there is a delay function for turning off the low beam after turning off the ignition after 45 seconds.
To carry out the adjustment, you need to prepare the following materials and tools:
- a set of keys;
- Phillips screwdriver;
- spare wheel;
- full tank of gasoline.
The last two points are needed to give the machine a full load. To check, the car must be installed horizontally (video author - Autonakat).
Further actions consist of the following steps:
- First you need to start the engine and let it idle. To fix the position, you need to put the car on the handbrake.
- Next, you should check the tire pressure and bring it back to normal.
- In front of the car, at a distance of about 3 meters, you need to install a special wall 1.8-2 m high and apply markings on it.
- You need to place a weight of up to 70 kg on the driver's seat to align the low beam line with the bulbs.
- To remove vibrations from the shock absorbers and body, the car should be slightly rocked.
- The light correction control must be set to the “one person” position, which corresponds to the load on the driver’s seat.
- Next, you need to turn on the low beam and adjust the left and right headlights separately. Both the left and right headlights need to be adjusted using a corrector. The rays of light from the light bulbs should shine according to the markings.
Low beam adjustment circuit
You also need to set up the light-off hold function. If desired, you can turn off the function within 45 seconds.
Headlight adjustment (adjustment dials)
Using the thumbwheel, you adjust the low beam horizontally, and using the hex bolt, you adjust the light in the vertical plane. You can raise or lower the beams from the headlights if, for example, the rear of the car is loaded. Ideally, the light beams should exactly match the markings on the wall.
After adjusting the low beam, you need to perform a test drive in order to check the correctness of the adjustment after repair. The light from the headlights should not blind drivers on oncoming vehicles.
Recommendations for quality improvement
To properly adjust the low beam, you need to check the body. There should not be any deformations on it, as they can affect the quality of light; the rays from the lamps will shine scatteredly. If the body has flaws, it needs to be repaired. In addition, in order for the bulbs to shine brightly, you need to check the cleanliness of the glass on the headlights. Dust that has accumulated on them can be removed with a vacuum cleaner.
During use, scratches may appear on the glass. In this case, it is not necessary to change the headlight; you can polish the glass surface. If problems are identified with the reflector, it cannot be repaired and should be replaced with a new one. To make the adjustment correctly, the machine must have lamps of the same power and size.
Halogen lamp for car
You can distinguish a car from the crowd using tuning:
- install eyelashes;
- dim the headlights;
- install lensed headlights;
- make lighting from LEDs.
The simplest tuning option is to purchase ready-made eyelashes and stick them on the top of the Lada Granta headlights. You can give the eyelashes the desired shape using a stationery knife. Tuning can be done with eyelashes made yourself. The materials used to make eyelashes can be different; film materials are suitable.
We recommend: Checking the car starter for operability
You can buy vinyl film, cut a template out of paper, and then cut out the eyelashes from vinyl. Tuning is done by gluing eyelashes onto an applied soap solution. You can perform tuning with plastic eyelashes.
Tuning - eyelashes on headlights
There are many tuning options used during car repairs. It all depends on the capabilities and imagination of the driver.
Reviews
| № | Positive |
| 1. | Kirill , 33 years old: after buying the car from the dealership there were no problems with optics. Incorrect lighting began after a collision on the highway. I had to adjust it with hydraulic correctors. It’s not at all difficult to figure out the sizes and angles of lighting on your own. |
| 2. | Vitaly , 41 years old: recently replaced the standard lamps with halogen ones, the accuracy of the light beam has dissipated. The regulator in the cabin did not cope with the task, even in position “2”. I adjusted it using hydrocorrectors on each of the headlights. It turned out to be good light. |
| 3. | Vladlen , 33 years old: despite the fact that the body geometry was restored after the accident, the low beam lost its accuracy. Thanks to hydrocorretors, I restored the light beam. |
| 4. | Vasily , 38 years old: I work as a taxi driver, I often drive at night. In general, the lighting of the Lada Grant is good and accurate, but after the repair all the settings were lost. I had to restore it myself using standard hydraulic correctors. |
| 5. | Mikhail , 42 years old: I can say that the lighting quality of the Lada Grant is good, far from ideal, but better than that of the Priora and Vesta. Sufficient for daily needs, those who want to improve performance can install xenon. |
| 6. | Gennady , 44 years old: I work as an entrepreneur, I drive most of the time. The accuracy of the low beam light beam is enough for me; the road and the right side of the curb are illuminated. During all this time I only adjusted it with hydraulic correctors a couple of times. |
| 7. | Valentin , 42 years old: after a major overhaul of the car last year, I slightly adjusted the high beam. The violation may be related to the accident. In all other respects, no comments. |
| Negative | |
| 1. | Victor , 34 years old: I don’t like the standard head lighting, it’s weak and dim. The adjustment doesn't help much. After installing xenon there are no problems, the road and side of the road are always under control. |
| 2. | Alexander , 36 years old: bought the car second-hand, second owner, good condition. I replaced the head optics with xenon, I’m happy with the quality, the clearance is excellent. My advice to motorists. |
| 3. | Konstantin , 32 years old: Lada Granta has a problem with high beams, similar to Priora and Vesta. Nothing has been changed. I installed additional headlights myself. |
Conclusion As for the Lada Granta, a car in the mid-price segment, the lighting is good, it is quite enough for daily use. Anyone who wants to see the road a kilometer ahead should install additional lighting.
To complete the data, read the recommendations and operating instructions (https://www.lada.ru/cars/granta/sedan/manual.html). The adjustment mechanism is similar to the Vesta and Priora models.
Preparing the car
To adjust the headlights correctly, you need to prepare the car: completely fill the fuel tank, put the spare wheel in its proper place, and adjust the tire pressure.
Headlights and reflectors must be clean, preferably polished, and not fogged up. It is necessary to install light bulbs of the same size, brand and electrical power.
Then, in the dark, the car is installed on a flat horizontal platform at a distance of 3 meters (or 5-10 meters for other brands of cars, according to their instructions) from the wall with markings applied to adjust the luminous flux. Such test walls (stands) are available at service stations and car repair shops. You can apply this marking yourself.
To remove vibrations from the body and shock absorbers, you need to rock the car, place a load on the front seat (or seat an assistant), the weight of which coincides with the weight of the driver.
This is necessary in order to equalize the height of the low beam headlights. The headlight leveling control located inside the car is set to the “one person” position.
The low beam setting is carried out with the engine running (idling) and the handbrake on or with anti-roll devices installed under the rear wheels.
Do-it-yourself adjustment of Lada Granta headlights
Let's look at what you need to quickly and step-by-step adjust the head light on a VAZ 2190:
- a room with a flat wall at a distance of at least five meters from the car;
- a Phillips screwdriver or a six-point hexagon;
- tape measure or long ruler;
- weight equal to yours to place on the driver’s seat (a person of your build or 2-3 bags of plaster - cement - the neighbor’s).
Step-by-step adjustment of low beam headlights on Grant
First, we park the car opposite a flat wall at a distance of 5 meters from the headlights to the wall. Only on a flat surface.
Your weight is in the driver's seat. The headlight hydraulic corrector is set to 0. The tires are inflated as required from the factory, the spare tire is in place.
The hydraulic corrector straightens the height of the light beam depending on how loaded the car is (on a scale from 0 to 5)
Second, we measure the height from the low beam bulbs to the ground. We mark it on the wall opposite each headlight - this is the upper limit of the light beam.
Third, we retreat down 35mm. and make another mark. For what - shown in the figure.
The headlight light on Grant falls in this shape. The upper edge of the beam has a kink: its upper edge should be equal to the height of your headlights to the ground. The lower edge of the fracture is at the same height minus 35 millimeters
Fourth, we close one headlight so that the light does not overlap the adjacent beam. We turn on the near one.
Fifth, use the light adjustment knob to adjust the height of the light. The goal is for the top edge to match our marks on the wall. An example in the picture above.
A long Phillips screwdriver is needed here. You can use a 6mm hexagon.
Access to adjusting the headlights on the Grant is not difficult. This connector only corrects the height of the light
Sixth – close the other headlight and adjust the second one.
Seventh - if you need to adjust the light from right to left, use long valves located on the headlights themselves.
Turn these knobs to adjust the light horizontally - right/left. If the light is adjusted correctly horizontally, the upper break lines of the light spot will be at the same distance as between the low beam lamps themselves.
Let's summarize
- Adjusting the headlights of a Lada Granta requires five meters of space, a machine, a Phillips screwdriver and a tape measure;
- to turn on the light in the trunk, turn on the low light and open the trunk;
- You can repair the hydraulic corrector yourself, or you can buy a new one for up to a thousand rubles.
Even more articles about the repair and maintenance of Grants are here.
As they say, saving means earning. This time we will save on adjusting the headlights. I’m not a big expert in car repair shops in my city, oddly enough, Granta doesn’t break down, and where it might break due to small things, I do the repairs myself, so I googled the most popular repair points in my city and downloaded their price list. According to it, it turns out that the average cost of adjusting headlights on a car is 400-500 rubles, some people include only the main optics in this amount, while others are ready to adjust the fog lights as well. Not to say that I'm a pauper, but I'm rational about costs, especially when you're getting ready to move forward with a real estate project soon, and I decided to try the headlight adjustment procedure myself. This is not difficult to do, but there are not enough clear instructions on how to do it without a device or without a specially marked wall. I decided to consolidate all the information I found and present it to the public.
Action plan
Summarizing all of the above, we organize the sequence of actions as follows:
- We choose the method of setting up the lighting fixtures (by ourselves, by a service station);
- We prepare the car, check the tire pressure (2.0 / 2.2 MPa), place the Lada Granta at a distance of three meters from the wall (notional obstacle), remove the plug from the back of the headlight;
- We draw the diagram according to GOST, parallel and perpendicular lines;
- We compare the light beam with actual points on the wall;
- We carry out adjustments using hydraulic correctors.
Checking and adjusting Lada Granta headlights
Let's talk about adjusting the headlights, which is similar to how adjustments are made on other car models. This procedure must be carried out both on a completely new car and after driving on a rough road.
If your low beam headlights stop working, the culprit may be a relay or fuse. But if, on the contrary, the low beam does not turn off, then most likely your relay is stuck.
To make adjustments, we will need to acquire a Phillips-type screwdriver, a standard tool, as well as a spare tire and a full tank of gasoline (if possible). The last points are needed to ensure that the vehicle is fully loaded.
- The car must be placed on a flat, completely horizontal surface.
Checking the vehicle's leveling
- After this, the car starts and idles. To fix its position, the handbrake is depressed. If the hand brake is not tightened or does not work, you can install a wheel chock under the rear wheels.
- Check the tire pressure. If it does not correspond to the norm, then pump them up or deflate them.
- Next, a special wall is installed in front of the machine, the height of which reaches two meters, and the distance to it is about three meters. In principle, you can make the wall yourself from chipboard or plywood, as well as other available materials. Or the car is placed in front of a flat wall, onto which markings are applied.
Adjustment diagram for adjusting headlights
- A load weighing up to seventy kilograms is placed on the driver's seat, which is necessary to align the line of the headlights. You can ask your partner to drive.
- In order to remove vibrations of the body, as well as its shock absorbers, the car gently rocks.
- Next, we move the Lada Granta hydrocorrector light control to the “one person” position. This position corresponds to the load in the car on the driver’s seat.
Hydrocorrector in position “0”
- We turn on the low beam, studying the output and the actual deviation of the headlight beams on the car.
Headlight adjustment (adjustment dials)
The thumbwheel is used for adjustment in the horizontal plane, and the hex bolt adjusts the position of the light beam vertically. If possible, the beams should correspond as closely as possible to points on the manufactured wall, both in the vertical and horizontal planes.
In the photo there are two headlight adjustment dials
The most difficult to reach vertical adjustment bolt
It is considered that the optics are correctly adjusted when the rays go directly to the places of the required projections, previously applied to the wall, according to the operating rules of the machine.
Now a so-called test run is being carried out. This must be done in order to secure the headlight adjustment, and also to check whether the work was done correctly. Make sure that the beams of light do not blind drivers coming towards you.
We improve the quality of work done
To achieve the optimal result, it is necessary to check that the car body does not have any deformations, otherwise it will be extremely difficult to adjust the headlights, and the light from them will shine as if scattered.
Also check that the glass of the optical instruments is as clean as possible. You can remove dust and some other types of dirt using a vacuum cleaner without removing the headlight.
Scratches on a car headlight can be seen even with the naked eye.
If the car has been in use for a long time, especially on unpaved roads, then the headlight glass could have received damage in the form of small scratches. It is not necessary to change the headlights at all. Simply polishing them will be enough.
Some problems can also occur if the reflector is damaged or its geometry is violated. It’s difficult to help here, since the mirror surface is extremely difficult to restore. You will have to replace the reflector with a new one. It is not difficult to detect defects on it, since the uniform curvature of the image on the reflector will be disrupted.
And, of course, keep in mind that the optics must have lamps with equal power to each other, as well as identical dimensions. If this is not the case, then the adjustment will be of no use at all.
We improve the quality of work done
In order to increase the efficiency of roadway lighting, we check body elements for defects, damage, and deformation. By ignoring the curvatures on the body, it is impossible to achieve maximum concentration of the light beam.
We check the integrity of the headlight glass and the tightness of the sealing elements. There is dust and dirt inside the optics module - a sign of poor sealing. Replace the rubber seal, update the silicone sealant.
Long-term operation of the machine on rough terrain or unpaved surfaces leads to damage and scratches on the optics. It is not at all necessary to change the headlights; it is enough to carefully polish them with special means.
If the reflector or mirror surface is damaged, unconditional replacement of the optics. Such a defect cannot be restored.
Installation of lamps strictly in accordance with catalog articles. Purchasing components other than factory ones does not guarantee the quality of lighting or service life.
Why is the setting broken?
Light angle adjustments get lost for several reasons:
- after mechanical impact during an accident;
- due to deep potholes, holes, speed bumps and uneven road surface joints;
- due to the installation of low-quality lamps of questionable manufacture.
The angle of the light beam may be lost due to an accidental collision with a deep pothole at high speed. Granta's suspension cannot completely absorb the force of a powerful impact of the wheel on the asphalt, and inertia is transmitted through the body. The headlight reflector suddenly accelerates up or down, the adjustment screw slips, and the light beam shines incorrectly. Frequent rolls over curbs or a high garage threshold can also have this effect.
During the journey, drivers find themselves in different traffic situations, accidentally falling into deep holes or driving over speed bumps at high speed. All this over time disrupts the position of the adjusting screw in the headlight reflector. However, the installation of Chinese low or high beam lamps affects the angle of the light beam. This parameter is affected by the location of the filament. If the bulb of the installed part is slightly offset vertically, then the standard optics will not be able to correctly collect the light beam and transmit it to the road surface. In this case, you will also need to adjust the light angle or replace the lamps.
At the time of an accident, strong vibrations are transmitted to the body, which can not only disrupt the settings, but also damage the Granta hydraulic corrector. Also, after an accident, adjustment of the PTF may be required.
Hydraulic corrector malfunction
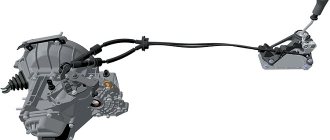
The hydraulic corrector device is simple. It consists of a master cylinder and two auxiliary cylinders for the left and right headlights. All cylinders of the hydraulic corrector are connected by tubes. On the dashboard there is a corrector knob used to adjust the headlights. When you turn the corrector knob, the pressure in the main cylinder changes, which is transmitted through the tubes to the workers. The force acts on the reflector pistons, which changes the angle.
In the electric corrector, the function of transmitting force is performed by motors that receive power from the on-board network. An electric corrector is more resistant to temperature fluctuations than a hydrocorrector, but is much more expensive.
Replacing the hydraulic corrector with a similar device
The reason why a hydraulic corrector may need to be repaired is most often due to jamming of the cylinder or a violation of the tightness of the system: rupture of seals or damage to tubes. In this case, the repair is ineffective; it is easier to replace the hydraulic corrector yourself with a similar device or an electric corrector. The replacement procedures are similar, but have differences.
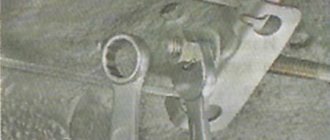
To replace the hydraulic corrector you will need a 21" socket and a ratchet. First, by unscrewing the nut inside, you should remove the corrector handle to release the corrector master cylinder. The cylinder needs to be removed. Then you need to remove the working cylinders and tubes. Then the entire structure needs to be pulled out through the hole into the cabin. Installation of a new hydraulic corrector is carried out in the reverse order.
Electrical corrector for Lada Granta
Replacing a hydraulic corrector with an electric one
The electrical corrector is installed in the same way. The hydraulic corrector is removed and electric analogues are installed instead of the working cylinders. Then you need to connect the positive wire to terminal “20”, and short the negative wire to ground. The connecting tubes are replaced with the wires used. The last step is to connect the terminal to the negative of the battery. It remains to check that the electric corrector is working correctly.
Hydro- and electric correctors used on modern cars make it easier to adjust the low beam. Properly adjusted headlights ensure the safety of the driver and passengers.
Replacing standard lighting
In order to replace headlights or carry out repairs, you need to prepare accordingly. The vehicle owner will only need 8 mm and 10 mm socket wrenches. The process of removing the headlight is as follows:
- Initially, you should disconnect the negative terminal from the battery.
- In order to gain access to the lower mounting of optical instruments, you need to remove the lower bumper.
- It is necessary to disconnect the turn signal lamp clips. You also need to remove the running lights of the Lada Grant.
- The main light cover should be removed by turning it counterclockwise. After this, you can gain access to the inner surface of the headlight.
- Remove the wire retainer from both the low beam and high beam lamps.
- The headlight hydraulic corrector must be removed counterclockwise.
- Using a wrench, unscrew the 4 mounting bolts.
- After completing all of the above steps, you can remove the burnt out lamp by replacing it with a new one.
While disconnecting optical devices, they must be held. This should be done to prevent them from falling and being damaged.
The rear lamps can be removed and replaced much more easily than the front lamps. This is due to the fact that they are accessed through the trunk of the car. As a result, there is no need to remove the bumper. Removing and replacing lamps in the rear headlights is as follows:
- The luggage compartment trim needs to be removed. The bases of the instrument lamps will become visible under it.
- To unscrew you will need an 8 mm wrench.
- Another fastener needs to be pressed out without using tools. This can be done by hand.
- The taillight connector can also be removed without the use of keys.
- Having pryed the headlight, it should be bent. After this, you can completely remove the device.
- To replace the lamp you need to unscrew the base.
After all these steps, the work must be done in the reverse order to install the headlight unit in its original place.
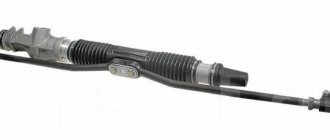
What is a hydraulic corrector and how does it work?
The hydraulic headlight corrector is installed on the Grant from the factory. This device adjusts the headlights higher or lower depending on the vehicle's load.
You need to adjust it yourself - there is no automatic setting.
The corrector control is located under the light switch handle. Position 0 corresponds to a car with one person - the driver.
The more the machine is loaded, the higher the hydraulic corrector value should be.
Principle of operation:
- the handle controls the hydraulic corrector cylinder;
- the cylinder regulates the pressure in the flexible tubes that go to the pushers;
- pushers are installed in the headlights - the higher the pressure in the tubes, the stronger the liquid inside the pusher presses on the rod;
- the position of the rod deeper/further is responsible for adjusting the headlight higher/lower.
What to do if the hydraulic corrector is broken
Have both or one headlight stopped responding to the hydraulic corrector? Most likely your pusher is broken.
According to the regulations, the entire hydraulic corrector mechanism is replaced as an assembly and cannot be repaired. Price from 400 to 1000 rubles. Order number: 21903718010.
If you want to fix the pushrod, there are two ways.
Table 1. Options for repairing the headlight range control pusher.
| Option 1 is barbaric. No further adjustment. |
|
| Option 2 is humane. We return the corrector to full working condition. |
|
A corrector kit costs about 700 rubles - it may be easier to replace it
How to replace a hydraulic corrector with an electromechanical one
Do you want to replace the hydro with an electric corrector (EMKF)? The process is simple, as there are ready-made solutions from the factory.
Article: EMKF-41. Price 2000-3000 rubles.
To replace, you only need straight hands - depending on the manufacturer of the EMKF:
- dismantle the old hydraulic corrector;
- We install a new corrector control unit in place of the cylinder - we run the wiring according to the instructions;
- we pull the wires through the elastic band along which the hydro pipes went;
- We put the regulators in their standard places in the headlights.
general information
Headlight settings are lost for a variety of reasons - from off-road conditions to minor traffic accidents.
Symptoms can also vary, for example, problems with low beams most often arise due to a broken relay or fuse.
Let’s also make a reservation that the headlight corrector installed on Grants can only compensate for the different load of the car, however, the car owner must level the horizontal plane independently.
The main reason for adjusting the headlights is the lack of light when illuminating the road, which has several possible reasons:
- Typically, a car that comes off the assembly line is adjusted to the weight of the average car owner (75 kg). If your body weight differs from the weight specified in the settings, then it is better to carry out the adjustment immediately after purchasing the car;
- If the hydraulic corrector breaks down, which results in bending of the headlights and difficulty making adjustments;
- After driving off-road;
- When buying a used car, since in this case the headlights were adjusted by the previous owner of the car to suit his own needs and weight.
Let's take a closer look at hydraulic correctors. These devices are installed on cars by the manufacturer and are designed to adjust the headlights higher or lower, depending on the degree of load on the car.
Since they do not have automatic adjustment, the adjustment must be carried out independently; the controls for the corrector are located at the light switch.
The zero position corresponds to a car with one person in the cabin (driver).
The operating principle of the device is as follows:
- the corrector cylinder is controlled using a handle;
- the cylinder is responsible for adjusting the pressure level in the tubes going to the pusher;
- the pushers are located directly in the headlights, and the higher the pressure in the tube rises, the more actively the liquid located in the inside of the pusher will press on the rod;
- The most important position for adjusting headlights is the position in which the rod is located.
New Lada: Grant fuse diagram with description
If the corrector breaks down, which often results in one of the headlights stopping responding to it, the pusher needs to be repaired - it is its failure that in the vast majority of cases leads to a malfunction of the device as a whole. There are two methods for repairing a pusher. The first of them does not provide for its subsequent adjustment; to implement this technique you will need:
- Remove the broken pusher from the headlight;
- Warm up the pusher tube (this will give it greater elasticity), and then remove the pusher from it;
- Tighten the self-tapping screw from the side of the tube (be sure to screw it at an angle, the degree of protrusion of the rod directly depends on the depth of the screw);
- Then adjust the length of the screw to get the final result you need.
The second method involves returning the hydraulic corrector to a fully functional state. To do this you need:
- Remove the pusher from the headlight;
- After warming the tube, remove it from the pusher;
- Try to move the pusher using pliers (the device will not function if there is not enough liquid in it or there is no proper pressure);
- When the rod moves, antifreeze is pumped into the pusher (using a conventional syringe), after which the system is put back together;
- If there is no movement of the rod, you should pump a small amount of antifreeze into the pusher (to the required level), and try to develop the rod;
- The optimal level of liquid inside the pusher can be determined both experimentally and by comparing a faulty hydraulic corrector with a working device.