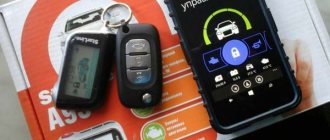
In 2022, it is almost impossible to find a car without an alarm system: probably only new vehicles purchased just a few days ago are not equipped with such equipment. At the same time, there are many devices on the modern market that allow you to equip your car with a set of warning equipment. The StarLine A91 model is popular both among novice drivers and among professionals who have been driving for more than ten years. In order to register directly the Starline A91 key fob, the owner of the alarm will need to implement a number of simple operations.
Programming Starline A91 key fob
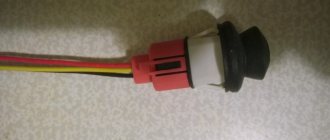
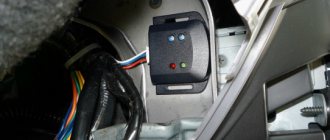
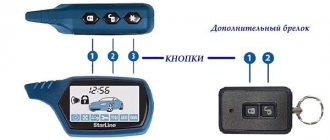
To connect the Starline A91 key fob to the alarm system installed in the car, you need to find the service button in your car. It is usually located under the panel, also called Valet, we will abbreviate it as “V”, its use occurs when the ignition is turned off. To bind, you need to press on it 7 times; you can note that for each impact, the signal light will respond by lighting up. Turn on the ignition.
After this, the car will make a peculiar sound, which will mean that your 5 seconds have passed; during this time you need to have time to press the second and third buttons on the key fob at the same time until you hear a sound notification.
If you don’t have time in the allotted time, then you need to start from the very beginning - the service button. If everything works, turn off the ignition, after which we hear another sound notification, which means the programming procedure is completed.
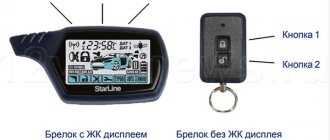
In this way, the main key fob with the display is registered, and the additional key fob is assigned by holding the close and open buttons until the sound signal.
Starline A 91 is very similar in appearance to B9, but they are different and do not fit together, so be careful when purchasing. In order to distinguish them, you need to find the name on the back side; if that doesn’t work, you can try the code written on the inside where the battery is, or call support.
After programming a new key fob, the old one may stop working, because... will be erased from the system memory automatically; usually up to 4 key fobs can be stored in it. For the same reason, you can use used keychains without fear that you won’t be able to attach them, the main thing is that the model matches.
Key fob compatibility.
Key fob compatibility
| Keychain model (patient) | Keychain model (donor) | Note |
| E60.1, E90.1, E61.1, E91.1, E63, E93 | AX3 | Can be prescribed to a donor and vice versa, but only to these patients |
| E60, B64, D64 | E60, B64, D64 | Interchangeable with each other |
| E90, B94, D94 | E90, B94, D94 | Interchangeable with each other |
| A2 | A4 | Can be prescribed to a donor and vice versa, but only to these patients |
| B6 | B9 | You can register to the donor and vice versa, but only one-sided key fobs! |
| Old versions of the B series (black LCD key fob and block) | New versions (blue LCD key fob and block) | Can be registered in the donor and vice versa |
| B6 Dialog | A61 | Can be prescribed to a donor and vice versa, but only to these patients |
| B9 Dialog | A91 | Can be prescribed to a donor and vice versa, but only to these patients |
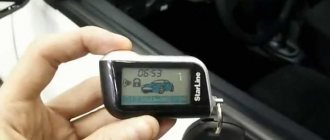
Indication on the key fob screen
There are a lot of animated icons on the display of the main key fob, the main one is the car, and the rest are located around it, most of them are not visible until you activate them.
Selected parts of the car: the hood, the trunk door and the passenger compartment react to the activation of the limit switch and may indicate an unlocked position when attempting to arm the car. When closing and opening the headlights in the figure light up.
The key appearing in the cabin indicates that the ignition is on.
A working exhaust at the rear of the car in the form of smoke signals that the engine is running.
When the word “brake” lights up, which is circled in a rectangle, it indicates that the handbrake is tightened on the manual and the pedal is pressed on the automatic, depending on the transmission of your car.
The activation of the shock sensor is displayed in the form of a hammer raised above the hood of the car.
One of the main indicators is the lock, which by its appearance (closed/open) shows whether the security is turned on.
The status of the sound signal will be indicated by the speaker sign; in silent mode, it will be crossed out.
The bell on top next to the hourglass indicates an alarm clock and timer.
The manual transmission, circled in a rectangular frame, is located at the bottom left of the car; when it lights up, it means that the alarm system is set to autostart with a manual transmission. This function is activated when installing the alarm system and cannot be disabled or activated using the key fob.
Do I need a case for a car battery?
The entire bottom row of icons indicates a menu that helps enable additional settings: periodic autostart, turbo timer, auto-arming and immobilizer.
The thermometer is in the middle of the display on the right, it lights up when asking about the status of the machine, you will see the engine heating numbers in Celsius, in place of the clock.
In the upper left corner there is a satellite icon, which will appear if you connect a beacon that works as a GPS and is an alarm interface.
The word pin code in the frame, located at the bottom left, next to the manual transmission, will light up when you set the secret code in the settings. The code is used to disarm a car without a remote control.
Two-way and one-way communication
The keychain itself can be with or without feedback. Roughly speaking, its electronics can only contain a transmitter or a transmitter and a receiver.
When there is no feedback, data transmitted from the alarm unit cannot be received.
A printed circuit board without a receiver is installed only in additional key fobs. And feedback, in turn, is always provided by the main key fob (it has a display).
Thanks to recent research, it has become clear that one-way communication is not suitable for providing serious protection. These are not just general words, but a real fact. Therefore, new alarm models are equipped with key fobs with feedback. Example: Starline B6 Dialog. That is, now only two-way communication is used. But not for the classic B6 alarm system.
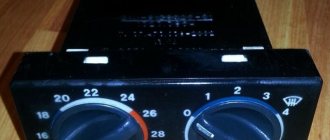
Setting the clock on the StarLine A91 key fob
It is not necessary to set the correct time, because... We usually check the time on our phone or the old-fashioned way on a wristwatch. But it needs to be configured if you want to use autorun on an alarm clock.
Download Instructions Starline A91
To configure, you need to hold the third button until one long beep and 3 single beeps. After this, the digital clock will blink on the display. With the second button you can increase the value, with the third you can decrease it. The setting starts with the clock, then pressing the third button will switch to changing the minute digits.
If you don’t need further setup, then you don’t have to interact with the remote control and after a few seconds the key fob itself will go to the initial window.
The time on the key fob will have to be set each time after replacing the battery.
Setting the timer
A timer is needed for a turbocharged engine, which is why it is also called a “turbo timer”. It allows you to turn off the ignition, while the engine will continue to run and cool for a specified time. This function saves the driver’s time and the resource of the unit.
To configure the function, you need to press the “V” button 6 times. We emphasize with the ignition off. After that, turn on the ignition and listen for six signals and press the Valet button again. To set the timer time, you need to use the corresponding button on the Starline key fob. The first will correspond to 1 minute, the second to 2 minutes, the third accordingly. For 4 minutes you need to press 1 button for a long time until there is a short response and again after it.
Turn off the ignition, confirming your actions. The option is configured.
To use, you need to press the third button for a long time, up to 2 beeps, then the turbine indicator will flash on the screen, with a short click on the same button you will turn on this function. The next time you press the button you will confirm your actions.
Interesting: Programming Sherkhan Magikar 5
Conclusion
Starline brand car alarm key fob often encounters malfunctions. To prevent them, you will need to install a cover and be careful during use. Spare parts for the device are low cost and easy to install. It is possible to repair the key fob yourself if you follow the recommendations of specialists and follow the suggested instructions. With a minimum of effort, the car owner will be able to use the car’s security system again.
Tired of paying fines? There is an exit!
- Absolutely legal (Article 12.2);
- Hides from photo and video recording;
- Suitable for all cars;
- Works through the cigarette lighter connector;
- Does not cause interference to radios and cell phones.
Find out details
Setting the sensitivity of StarLine A91
In an alarm system, one of the most important components is the shock sensor; it prevents burglary and alerts in the event of an accident. It is usually attached to the A-pillar, closer to the driver's feet.
If you need to change the degree of sensitivity, you will have to look for this sensor and turn the balancers that regulate its level: clockwise - increase, counterclockwise - decrease. First, the safety regulator is adjusted, then the alarm regulator. When setting up, the doors must not be closed and the security mode must not be turned off.
Turn on the key fob sound
The Starline A 91 alarm system is an average-priced system and does not have such a function. If the alarm or key fob has lost sound, then you need to contact a service center.
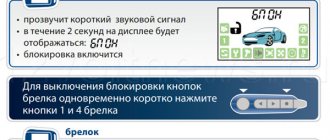
Locking key fob buttons
The function is useful if you carry the key fob in your pocket; to avoid pressing the buttons, you can temporarily disable them. To do this, you need to press the first and third buttons together, and to turn the buttons back on, press the second and third.
Why is it not registered?
Unfortunately, many inexperienced drivers regularly encounter situations in which the device in question simply refuses to carry out user-specified commands. There may be several reasons for such problems to occur:
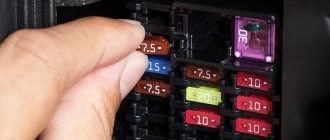
- Defective or broken battery. Before starting all operations, the car owner must check the charge level of the module itself. You should also inspect the contacts of the current source: they should not show signs of damage, oxidized areas, corrosive deposits, etc.
- Exactly four key fobs were already attached to the car - and this is the maximum possible number of remote controls that can be connected to one car. When you try to activate the fifth device, one of the previous modules will simply be deleted from the memory of the central electronic alarm device.
- The appearance of irreversible damage to the processor unit or antenna. It will not be possible to cope with the repair or restoration of such parts on your own. If faced with such problems, the user should go straight to a specialized service center.
Absolutely every individual situation requires detailed consideration. Therefore, if the device cannot be registered, perhaps the driver should visit specialists. Replacing the Starline key fob module is an operation carried out in almost every more or less large service establishment.
Setting the duration of starter cranking
The starter operates for about 1 second, which is not enough to start the engine in cold weather. Using the settings, you can increase the scrolling time. To do this, you need to use the “V” button 6 times, after which you will enter the setup mode. Turn the key to the “on” position, after which the headlights will blink 6 times, then press the button 9 more times. Then on the “remote control” we press the button corresponding to the time you need, 1 = 0.8 seconds, 2 = 1.4 seconds, 3 = 2 seconds. To turn on 3.6 seconds, use 1 button, long press, then normal.
Setting up the closer
This is an additional option that is activated when installing the Starline system at the service center. It works in such a way that when the security mode is turned on, the windows automatically close.
Enabling start based on engine temperature
Relevant function in winter. When it is running, the engine will not start during autostart if the engine has not cooled down, which saves the resource of the unit and fuel.
To connect it, press Valet 6 times, turn on the ignition, listen to sound signals equal to the previous presses, and then press 4 times again. After we need to set the environmental conditions, the first button corresponds to minus 5 outside, the second minus 10, the third minus 18, to set a negative 25 degree temperature, for a long time, and then usually click 1 button.
Setting up auto warm-up
The function makes it possible to start the engine to warm up from anywhere (home, work, etc.). It is worth considering that if the engine fails to start on the fourth attempt, you will receive a notification about failure.
Before starting the setup, for the function to work correctly, set the correct time on the key fob. Then use the “V” button six times, turn the key to the “On” position, then the same button 3 times, each press will occur in conjunction with the sound. After this, you will have no more than 10 seconds to make further adjustments. The first button will be equal to 2 hours, and each next button will be +1 hour.
To enable the function, you need to hold the 3rd button until the 2nd signal, then the 3rd button to move to the fan indicator on the remote control display, and pressing the 1st button will confirm your actions.
Remote engine shutdown
Starline A91 allows you to remotely turn off the car engine both to prevent theft (the interlocking circuits should in this case break the wiring sections necessary for the engine to operate, and not block the starter), and to terminate the autostart early.
In the first case you will need:
- Program function 8 of the service menu in advance (see procedure above) to value 1 or 2. In the first case, the engine, after turning on the “anti-robbery” mode, will be turned off the first time you press the brake pedal, in the second - immediately.
- To directly turn off the engine, simultaneously press and hold buttons 1 and 2 on the key fob.
Disabling the anti-robbery mode will require pressing button 2, as with normal disarming.
To turn off an engine running on autostart:
- On the main key fob, press button 2 for a long time, then briefly press button 3.
- The additional key fob does not provide the ability to turn off the engine.
Video: Starline A91 feature set.
Trunk control
The option is activated when installing the starline system. To use, you need to press the third button for a few seconds, and then click on the first.
The following instructions will allow you to activate the function: remove the car from security mode, use the “V” button 5 times, turn on the ignition, hear 5 signals, press the button 13 more times, and each press will be accompanied by a sound notification. We set values from 1 to 4, where the button number corresponds to the value, and to set the fourth value, you need to hold down and then click the first key.
To complete the setup, turn off the ignition.
Video duration 2:00 minutes.
Setting the time
One of the functions of security system key fobs is to display the current time on the screen. This is not just an opportunity for the owner of such a device to find out the exact time at any time of the day, but also to remotely start the engine on a schedule. But sometimes there is a need to know how to reset the time. One of the reasons is replacing the device's battery. The degree of its discharge is indicated by a special symbol on the key fob screen. If the battery status indicator starts blinking, this is a sign that it is time to replace it. And when the battery is removed, the time is automatically reset. And now, if the time is not set correctly, the programmed capabilities of the system - starting the engine by an alarm clock, by a given interval or by a timer - will not work correctly. And this can lead to such troubles as:
- By the time you are scheduled to leave the house, the engine will not be warmed up.
- Increased loads on the starter when starting the engine in winter.
- The battery may fail.
Setting the clock can be done in two ways:
In order not to wait until midnight, programming is easier to do according to the instructions. You must press and hold button No. 3 in this position. After three signals from the remote control, you can set the time using service buttons No. 1 and No. 2 (see the figure above). These buttons increase or decrease the time digits, and button No. 3 allows you to move between hours and minutes.
Once the time is set correctly, you don't have to press anything. The system will automatically signal with a short signal that the key fob has been programmed.
Setting up the key fob after replacing the battery
Unfortunately, all settings, from the time on the display to the start of the motor, will have to be configured again each time. Serious settings get lost and do not work correctly. Therefore, it is better to remember or save information on connecting the options you need.
No response to key fob
First of all, you need to make sure that the battery is working and the display is working at its full contrast and brightness; if this is the case, then the following problems are possible:
- The distance from the key fob to the car exceeds the range. It is worth paying attention to nearby possible interference and taking into account the reduced range in parking lots.
- Check the system's response to the spare key fob. Which will make it clear that the problem is in the starline system or in the main key fob.
If the problem is with the key fob, you should reprogram it as indicated at the beginning of the article. The system memory is not infinite, which means it is possible that the system “forgot” the key fob. But if this option does not solve the problem, you should contact the appropriate service.
If you don’t want to contact the center, then if you have the skills and the necessary tools, you can re-solder it yourself, but working with the software is only possible in the service center, because There is no publicly available data on this issue.
Transceiver with call button
The Starline company, as we see, in the fourth generation switched to using the same type of transceivers.
They may look different in appearance, but compatibility does not suffer from this. It is a pity that such principles were not relevant earlier. Then, there would be no problems with the choice of equipment.
Transceivers are also compatible
The transceiver is a small box with an antenna that is connected to the signaling unit. Without an “antenna,” of course, nothing works. The following Starline “antennas” are interchangeable:
- A4, A2 and 24V (if there is no call button on the case);
- A9, A6, A8, B9, B6;
- C4, C9, C6;
- B6 Dialog, B9 Dialog and here – A61, A91;
- A62, A92, B62, B92;
- All fourth generation (E90, E60, A64, ... D94).
Compatibility of old Starline key fobs
Currently, it is possible to record key fobs: - key fobs E60, B64, D64 are interchangeable (with each other) - key fobs E90, B94, D94 are interchangeable (with each other) - StarLine A2 to StarLine A4 and vice versa (one-sided and double-sided key fobs). StarLine A2, A4 and 24V (one-sided key fobs!) - StarLine B6 to StarLine B9 and vice versa (only one-sided key fobs!) - One-sided key fobs of old versions of series B (black LCD key fob and block) to new versions (blue LCD key fob and block) and vice versa. — StarLine B6 Dialog key fobs in StarLine A61 and vice versa, StarLine B9 Dialog in StarLine A91 and vice versa.
Attention. B6 Dialog and B9 Dialog have the main difference from B6 and B9 - these are Russified icons on the key fob, and the SN serial number looks like B91 W123456189 or B61 W123456189. If these signs do not apply to you, then replacing the B6 key fob with an A61 or B9 with an A91 key fob will not work.
How to unlock
In case of irreversible damage or loss of the remote control, the driver can disable the security using the programming button or a secret digital password consisting of 1-3 digits. The removal algorithm is programmed when setting up the processor unit. The commands and tables given in the manual will allow you to select the required operating mode.
Algorithm for disabling protection using the service button:
- After unlocking the door with the standard key, alarm signals begin to sound (or light signals, if the security system was previously turned on without a remote control). If a 2-stage disarming is programmed in the unit, the audible alarm does not sound.
- Place the key in the lock and turn the cylinder to the “on” position.
- Press the hidden setting key 3 times. It takes 20 seconds to find the button and press it (from the moment the alarm is turned on).
- Wait for 2 beeps from the standard siren, indicating that the security function has been disabled. Alarms are automatically stopped.
With a programmed coded shutdown, you must enter the first register of the password by pressing the setup button. The vehicle emits light and sound alarms and the key is in the ignition on position. If the code consists of a single digit number, then the security will be disarmed after the key is removed from the lock. To enter a two- or three-digit number, you need to enter the registers one by one, separating the numbers before turning on the ignition.
When unlocking, you should take into account the state of the automatic security activation function. If the mode is activated, an interval of up to 10 seconds is allowed between turning on and off the ignition circuits. If the requirement is violated, the security cycle is resumed and all entered password digits are canceled. When programming 2-stage protection, engine locks are removed by re-entering the password or using the setup button.
How to setup
Setting up the Starline key fob begins with programming the current time. To turn on the settings menu, you need to hold the button marked with an asterisk icon for 2-3 seconds. The buzzer will give a melodic signal, which is replaced by a short squeak and 2 additional beeps. At the same time, the flashing mode of the first clock register is activated. The value is changed using protection mode switches. After briefly pressing the star key, the minutes field is set.
The Starline alarm operating instructions recommend that you proceed to setting the alarm clock after setting the clock (by pressing the key with the star icon). Adjustment of hours and minutes is carried out using a similar method. To enable the mode, a separate section is used, which is activated after setting the minutes. The driver turns on the alarm by briefly touching the button marked with a locked sign (a bell-shaped label will light up on the display).
The unlock key allows you to turn off the alarm.
After adjusting the alarm, set the timer (if necessary). Programming and control of the mode is carried out in the same way; the active timer is displayed on the display with an hourglass icon. If there are problems with adjustment associated with breakage of the keys or element base, it is necessary to replace the feedback key fob.