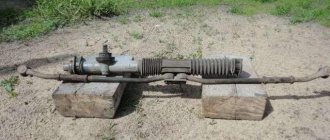
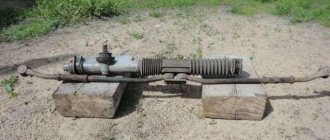
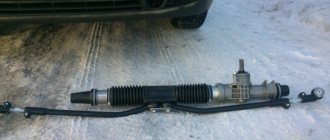
Lada Granta was originally created as an inexpensive car. Actually, that’s why it became one of the most popular cars on the roads. The manufacturer tried to introduce both proven and new elements into the design. But they have their drawbacks. The Lada Granta steering rack can present various surprises during operation. It is useful for the owner of a domestic car to understand the structure of many components.
Rack and pinion steering
- The steering column provides the ability to adjust the tilt of the steering wheel. And the steering wheel itself can be locked by installing an anti-rotation device connected to the ignition switch.
- The steering mechanism is of a rack and pinion type, where it is possible to change the gear ratio in different operating modes.
- The mechanism is mainly equipped with electric power steering.
- The electric amplifier is equipped with a unit that allows you to independently diagnose the technical condition of the device, and, if necessary, exclude the amplifier from operation.
Reliability of engagement of the gear pair on one side is ensured by a special gap set at the factory. On the other hand, the precision of engagement is maintained by a spring stop, which presses the rack itself against the gear teeth.
The above gap under normal conditions is 0.1 mm, but during operation it may be violated due to wear of individual parts. Thus, one of the main reasons why an extraneous knock appeared in the steering mechanism is a violation of the set gear clearance. It should be noted that there are other malfunctions that can lead to an unpleasant knocking sound in the car:
Useful tips for motorists
In conclusion, I would like to give a few tips that will help the steering rack and other elements of the control system serve you for a long time and reliably:
- visit a service station once every three months or check the condition of the steering yourself;
- constantly monitor the condition of the protective casing installed on the steering rack;
- try to drive on road irregularities to a minimum, especially when driving at high speed;
- do not wear out the steering rack by sudden starts with the wheels turned all the way;
- If play appears, make adjustments immediately;
- If you notice signs of malfunction, carry out repairs immediately, without waiting for the condition of the steering system to deteriorate.
Removing the steering gear
- socket wrench or socket wrench 13;
- flat screwdriver;
- durable knife;
- special 24mm wrench for the steering rack;
- hexagon 6 with wrench.
This work is carried out from the salon. Therefore, the car is not raised high. The swing rods can now be released by unscrewing them from the swing arms. And as soon as this work is completed, you can begin to dismantle the steering mechanism. Using a 13mm wrench, unscrew the nuts securing it and remove the mounting clamps.
Preparatory actions, dismantling unnecessary parts
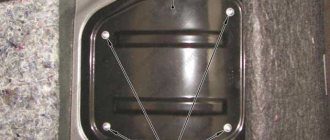
To remove the crankcase protection, you need to unscrew 4 screws located in one row near the bumper. Also, unscrew two screws having a standard size of M6x16. In some configurations, the protection consists of two parts, but in this case they are attached only with self-tapping screws. These words are illustrated by the following photo:
First, unscrew the “10” screws, and then the two “18” screws. In the second case, there will be more screws (eight).
Now let's look at how to remove the battery. First of all, disconnect its terminals. Then, you need to move the additional fuse box to the side. In general, actions are performed according to the photo:
Diagnostics, repair and reassembly
Unscrew the adjusting nut. Here you need to use a special 24mm wrench, which has external edges for unscrewing. Sequentially remove the rack stop spring, the sealing ring and the rack stop. Remove the crankcase cover. After removing the bearing cage and sealing ring, remove the rack. The second element of the steering mechanism pair - the gear shaft - is dismantled.
Before reassembly, all critical connections are lubricated with a special compound. Very often, it is the insufficient amount of lubricant that leads to rapid wear of loaded parts, which violates the previously established clearance. Therefore, even a recently installed rack knocks again.
How to avoid
To avoid the appearance of new knocks after repair, you must follow a few simple rules:
- Do not reach high speeds on uneven and gravel-covered roads, as well as when driving over potholes and potholes. And if you still can’t avoid this, be sure to ensure that the steering wheel is not in the extreme position at the moment the front wheels come into contact with the obstacle.
- Do not make sudden acceleration or braking when the steering wheel is in the extreme position.
- Do not drive onto curbs or high curbs.
Thanks to following these simple rules, knocks will not bother you for a long time, and the steering rack will last even longer.
Rack adjustment
If the value is 0.05 mm, then the adjusting nut should be tightened to the same amount. After the steering rack adjustment is completed, check the ease and uniformity of movement along the entire length of the rack stroke. Provided that everything is done accurately, you should fix the position of the adjusting nut by performing special core punching with a punch. When all the work has been completed, you can begin to reinstall the steering mechanism on the Lada Granta. After the mechanism has been installed back on the car, you should, even before starting to drive with the car stationary, turn the steering wheel, checking the uniformity of rotation. A check that will reveal that there is no knocking can only be done while driving on a rough road.
Removal of the steering mechanism (steering rack) on a Lada Granta car is carried out for its disassembly and repair in case of failure or complete replacement, as well as when carrying out various works in which its presence will interfere with the progress of their implementation. Prepare a standard set of tools and perform the following sequence of actions:
- Place the car on a jack and remove both front wheels.
- Remove the battery.
- From inside the cabin, unscrew the bolt of the terminal connection between the intermediate shaft of the steering column and the steering gear shaft. The wheels must first be set to a position corresponding to straight-line movement.
- We disconnect the tie rod ends from the rotary arms of the shock absorber struts.
- Next, unscrew the bolts and disconnect the steering rods from the mechanism.
- We unscrew two nuts securing the mechanism to the body studs.
- Remove the clamps from the studs.
- Then remove the rack itself by taking it out through the hole in the left wheel arch.
- Make the necessary repairs, then install in the reverse order.
At this point, the repair work to remove the steering mechanism on the VAZ 2190 has been completed.
Steering wheel tuning on Lada Granta
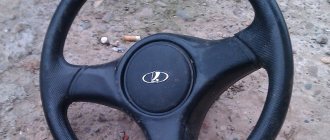
There are few options for upgrading the steering wheel on the Lada Granta. The most popular of them is installing a sports version. Such a steering wheel will not only make the interior more attractive, but will also increase the comfort of control, especially if it is selected correctly. You can install a multi-steering wheel, but only if the configuration is maximum, in other cases there will be nothing to control with its help.
The sports version must be injury-proof, that is, in the event of an accident it must be deformed without causing damage to the driver. Among the shortcomings, it can be noted that although there is an airbag in the standard steering wheel, the sports one does not have it. You can also modify the steering wheel by installing braid. More advanced ones install a heating thread under it.
To install the sports steering wheel, you will need to carry out the following operations.
- Align the front wheels straight (you can drive a little forward and back so that the trajectory is straight).
- Disconnect the battery terminals by de-energizing the vehicle's on-board network.
- The airbag control module must be disabled (if the Granta equipment is equipped with it). If you do not turn it off when removing the factory steering wheel, it may shoot out.
- Remove the steering wheel and install a horn on the adapter. The wiring must be stored in the adapter; to do this, carefully inspect all contacts.
- Connect the adapter to the shaft, but do not secure it with a nut.
- A sports steering wheel is installed on the adapter and secured with special screws.
You cannot throw away or sell the factory product; the sports version will raise questions when passing inspection.
Rack and pinion steering
If we talk in general about the steering mechanism of the Lada Grant, then the following are its main characteristics and features.
- The steering column provides the ability to adjust the tilt of the steering wheel. And the steering wheel itself can be locked by installing an anti-rotation device connected to the ignition switch.
- The steering mechanism is of a rack and pinion type, where it is possible to change the gear ratio in different operating modes.
- The mechanism is mainly equipped with electric power steering.
- The electric amplifier is equipped with a unit that allows you to independently diagnose the technical condition of the device, and, if necessary, exclude the amplifier from operation.
The schematic diagram of the Lada Granta steering device is quite simple. The rack-and-pinion type mechanism is fixed in the engine compartment on a special shield through rubber supports. Reliability of fastening is ensured by bolts welded to the body. Steering drive is provided through two separate tie rods, which interact with the steering arms of the front wheel struts.
Reliability of engagement of the gear pair on one side is ensured by a special gap set at the factory. On the other hand, the precision of engagement is maintained by a spring stop, which presses the rack itself against the gear teeth.
The above gap under normal conditions is 0.1 mm, but during operation it may be violated due to wear of individual parts. Thus, one of the main reasons why an extraneous knock appeared in the steering mechanism is a violation of the set gear clearance. It should be noted that there are other malfunctions that can lead to an unpleasant knocking sound in the car:
- loosening of the steering rack itself on the mounting bolts;
- loosening of the tie rod ball joint;
- wear or destruction of mechanical transmission teeth.
Power steering and power steering: do-it-yourself installation
The electric booster first appeared on Kalina, then on Grant and on the new Priora. You can drive a car without an ESD. But if a car owner previously owned a car equipped with a hydraulic or electric booster, then, at a minimum, he will experience great inconvenience. On the Lada Granta in the minimum configuration, the manufacturer does not install electric power steering, so many owners of such cars decide to install the power steering themselves. This procedure is not the easiest, and the unit is not cheap. But its presence means a comfortable ride, maneuverability and safety.
Removing the steering gear
If a knock does occur, the car owner will have to dismantle the mechanism. It is more convenient and faster to carry out this work when the vehicle is on a lift. To carry out the work you will need the necessary tools, which in this case include:
- socket wrench or socket wrench 13;
- flat screwdriver;
- durable knife;
- special 24mm wrench for the steering rack;
- hexagon 6 with wrench.
Before starting work, the battery is disconnected, thereby taking the necessary safety measures. At the initial stage, you need to first loosen the bolts securing the front wheels. The wheels themselves should be left in the “straight” position before lifting the car onto the lift. Next, the steering wheel driveshaft is disconnected from the rack and pinion drive shaft.
This work is carried out from the salon. Therefore, the car is not raised high. The swing rods can now be released by unscrewing them from the swing arms. And as soon as this work is completed, you can begin to dismantle the steering mechanism. Using a 13mm wrench, unscrew the nuts securing it and remove the mounting clamps.
The steering mechanism is removed along with the disconnected steering rods. The next stage of repair work is disassembling the removed device. Here you should free the steering rack from all protective covers that are put on the mechanism. For this purpose, cut off all the fixing clamps, which will subsequently need to be replaced with new ones.
Design
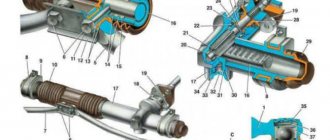
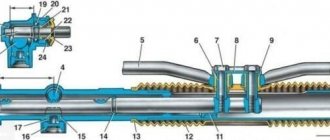
Steering rack design: 1 – shaft boot, 2 – cover mounting bolts, 3 – Belleville washer, 4 – worm shaft oil seal, 5 – worm gear cover, 6 – sealing collar, 7 – thrust bearing, 8 – worm shaft with bearing, 9 – rasp, 10 – left boot, 11 – binoculars, 12 – binocular bracket, 13 – nut plug, 14 – thrust nut, 15 – thrust spring, 16 – locking collar, 17 – thrust piston collar, 18 – thrust rasp piston, 19 – piston liner, 20 – steering rod bolt, 21 – stopper, 22 – plate, 23 – plastic clamp, 24 – steering rack boot, 25 – left side boot, 26 – steering rack pipe.
Diagnostics, repair and reassembly
Before determining why there is a knock in the steering, you should completely disassemble the rack and carry out diagnostics for wear, destruction of components and connections. Disassembly is carried out in this order. Secure the steering rack in a vice, having previously installed spacers made of soft metal or other material. Unscrew the nut securing the mechanism crankcase pipe. The crankcase tube is removed. Remove the clamps securing the pipe bushings and remove them.
Unscrew the adjusting nut. Here you need to use a special 24mm wrench, which has external edges for unscrewing. Sequentially remove the rack stop spring, the sealing ring and the rack stop. Remove the crankcase cover. After removing the bearing cage and sealing ring, remove the rack. The second element of the steering mechanism pair - the gear shaft - is dismantled.
Now you can diagnose the condition of the bearings and sealing rings. After thorough cleaning, the wear of the gear sectors and the condition of the surface of the rack and shaft are assessed. After all, this is where the reason lies that causes the knocking that appears. If necessary, select the necessary parts and replace them.
Before reassembly, all critical connections are lubricated with a special compound. Very often, it is the insufficient amount of lubricant that leads to rapid wear of loaded parts, which violates the previously established clearance. Therefore, even a recently installed rack knocks again.
Assembling the steering mechanism is carried out in the reverse order. For correct and easy installation of dismantled bearings, you should select the required diameter of pipe cutting, which will help to correctly install the bearings in place. The assembled steering mechanism must be adjusted, since the size of the gap can also determine whether a knock will appear after reinstallation.
Repair kit
In a Priora with an EUR, a rack from Kalina was installed with catalog number 11183-3400010 20. Therefore, the repair kit must be purchased specifically from Kalina.
Steering rack number
The repair kit includes a large number of parts necessary for repairs.
The price of a new rack starts from 5,000 rubles and higher, depending on the manufacturer, but new does not mean good, and the cost of a repair kit varies from 500 to 1,000 rubles, which is almost 10 times cheaper than a new rack.
Rack adjustment
Before installing the rack and rods back, it is necessary to set the gaps of the gear connection. Please note that it is better to immediately replace the thrust nut with a new one. Set the rack to the middle position, as if the wheels were straight. For adjustment, a special clock-type indicator mechanism is used. We start rotating the gear shaft and measure the indicator readings.
If the value is 0.05 mm, then the adjusting nut should be tightened to the same amount. After the steering rack adjustment is completed, check the ease and uniformity of movement along the entire length of the rack stroke. Provided that everything is done accurately, you should fix the position of the adjusting nut by performing special core punching with a punch. When all the work has been completed, you can begin to reinstall the steering mechanism on the Lada Granta. After the mechanism has been installed back on the car, you should, even before starting to drive with the car stationary, turn the steering wheel, checking the uniformity of rotation. A check that will reveal that there is no knocking can only be done while driving on a rough road.
Steering malfunctions usually occur due to insufficiently frequent preventive inspections. If the owner has missed the appearance of minor leaks in the steering mechanism, loss of integrity of the protective covers, then the likelihood that a knock will soon appear in it is quite high. Therefore, it is important to carry out annual diagnostics.
Lyrical digression
In Lada Kalina, the steering rack never makes a knock when we are talking about a new car. This is also true for the break-in period. Let's say in your case this is not done. Then, do not try to repair anything, but go straight to the dealer. According to reviews, the defect in question is covered under warranty, and most car dealers do this: the steering rack assembly is replaced with a new one.
This is what the replacement unit looks like, the rack assembly
There is a logic here. At the factory, adjustments are made correctly (this is true in 99.9% of cases). If a defect appears, the dealer replaces the assembly without expecting that adjustment will solve the problem. The owner does not need to hope for this either. The choice is yours.
