The differential bearings are mounted with a preload of 0.25 mm. The tension is ensured by selecting the thickness of the adjusting ring installed in the gearbox housing socket under the outer ring of the differential bearing!
So, if the bearings are good, then it’s better not to touch them, since I started looking all over Kharkov for these rings, not every store has them, and if they do, then, as always, they don’t have the required thickness!
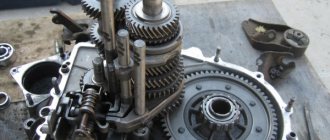
secondary shaft assembly
secondary shaft assembly
A small manual from the encyclopedia for assembling the gearbox:
1. When assembling the gear selector lever and the joint with the gear selector rod, first degrease the threaded holes in the joint body and the lever hub, as well as the mounting mounting bolts. 2. Apply thread sealant to the bolt threads. 3. We press the oil seals of the input shaft, drives and gear selection rod using mandrels or suitable pipe sections. 4. Lubricate the working surface of the oil seals with a thin layer of Litol-24 lubricant. 5. We install an oil seal with a right notch in the clutch housing (for right-hand drive), and an oil seal with a left notch in the gearbox housing (for left-hand drive). The arrows on the oil seal housings must coincide with the direction of rotation of the drives when the vehicle moves forward. 6. When assembling the secondary shaft, we replace the retaining rings of the synchronizer hubs with new ones. We press the outer and inner rings of roller bearings, ball bearings, gears and synchronizer hubs with mandrels or suitable pipe sections. 7. When assembling the hub with the synchronizer sliding clutch, before installing the retainer, apply a little grease to it and put it in the cracker. 8. Using a screwdriver, press the installed synchronizer spring towards the hub and put the block with the lock in place. In this case, the deepest socket should be located opposite the latch in the sliding coupling. 9. When assembling the differential, lubricate the satellites and drive gears with oil. 10. We mount the differential bearings with a preload of 0.25 mm. The tension is ensured by selecting the thickness of the adjusting ring installed in the gearbox housing socket under the outer ring of the differential bearing. 11. Selecting the thickness of the adjusting ring is necessary if replacing one of the following parts: differential box, differential bearing, clutch housing and/or gearbox housing. 12. After installing the differential into the clutch housing, it is necessary to secure one of the drive gears with a mandrel (plug) so that they do not move from their seats during further assembly. 13. Before assembling the gearbox housing with the clutch housing and the rear cover, apply a layer of sealant around the perimeter of the mating surfaces.
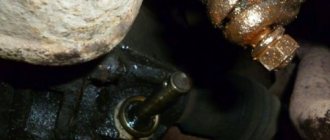
mileage 15 km after repair
I have already driven almost 1000 km . Catalog numbers and manufacturers of spare parts:
1. Input shaft: 1.1. Front single-row radial roller bearing: Catalog number
: 2108 - 1701031, 42205, NJ 205 (international name)
Manufacturers:
• EPK plants (Saratov, Volzhsky, Aviation Bearing Plant) produce the following varieties: 42205 KM (SPZ), 42205D1 (ZAP), 6-42205 A1E1USH1 (SPZ and VPZ), the latter is the most common and in demand.
• 10 GPP (Rostov-on-Don) offers modification 42205 AEM. These products occupy an intermediate position in the quality-price range. • The Samara SPZ-4 plant produces the simplest modification of this type, with a polyamide separator. They are very cheap, but knowledgeable motorists prefer not to use them. • If you are offered a “Vologda bearing” of this type, then it is a Chinese counterfeit (23 GPZ does not make them now). Catalog numbers
: SKF NJ 205 ECP; KOYO NJ205; Toyota 97123-06205; 6205ZZ; 93306-205U6-00 (Yamaha); 6205ZZCM
1.2.
Rear single-row radial ball bearing: Catalog number
: 2108 - 1701033, 50305, 6305 (international name) Quantity: 2 pcs.
Manufacturers:
• 3 GPP (Saratov) and VBF (Vologda), as well as HARP (Ukraine) - prices and quality are higher.
• GPZ (Moscow), SPZ-4 (Samara) (low quality, low price), • It is not recommended to buy bearings with other markings, since these are most likely Chinese products, which bear the markings of the companies ordering their production. The imported analogue is designated 6305. Closed 6305 ZZ and 6305 2RS (metal or rubber plugs). A bearing with a thermal gap is designated 6305/C3 (analogous to 76-305). Metal plugs - ZZ, rubber plugs - 2RS. Products of the SKF, FAG, KOYO brands are much more expensive and reliable than others. Catalog numbers
: SKF 6305 N; NTN-SNR 6305N; Toyota 90099-10142; 6305DDU; 6305NR; 90601-0012 (Subaru); 97100-06305; 5-81229-104-0
2. Secondary shaft:
2.1. Front single-row radial roller bearing: Catalog number
: 2108 - 1701180, 42305, NJ 305 (international name)
Manufacturers:
• EPK plants (Saratov, Volzhsky, Aviation Bearing Plant) produce the following varieties: 42305 KM (SPZ), 42305LM (SPZ), 6-42305 A1E1USH1 (SPZ and VPZ), the latter is the most common and in demand.
• 10 GPP (Rostov-on-Don) offers modification 42305 AEM. These products occupy an intermediate position in the quality-price range. • The Samara SPZ-4 plant produces the simplest modification of this type, with a polyamide separator. They are very cheap, but knowledgeable motorists prefer not to use them. • Some suppliers will also offer you the Craft brand. These Chinese bearings are the cheapest, but are completely unsuitable for installation in car gearboxes. Catalog numbers
: Koyo NJ 305; Coram NJ 305
3. Bearing of the secondary shaft of the gearbox, single-row needle without rings in a plastic separator (for speed gears):
Catalog number
: 2108 - 1701108 Quantity: 5 pcs.
Dimensions: 30x36x25 Catalog numbers
: K32X37X27 (SKF), PW-P1108 (Pilenga)
4. Single-row tapered roller differential bearing:
Catalog number
: 2108 - 2303036, 7207, 30207 (international name) Quantity: 2 pcs.
Catalog numbers
: NSK 30207, KOYO 30207JR; HR30207J; MB 393957; MT 202119; MA 125934 (Mitsubishi)
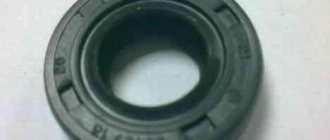
5. Seals:
5.1. Drive oil seal: Catalog number
: Corteco 12015250\Corteco 12015250B
5.2. Input shaft oil seal: Catalog number
: Corteco 19034619B\Corteco 19034619
5.3. Gear selector rod oil seal (yoke oil seal): Catalog number
: Corteco 12010803\Corteco 12010803B
6. Reverse gear Pilenga
Catalog number
: GB-P 0850
7. Engine mounts.
Manufacturer: BRT 7.1. Side engine mount bracket for LADA Samara 2108-1001040-10RU 7.2. Rear engine mount bracket for LADA Samara 2108-1001031-10RU 7.3. Front engine mount bracket for LADA Samara 2108-1001015-10RU
Removing the gearbox from a VAZ 2113, VAZ 2114, VAZ 2115
How to remove the gearbox from a VAZ 2113, VAZ 2114, VAZ 2115?
This question may arise in a number of cases, whether it is replacing a clutch disc , clutch basket , release bearing , or replacing a flywheel crown. And there are many other reasons for the need to remove the gearbox. In this regard, this procedure is included in a separate article. Removing the gearbox is a thorough process and you need to prepare for it properly. You will need: a lift or pit, a set of socket wrenches (sizes: 30, 19, 17, 13, 10), a flat-head screwdriver, a mount…………..
After preparing all of the above, you can proceed directly to removing the gearbox. First of all, remove the terminal from the battery. The air filter will interfere with us, so use a 10mm wrench to unscrew the air filter mount. We disconnect the mass air flow sensor and move the filter to the side, along with the pipe.
It would be enough. Using keys 13 and 17, disconnect the power supply to the starter and unscrew one bolt (indicated by the upper right arrow (the rest will be more convenient to turn from below) securing the starter itself.
Unscrew the two nuts securing the gearbox to the engine. Use a 17 key to disconnect the clutch cable.
Next, we hang up the car and take off the front wheels. Use a 30mm wrench to unscrew the hub nut, having previously loosened it.
At the same time, it is necessary to keep the brake pedal depressed. And not weakly, because as a rule the hub nuts are tightly tightened. Further actions will take place under the car. The next step is to remove all the protection available under the engine compartment.
If you need to remove the drive, in order to protect against possible leaks, you need to drain the oil, for which you unscrew the bolt-plug with a 17mm wrench. Here we will consider the option without removing the drives from the gearbox. After the engine protection is removed, you need to use a 17mm wrench to unscrew the three bolts securing the crabs.
Using the key again at 17, unscrew the stabilizer mounts.
Using the same key, unscrew the two bolts securing the ball joints.
After carrying out these procedures, you can pull out the drive. To do this, it is necessary to remove the drive from the hubs on each side by simply moving the hub to the side.
Disconnect the reverse switch. Disconnect the speedometer terminal.
Now we remove the starter by unscrewing the remaining two bolts (let me remind you that one bolt on top has already been unscrewed) securing it.
From the rear, on the interior side, a rod approaches the gearbox (the rod comes from the gear shift lever). This rod will be connected to the gearbox rod through a clamp tightened with a bolt and nut size 13. We loosen this clamp and pull the rod off the splines of the rod.
So, using a 10mm wrench, unscrew the three bolts securing the flywheel protection, the so-called crescent.
Unscrew the side airbag fastening. And the rear cushion is attached to two studs. And finally, we unscrew the remaining two bolts (the first bolts, let me remind you, we unscrewed them from the top) securing the gearbox to the engine. After the work has been done, the gearbox can be removed, first by hooking it with a pry bar.
The box must be removed carefully, especially without damaging the petals on the clutch basket with the input shaft. The box has been removed. Its installation is carried out in the reverse order of removal. When the process as a whole is clear, the sequence of some steps can be changed, depending on what is convenient for you. In addition, it should be noted that after installing the box in place, it will be necessary to adjust the travel of the clutch pedal by moving the clutch cable to a certain position using the corresponding nuts.
Source
Replacing the VAZ 2115 clutch
Some types of repair work cannot be done alone. Replacing the VAZ 2115 clutch with your own hands requires an assistant.
To remove the clutch it is necessary to remove the heavy gearbox. It is impossible to do this alone.
Tool
- supports for the engine and gearbox;
- wheel stops;
- keys for 10,13,19;
- crowbar or hammer;
- jack;
- 5 liter oil container.
Clutch kit for VAZ 2115.
Most car owners have all the necessary tools. If you don't have anything on the list, you can borrow from a neighbor.
How to replace
Replacing the clutch requires lifting the front part of the Lada Samara. First of all, it is necessary to block the movement of the rear wheels using stops.
Place all disassembled parts into prepared boxes. After installation there should be no extra ones left.
How to install
We change the clutch on a VAZ 2115.
First, a new clutch disc is installed. It is necessary to install the clutch basket on the flywheel on top of the disc. The holes for the bolts must match.
Place several bolts into the mounting holes of the box and move it towards the engine. After the input shaft hits the hole on the clutch driven disc, guide the last bolt using a screwdriver.
The clutch basket is tightened only after the input shaft enters the disc through the starter location.
Further assembly of the structure is carried out in the opposite order of disassembly.
Clutch adjustment is performed after complete assembly.
Which clutch is better to install?
There are many clutch kits on the market from different manufacturers. Lada Samara is standardly equipped at the factory with a Vazinterservice (VIS) clutch. The cost of a clutch on the market is around 1,500 rubles - this is the cheapest option.
Experts recommend not saving on the clutch and buying foreign analogues. Clutch kits from Valeo and Kraft Tech are in great demand. The average cost of a Valeo unit is within 3,000 rubles.
How to remove?
To remove the gearbox you will need:
- set of keys;
- screwdrivers;
- assistant;
- WD-40;
- board or other hanging equipment.
Disconnect the terminals from the battery and remove it. Drain the oil (How to drain the oil from the gearbox?) and remove the starter (How to remove the starter on a VAZ 2114?). As you work, if you cannot unscrew any fastener or bolt, do not forget to use WD-40.
- We place the car on the overpass (pit) and remove the crankcase protection by unscrewing 3 fasteners.
- Remove the clutch cable from the release fork. Then we pull it out of the bracket on the box.
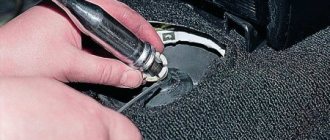
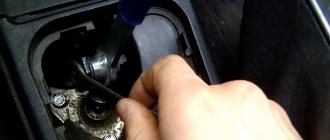
- Remove the wiring block from the speed sensor (DS), secured with a spring. Therefore, to remove it, we compress the element.
- We unscrew bolt No. 1 securing the ignition module bracket to our gearbox, No. 2 and 3, shown in the figure.
- We climb under the car and find the wiring block for the reverse sensor. Disconnect.
- Unscrew the 2 bolts securing the torque arm to the box.
- Loosen the gearbox shift rod clamp. We take it out from the gear selection rod hinge, pushing it back.
- We remove the wheel drives. We tie the plug inserted in place of one of the drives with a rope or wire so that it does not fall out during dismantling of the gearbox. The right drive does not need to be completely removed. We disconnect the element from the box and hang it in the body, first moving it to the side.
- So that the gearbox can be removed without additional difficulties, unscrew the two bolts of the left ball joint from the steering knuckle.
- Unscrew the lower right mount of the gearbox to the engine. The support bracket must be removed from the stud.
- If necessary, just loosen the fastening of the element.
- Unscrew the 3 bolts and remove the clutch housing cover.
- Unscrew the bolt of the lower left gearbox mounting.
- We hang the engine using a board or other device.
- Unscrew the nut securing the left power unit support (from the bottom of the car).
- Remove the fastening elements of the rear support of the power unit to the body.
- We unscrew the bolts securing the rear support to the gearbox, holding the nuts from turning with a second wrench, and remove it.
- By inserting a screwdriver between the clutch housing and the cylinder block, we move the gearbox off the guide bushings. At the same time, be sure to hold the part.
- We move the gearbox as far back as possible, passing the rear cover of the box over the front suspension brace. The input shaft should disengage from the clutch. If this fails, push the engine to the side. Lowering the front end of the box, remove it from under the car.
Box removal process
Removing the VAZ 2114 box is quite simple, although there are some peculiarities, so it is still advisable to have an experienced partner next to you for the first time.
Tools
- a set of keys;
- Screwdriver Set;
- WD-40 fluid in case you can’t unscrew some part;
Rust converter WD-40
- container for draining old transmission oil;
- new oil (if the replacement was carried out a long time ago);
- rags;
- board.
Gearbox VAZ 2114 disassembled
Stages
Since you will have to work under the car, it is better to place the VAZ 2114 car on a pit or overpass; a car lift would be a good solution, otherwise you will have to resort to jacks.
- First you need to remove the terminals and remove the battery.
- Drain the oil from the gearbox into a prepared container by unscrewing the drain plug.
- We remove the starter.
- Remove the clutch cable.
- We disconnect the block with wires from the speed sensor, after compressing the spring.
- We unscrew the bolt attaching the ignition bracket to the gearbox. Then unscrew the remaining bolts.
- Under the car we find and disconnect the block of wires leading to the reverse sensor.
- Unscrew the bolts securing the linkage bracket to the gearbox.
- Having first loosened the gear shift rod clamp, we pull it out, pushing it back.
- We dismantle the wheel drives. You can leave the right one.
- In order for the gearbox to be removed without any complications, unscrew the bolts with which the left ball joint is attached to the steering knuckle.
- We disconnect the lower mount of the gearbox to the engine - sometimes you can get by by simply loosening the tightening of the bracket.
- After unscrewing the bolts, remove the transmission housing cover.
- Unscrew the bolt on the left of the gearbox.
- We carefully and carefully hang the engine using a board or other device.
- At the bottom of the car, unscrew the nut securing the left motor mount.
- We unscrew the two nuts with which the rear motor mount is attached to the body.
- We unscrew the two bolts with which the rear engine support is attached to the transmission (the second key is used to keep the nuts from turning), and remove the support.
- We move the box along the guides.
- This completes the process of removing the box; after completing all the necessary tasks, assembly occurs in the reverse order.
- When you put the box in place, do not forget to adjust the clutch and fill it with new oil.
How to remove the gearbox on a VAZ 2114?
While operating a car, some car enthusiasts are faced with the same important question, namely: how to remove the box on a VAZ 2114 or on another car of this AvtoVAZ line. The VAZ 2114 gearbox is the same as on the VAZ G8. The only difference is that the VAZ 2108 does not have a dipstick, and it accelerates faster.
The gearbox may need to be removed in a variety of cases, for example, in order to replace the clutch or something in its system, as well as to repair the gearbox itself.
Is it true that the box from the VAZ 2115 fits in the VAZ 2109?
Photo source: youtube.com/watch?v=IJDTUwSivHE
Even the best cars sometimes break down, and our beloved “nines” are not immune from this.
A breakdown of the gearbox especially hurts the pocket of a car enthusiast, because a good option for replacing it costs far from a penny. But sometimes it happens that there is money, but there is no good replacement.
There is an opinion that a gearbox from Samara could be a good option for replacing a broken part from a 9, but is this true?
Difference in characteristics
Sometimes it happens that the required part is not on sale, or the quality of those presented does not satisfy the driver’s needs. In the case of replacing a gearbox, you can often hear that VAZ gearboxes are completely interchangeable, you just need to change a few parts, and that’s it – you can install it.
But will the box from 2115 to 2109 actually fit? Before answering this question, you need to compare the characteristics of these boxes. The first thing that catches your eye when considering this option is the difference in torque, namely 120 versus 125, and the amount of lubricant - 3.5 versus 3.4.
Both indicators are higher in Samara, but it seems not critical. Another important aspect is the gear ratios, here you can also see a small difference, especially noticeable when considering the final drive: 3.937 on the nine and 3.7 on the Samara.
In general, the difference when driving is unlikely to be noticeable, even at low speeds.
Removing the gearbox from a VAZ 2113, VAZ 2114, VAZ 2115
How to remove the gearbox from a VAZ 2113, VAZ 2114, VAZ 2115? This question may arise in a number of cases, whether it is replacing a clutch disc , clutch basket , release bearing , or replacing a flywheel crown. And there are many other reasons for the need to remove the gearbox. In this regard, this procedure is included in a separate article. Removing the gearbox is a thorough process and you need to prepare for it properly. You will need: a lift or pit, a set of socket wrenches (sizes: 30, 19, 17, 13, 10), a flat-head screwdriver, a mount………….. After preparing all of the above, you can proceed directly to removing the gearbox.
First of all, remove the terminal from the battery. The air filter will interfere with us, so use a 10mm wrench to unscrew the air filter mount. We disconnect the mass air flow sensor and move the filter to the side, along with the pipe. It would be enough. Using keys 13 and 17, disconnect the power supply to the starter and unscrew one bolt (indicated by the upper right arrow (the rest will be more convenient to turn from below) securing the starter itself.
Unscrew the two nuts securing the gearbox to the engine. Use a 17 key to disconnect the clutch cable.
Next, we hang up the car and take off the front wheels. Use a 30mm wrench to unscrew the hub nut, having previously loosened it.
At the same time, it is necessary to keep the brake pedal depressed. And not weakly, because as a rule the hub nuts are tightly tightened. Further actions will take place under the car. The next step is to remove all the protection available under the engine compartment.
If you need to remove the drive, in order to protect against possible leaks, you need to drain the oil, for which you unscrew the bolt-plug with a 17mm wrench. Here we will consider the option without removing the drives from the gearbox. After the engine protection is removed, you need to use a 17mm wrench to unscrew the three bolts securing the crabs.
Using the key again at 17, unscrew the stabilizer mounts.
Using the same key, unscrew the two bolts securing the ball joints.
After carrying out these procedures, you can pull out the drive. To do this, it is necessary to remove the drive from the hubs on each side by simply moving the hub to the side.
Disconnect the reverse switch. Disconnect the speedometer terminal.
Now we remove the starter by unscrewing the remaining two bolts (let me remind you that one bolt on top has already been unscrewed) securing it.
From the rear, on the interior side, a rod approaches the gearbox (the rod comes from the gear shift lever). This rod will be connected to the gearbox rod through a clamp tightened with a bolt and nut size 13. We loosen this clamp and pull the rod off the splines of the rod.
So, using a 10mm wrench, unscrew the three bolts securing the flywheel protection, the so-called crescent.
Unscrew the side airbag fastening. And the rear cushion is attached to two studs. And finally, we unscrew the remaining two bolts (the first bolts, let me remind you, we unscrewed them from the top) securing the gearbox to the engine. After the work has been done, the gearbox can be removed, first by hooking it with a pry bar.
The box must be removed carefully, especially without damaging the petals on the clutch basket with the input shaft. The box has been removed. Its installation is carried out in the reverse order of removal. When the process as a whole is clear, the sequence of some steps can be changed, depending on what is convenient for you. In addition, it should be noted that after installing the box in place, it will be necessary to adjust the travel of the clutch pedal by moving the clutch cable to a certain position using the corresponding nuts.
VoFFsK › Blog › Replacing the clutch of a VAZ 2115 without a pit and a lift.
Good day to all! I’ll tell you about how I changed the clutch on my 15x. I’ve been driving with a dead clutch for about half a year. I’m pretty fed up with the fact that at 3rd speed, if you go to overtake, the car doesn’t listen. starts to accelerate. However, if you accelerate smoothly, 130 goes easily. Closer to the point: Repaired in the village, 2000 rubles. The toad made me give it to the guys at the service center. I changed everything at once, it’s calmer! )) I have an article about the release lever, and KraftTech bought the clutch for 3000 wooden ones. The release lever was included in the kit, but it didn’t inspire confidence. That’s why someone else installed it. I parked the car on level ground, with the handbrake on. I secured it with bricks under the rear wheels. INSTRUCTIONS: Ask your friends about the alignment or input shaft of the gearbox, you can even center the clutch disc from the “classics”. It’s better to do the work in 2m, especially after you throw off the box. I’ve already seen someone like this. Unscrew the hub nut (head 30, knob and pipe). There's a puck there, don't lose it! Let's jack it up. We unscrew the left wheel and remove it. We unscrew the ball joint (part 13). On the right side we unscrew only the hub nut, but not completely. We remove the engine protection, if there is also the left side of the engine boot (k-ch8). We remove the air filter, the battery. We jack up the car higher, put hemp, bricks or SCC blocks under the side members or sills, whichever is given what. I had these blocks. By 2 On each side. This height is enough to completely move under the car. Place a beam or piece of wood on a block or brick so as not to crush the box. We take a jack and a beam, jack up the engine. (This is how it should be!) Lay out an old blanket, climb under the car. Unscrew the rocker clamp (key 13), the gearbox cushion (17). There is also a stretcher from the engine, we also unscrew it. The key is 19. It took us a ton of effort, because it was apparently tightened with great force and without the right drive, but it will interfere. There is also a box boot, from the end of the pallet. There are 3 bolts per 10. Found it? Removed it? Let's continue. We disconnect the speed sensor on the top of the box and another one on the left. We unscrew the clutch cable with a key of 17. We remove it from the fork. We move it to the side. We unscrew the bracket for the front box cushion, on the left. There are 3 nuts. Remove the starter, wire + and red (3 nuts k-ch13). The left drive pulls out of the hub. We unscrew (k-ch13) the fastening of the ignition coil from the box. I removed the coil, for convenience. And one by one we twist the remaining bolts of the box itself, there are only 4, with a 19 head. Next, with an assistant, one from the side of the arch towards you, one from above using a mounting tool or a powerful Use a flat screwdriver to disconnect the box from the engine. It should hang on the drives. You can completely remove the gearbox because The clutch disc will still need to be centered. If you are working on asphalt, place boards and a rag so as not to damage the gearbox. When the box was detached, it hung on the drives and the left tripwire from the crab. To access the basket, pull the box and secure it with an assistant) or something. We see the basket (there are different bolts). Mine was 8. I twisted it with a cap and licked off the heads of 3. I unscrewed it with a hammer, a mat and a chisel. Then I replaced it with an M8 13x15 bolt. We take out the clutch. There should be no sagging petals on the basket, and there should be no severe abrasion in the center from the release bearing. The pressure part should not have chips, scratches, grooves and signs of overheating in the form of a purple-dark blue color. If there is one of these signs, the basket better for replacement. We look at the disk itself. It is very worn if the rivets have already begun to shine on the surface, as was the case with me, or there are no springs. Next, we check the release bearing. It is installed on the input shaft and is held by a spring. You need to bend the whiskers towards yourself and remove it. Check for torsion and play. Let’s not allow too much play in the bearing on the housing. Play in the bearing race is unacceptable! If it is not possible to replace it with a new one, put lithol-type lubricant in it, but do not overdo it. It is better to remove the excess. We put the release lever back. Check the clutch fork boot! Next, we install the disk with the basket, lean everything against the flywheel, place it on the guides and insert the centering device. We attach the basket. It is advisable to tighten it crosswise, but not critically. We screw it to the flywheel with force. Next, with an assistant, we lift the box and guide it, be careful, the gearbox is quite weighty. If the shaft does not immediately fit into the splines, turn the box a little. When the shaft is in, insert the box all the way and tighten the top bolt.
Removal and installation of gearbox VAZ 2114, VAZ 2115, VAZ 2113, Lada Samara 2
Removing the gearbox.
Place the vehicle on a lift or inspection ditch. Raise the engine hood and lock it in this position. Removal work carried out from inside the engine compartment of the Lada Samara 2:
– disconnect the wires from the battery, from the starter traction relay; – disconnect the ground wire from the clutch housing; – disconnect the lower part of the VAZ 2113 clutch cable as described in subsection. "Clutch"; – unscrew the two upper bolts securing the clutch housing to the engine block and the two upper nuts securing the starter, attach a bracket for lifting the power unit to the left stud of the engine exhaust manifold;
Installing a cross member to support the power unit: 1 – cross member 67.7820.9514
– install cross member 67.7820.9514 on the drain gutters to support the engine and hook it onto the bracket installed on the exhaust manifold stud. If there is no cross member, hang the power unit with a hoist. Removal work carried out from below the car: – remove the engine mudguard and the lower cover of the clutch housing; – drain the oil from the VAZ 2114 gearbox; – disconnect the wires from the reverse light switch;
Mounting the gearbox on the car: 1 – engine; 2 – bracket for fastening the power unit; 3 – suspension arm extension bracket; 4 – stretching; 5 – gearbox; 6 – wheel drive shaft; 7 – suspension arm; 8 – anti-roll bar; 9 – rear support of the power unit; 10 – clamp; 11 – gear shift lever drive rod; 12 – internal hinge housing
– loosen clamp 10 (Fig. 3.11) and disconnect rod 11 from the hinge of the gear selection rod of Lada Samara 2; – unscrew the nut of the stud securing the gearbox to the VAZ 2115 engine; – disconnect the ball joints of the suspension arms from the steering knuckles; – using a puller 67.7801.9524 or sharply hitting the body 12 of the internal joint with a hammer through a drift, knock out one hinge from the side gear, then fix the side gear with a technological mandrel or plug used when transporting the differential (otherwise the unfixed side gear may fall into the gearbox housing) ; then knock out the second hinge; – move the wheel drive shafts to the sides;
VESKO-TRANS.RU
AutoNews / Reviews / Tests
VAZ 2115 Replacing the Clutch Without Removing the Box
replacement Clutch VAZ-2115 Do it yourself: detailed notes and repair methods
On a VAZ-2115 car, replacing the clutch is usually carried out if the box is removed. Much easier. work comfortably, nothing interferes. The article describes in detail the process of removing and replacing the secondary gearbox oil seal on a VAZ 2121 and Niva 2131. Replacing the clutch master cylinder on a VAZ 2101-VAZ 2107. But the repair can be performed without removing the gearbox. However, you should try it. the jewelry work remains to be done. But before repairing, make sure that the coupling has failed. Very often a particular gearbox breaks down, and drivers make mistakes with the clutch.
Symptoms of Failure
If the clutch is engaged, this is a clear sign of wear on the friction linings on the disc. This leads to the fact that when the engine speed increases sharply, the speed slows down, as if not all the movements are transmitted to the wheels. The only correct decision. replace clutch . Replacing 2114 VAZ clutches without removing the box. And you can do this without outside help, without resorting to an expensive car service.
Repair tool
You will need the following tools and accessories:
- Clutch kit. disc, output bearing, basket, bolts. Be sure to change the driven disk. The leader (basket) changes less frequently and has a much larger resource.
- Set of wrenches, winding keys, sockets.
- Screwdrivers, pliers, chisels.
- Drain pan out of the box. This will be required in any case, regardless of the replacement method you choose.
- Two nests are better. When removing a drawer, place a second drawer under the tray to keep it level and prevent it from falling.
- Car mounts and wheel covers.
- The presence of an overpass, pit or lift is welcome.
With all these devices you can start repairing. If you are experienced, the entire procedure should take an hour or two. But if you are doing it for the first time, it will take longer.
What to do before removing the gearbox
remove the gearbox for In order to replace the VAZ-2115 clutch yourself, you need to do the following:
- Drain the oil completely. it will destroy the descent of 2 birds with one stone. Firstly, the weight of the box will be less. Secondly, you will not lose lubrication during operation. Pay attention to the mileage of the car that was filled with oil. If it has developed its own resource, change it after installation.
- Remove the left wheel by lifting its side up towards the jack.
- Remove the two ball mounting bolts.
- Remove the pin and unscrew the nut from the tie rod. Replace the clutch slave cylinder from VAZ 2101-VAZ 2107. Remove the tip using a puller.
- Carefully remove the inner left hinge from the hole in the box. To do this, use a chisel and a small hammer.
- Leave the correct disc in place and it should be removed as soon as you begin to remove the box.
- Hang the left handlebar so it doesn't get dirty and get in your way.
- Remove the starter by first disconnecting the negative terminal from the battery.
Replacing the clutch on a VAZ 2114 without a hole
In this video we will look at how to change the clutch
on
VAS
2108. 15
without
a pit, how to set it up, what to pay for.
Replacing the clutch and releasing the bearing of a VAZ 2114 without removing the underpants
Clutch replacement
and releasing the bearing
VAZ
2114 (
VAZ
2108, 2109)
without removing the box
, discs (grenades) and sewerage.
That's it, almost everything is ready to dismantle the gearbox. But before you can completely remove it, you need to take a few more steps.
Disassembling the final box
Finally, do the following:
- Unscrew the nut according to the weight of the wire.
- Remove the clutch cable. If it is broken or damaged, be sure to replace the clutch cable on the VAZ-2115.
- Remove the bolts and nuts that secure the side and rear airbags. Summary of the article: Replacing the clutch on a VAZ 2112 without removing the joints; Replacing the clutch on a VAZ 2110, 2111, 2112 Replacing the clutch. In this case, it is advisable to install a jack or support under the crankcase so that the box does not sag too much.
- Loosen the scene clip and remove it.
- Now all that remains is to unscrew the three bolts and nut that tighten the gearbox and cylinder block.
- Separating the engine and transmission requires a mount and a lot of effort. If the assembly has not been disassembled for a very long time, it will be difficult to remove the input shaft from the grooves.
- Being careful not to damage the aluminum components, slide the box towards the left wheel. It is at this point, when he begins to move away from the block, that the inside right grenade must be removed.
When carrying out repairs, it is advisable to hang the box with a cable from a crossbar installed under the cover. Pre-treat all threaded connections with WD-40. This will help loosen the bolts and nuts much faster.
Remove and replace clutch block
To remove the basket and drive, you will need to unscrew the bolts in a circle. Please note that replacing the VAZ 2106 clutch requires replacing the front brake pads; it is advisable to do this across, this will not damage the basket. Instructions for replacing the VAZ 2110 clutch with your own hands, without removing the box and without requiring draining the oil, video report. The output bearing is located on the input shaft of the box and is fixed with a spring clip. It should be removed and a new one installed immediately. It is recommended to apply some new graphite based lubricant. this will slightly extend its service life.
Install in the following order:
- Insert the guide into the crankshaft. a small piece of pipe or piece of the transmission input shaft.
- Install the clutch disc and basket on it.
- Tighten the bolts, but do not tighten them.
- Make sure the disc and basket are in focus.
- Tighten the bolts crosswise.
Replacing the VAZ-2115 clutch disc is complete; remove the guide sleeve at the end of the entire procedure. Now you are ready to put the box in place. It is much more difficult to install it, because even with a slight deviation in the centers of the holes in the disk and crankshaft, the first one will not fit at all. Make your own clutch replacement on a VAZ 2107 (video). Everything will need to be collected and aligned. So do all the work correctly before installing the box.
Dismantling the VAZ 2114 gearbox: removal and repair
If all the steps described above have been completed correctly, then withdrawal can begin. The process goes as follows:
- The gearbox is attached to the engine on several sides. First you need to remove the lower fasteners, and then loosen the bracket and remove it. The bracket can also be removed using a wrench of the appropriate size;
- Next, remove the bolts that secure the clutch housing cover. A slotted screwdriver works best here. There is also a bolt at the bottom left that needs to be removed;
When the work is completed and the box is completely dismantled, you should disassemble it and check the parts for wear. If possible, repairs and replacement of damaged elements are carried out. In some cases, the problem can be solved by replacing bearings or seals, rather than purchasing a new gearbox.
- Instructions for replacing, adjusting and repairing the VAZ 2114 clutch
- Replacing a short-stroke rocker on a VAZ 2114
- VAZ 2114 rocker: changing the standard one to a short-throw one
. Greetings. Please tell me in which direction to look for the problem. The problem is the following: when switching from first gear to reverse, a metallic knock or impact is heard (but not always, every 3-4 shifts out of 10). I'm sinning on the elastic coupling of the cardan. The box was recently repaired. The car is 2009, 259t mileage.
Repair of gearboxes (gearboxes) VAZ, GAZ, NIVA, UAZ
The transmission or gearbox is a very important component of the car; if the gearbox is faulty, in most cases it is almost impossible to drive the car. When switching, jerks and crunches are possible; when moving, the car may jerk, accelerate poorly, some gears simply may not engage, and if 1st gear does not work, then you have to start moving from the second gear, which is also not correct, in a word, if you have If the first signs begin to appear indicating that the transmission is operating abnormally, it is better to immediately contact experienced auto mechanics; we have professionals who can sort out and restore your transmission.
Request a call back
Your message has been received
Our specialist will contact you shortly at the number provided.
We repair gearboxes on VAZ, GAZ, UAZ, Niva cars.
We have qualified specialists who will carry out high-quality repairs, complete restoration of the faulty gearbox, after repair the gearbox will work properly, we give a guarantee for the repairs and if suddenly after the repair something goes wrong, then we are always ready to help you, although in such cases practically no, we approach our work carefully and responsibly.
There are situations when repairs are impractical and we can always offer you an already restored gearbox; this is faster and cheaper than restoring a damaged gearbox. In addition, the price is quite reasonable and we will never charge you too much.
The most common causes of malfunctions:
- Noises in the gearbox, which clearly indicate abnormalities in operation (gears, synchronizers may fail, shafts may shift, etc.);
- Difficulty shifting gears (wear or other malfunction in the clutch, wear of the sliding clutch, wear of the fork, sticking of the gearbox hinge);
- Gears fly out when driving (synchronizer rings are worn out, the synchronizer spring is faulty, the clutch is worn out, the synchronizer ring is worn out);
- Leaking oil and gearbox (caused by oil seals, or wear of the sealing gasket, etc.)
In any case, there can be a whole bunch of reasons for malfunctions, and our specialists will identify the malfunction before carrying out repairs and only after that will agree on the cost of repairs or provide you with an already repaired gearbox, which is much faster.
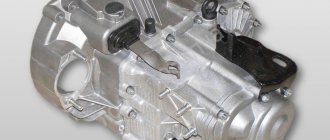
Gearbox device
Gearbox removed and slightly disassembled
Before starting the process, it is necessary to study the structure of the gearbox, as well as its design. This is necessary in order to determine the reasons why the unit needs to be dismantled, as well as to determine the mounting fasteners.
1 – clutch release bearing; 2 – guide sleeve; 3 – input shaft; 4 – roller bearing of the secondary shaft; 5 – secondary shaft; 6 – retaining ring; 7 – satellite axis; 8 – speedometer drive drive gear; 9 – transport plug; 10 – wheel drive oil seal; 11 – tapered roller bearing of the differential; 12 – axle gear; 13 – satellite; 14 – differential box; 15 – clutch housing; 16 – driven gear of the main gear; 17 – drain plug; 18 – adjusting ring; 19 – driven gear of the 1st gear of the secondary shaft; 20 – synchronizer for 1st and 2nd gears; 21 – driven gear of the second gear of the secondary shaft; 22 – retaining ring; 23 – persistent half ring; 24 – driven gear of the third gear of the secondary shaft; 25 – synchronizer for 3rd and 4th gears; 26 – driven gear of the fourth gear of the secondary shaft; 27 – needle bearing of the secondary shaft gears; 28 – ball bearing of the secondary shaft; 29 – thrust plate; 30 – driven gear V of the secondary shaft transmission; 31 – 5th gear synchronizer assembly; 32 – nut; 33 – thrust washer; 34 – drive gear V of the input shaft; 35 – rear cover of the gearbox housing; 36 – ball bearing of the input shaft; 37 – gearbox housing; 38 – roller bearing of the input shaft; 39 – breather; 40 – input shaft oil seal
What oil is better to fill?
When choosing a lubricant for the gearbox of a VAZ 2115 car, you need to take into account the following factors:
- climatic conditions of vehicle operation, seasonal air temperature plays a particularly important role;
- transmission design features: automatic or manual gearbox, the magnitude of mechanical forces in the units, specific loads placed on the units, especially when the engine is running at maximum speed;
- transmission oil viscosity corresponding to the first two points;
- the use of chemically active additives that can affect the operation of various transmission units and components.
After analyzing these criteria and familiarizing yourself with the range of available retail outlets, you can choose the optimal oil for your car. For cars such as the VAZ 2115, it is necessary to use GL 4 lubricant, classified in Russia as TM 4. The manufacturer recommends using Lukoil TM 4-12 SAE 80W85 fluid. It is excellent in its performance characteristics, but is not an off-season lubricant. Accordingly, in particularly severe frosts this lubricant thickens, causing certain problems in the operation of the gearbox.
In 1998, a set of requirements for fuels and lubricants was in force, which shows the temperature range for normal operation of transmission fluids. In the case of 80W85 lubricant, temperatures from -26 to +40° are considered normal. In this regard, in our country it is recommended to pour out-of-season transmission oils SAE 75W80 or 75W90, designed for use at air temperatures from -35 to +40°. In turn, high-viscosity fluids 85W90 and motor lubricants 5W50 and 10W50 are not permissible for use as transmissions for the VAZ 2115. Transmission gears with such oils will not be sufficiently lubricated even in hot weather, and in cold weather they will simply function at break.
VAZ 2114 gearbox device
The main working unit of the transmission is the gearbox, in which all the main parts are rotating shafts, gears and transmission links that experience constant friction and require effective lubrication. This oil is special and is called transmission oil according to the place of application. To understand which gear oil is best for the VAZ 2114, you need to understand the structure of the VAZ 2114 gearbox.
The following requirements apply to the gearbox, as well as to the entire vehicle transmission:
they must provide simple and easy control while driving in order to minimize driver fatigue;
The VAZ 2114 gearbox device meets all these requirements. This mechanism is designed to change the drive torque and wheel speed within wide limits necessary to ensure vehicle movement over the entire speed range determined by its technical characteristics. In addition, it ensures that the machine moves backward and idles for a long time.
The VAZ 2114 gearbox has five stages, synchronized. The box is connected to the differential, as well as to the main gear. The input shaft is made of a block of gears of the first, second, third and fourth gears with a mounted fifth gear drive gear. The secondary shaft collects all the driven gears and is itself connected to the drive gear of the main transmission. The gearbox control drive includes:
- gear lever;
- rod and ball joint;
- gear selector rod;
- gear selection and shift mechanism.
Lubricant viscosity
It is necessary to pay attention to the kinetic viscosity of transmission oil first of all. You can select a suitable lubricant by knowing the climatic characteristics of your region; if you live in a region where the temperature often drops significantly below zero, then you should purchase class 90 oil, which is quite reasonable for most regions of Russia. In hotter climates, SAE grade 140 lubricant is suitable. Based on these principles, you must decide for yourself which oil is best to fill into the VAZ 2115 box in your region.
A domestic manufacturer has released a special gear oil for the VAZ 2115 gearbox called Reksol T; it meets the parameters 0W-85 API GL-4. Then another brand, Lukoil, released an analogue with the same parameters.
The last digit in the numerical designation indicates the temperature range permissible when using a particular lubricant. The higher the number, the hotter the climate in which it is recommended to be used.
VAZ 2114 gearbox: device, malfunctions, removing the gearbox yourself
The fourteenth VAZ (like the VAZ 2113 and VAZ 2115) is equipped with a five-speed manual gearbox. This gearbox is similar to the units that were installed on the eight, but the main pair has been changed.
From this article you will learn the technical characteristics and design features of the gearbox on the VAZ 2114, how the repair and maintenance of the fourteenth gearbox is carried out, and what is the current cost of used and new units.
Disassembled gearbox
How to install the gearbox?
The gearbox must be installed in the reverse order. After installation, you need to adjust the clutch drive (How to adjust the clutch drive?) and the gearbox lever, and fill in the transmission oil.
Any motorist has encountered the need to dismantle the gearbox. So, on the VAZ-2114 this is done identically to the first generation Samara-1. This is mainly due to repair and restoration operations. So, the article will tell you how to remove the gearbox from a car, and also tell you about some of the nuances and subtleties of the process.
POSSIBLE FAULTS
Despite the imperfect operation, the VAZ 2114 gearbox, when used correctly, is distinguished by good endurance and durability. If you do not hesitate to prevent and promptly eliminate breakdowns, repairing it is not expensive.
Let's consider the main gearbox malfunctions that the owner of the fourteenth may encounter:
- Lack of speed fixation when switching. If the speeds are out of whack, the cause is most likely worn teeth on the gears and clutch. Accelerated wear of these parts is caused by incorrect gear shifting and non-compliance with the speed limit. The problem is resolved by replacing the gears.
- The gear shift lever is tight. The reasons are mechanical damage to the teeth of the lever fixing on the hinge or wear of the reaction rod; it’s also a good idea to check the integrity of the plastic parts of the gearbox drive;
- The VAZ 2114 gearbox is humming. Most often, the gearbox is humming in neutral gear. First of all, you need to check and, if necessary, add oil (in general, the box may hum due to the use of low-quality lubricants). If the oil is normal, the problem is wear of the bearing on the input shaft, which can only be determined through diagnostics or by disassembling the gearbox;
- Crunching sound when changing speed. Here it is necessary to change the worn out synchronizer, and it must be changed immediately after the problem has been discovered, because if you tighten it, the gear unit will completely fly off;
- Knock. The gearbox on a VAZ 2114 can knock both under load and without it, and in any gear. The cause of the knocking noise is a damaged drive gear of the problematic transmission.
One of the key factors for the trouble-free operation of gearbox number fourteen is the use of high-quality lubricants. The most suitable option is GL-4 mineral oil. It is not cheap, but it does its job at 5+; when using mineral oil, VAZ gearbox repairs are usually required extremely rarely.
Most VAZ 2114 owners agree that the best gearbox oil is 75W90. It is distinguished by greater fluidity than typical gearbox oils, due to which the lubricant better gets into those places of the gearbox, the lubrication of which is provided exclusively by splashing. Good options for 75W90 are Hypoid-Getriebeoil TDL and Liqui Moly Vollsynthetisches Getriebeoil (GL-5).
Checking the oil level should be carried out every three weeks. In the gearbox, the fourteenth gear is placed vertically, the topmost is the fifth, it is the one that is most susceptible to failure due to lack of lubrication, so it is always necessary to fill in oil to the maximum mark, and best of all - 200-250 ml. more than the required norm.
Determining the malfunction and how to fix it
There can be many reasons for the malfunction, but the main ones can be identified independently. You can find out what happened to the box by the following factors:
- Loud noise;
- Poor gear shifting;
- Spontaneous shutdown;
- Crackling noise during shifting;
- Oil leak.
The reason for the constant noise while driving may be wear of the gears or failure of the bearings. The problem is solved by replacing them. But before the box is removed for further repairs, make sure there is oil. There are times when it just needs to be topped up or replaced.
Inadvertently shifting gears while driving can cause wear on the synchronizer teeth or severe vibration due to damaged rear bearings. Damaged support seals and synchronizers can always be replaced with new ones.
The reason for the gear not engaging may be the following:
- Clutch wear;
- Damaged drive rod;
- Loose fastening of the hinge and rod lever;
- Unadjusted shift drive;
- Damage or wear to the plastic parts of the drive.
A cracking noise when turned on can be caused by an unpressed clutch and a broken synchronizer ring of the VAZ 2115. If a leak is detected, it must be repaired immediately. Typically, oil begins to leak from the drain plug or from a crankcase mount weakened by constant vibration.
REMOVAL AND REPAIR
Almost any DIY repair of a VAZ 2114 gearbox - installing new bearings, clutch or gears - involves removing it. To do this, you will need screwdrivers, a set of wrenches, WD-40 and hanging equipment to lift the unit.
Let's figure out how to remove the gearbox of the fourteenth:
- We drive the car onto an overpass or into a garage with a pit. First of all, we disconnect and remove the battery, then drain the oil from the gearbox and remove the starter. To do this, you need to disconnect the power wires from it, remove the protective jacket, unscrew the two fixing nuts from the bottom (from the pit) and one from the top of the starter;
- Now you need to remove the connecting cable from the clutch release fork and remove it from the bracket on the gearbox;
- Disconnect the wiring to the speed sensor. The wire block is secured by a spring, which must be compressed to disconnect the connection;
- We climb under the fourteenth and disconnect the wiring from the reverse sensor;
- We tighten the bolts with which the jet thrust bracket is attached to the unit body;
- We remove jet thrust. To do this, you need to loosen the clamp connected to the rod and move it back, which will make it possible to remove it from the hinge;
- Now you need to dismantle the wheel drives: remove the left one completely, and simply unscrew the right one, move it to the side and hang it on the car body;
- We unscrew the bolts from the ball joint (left) that secure it to the steering knuckle;
- We dismantle the gearbox mount to the engine on the lower right side; to do this you need to remove the supporting brackets from the stud;
- Remove the clutch housing cover (it is secured with 3 bolts);
- Unscrew the bolt on the lower left gearbox mount;
- Unscrew the nuts that secure the left and rear engine mount;
- Now we remove the fixing bolts with which the gearbox is attached to the rear engine support. We dismantle the support itself;
- Using a screwdriver as a lever, insert it into the hole between the engine cylinder block and the clutch housing, and move the gearbox off the guides as far back as possible. The rear part of the box body should pass on top of the suspension extension, and the input shaft will be disconnected from the clutch, after which the unit can be removed from under the car.
Now you know how to remove the VAZ 2114 gearbox. Good luck with your driving without any breakdowns!
Preparing for removal
Preparatory work includes the removal of all parts that block access to the gearbox. You can begin removal when you have a board or other hanging equipment, a set of wrenches and sockets, different types of screwdrivers, and WD-40 lubricant at hand. It is also recommended to carry out work in a garage where there is a car pit. Now you can proceed to the analysis:
- It is necessary to remove the terminals from the battery and then remove it. The next step is to completely remove the working fluid from the gearbox and remove the starter. Some bolts may not budge, in which case WD-40 must be used;
- Now the VAZ 2114 needs to be placed on the pit and the crankcase protection, which is attached to the bottom with three fasteners, removed;
- There is a cable coming from the clutch fork - it should be disconnected from the fork and then removed from the gearbox bracket;
- Next, you need to hang the motor to gain access to the lower parts. After this, all wires must be disconnected from the speed sensor. A spring is used as fastening here.
Operation, repair and maintenance
To avoid repairs to the VAZ-2114 gearbox, the manufacturer recommends regular oil changes. In general, most manual transmissions are maintenance-free. That is, the period for replacing the lubricant is the resource of the gearbox itself. But this applies to imported cars. Regarding “Samara”, we can say that for normal operation of the gears you need to change the oil in the gearbox. VAZ 2114 is no exception. The manufacturer allocates a period of 60 thousand kilometers. It is also recommended to change it after a long period of inactivity. For example, after “wintering” a car in a garage or on the street. Unlike motor oil, gear oil has a higher viscosity. For a VAZ-2114 car it is 80W-85.
View gallery
If the oil is changed according to the regulations, this is reliable protection of the gearbox from repairs. But it also happens that the box starts to hum. In this case, the gears are changed. Due to wear, the gap between the teeth increases. There is a backlash during rotation, which is accompanied by a hum. It can be in one or several gears at once. After such repairs, the noise in the box disappears. By the way, some motorists use a thicker lubricant to eliminate hums. But it is worth remembering that this is only a temporary solution and will only delay transmission repairs for a short time.
Source
Step-by-step instruction
- Warm up the car, it is better to do this on a lift, but if there is none, then you need to drive the car for about 10 km, while switching all gears;
- Raise the right front part of the car using a jack;
Important to remember! Be sure to play it safe and place a safety bar under the car, which will save your life if the jack becomes warped or weakened.
- Taking a container for draining waste and a wrench No. 17, unscrew the plug on the lower flange on the left side of the gearbox;
- If the plug is not visible (this also happens), then you will have to remove the engine protection and find the plug under it;
- Substituting the drainage container, wait about 15 minutes until all the liquid has drained, and screw the plug back on;
- Next, remove the intake pipe and air filter that prevent the assembly from being removed;
- After removing the dipstick from the gearbox, insert a funnel or the cut-off neck of a bottle into it and begin pouring new oil. You should immediately pour no more than 2 liters of liquid;
- When the lubricant is filled, you should make sure that there are no leaks and only then return the motor protection to its place;
- Add oil to the required level, periodically checking it with a dipstick, return the air filter and pipe to their place.
- The lubricant in the VAZ 2115 gearbox has been replaced, and you can start running it in.
Video - replacement instructions using the example of VAZ 2210, 2111, 2112
In this video, you can see how the fluid is replaced using the example of VAZ 2210, 2111, 2112 cars.
What oil do you use?
Long-term use of a VAZ car can easily damage any part. The variable gearbox of the modern model 2115 is no exception. Especially if an inexperienced driver has been behind the wheel for a long time.
If you know a master, you can contact him. Typically, such masters take care of each client, always performing their work with high quality and much cheaper.
But, when you know at least a little about the structure of the box and are not afraid of getting dirty, it is better to do the repairs yourself. After all, having done everything yourself and poured high-quality oil, you will always be sure that it will not let you down at the most inopportune moment. The design of the domestic VAZ 2115 car is quite simple; it does not require certain skills and knowledge during maintenance.
How the replacement is carried out - stages
In addition to the video demonstrating the process of changing the lubricant in the VAZ 2115 gearbox, we will provide a description of the sequence of actions.
- Using a knife, we cut off the side of the canister or bottle, making a kind of “bath”.
- Before starting work, be sure to warm up the gearbox by driving a VAZ 2115 for about 10 km with a warm engine. In this case, the gears will be able to distribute the lubricant throughout the gearbox.
- We lift the right side of the car with a jack, lay down a block or stand and lower the car. Under no circumstances should you work under a vehicle that is simply supported by a jack.
- In case of a cold floor, we place a plywood sheet under the VAZ 2115.
- Wearing gloves and grabbing a canister and a 17mm wrench, we lay down under the car. If there is a crankcase protection, there may be a cut in it under the oil plug. The plug itself is located at the bottom of the left flange of the gearbox.
- If there is no cut, the engine protection must be removed. To do this, clean the plug with a brush and wipe the adjacent area with a rag, then use a 17 mm wrench to unscrew the plug, placing a canister underneath into which warm liquid will flow.
- After waiting 10-15 minutes for the lubricant to completely come out, we install the plug in place.
- Using a knife, cut off the bottom of a one and a half liter plastic bottle.
- We dismantle the intake pipe and air filter by removing the terminal from the mass air flow sensor. Then we twist the clamps at the crankcase pipe and throttle body to completely remove the intake assembly.
- We take out the oil dipstick in the gearbox, located in the upper part, not far from the passenger compartment.
- The neck of the bottle without a bottom is placed against the hole under the cork, as a result of which the bottle acts as a funnel - no more than three liters of oil should be poured into it, after which we check for lubricant leaks from the cork within ten minutes.
- If liquid does not drip from the plug, if necessary, replace the engine protection and remove the VAZ 2115 from the stand.
- Using the dipstick, we continue to pour oil into the gearbox to the maximum mark - in total, the gearbox should hold 3.2 liters of oil.
- In the reverse order described above, we return the filter and inlet pipe to their place.
At first, it is recommended to fill in no more than 2 liters of oil. Then you should check for leaks in the drain plug under the car. To do this, wait about ten minutes, and then continue to pour the lubricant.