Replacing ball joints
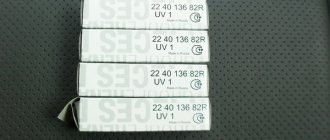
The ball joints started knocking about 7 tkm ago, I was not able to diagnose the ball play myself, no matter how hard I tried (maybe someone can tell me the right way), but there was nothing else to knock about. TRW balls (part number JBJ721) were purchased as a replacement. They need to be stuffed with special stuff. lubricant for ball and steering. The good old ShRB-4 is ideal for this; in addition to lubrication, it envelops the ball and prevents water and dirt from entering the joint. Due to the lack of ShRB-4 in our area, another lubricant was used (pictured below).
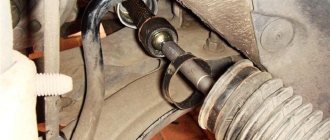
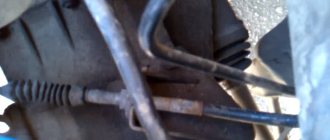
Now let's see how things are with the old ball joints. We remove the lever.
Instead of the upper sealing ring of the boot, I wanted to install a rubber one for better compression (as petrovich35 advises to do; by the way, he describes in detail how to properly maintain the suspension), but I couldn’t find a suitable size.
That's it, we install the lever in its place, I coated all the threads and connections with graphite grease to make it easier to disassemble next time. Do not forget that the final tightening of the two lever bolts in the subframe must occur while the car is on its wheels.
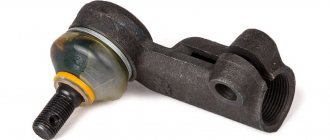
Inspection of steering tips
I changed the steering tips a year and 10 tkm ago, I installed Sasic tips. Like the ball ones, they failed due to dirt and water that passed through the bad boot seal on top. Now I decided to check and replace the lubricant in them, because... unknowingly put Litol-24 in them.
Replacing steering rack boots
I didn’t like the steering rack boots last year when replacing the steering tips. They started to crack. I decided not to joke about it; the power steering rack requires special attention to the anthers. I bought Sasic anthers (item 4006224). It wasn't easy to pull them on, but it was possible.
Inspection of caliper guide pins
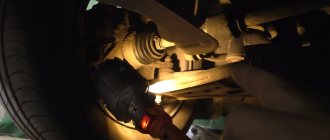
8 months and 8 tkm ago I filled the guides with Slipkote grease. I decided to see how things were going there and took it apart on one side. And everything is fine there, no water, no dirt, the lubricant has not thickened. Just a little darker from work. I put everything back together and didn’t touch anything. On the other hand, I didn’t even climb there.
1. Ball joints and steering joints fail mainly due to water and dirt entering through the upper boot seal. And also due to the absence or small amount of lubricant.
2. It is necessary to apply specialized lubricant under the boots and, if possible, improve the seal of the boot on top.
3. Ball and tips with a “skirt” on the pin for the top seal are preferable. If anyone knows the article numbers for such spare parts for our cars, please tell me.
I wish you a soft suspension, a dry and smooth road!
Added 06/15/2017
I applied vibration insulation to the front wheel arch liners and noticed that after 1.5 months the VAZ boot on the steering tip was all cracked, so I decided to replace it with a damaged but sealed original one. The blue grease does not cover the ball: a little water was found right on the ball. There was no opportunity to take a photo.
Price tag: 1,500 ₽ Mileage: 71000 km
Steering rack on a Lada Granta car
Lada Granta was originally created as an inexpensive car. Actually, that’s why it became one of the most popular cars on the roads. The manufacturer tried to introduce both proven and new elements into the design. But they have their drawbacks. The Lada Granta steering rack can present various surprises during operation. It is useful for the owner of a domestic car to understand the structure of many components.
Steering of Lada Granta
It is designed to control the car while driving. Structurally, it consists of the following main elements:
The work of the mechanical part is that the driver acts on the steering wheel, the impulse through the steering mechanism and rack transmits force to the front wheels through the levers, and the car turns in the desired direction. A characteristic feature of a passenger car steering wheel is its smaller diameter (compared to a truck). The design of the mechanism also differs. The steering of the Lada Granta is complemented by an electric booster. The steering wheel can be adjusted in height. Unfortunately, there are no settings for departure.
The steering mechanism of the Lada Granta is rack-and-pinion type, the simplest and most inexpensive option.
The drive is mechanical, structurally consisting of levers, rods and hinges. For more efficient and convenient control, the Lada Granta is equipped with an electric amplifier. This is a complex mechanism that provides force through the use of electricity. An electric power steering, or simply EPS, is used to improve dynamic characteristics and controllability. And, according to some data, it allows you to save fuel by increasing the vehicle’s maneuverability.
Properties of benign anthers
In order for the steering boot to cope with the functional tasks assigned to it, it must be characterized by the following properties:
- elasticity: the nodes that need its protection are movable, therefore, in order to avoid its breaking, this quality is very important;
- preservation of properties for a wide range of temperatures (at low temperatures - do not lose elasticity, and at high temperatures - do not soften);
- immunity to aggressive factors;
- ability to withstand the influence of fuels and lubricants.
Steering mechanism malfunctions and their elimination
The steering mechanism of the Lada Granta is quite reliable and rarely causes problems for the owner. However, this does not mean that problems do not occur at all. There are problems. And you need to know how to eliminate them.
| Cause of problems | |
| Large steering wheel play | |
| The fastening nuts on the ball rods have become loose. | The cotter pin may be missing. Tighten the fastening and install a cotter pin if necessary. |
| The clearance in the ball joint rods is too large. | Replacement of steering tips for Lada Granta. |
| The silent blocks of the hinges are worn out. | Replace the rods. |
| There is too much clearance between the rack and nut. | Worn elements must be replaced, and after replacement the mechanism must be adjusted. |
| There is a knocking sound when turning the steering wheel | |
| The tie rod nuts are loose. | Tighten the fastening nuts. |
| There is a large gap between the rack and the nut. | Replace worn elements; after replacement, the mechanism should be adjusted. |
| The steering mount is loose. | Tighten the fastening nuts holding the mechanism. |
| Steering wheel turns too hard | |
| The support bearing of the shock absorber strut is faulty. | Replace the support bearing. |
| The support sleeve is worn, the rack stop is worn. | Worn elements need to be replaced. |
| Tire pressure is too low. | Inflate tires to optimal pressure. |
| Ball joint parts are worn or damaged. | Replace elements. |
| The shock absorber struts or their elements have expired. | Repairing the shock absorber strut or replacing it. |
| The shaft bearings are worn out. | The shaft bearings need to be replaced. |
| The electric power steering is faulty. | Replacement of the EUR together with the shaft. |
Like the braking system, engine operation and other important components and assemblies, the steering system must be periodically inspected for malfunctions. If there are no signs, protective boots and other smaller structural parts must be inspected. The steering rack of the Lada Granta is a key control mechanism. It is thanks to this that the car is controlled by turning the wheel.
Not only the comfort of control, but also the safety of the driver and his passengers depends on the serviceability of the steering mechanism. Unit problems must be diagnosed and corrected in a timely manner.
Basic steering rack faults
The main sign of a breakdown is a knocking sound when turning. At first it is almost invisible and appears when hitting potholes. If you ignore the first symptoms, the noise will not go away and will constantly get worse. Then the knock will be transmitted to the steering wheel. If you ignore this symptom, the rack will simply jam, and this risks getting into an accident due to loss of control. The rack knocks due to wear of the hinges, teeth or rubber-metal bushings (damper).
The following symptoms can also be attributed to steering rack malfunctions.
- The steering wheel turns hard (accompanied by a slight whistle).
- The tight rotation stops as the speed increases.
- With straight steering, there is no gain.
- When turning, the steering wheel does not turn the front wheels properly (the car begins to roll left/right while driving).
- Vibration, beating, grinding; the steering wheel begins to rattle.
- The steering wheel does not return to its original position.
- The steering wheel rotates spontaneously.
There are many reasons for steering rack malfunctions. But these are the most common. If at least one of them occurs, the Lada Granta should go for repairs as soon as possible.
DIY steering rack replacement
For novice motorists, this may seem like an overly complicated procedure. But in reality everything is simpler. The algorithm of actions is as follows.
- Disconnect the battery, loosen the bolts of the front wheels, hang the front on jacks and remove the wheels.
- Inside the car, you need to unscrew the bolt that connects the steering gear terminal to the intermediate shaft. In this case, the steering wheel must be in a straight position (the wheels are strictly straight).
- Disconnect the rods from the swing arms.
- Unscrew the steering mechanism mounting nuts through the gaps in the wheel arches.
- Dismantle the clamp and remove the steering mechanism assembly.
- Next, all anthers and their fastenings are removed.
Now you can install a new steering rack (if you did not use a repair kit). The assembly is assembled in the reverse order. The position of the rack should be adjusted so that the marks on the crankcase coincide with the marks on the protective boot. The last operation when replacing a unit is to adjust the front wheel alignment.
If the rack has been repaired, all parts are generously lubricated with special lubricant (lack of lubrication shortens the service life of the steering rack).
In most cases, the cause of rack failure is motorists ignoring to inspect the car for faults. A thorough diagnosis of all components and assemblies is carried out at least once a year.
FakeHeader
Comments 77
Look at my 2-finger lubricant test. lubricant for balls d.b. — enveloping — waterproof — don’t freeze — don’t eat the anthers, you can seal the throat of the anthers with a sealant.
The blue grease was a mistake, as was lithol. Now ShRB-4 is installed everywhere. Provide a link to your test
the author is just great and saves on his wallet
He doesn't save anything.
I will say one thing - the author should have gone to proctology. Because he likes to poke around in shit. And he installs shitty spare parts, and also tries to lubricate them with something that’s not clear.
Judging by your account, you are no longer capable of anything other than writing such comments.
Would you like to tell me one secret. Starting from 05, now I already have my fourth Renoch, I had three Logans, now Sanderik. Initially, I did the same thing, especially on the first car on the collective farm, I tried to choose something that was not particularly expensive, but of normal quality. I remember adding lubricants to the tips, but they still didn’t work even half as well as the original ones. Having saved a thousand on a normal Valio clutch, on the advice of “experienced” ones, like it costs less, but runs no worse than Valio, I installed the clutch. Automotorfrance, in the end, through year, all this cost me 2.5 times more money than Valio would have originally supplied, I probably changed about five thermostats with gaskets until I bought the original one and forgot about it. Of course, you can experiment with spare parts, but after 12 years of operation of these machines , came to the conclusion that with regard to steering, suspension, clutch, and such critical components, it is cheaper and safer to supply an original spare part once, or an expensive analogue one from a company that supplies the assembly line, than to change others three times during this time. People are looking for immediate benefits , but in the end they end up with much more money. Cheaper spare parts will never be better, even if you lubricate them or not, they still won’t pass more than half of the original ones.
Nowadays, additional lubrication of balls and ends is absolutely not needed, some people think that if I put more lubricant in, the part will last longer, but this is not true, this was true before, when other materials were used in balls and ends. Balls at the factory put absolutely enough lubricant on them. its entire service life, of course we are talking about good manufacturers. By stuffing a bunch of lubricant, you only violate the factory seal of the boot, and waste your time. Now all more or less normal parts are made with Teflon liners, this is a self-lubricating material, so the finger does not need any What kind of additional lubricant, by analogy, you can fry on a Teflon frying pan without oil, excess lubricant only destroys the boot and attracts all sorts of dirt. So you don’t have to waste your time.
Steering rack adjustment
The unit knocks for various reasons. In fact, this is a real disease of the control mechanism, inherited from the Lada Kalina, since the components are identical on these cars. You can adjust the rack yourself.
To do this you will need a minimum of tools:
- steering rack calibration key;
- socket heads for 10 and 13;
- shaped screwdriver.
To tighten the slats, you can use two methods. The first involves using a special key that can be inserted into the gap of the arch on the left side. The second method is more labor-intensive and is suitable if it is not possible to stick your hand into the gap. To do this, you will need to dismantle the battery and its platform; this is the only way to get to the nut for tightening the gearbox. The first method is simple, so it’s better to consider the second option.
To do this, you need to disconnect the battery terminals and remove it, and then remove the platform under it. Now you can get to the nut located on the inside of the gearbox housing. You can buy a combination wrench for tightening, on the one hand - for tightening the rack, on the other - for tensioning the timing belt.
To tighten the nut, turn it clockwise.
Steering wheel tuning on Lada Granta
There are few options for upgrading the steering wheel on the Lada Granta. The most popular of them is installing a sports version. Such a steering wheel will not only make the interior more attractive, but will also increase the comfort of control, especially if it is selected correctly. You can install a multi-steering wheel, but only if the configuration is maximum, in other cases there will be nothing to control with its help.
The sports version must be injury-proof, that is, in the event of an accident it must be deformed without causing damage to the driver. Among the shortcomings, it can be noted that although there is an airbag in the standard steering wheel, the sports one does not have it. You can also modify the steering wheel by installing braid. More advanced ones install a heating thread under it.
To install the sports steering wheel, you will need to carry out the following operations.
- Align the front wheels straight (you can drive a little forward and back so that the trajectory is straight).
- Disconnect the battery terminals by de-energizing the vehicle's on-board network.
- The airbag control module must be disabled (if the Granta equipment is equipped with it). If you do not turn it off when removing the factory steering wheel, it may shoot out.
- Remove the steering wheel and install a horn on the adapter. The wiring must be stored in the adapter; to do this, carefully inspect all contacts.
- Connect the adapter to the shaft, but do not secure it with a nut.
- A sports steering wheel is installed on the adapter and secured with special screws.
You cannot throw away or sell the factory product; the sports version will raise questions when passing inspection.
Power steering and power steering: do-it-yourself installation
The electric booster first appeared on Kalina, then on Grant and on the new Priora. You can drive a car without an ESD. But if a car owner previously owned a car equipped with a hydraulic or electric booster, then, at a minimum, he will experience great inconvenience. On the Lada Granta in the minimum configuration, the manufacturer does not install electric power steering, so many owners of such cars decide to install the power steering themselves. This procedure is not the easiest, and the unit is not cheap. But its presence means a comfortable ride, maneuverability and safety.
Installation does not require any special knowledge or skills; minimal experience and a set of tools are sufficient. If, nevertheless, the question arose about installing electric power steering on the Lada Granta, then when purchasing an electric power steering unit, you should pay attention to its number.
The set of numbers contains a definition of the place of production, these are the last two digits:
- 00 – made in Makhachkala (not the highest quality, has many negative reviews);
- 04 – Korean amplifier, you can buy it in a store, a rare copy at auto wrecking yards;
- 02 – made in Kaluga, a good medium option.
To install the amplifier you will need a set of wrenches, screwdrivers and an angle grinder (grinder). Before proceeding with installation, the steering wheel, all steering column switches, the ignition switch, and the steering column with cardan must be removed. The further algorithm of actions is as follows.
- Knock out the bolts from the removed bracket in the form of a plate and cut off about 3 cm from the top with a grinder.
- Drill holes in the plate to mount the electric amplifier.
- Fix the cardan to the EUR.
- Place washers under the bracket (where the electric booster is mounted), and you can use them to adjust the steering wheel.
- Attach the electric booster, and then install the cardan into the rack.
After this, all that remains is to connect the EUR to the wiring according to the electrical diagram supplied with the amplifier. Using washers you need to adjust the steering wheel deflection in different positions. No further maintenance of the electric amplifier is required. Those who decided to replace the electric power steering with a hydraulic booster should understand that this idea is pointless. Firstly, the power steering is much more technologically advanced and modern, and secondly, installing the power steering on the Grant is a labor-intensive and expensive process that has no practical advantage.
Replacing tie rod ends on Lada Kalina
We figured out where the tips on Kalina are located, determined whether they were broken and bought new spare parts. Now it's time for replacement. The procedure is not complicated, but requires special attention. Incorrect installation may damage other mechanisms. Your safety while driving depends on this.
Preparing to replace tie rod ends
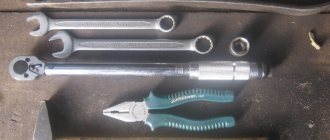
It is better to work on a lift or in a pit, but if there are no conditions, you can get by with a jack. Before you begin replacement work, you need to prepare the following tools:
- A set of wrenches and socket heads (keys 10, 17 and 22 are required);
- pliers;
- a torque wrench is desirable;
- a puller for pressing out the tip will simplify the work;
- hammer;
- mount.
Don't forget about safety. We place stops under the rear wheels, two for each wheel on different sides. After lifting the car with a jack, be sure to place a block for insurance. Some drivers also put the removed wheel under the bottom just in case.
Procedure for removing the steering rod
First of all, we remove the wheel to simplify access to the tip of the Lada Kalina. We see the tip and, using pliers, remove the cotter pin that secures the nut on the hinge pin. Then unscrew the nut with a 17 wrench.
We loosen all the nuts that secure the steering tip, then press out the tip itself using a puller. If you don’t have a puller, then take a pry bar and a hammer. Carefully knock out the steering tip, pressing it at the same time with a pry bar.
It all sounds quite simple and easy, but in fact you will have to work hard to unscrew the nuts. Nuts often stick tightly, and the threads can be stripped. So, if the nut doesn't fit, take WD-40 and pour it thoroughly on all the nuts. You may need to soak the nuts for several hours.
If time is running out, it will be easier to remove the tie rods along with the ends and heat up all the tie rod nuts. Tap them with a hammer and then they will come off without any problems. For heating, a gas burner or special gas cans are usually used.
It is not difficult to remove the entire rod - unscrew the nuts and remove the protective cover. We bend the locking plate and unscrew the rod from the steering rack. We press out, press out or knock out the tip pin from the steering knuckle with a hammer and pry bar.
Of course, it is better to do without removing the traction, but it depends on your luck. If the car has been serviced on time, then removing the linkage when replacing steering wheel ends is usually not required.
When unscrewing the steering ends, it is advisable to count exactly how many turns the old ends were screwed in. When you screw in new tips, screw them in the same number of turns.
Of course, this will not save you from the need to go to the wheel alignment after the work has been done. But you can get to the service station or drive for several days without any special consequences.
Well, if you don’t have a torque wrench, then you’ll have to count the number of revolutions all the more. Otherwise, the new steering tip will have to be screwed in by eye.
Installing a new tie rod
Work on installing a new steering end is carried out in the reverse order. There will no longer be any problems with tightening new nuts on Kalina.
The only thing you need to pay attention to is the cleanliness of the thread and the presence of lubricant on it. There is most likely no grease on the threads for a long time. Therefore, we lubricate all threaded connections with graphite lubricant.
The nut securing the steering tip to the lever must be tightened with a certain force. In some operating and repair manuals for the Lada Kalina you can find information that the tightening torque should be on average 70 Nm.
In fact, the tightening torque is 27-33 Nm. This is why we counted the number of turns. And if you haven’t, then a torque wrench will help us.
Don’t forget about the cotter pin, which must be used to secure the nut so that it does not unscrew while the car is moving.
If you want to be as confident as possible that the steering tips will last as long as possible on your Lada Kalina, it is recommended to check the amount of lubricant under the tip boots. The boot is removed from the new tip carefully so as not to tear it. Next you need to remove the O-ring and spring ring.
Kalina's steering tip finger should be covered in grease. Unfortunately, this is not always the case. If there is not enough lubrication, then fill the boot with lithol-24, then install it back on the steering tip and put on the O-rings.
The importance of timely replacement
The need to monitor the condition of the boot is due to the fact that if it is damaged or worn, dirt and precipitation may get into the hinge joints. Wear will certainly have a detrimental effect on the operation of the steering rack, and therefore on efficiency, driving safety, and vehicle control. Let's imagine that the steering rack boot of a VAZ 2114 in a car breaks and you are moving along a country road at a decent speed, make a maneuver, twist the steering wheel, and it begins to live its own life. The steering wheel does not provide the necessary force to immediately turn the front wheels in the required direction. Unpleasant? Yes. Moreover, it is dangerous to life and health! Therefore, there is no need to delay replacing the sewn cover.
We diagnose faults in VAZ 2110 steering tips
It is worth understanding that due to the proper and correct operation of the product, the stability of the car on the road, comfort of movement and normal controllability of the vehicle are ensured. The tips are responsible for the correct installation of the wheel alignment of the VAZ-2110, and therefore for the uniform wear of the tires, they influence the technical condition of the front suspension as a whole.
Diagnostics of tie rod ends
As a rule, replacing steering tips on a VAZ 2110 makes itself felt as follows:
- The first bell is characteristic noises and tapping sounds in the car’s suspension. They can be on one side of the front wheel, or on both sides at the same time. The knocking noise usually gets worse when turning;
- Naturally, vehicle control and driving comfort in general become more difficult.
It is quite possible to diagnose a faulty tip on a VAZ 2110 on your own in just a couple of minutes. Why do we twist the car steering wheel to the extreme left or right position? In the first case, it will be convenient to observe the condition of the right steering tip, and in the case of turning the steering wheel to the right, it is possible to inspect the left one.
The first step is to check the condition by visual inspection. If the rubber boot is damaged, this is an almost 100% guarantee of a broken tip and dry joint grease. Most likely, for this reason, it has long been clogged with road dust, soured and corroded - replacement is urgently needed.
If everything is fine with the boot, check the play of the articulated joint in the product, which is the cause of increased knocking when the car is running. To do this, the car is slightly jacked up from the side of the diagnosed steering tip of the VAZ 2110 and manually, by twitching, the degree of freedom of the hinge in the part is checked. If there is noticeable play, you will have to remove the wheel and change the tip.
Why did it happen so?
Perhaps the automatic requests do not belong to you, but to another user accessing the network from the same IP address as you. You need to enter the characters into the form once, after which we will remember you and be able to distinguish you from other users exiting from this IP. In this case, the page with the captcha will not bother you for quite a long time.
You may have add-ons installed in your browser that can make automatic search requests. In this case, we recommend that you disable them.
It is also possible that your computer is infected with a virus program that is using it to collect information. Maybe you should check your system for viruses.
If you have any problems or would like our support team, please use the feedback form.
Special attention is traditionally paid to the protection of important components and mechanisms in a car. Mechanisms that transmit torque or rotational movements are especially carefully protected. The steering rack is no exception to this rule. In order to prevent various microparticles (dust, debris, dirt, water) from getting into important areas that ensure the transmission of rotational movements from the steering wheel in the car interior to the rods, a VAZ 2114 steering rack boot is used.
This is a protective cover that is made primarily of rubber. If we talk about its shape or structure, then in appearance it resembles a corrugation; this design is determined by the need to compress and unclench during the operation of the mechanism. The purpose and operation of the boot is quite simple and obvious; it covers an important part of the rack from the influence of negative external factors.
Purpose and characteristics of steering tips
The control system of any car consists of the following main components:
- a steering wheel with a steering mechanism that converts the rotational movement of the steering wheel into the translational movement of the rods;
- steering rods that transmit force from the steering mechanism to the rotary arm of the wheel hub;
- tie rod ends, ensuring rotation of the lever when the angle of inclination of its axis of rotation changes.
The design is equipped with a hinge that allows you to change the angle of inclination of the pin to which the rotating arm of the hub is attached. This transmits the necessary force to turn the wheel.
Schematic diagram of the tie rod end
The tip consists of the following main parts:
- Finger with a hinge in the form of a sphere.
- Grease.
- Protective case.
- Retaining ring.
- Pastel made of polymer.
- Stub.
- Frame.
An important link in the design is the protective cover, which prevents dirt, water and aggressive substances from getting on the rubbing surfaces of the hinge.
Replacing the steering rack boot of a VAZ 2114
“You should know! An important part of the replacement process is under the hood, so wait until your vehicle's engine has cooled down before performing the replacement procedure." Today we’ll look at a way to replace the boot without removing the steering rack. Of course, the process is not as easy and relaxed as in a situation where the engine is previously removed. However, this will not affect the positive result. Inventory we will need:
- Screwdriver
- Hammer.
- Pliers.
- Wrenches for “10”, “13” and “22”, but ratchets of the same sizes are better.
- Lithol for lubrication.
For ease of understanding, we will divide the replacement event into 13 consecutive steps:
- As mentioned above, we wait for the engine to cool down (if it was functioning previously). We will be working from a rather cramped engine compartment, so in order to get to the rack it is necessary to dismantle some components that will get in the way. Using a wrench or a ratchet set to “10”, unscrew the adsorber housing and remove it.
- Next, we find a metal protection that is screwed to the car body and protects the unit from mechanical damage. Take a 10" wrench and unscrew the fastening nuts (two on top, one on bottom). Remove the protective rubber band.
- Now you can see with the naked eye two steering rods secured with bolts. We need to unscrew them and flare them, for this we use a flat-head screwdriver, a hammer, and a key set to “22”.
- When all fastening elements are unscrewed, disconnect and remove the steering rods from the rack.
- Now is the time to start working directly with the rail itself. First of all, we need to unscrew the fastening located at its right end (in the area of the passenger compartment). We unscrew the two nuts from the top and bottom (the key is set to “13”).
- Remove the mount, metal bracket and protective side rubber band.
Pull out the old boot. If it cannot be removed, twist it around the knot and loosen it.
- When the protective cover is removed, inspect the rail for dirt. Clean and lubricate the surface by applying some lithol to it. "Important! When performing work when the steering tips are disconnected, do not rotate the steering wheel.”
- We put on the new protective product in such a way as not to twist (damage) it.
- When the casing is strung and is positioned as it should be, we use bolts to secure the steering rods directly to the rack (use a key set to “22”). Roll up the nuts.
- We install the side cover and the metal mounting bracket. Check that all fastening bolts are tightened.
- We install metal protection and rubber.
- We return it to its place, screw the adsorber.
Do-it-yourself replacement of VAZ 2110 steering tips, step-by-step instructions
If the cause of the malfunction has already been determined, it’s time to start repairs. You can save a lot of money by replacing the part yourself. This is done very quickly. With the right pace of work, it’s quite possible to get it done in about half an hour. However, later you will still have to go to the wheel alignment to calibrate the installation angles of the car wheels. Unfortunately, you can’t do anything here with your own hands without a special stand.
First of all, when the car is stationary, the wheel mounting bolts are torn off and then the car is lifted with a jack from the side of the steering tip being replaced. Having unscrewed the wheel, it would be correct to place it under the bottom of the car for reinsurance with the jack. Next, the correct sequence of work is as follows:
- 1. Undo the cotter pin and unscrew the lower nut securing the ball pin using a “19” wrench. A penetrating lubricant (WD-40 or its equivalent) will be a good assistant in dealing with soured bolt joints. It is advisable to first clean the tip itself and the steering knuckle of the strut from dust and dirt with a hard-bristled brush;
Dismantling and removing the steering mechanism
- 2. Next, the coupling bolt securing the product to the steering rod is unscrewed;
- 3. In the future, it will be correct to use a special puller for the steering end of the VAZ 2110. The artisanal method of removal using a crowbar and a hammer can be fraught with damage to the steering rod; you should be extremely careful. It is best, however, to buy the above-mentioned ball joint remover and use it;
- 4. Turning the tie rod to the right, unscrew it from the tie rod thread. We count the number of revolutions (this will help us at least approximately maintain the wheel alignment setting when installing a new part).
What you will need
Replacing the steering rack boot requires very few tools. Most likely, you can get by with a screwdriver and a couple of wrenches. You will also need two new boots and clamps to attach them to the steering rack and rods. Old metal clamps may rust, and it is better to replace them to ensure reliability. In some car models, for example, in VAZs, the boot is a cover that immediately covers both the steering rack and two tie rods. In this case, you will need not four clamps, but only two.
A screwdriver will be needed to unscrew the screws holding the clamps together, and wrenches will be needed to remove the tie rods. The wrench numbers for each car model may be different. And the screwdriver can have a flat blade or a Phillips blade, depending on which screw is used on the clamp.
If a plastic tie is used instead of a metal clamp, you will need a sharp knife to cut it.
A small amount of viscous lubricant, for example, grease, will also be useful. Why it may be needed will be indicated below.
It may be useful to watch a video showing the technology for replacing the boot specifically for your car model. Why do I recommend watching the video? Although the replacement principle is the same for all cars, there may be nuances that affect the quality and reliability of the further service of the element. The video will help you understand the details and avoid mistakes.
Do-it-yourself power steering and power steering installation
The electric booster first appeared on Kalina, then on Grant and on the new Priora. You can drive a car without an ESD. But if a car owner previously owned a car equipped with a hydraulic or electric booster, then, at a minimum, he will experience great inconvenience. On the Lada Granta in the minimum configuration, the manufacturer does not install electric power steering, so many owners of such cars decide to install the power steering themselves. This procedure is not the easiest, and the unit is not cheap. But its presence means a comfortable ride, maneuverability and safety.
Installation does not require any special knowledge or skills; minimal experience and a set of tools are sufficient.
If the question arises about installing electric power steering on the Lada Granta, then when purchasing an electric power steering unit you should pay attention to its number
What tips are best to buy for Lada Kalina
When purchasing spare parts for any car, the manufacturer recommends using the original. In the case of the Lada Kalina, everything is the same, only the original is produced by VIS LLC.
Owners of Lada Kalina cars recommend foreign-made analogues - they take better care than the original.
If we talk about specific brands, we can recommend the following tie rod ends:
- Lemforder;
- Fenox;
- Sevi;
- MANOVER and so on.
Spare parts sellers may recommend that you replace the entire steering rod, including the tip. But, as a rule, it is the tips that break; there is no need to spend money on the rod assembly.
Preparing the car
The preparatory work in our case is very simple and consists of providing convenient access to carry out the necessary work. On some cars you will have to remove the engine protection, jack up the front end and remove the wheel. On others, you may need to remove the alternator or battery. If it is possible to park the car on a pit or overpass, this will make the task much easier. If you use a jack, do not forget to put stops under the rear wheels to prevent the car from falling. No one wants body damage and possible injuries.
Disassembling the Lada Granta steering mechanism
Replacement instructions
So, the preparatory work has been completed, the video has been watched, the tools have been prepared. First of all, we unscrew the steering rods to ensure the removal of the damaged part. If disconnecting the steering rods can subsequently lead to a wheel alignment disorder, then in order to avoid a future trip to the service station, I recommend putting marks that will help return everything to its place. Another solution would be to measure the required distances using a caliper. However, this will not be needed for all car models.
Source
Where to find tie rod ends for Lada Kalina
Before you start replacing tie rod ends on a Lada Kalina, you need to clearly understand where they are. You can see the traction ends without even removing the wheels. It is enough to simply lift the body on jacks on both sides or on each side in turn.
The ball ends are attached to the trunnion arm. By turning the wheel, you can free up visibility and space for repairs.