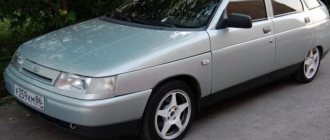
The peculiarity of the Opel Astra H model is that it was supplied to our country with different power units, in which the arrangement of the generator, air conditioner and pump belt rollers is slightly, but slightly different. Moreover, differences in belt length also depend on the vehicle's equipment, so the procedure for removing it, although not difficult, will differ depending on the factors listed above.
Frequency of replacing the Opel Astra H drive belt
Each manufacturer, as part of its repair and maintenance manual, indicates the recommended frequency of replacing the drive belt, of which there may be several. For Astra H, this indicator depends on the engine model. So, for engines of the Z13DTH, Z17D7L and Z17DTH series, the belt must be changed every 90 thousand kilometers (or every six years, whichever event comes first).
For cars with the Z19DT(L/H) engine, the replacement interval for the auxiliary drive belt is increased to 120 thousand kilometers (every 10 years), and the most reliable power units are the Z19DTH and Z17DT series, where the recommended interval for replacing the alternator belt is 150 thousand km (or those 10 years of operation).
Of course, if the car is used in difficult conditions, critical belt wear may occur much earlier, and its condition must be monitored more often than the manufacturer prescribes.
A broken drive belt is a nuisance that can have serious consequences for the car:
- deep discharge of the battery and a decrease in its capacity;
- violation of the tightness of the cooling system;
- engine overheating.
Common generator “diseases” and ways to eliminate them
Let's start with the most common faults typical for generators in Opel Omega A, Astra G, Vectra B and many other models:
- Strap slipping while driving. First of all, you need to make sure that the bearings are intact, after which you can tighten the strap.
- If the brushes of the device are stuck, it is necessary to clean the brush holder, as well as the brushes, from dust and dirt. After this, you can check the force of the brush springs.
- The contact rings are burnt - in this case, you need to clean them, and if necessary, sharpen them.
- There has been a break in the excitation circuit; the only way out is to eliminate the break.
- A fairly common malfunction of the Opel Vectra generator is the rotor sticking to the poles of the stator element. It is necessary to diagnose the condition of the bearings, as well as their installation location. If you find faulty elements, they must be replaced.
- Poor contact or complete absence of the generator unit with the ground of the voltage regulator. It is necessary to check the integrity of the wiring, as well as the quality of the contact connections.
- If the brushes are worn out, they will have to be replaced in any case.
- If the slip rings become oily and dirty, they should be wiped with a rag soaked in kerosene or gasoline.
- The voltage regulator has failed - you should check it, and if it fails, replace it with a new one.
- Another common problem is a turn short circuit or open circuit in the winding. You will have to completely disassemble the assembly to diagnose the stator winding for short circuits or breaks. If the problem lies in the stator or winding, then the failed elements must be replaced.
- If bearing elements are worn or damaged, these components must be replaced. And if the problem is wear of the seat for the bearing devices, then the mechanism cover will have to be replaced.
- One of the most serious problems is pulley failure. If you notice that the teeth on the pulley have begun to wear out, the pulley will have to be completely replaced.
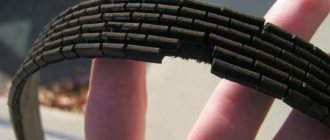
- Belt wear. If the strap shows signs of wear, damage, or delamination, then it is necessary to replace it (the author of the video about replacing the tensioner roller of the device is the zverdiman channel).
The most common faults are belt wear and humming bearings.
How to check the condition of the drive belt
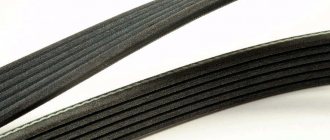
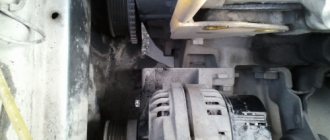
The generator along with the belt drive is located on the right side of the engine compartment when looking at it in the direction of travel. A visual inspection of the belt should be carried out every 5000 km. During inspection, the presence of serious defects in the inner surface of the belt (cracks and delaminations) is determined. If visual inspection is difficult, it can be supplemented with tactile inspection by feeling the belt. The presence of polished (ideally smooth) areas is also unacceptable, as are abrasions, as well as extensive oil stains.
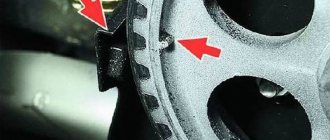
On models with a gasoline engine, the automatic tensioner lever should be checked at the same intervals. Its tip should be in the interval between the stops on the base platform. If it goes beyond these limits (adjacent to the stop), the belt along with the tensioner must be replaced.
Step-by-step instruction
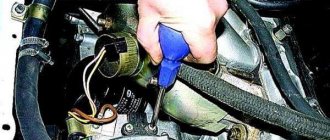
First, disconnect the air filter with pipes from the throttle valve.
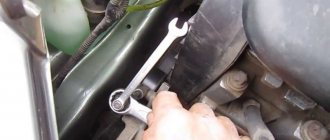
We remove the front right wheel, the side plastic protection and jack up the engine through a plank. We remove the generator belt, using a nineteen key, using a special protrusion, turn the tension roller, thereby loosening the belt. In the photo it has already been removed.
Remove the engine mount.
Remove the upper protective cover of the timing belt.
Remove the middle part of the plastic protection.
Set the top dead center
We turn the crankshaft by the bolt, always clockwise, until the marks on the crankshaft pulley and the lower protection coincide.
It's not very visible, but it won't be difficult to find them.
The marks on the top of the camshaft couplings should also match.
Unscrew the crankshaft pulley bolt. If the transmission is manual, then this procedure will not pose any special problems. We place stops under the wheels, turn on the fifth wheel, insert a specially trained screwdriver into the brake disc under the caliper and, with a slight movement of the hand, unscrew the bolt. But if the robot is like in our case, then a wrench helps us, but if there is no current one, we make a crankshaft pulley clamp. In the corner we drill two holes by eight and insert two bolts there, tightening them with nuts; we eventually insert these bolts into the holes in the pulley. You will get the dimensions yourself by measuring the distance between the holes. In the photo, the lock is shown schematically with a red rectangle; any holes can be used.
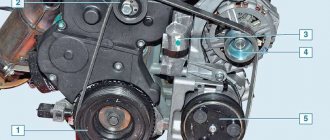
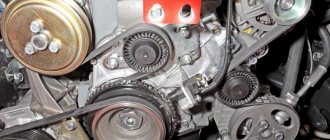
Remove the pulley and lower timing belt protection. On the left we see a tension roller, on the right a bypass roller.
We check the camshaft marks and, if they are gone, we bring them down. The marks on the crankshaft sprockets, in turn, should also match.
We install our Russian clamp on the camshafts and mark the old belt, just in case.
You can purchase special clamps; you can find them on Ali or on Vseinstruments.ru.
It will turn out like this.
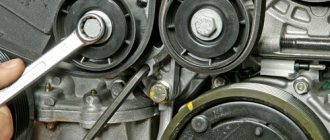
Using a hexagon, we turn the timing belt tension roller counterclockwise, thereby loosening the belt and removing the belt and rollers.
Engine Z22YH
13. The multi-ribbed belt on these models is removed from below; first remove the right engine boot (see Section 5).
14. Turn the tensioner (see accompanying illustration) by the bolt in the direction of the arrow and loosen the multi-rib belt.
15. After installing the multi-rib belt, check the position of the tensioner lever (see accompanying illustration) - when the belt is tensioned, the control mark of the lever should be between the lever position limit marks.
16. Reinstall the boot and lower the car onto the wheels.
general information
1. The operations for removing and installing a multi-rib drive belt are in most cases similar for all engines; the differences are determined only by the configuration options of the tension rollers and related features. If the belt replacement procedure is not completely described in the descriptions below, you should focus on performing the operations for the Z16XEP gasoline engine.
2. The multi-ribbed belt is designed to drive auxiliary units such as the generator, water pump and air conditioner pump unit. Depending on the engine model and configuration, the number of drive units may be different, and the length of the belts will vary accordingly - be careful when buying a new belt for your car. Before removing the belt, it is recommended to sketch a diagram of its tension.
3. If the belt will be reused, before removing it from the pulleys, make a mark (in the form of an arrow) with a marker to determine the direction of rotation of the multi-rib belt during subsequent installation.
Engine Z14XEP
17. A feature of this engine is that to replace the multi-ribbed belt, it is necessary to remove the right engine mount, for which you must first remove the right engine boot and install a special tool (see Section 5).
18. After installing the tool, lower the car, open the hood and remove the air cleaner (see Chapter 4).
19. Unscrew the bolts securing the right support (see accompanying illustration) and remove it.
20. Using the special device KM-6131, press the tension roller in the direction indicated by the long arrow (see accompanying illustration) and fix it in this position. Remove the multi-rib belt.
21. If it is necessary to replace/remove the tension roller, disconnect the right support mounting bracket from the engine block (see accompanying illustration) by unscrewing the 3 mounting bolts. Then press the tension roller again, remove the KM-9S5-2 locking device and release the roller. Unscrew the tensioner mounting bolts (see illustration 7.20) and remove it from the engine.
22. Installation of all removed components is carried out in the reverse order of removal.
Engine Z16XEP
4. Remove the air cleaner (see Section 4).
5. Make a mark to determine the direction of rotation of the belt during installation.
6. Using a key (see accompanying illustration), turning it in the direction indicated by the arrow, press out the tension roller and secure it with a special rod, then remove the belt.
7. Place the multi-ribbed belt onto the drive pulleys.
8. Using a wrench, slightly press the tension roller in the direction of the arrow and remove the locking rod. Then slowly turn the key clockwise - the multi-rib belt will tighten.
9. Install an air cleaner.
Engine Z13DTH
23. The multi-rib belt on these models is removed from below. It is necessary to first remove the right engine boot (see Section 5).
24. Loosen the multi-rib belt by turning the tensioner with a special wrench (see accompanying illustration 7.24a) in the direction of the arrow, and secure the tensioner in this position with the locking rod (see accompanying illustration 7.24b).
Note: At service stations, the KM-6130 device is used for this purpose.