Many car enthusiasts, when they detect an extraneous knock coming from the depths of the car’s suspension, including Renault Logan, subsequently inevitably face the need to replace the tie rods, their ends, as well as the rack and pinion mechanism itself. To carry out repairs of failed components, many Renault Logan owners resort to the services of expensive specialized centers. However, replacing the tie rod end can be done with your own hands.
This article is devoted to how to diagnose the steering unit with your own hands for the presence of play, as well as replace the steering rods, rods and rack and pinion mechanism in the Renault Logan model.
How to identify faults?
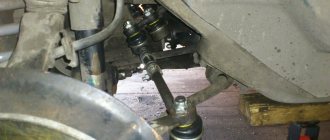
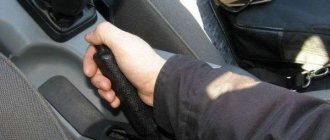
To independently perform diagnostic manipulations in order to determine the need for further repair of elements of such a unit as a steering rod, you will need the “help” of a pit or a lift. If suspicions affect the steering tip, then play in it can be identified through linear movement (force) applied to the rod. If a sound characteristic of play is detected, then the tie rod end needs to be replaced.
When the Renault Logan steering unit has power steering, the tie rod end is replaced using an identical algorithm (as in the version without power steering).
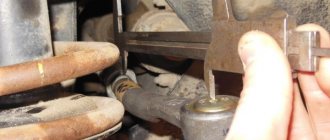
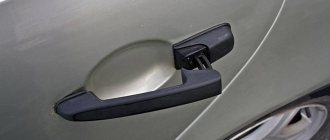
To detect play at the hinged connection of the rod with the rack, you should squeeze the boot with your fingers and feel the specified hinge for wear.
The decorative boot hides a bushing underneath, which ensures the alignment of the shaft in the rack and its tight fit. Transverse play present at the shaft will indicate wear of this bushing. Replacing it will require a difficult undertaking involving partial disassembly of the rack and pinion mechanism. And all this is done with your own hands.
The Internet allows you to find a lot of options for video material illustrating the procedure for replacing steering rods in a rack and pinion mechanism. This allows you to defeat the annoying knocking.
Replacing the accessory belt for Renault Logan
Replacing the muffler Renault Logan
Renault Logan configurations
Renault Logan remove replacement repair Replacement of the tie rod end Renault Logan
Renault Logan > Car repair > Steering > Replacing the tie rod end Renault Logan
We replace the tie rod end when its ball joint fails or the joint cover is damaged. We remove the front wheel from the side of the tie rod end being replaced and securely fix the car on a factory-made stand.
Turn the steering wheel all the way in the direction opposite to the tip being removed. The work is shown using the example of the right tie rod end; we replace the left tie rod end in the same way.
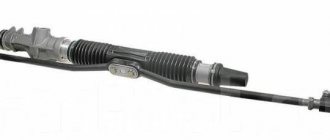
About the structure and features of the steering mechanism
Here you will need to understand in order the purpose of each element, what the steering rod contains, in order to understand the importance of replacement technology.
This applies to:
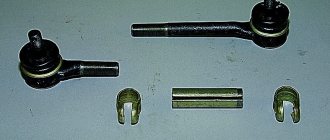
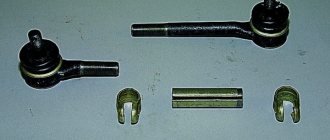
- tips (both right and left sides);
- rods (also on both sides);
- anthers of these parts;
- racks (installation of a repair kit and “tightening” its gearbox)
All designated parts are integral components of the steering mechanism, which over time can upset the owner due to wear.
Next, we will consider step-by-step instructions to correctly replace the tie rods. We will also pay attention to the selection of the required parts according to the article numbers.
Renault Logan steering rod replacement
If the steering tip is out of order (you can hear squeaks on bumps when turning the steering wheel) or its protective rubber cover is damaged, then repairs will have to be made.
In the video you can see how to replace the tie rod end.
Necessary tool
Keys and accessories:
If you have a little experience in carrying out such work, then you can replace the tips on Renault Logan yourself. To do this, you should only adhere to the rules listed below.
Let's start replacing (preparatory work)
To replace the tips, you need to put the car on supports. Then you should remove the front wheels. In this case, it is recommended to turn on the handbrake and place wheel chocks under the rear wheels to ensure the stability of the car.
Stages of work
- Before repairing, all elements of the steering mounts must be sprayed with WD-40. You can also use water if liquid is not available. You should pour it over the bolts and wait a while until they are saturated with moisture. This will make it easier to unscrew the bolts.
We removed the wheel and treated the tie rod end to the hub with WD-40
Loosen the tension, indicated by an arrow
Loosen the pin bolt
We use a ball joint remover (it is universal for all cars)
The steering knuckle was removed
We use a jack to help
AHTUNG! Do not overtighten, otherwise you will have to take a new tip
- It is recommended to lift the car on the side on which the part will be replaced.
- When carrying out work, the car must be on the parking brake.
- To clean dirt from the steering column, you can use a metal brush.
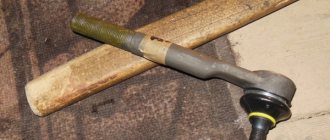
- In the event that you do not have a puller at hand to press out the finger, you can use a wooden block and a hammer. Using a hammer through the beam, you need to hit the mounting hole of the finger, freeing it.
- It is important to remember that the steering wheel tip on the right has a left-hand thread, and on the left – a right-hand thread (that’s why the article numbers are different, they are lower).
Article numbers of “tested” steering tips
All spare parts for Logan have numbers, steering rods are no exception. To make repairs efficiently and quickly, you should buy new spare parts before starting.
60 01 550 442 - original code for the left steering tip for Renault Logan.
60 01 550 443 - original code for the right steering tip for Renault Logan.
Steering end 60 01 550 442
Sasic - 4006158 4006159 - a popular replacement option (analogue).
Sasic 4006158 — steering tip (analog)
Which brand should you prefer?
To select the required part, we use the article number, which will allow you to accurately select spare parts. To determine the treasured code, we consider the number indicated on the part itself. We recommend purchasing original products using the corresponding factory part number. We should not forget about the galaxy of brands that have their own items at their disposal. However, the quality aspects of the manufactured parts will not be able to guarantee their presence at the same level as the original products.
Short description
- First, use a can of WD 40 to spray the fasteners. If you don’t have a wedge at hand, use water, wet a cloth, put it on the fasteners and wait for it to get wet;
- Let's start by loosening the rod end locknut. Having loosened it, we leave it in the same place;
- We unscrew the steering tip nut on the steering knuckle, holding the hexagon to prevent the finger from turning;
- If desired, use a ball joint puller and press the pin out of the steering knuckle arm. An alternative is to use a heavy hammer, tap it on the end of the fist boss from the side along the axis of the lever, alternating blows on the fasteners from above;
- We pull out the finger from the socket of the rotary lever;
- We screw the new one in the reverse order of removal, up to the locknut installed in the place where it was before;
- We place the hinge pin in the socket of the steering knuckle lever, and tighten the new pin well, holding it from turning;
- Let's tighten it with good force, so as not to break the thread of the lock nut of the rod end;
- Having completed the work on both sides to replace the steering tips, we go to a technical service, where we set the angles of the car’s wheels.
Replacing Renault Logan steering wheels incorrectly
Right
Let's start the renovation
To be able to carry out repair work, you will need an appropriate tool that allows you to dismantle the rod, its tip or boot. A lift will also greatly simplify the task.
- If an annoying play is detected in one of the tips, then we replace it according to the given algorithm and, not forgetting to check the article data.
- We remove the wheel from the corresponding side.
- We unscrew the nut that secures the ball pin of the tip in the eye of the steering knuckle.
- To release the conical part of the pin from the eyelet, we apply a lateral impact load to it (with a hammer) or, which is more civilized, use a puller.
- Lubricate the threaded part of the pin on the new tip with an appropriate lubricant, after which we screw the tip onto the rod. Tighten the locknut. To ensure a minimum error in wheel alignment, we ensure that the number of turns matches when dismantling and screwing the tip onto the rod.
- We head to the service center to monitor and adjust wheel alignment.
- During installation, we take “care” of the boot so as not to damage its rubber texture.
- The replacement algorithm is identical for both sides of the suspension.
- A failed rod should also be unconditionally replaced since it falls into the category of parts that cannot be repaired.
- Having dismantled the clamps (2 pieces), remove the boot from the rod and put it aside for a while.
- Armed with a special device that allows you to unscrew the rod, we will implement this action.
- We install a new analogue and put on the boot, securing its extreme sections with clamps.
- If it is not possible to remove the boot through the tip, we dismantle the latter. After assembling the unit, a wheel alignment is required.
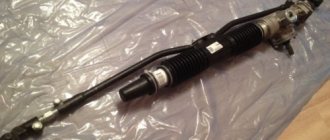
- Now let's begin the process of replacing the rack, which can be done in several steps.
- First, drain the fluid from the power steering circuit.
- We disconnect the steering shaft from the seat on the rack gearbox.
- We unscrew several bolts that hold the rack assembly to the subframe. In the Renault Logan modification, 2 pcs.
- To ensure the correct angle of installation of the wheels, we first make the appropriate markings. The shaft is marked with only one mark.
- We disconnect the tips from both sides of the Renault Logan car.
- Now we take out the assembly assembly.
- We prepare a new unit and install it on the car in the reverse order of the dismantling procedure.
If the owner is faced with the need to replace the rack in a Renault Logan car, the equipment of which does not include power steering, then the technology is completely identical to the sequence of manipulations given here. The exception is that there is no need to drain the liquid.
Renault Logan steering rod replacement
Home › Car repair
18.05.2018
Having discovered an extraneous sound heard in the depths of the Renault Logan suspension, many car enthusiasts rush to expensive specialized centers for diagnostics and repairs. Although, the steering rod can be easily replaced independently, without using the services of specialists.
Signs indicating the need for repair
First of all, you should make sure that the problem is in the steering rod. To correctly diagnose a node, you need to become familiar with its structure. The steering rod is the connecting link between the rack shaft and the steering tip.
Considering that it has a spherical shape with an elongated finger, the cause of the knock may be axial play. To carry out diagnostics, the car is driven into a pit or jacked up. If the tie rod ball swings when pressed with your fingers, the element needs to be replaced.
Attention! A worn tire can cause a malfunction, causing the wheel to “dance”, disrupting the alignment.
Required Tools
To carry out repair work you will need:
- hammer;
- wrench 16, preferably open-end;
- wheel wrench;
- wooden block.
If you have a little experience and a great desire, you can replace the steering rod yourself.
Repair stages
When starting repair work, the front part of the car is lifted with a jack, and the rear wheels are secured with wheel chocks. This will provide the car with stability. Replacing the rod contains certain stages:
- To make it easier to unscrew the bolts, spray them with WD-40 or clean water.
- Unscrew the nut holding the ball pin in the steering knuckle.
- To free the conical part of the pin from the eyelet, you will have to use a hammer or a special puller.
- Before screwing the tip onto the rod, the threaded part is coated with appropriate lubricant. When tightening the locknut, you should make sure that the number of turns matches the one that was used during dismantling. This will minimize wheel alignment errors.
- Having completed the work, you need to contact a specialized service station to adjust the wheel alignment.
With the right approach, you can replace the Logan rod yourself. This will allow you to save money and gain relevant knowledge that will be useful in the future.
Information provided by the online spare parts store www.z-renault.ru
And then a detailed video about replacing the steering rod:
Renault Logan steering rod replacement Link to main publication
Source: https://avto-cool.com/remont-avtomobiley/zamena-rulevoy-tyagi-reno-logan
Preparatory work
To replace the unit, you will need to put the car on a lift or use a pit with a jack. The tips are located close to the front wheels in the arch area, so working while lying down will be extremely inconvenient. From the tool you will need:
Lift or jack.
- a set of keys;
- hammer;
- special wheel wrench;
- WD-40 composition;
- tool for dismantling hinges;
- high-quality lighting - a flashlight or something similar.
As a rule, replacing one tip takes 1 hour.
What to buy
If the steering rod is faulty, it must be replaced. Here the question arises about buying a new part. It is recommended to buy original products. In the technical manual for the car or from the official dealer, you can find out the catalog number of the steering linkage for your particular Renault Logan. A popular model is TRW catalog number JAR 1031. Its cost is 1000-1200 rubles. We also recommend taking a closer look at the products of the following brands:
- ABS (Netherlands);
- ASMETAL;
- Autolog (Germany);
- DELPHI;
- MONROE;
- PROFIT;
- Sasic (France);
- SWAG.
The cost of the most expensive models reaches 5 thousand rubles, but whether it is worth overpaying for the brand is up to you to decide.
Video lesson
Having bought the car a little over a year ago, I immediately went through diagnostics at Renault Service on Chicherin - there were no complaints about the chassis, except for the recommendation to replace the left wheel bearing, which was done almost immediately. The tie rods with ends had no play. But the year did not pass without a trace - I began to notice an unpleasant thud on our Belgorod side streets, broken during the winter... I did not feel any noise on the highway.
I decided to make diagnostics routine and it so happened that I did it three times over the last 2 months in different services - no, not on purpose, checking and comparing the quality of diagnostics, but mainly as a bonus, during scheduled visits to the service. I concluded, as a novice car enthusiast, that going to a service center specifically for chassis diagnostics is not financially profitable, so the first diagnosis, which I came specifically for, cost me 400 rubles. It’s better not to rush into this matter and ask the technician to check the chassis during a visit to the service center, solving other issues - for example, when replacing the brake fluid, the technician diagnosed the chassis for me for free, and when replacing the clutch cable, the diagnostics cost me 100 rubles .
So, the verdict of three independent services was the same - a slight play in the steering rods with tips, hence the noise from the front suspension on uneven surfaces. True, where I gave 4 hundred, the diagnosis was more scrupulous, versatile ones were rejected - one rod and one tip, but it was decided to change everything completely, especially since wheel alignment is required. As for replacing the levers right away, my ardor was cooled by the master at “Cruise” - good is better than new!
I didn’t have to worry about choosing a manufacturer for a long time - I took the proven Lemforder in Exist (1000+1000/900+900).
At the same time, the Sasic anthers, which forced the master to tinker, fit with difficulty from the side of the steering rack, but this is not bad - they will fit more tightly. They were tightened with plastic clamps.
Result: the noise of the suspension when driving over bumps and small potholes has disappeared - the suspension works smoothly without thumping, the positive result is obvious. So, I present a photo report...
Removing the old tips turned out to be not so easy - I had to resort to a gas torch.
Same thing on the second side...
Price: 5,900 ₽ Mileage: 80,900 km
Good day to all good people. In this article we will figure out how to replace a Logan tie rod end with your own hands without outside help. The average time to complete the job is from 60 to 90 minutes, depending on the driver’s experience.
The weak link of the tie rod is the tip. The average period of operation of the element does not exceed 30-40 thousand kilometers. Heavy use of the car and bad roads will bring the replacement period closer.
In the article you can find a video of replacing the Logan tie rod end, which will help the driver. It will complement the text material and help you understand the nuances of replacing the tip yourself.
Service life and causes of breakdowns
The problem is that no one gives specific figures regarding service life. If we talk about the rods themselves, they have an almost unlimited resource, since they are made of high-strength metal. Most often it is the tips that suffer, but even here everything depends on many factors. Some drivers do not monitor the condition and drive the car until the suspension literally crumbles. The advantage of this solution is that you will know exactly when to change the tips. Naturally, the suspension can fly at the most inopportune moment - and this is the main disadvantage.
Auto mechanics and experienced drivers strongly do not recommend bringing traction to a critical state. On average, their service life is 60-100 thousand kilometers. However, it all depends on a number of factors:
- Quality of roads. With regular off-road driving or surfaces with numerous holes and potholes, the tips will be subjected to heavy loads, which will ultimately accelerate the wear of the part and the formation of backlash.
- Driving style. Not all drivers slow down in front of speed bumps or large puddles that may contain a large hole. It’s in vain, because the slightest careless “flying” into such a hole can put an end to many suspension elements.
- Environment. The most dangerous to the design of the tips are dirt and water. If it rains regularly in your region and there is no asphalt surface, then the tie rod ends will quickly break.
- Product quality. Some drivers are unlucky. They complain about the poor quality of factory parts. Sometimes buying cheap tips will also cause them to fail quickly.
Avoiding unexpected breakdowns is quite simple - every 10-20 thousand kilometers, carry out diagnostics or at least inspect the condition of the anthers. Yes, they play a decisive role in protecting the tips themselves, so if you find breaks or other defects, replace them immediately. You won’t even notice how, after a couple of trips, large volumes of dirt and water will literally seep through the damaged boot.
It is quite difficult to check the design of the tips themselves in a garage environment, since you will have to disassemble everything. Here you can contact a specialized service station or wait for characteristic symptoms of a malfunction to appear.