VAZ 2110 manifold gasket burnt symptoms
Symptoms that the exhaust manifold gasket has burnt out.
Complete list and action plan If the manifold seal is not replaced in a timely manner, the safety conditions for operating the vehicle are greatly reduced.
In general, a manifold is a device designed to remove exhaust gases from a car engine. The second function of the collector is to improve the filling of the working chambers and enhance the ventilation of the working space. All operation of the exhaust device is carried out at elevated temperatures and high gas pressure.
This element is attached directly to the head ( cylinder head
) and the other side is in contact with the exhaust pipe or converter. The most important task of the exhaust manifold gasket is to prevent exhaust gases from entering the valve space. These gases, in turn, can cause fire of parts or elements of the power unit.
Symptoms of a blown exhaust manifold gasket
The following can be distinguished: exhaust gases begin to flow into the car interior or their smell is felt; the car engine begins to start poorly; Strange sounds appear in the engine compartment. If these ailments are detected, you should begin to inspect the exhaust system. The collector itself is made of high-strength austenitic steel.
In this regard, burnout and replacement of the collector is quite rare. The main reason for the breakdown of the collector itself is drops of water falling on its hot surface, which leads to the formation of cracks in it.
The weak link of this durable and reliable element is the gaskets. Wear of the manifold gasket occurs mainly due to: poor quality of the material or very long operation under increased loads.
Manifold gaskets are now made from steel-reinforced, durable asbestos. However, even such a durable material is susceptible to destruction. The process of replacing the exhaust manifold gasket is not at all difficult.
Experts even recommend replacing the gasket after some time, without waiting for it to fail.
We carry out the following procedures:
- 1. Open the hood of the car;
2. Remove the air intake. Then remove the carburetor. Under these engine elements is the exhaust manifold;
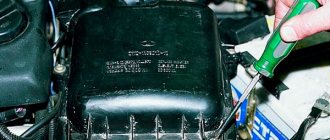
3. Remove the thermal shield. It covers the collector;
4. Unscrew two nuts on each cylinder that secure the manifold;
5. Unscrew a couple of bolts from the exhaust pipe;
7. There should be an old gasket or remains of it on the cylinder head;
8. We clear all the space for a new gasket;
10. After cleaning, apply a graphite-based lubricant to the area;
11. Now install a new gasket;
12. Reassemble everything in reverse order.
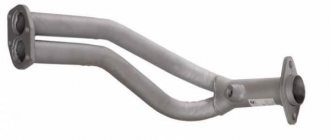
The exhaust manifold (EC) of a car engine is an element of the exhaust gas removal system. Its role is to collect combustion products from all cylinders and, combining them, transfer them to the exhaust pipe. From there they go to the catalyst, and after that to the muffler.
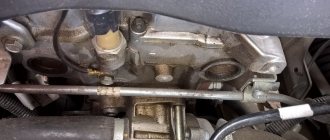
The exhaust manifold is attached to the cylinder head of the power unit (cylinder head). The tightness of this connection is ensured using a special gasket. Due to constant temperature loads, it sometimes fails. And although such a malfunction does not pose a serious threat to the engine, it is better to eliminate it immediately after detection.
In this article we will look at how to replace the exhaust manifold gasket using the example of domestically produced VAZ cars. But first, let's figure out what the VC itself is and how to determine that it's time to change its seal.
Rubber plugs in the Kalinovsky intake manifold: introduction
What do you think are those black “pipettes” circled in a fag-colored circle? Anyone who says that these are stubs will be right, but no one knows what these idiots are called. In the stores, they say no, but the sellers most obviously roll their eyes, either in surprise at the verbal construction “do you have plugs for the intake manifold receiver for the Lada Kalina?”, or sincerely amazed at the idiot who is looking for some reason original parts, instead of using some kind of silicone tube, as real pasans do on tachils rolled up in the trash. It’s worth mentioning here that these very original rubber bands plug holes for additional equipment in the receiver and they are made of such blatantly shitty rubber that they easily fail after a year or 15 thousand kilometers of operation - they crack lengthwise and the receiver begins to suck outside air bypassing air filter and sensors; The mixture therefore becomes leaner, and the engine is also choked with dust. Tough, in short. The destroyed plugs begin to hiss, grunt, hiss, and people around think that you have a turbine installed under the hood. The car may stop idling and jerk. How to determine that these are rubber bands and not something more serious? It’s very simple - you just need to stick your head into the engine compartment closer to the cabin (“look at the back of the engine, see the first picture”), or better yet, just remove the decorative plastic black engine cover and lean over it - I bet you’ll see two “droppers” - “massage” (gygygy) them with your finger, if the sound changes, then it’s them. In general, desperate to find anything, and also wanting to become really cool, I finally decided to do collective farm tuning. To do this, I need either some kind of vacuum hose from the “classics” (they say it’s suitable), or plugs for the brake bleeder fittings of any VAZ. The designs also inspire shock and awe when spoken out loud. Tomorrow or the day after tomorrow I’ll make a desperate attempt to go to VAZ-Avtodetal and if I don’t find the originals, which will fall off in a week anyway, I’ll finally do what I’ve fucking dreamed of for so long - I’ll collect pipes and plugs from the bleeder fittings. I'm happy. The report, of course, will be attached, and this sheet can certainly be considered a creative announcement of routine work. Haha.
How long does an exhaust manifold gasket last?
The exhaust manifold gasket is not one of those elements whose replacement is included in the routine maintenance plan. It can serve for two, five, or ten years. Its condition does not depend on age and mileage. The only factor that affects its service life is the correct operation of the engine. If it operates in standard mode, does not overheat, uses good fuel, the gasket will last a long time. If the opposite is true, it may burn out even after three months of operation.
Reasons for replacing the Lada Priora receiver
There are a considerable number of varieties of intake manifolds, for example, made from various types of metals or composite materials. However, the Priora receiver is made entirely of plastic. This material prevents excessive heating of the manifold due to a hot car engine.
Thus, the air flow characteristics are improved, which has a positive effect on the proportions and quality of the air-fuel mixture. However, plastic also has a main, negative side - fragility. As a result, numerous breakdowns occur both due to the fault of the car owner and due to low temperatures at which the plastic loses its strength coefficient.
The most common damage can be caused by: - road traffic accidents (even minor ones); — accidental impacts during any repair work in the engine compartment; — other reasons;
If the receiver on your car has through holes or any other leaks, then it must be repaired (if possible) or replaced. If a part is faulty, air loss will occur, resulting in improper engine operation.
Signs of a burnt-out VK gasket
Signs of a burnt gasket may include:
- change in the sound of a running engine;
- the appearance of a characteristic smell of exhaust gases in the vehicle interior;
- violation of engine stability, CHECK lamp on the dashboard is on.
As for the sound of the power unit, when the gasket burns out, a characteristic “chirping” is usually heard. In such cases, they say that the engine is “cutting.” This sound is created by exhaust gases escaping where the seal is damaged. Naturally, exhaust from under the hood enters the cabin through the heating and ventilation system. This creates additional inconvenience for the driver and passengers, and also poses a certain threat to their health, so in any case, replacing the exhaust manifold gasket if it is damaged is a necessary necessity.
In cars with injection engines, the operation of which is controlled by an electronic control unit (ECU), if the integrity of the gasket is damaged, the CHECK lamp on the dashboard may light up. This is due to the fact that the lambda probe, installed on the manifold itself or the exhaust pipe, detects changes in the amount of oxygen in the exhaust and transmits a signal to the ECU. Until the fault is eliminated, the controller forces the engine to operate in emergency mode.
When to change: self-diagnosis
The fuel system of an injection engine has a fairly extensive architecture and faults can only be identified after an accurate diagnosis of each of the system elements. For example, a drop in engine power may be the result of either a malfunction of the injectors, insufficient performance of the fuel pump or a clogged fuel filter.
In addition, jerks and dips, unstable idle and difficult starting, increased consumption, can occur when the injector is simply clogged.
You can check the injectors themselves directly on the engine without removing them. To do this, just start the engine and remove the wires from the connector one by one. If the stability of the engine changes at the same time, the engine starts to oscillate, then the injector is in order. If, when removing the wires from the connector, the stability of the motor does not change, the injector needs to be cleaned or replaced.
How much does a repair at a service station cost?
How much will it cost to replace the exhaust manifold gasket? The price for this type of work depends on the type of engine (carburetor, injection, 8-valve, 16-valve), the model of the seal itself, as well as the prices of the service station where you plan to repair your car.
On average, the work itself, together with the seal, costs somewhere around 1,500 rubles.
But you don’t have to spend money on work. Replacing the VAZ exhaust manifold gasket can be done on your own without much difficulty. Especially if you have a set of hand tools and you have even the slightest idea about the design of your car’s engine.
What is needed for repairs
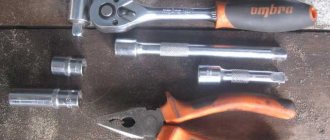
Replacing the exhaust manifold gasket involves using the following means:
- set of spanners;
- slotted and Phillips screwdrivers;
- sharp knife or spatula (to remove old gasket);
- a container with a wide neck with a volume of at least 5 liters (for draining coolant);
- rust preventative (WD-40 or similar);
- dry rags.
Important: replacing the exhaust manifold gasket 2114, like other VAZ models, requires preliminary draining of the coolant. Otherwise, you risk flooding the engine intake windows with it.
Tools and necessary parts
To remove the exhaust manifold on a VAZ 2114 in order to replace the gasket or entire part, you will need the following tool:
- open-end and ring wrenches for 8, 10, 13, 17;
- wrench with heads 17, 19;
- screwdrivers, pliers.
It is also a good idea to have tools such as a Dremel, nut saw or nut pick on hand. As a rule, the fasteners on the exhaust system parts stick tightly.
A few days before your planned repair, begin treating accessible nuts with WD-40 or another penetrating lubricant. Repeat the operation 2-3 times. This will make the task of removing the manifold a little easier.
The question often arises: is it worth using a sealant after removing and replacing the gasket? Experts believe that if you apply sealant to the gasket, it should only be high-quality silicone. A bad sealant can bring a lot of trouble to a VAZ 2114 engine: when it burns out, it turns into “pellets” that are pulled into the crankcase. And this is unnecessary contamination of the piston system.
Replacing the exhaust manifold gasket of a VAZ 2114
The algorithm for performing work for the “fourteenth” model of “Samara” is as follows:
- We install the machine on an inspection hole or overpass, dismantle the engine protection, and drain the coolant.
- Remove the negative terminal of the battery.
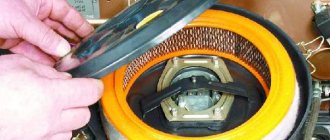
- Remove the air filter housing.
- Disconnect the accelerator cable and fuel pipes from the throttle assembly.
- Disconnect the throttle sensor and idle air control connectors.
- Disconnect the crankcase ventilation and brake booster hoses from the receiver.
- We dismantle the receiver itself, disconnect the wire connectors of the injection control unit.
- Remove the fuel rail (do not unscrew the injectors).
- Disconnect the receiving pipe from the VC.
- We dismantle the intake manifold, followed by the exhaust manifold.
- Remove the old gasket.
- Using a knife (spatula), carefully clean the mating surfaces of the manifold and cylinder head.
- Install a new gasket.
- We carry out installation in reverse order.
- Fill the coolant to the required level.
Determining whether the engine is sucking in air
Before you start removing more than half the engine parts to get to the manifold, you should check other parts of the air system. And after that, carry out a complete tuning of the car. First of all, you need to inspect all the hoses and gaskets located on the cylinder block.
The most common method of finding air leaks is to spray the hoses with plain water; if there is a hole in one of them, the engine speed will decrease when water enters.
Detailed instructions for removing the intake manifold on a new Priora
It is necessary to remove parts from a cooled engine. It will take about an hour, provided that you have at least a little understanding of the injection system. The following sequence of actions must be followed:
- First of all, you need to remove the throttle. There is no need to completely remove it, just move the assembly connecting it to the manifold to the side. You also need to remove the throttle valve to thoroughly clean everything;
- disconnect the drive throttle cable from the manifold;
- disconnect the connectors from each other to remove the wires from the ignition coils;
- on the camshaft, disconnect the sensor wires;
- disconnect all canister wires;
- disconnect the brake booster vacuum hose going to the manifold;
- then unscrew the clamp and remove the ventilation pipe;
- Unscrew the self-tapping screw of the oil level indicator guide tube;
- remove the dipstick with the guide tube;
- using sockets and a ten-size wrench, unscrew the nuts and bolts securing the exhaust module and coils from cylinders 1-2-3;
- remove the coils;
- then you need to unscrew the collector fasteners;
- slide it forward and remove the manifold.
Changing the VK gasket on a VAZ 2110
Replacing the exhaust manifold gasket 2110 is performed in the following order:
- We put the car on the overpass (inspection hole), remove the protection, and be sure to drain the coolant.
- We de-energize the car's on-board network by disconnecting the negative terminal from the battery.
- Remove the air filter.
- Disconnect the hose of the brake booster, pneumatic valve cover, and fuel pressure regulator from the receiver.
- Disconnect the throttle sensor and idle air control.
- Disconnect the air duct and turn off the air flow sensor.
- Disconnect the crankcase ventilation hoses from the throttle pipe.
- Remove the inlet and outlet hoses of the cooling system from the manifold.
- We dismantle the receiver assembly with the throttle assembly.
- Unscrew the 5 fastening nuts and remove the inlet manifold.
- We unscrew the bolts (3 pcs.) that secure the exhaust manifold to the exhaust pipe.
- We dismantle the VK.
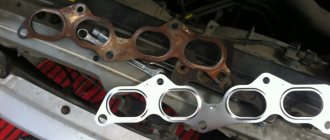
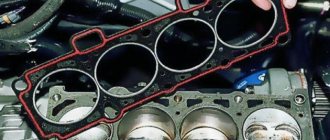
- Remove the old gasket or its remaining fragments.
- We clean the joints on the manifold and on the cylinder head.
- Install a new gasket.
- We install dismantled elements.
- Don't forget to add antifreeze (antifreeze).
Step-by-step instruction
Before starting work, remove the negative terminal from the battery.
1. First we need to remove the heat shield. It is secured with three nuts for a thirteen head.
Before unscrewing, the nuts must be cleaned and sprayed with penetrating lubricant.
2. After unscrewing the nuts, remove the casing.
3. Clean the exhaust manifold mounting bolts and spray with penetrating lubricant.
4. Disconnect the lambda probe connector.
5. Spray with penetrating lubricant and unscrew the two nuts securing the exhaust pipe.
Most often it is the stud that comes out, not the nut. There's still a spring there. Well, that’s okay, we’ll look at this further in the instructions.
6. After unscrewing the intake pipe, move it to the side and plug it with a rag.
7. Relieve the coolant pressure. To do this, unscrew and tighten the cap of the expansion tank.
8. A coolant channel passes through the lower exhaust manifold mounting studs. If the nut and stud are unscrewed, the coolant must be drained.
9. Unscrew the nuts securing the exhaust manifold.
If the lower nuts are unscrewed together with the stud, drain the coolant.
10. After unscrewing all the mounting nuts, pull off and remove the exhaust manifold.
11. Remove the gasket.
If you have a pin broken somewhere, or it breaks during the process of removing the manifold, you just need to drill it out. Access to all studs is more or less normal, except for one which is near the accessory bracket. In order to drill out this stud, you need to remove the bracket. The pin is marked in the photo below.
You need to drill out with a side drill.
12. We screw in the studs where they came out and screw in new ones where we drilled them out. The studs need to be seated on a thread locker (blue), especially the lower ones, to prevent coolant from leaking.
Also check that the remaining studs are tightened.
13. Before installing the collector, use a wire brush to clean the area where the exhaust pipe meets and where it meets the head.
Also check the flatness of the contact area between the manifold and the head. You can place it on a flat table or use a special ruler.
The contact area must be level. If it is crooked, then the collector is ground or another one is installed.
14. Screw the studs securing the exhaust pipe into the manifold. There are turnkey edges for ten.
The nuts from the studs must be pre-tightened. We clamp the stud in a vice and twist the nut.
15. Install the gasket.
16. Remove the rags from the exhaust pipe and hang the manifold.
17. Screw on all the manifold mounting nuts and tighten.
18. Install the gasket and put on the exhaust pipe.
19. We put on the springs, screw and tighten the nuts securing the exhaust pipe.
Marked is the spring that fits onto the manifold stud where the exhaust pipe is attached
20. Connect the lambda probe connector and install the heat shield in place.
Before installation, check the heat shield mounting studs. The studs are through, if they are not there or they are twisted clumsily, there will be a breakthrough of gases.
Replacing the exhaust manifold gasket: “Niva”
Replacing the gasket on a Niva will also not be particularly difficult. The order of work is as follows:
- To get started, follow the first nine points from the section for the VAZ 2110.
- Remove the bolts securing the front and rear support brackets to the exhaust pipe. Remove the front bracket, move the rear one to the side so that it does not interfere.
- Remove the fuel rail with injectors.
- Unscrew the nut securing the front eye bolt and remove it.
- Unscrew the nuts securing the heat shield of the intake pipe and remove it.
- Unscrew the two outermost and then the two upper nuts securing the intake manifold to the cylinder head.
- Using the wrench handle extension, remove the remaining two (bottom) nuts.
- Remove the intake manifold.
- Remove the starter heat shield.
- Unscrew the nut securing the ground wire to the cylinder head. Remove the conductor tip.
- Unscrew the three nuts securing the VK and dismantle it.
- Remove the seal, clean the mating surfaces and install a new gasket.
- Reinstall the removed parts in reverse order and fill with coolant.
How to remove the receiver on a Priora
Tools that may come in handy: - 10mm socket; - key 13; - screwdriver.
To remove the intake manifold you will need:
- Due to the fact that in the next steps of the instructions there will be manipulations with electrical wiring, it is necessary to remove the negative terminal of the battery.
- The next step is to remove the plastic screen (cover) from the engine housing. This is done so that it does not interfere with your work.
- After which, it is necessary to remove power from the four ignition coils and dismantle them. To do this, pull out the contact chips. Take a 10mm socket (or a wrench of the same size) and unscrew one fastening bolt on each coil. Simply pull the coils upwards using the necessary force. Now they can be removed. There is no need to remove the spark plugs themselves; they will not interfere with removal. On the other hand, it is advisable to take advantage of the situation and check their condition (gap and spark quality).
How to extend gasket life
Although replacing the exhaust manifold gasket is inexpensive and can be done successfully in your own garage, who wants to waste their time on it? It's better to let it serve longer. And to extend its service life, listen to the following tips:
- monitor the condition of the cooling system, check the level of antifreeze (antifreeze) to prevent engine overheating;
- use only high-quality fuel;
- check the tightness of the connection between the cylinder head and the exhaust manifold;
- If you find that the integrity of the gasket is damaged, do not wait until it burns out completely, replace it;
- When buying an exhaust manifold gasket, choose a quality product from well-known manufacturers.
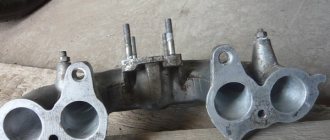
The exhaust manifold gasket is responsible for sealing the joint between the exhaust manifold, which removes exhaust gases, and the cylinder head. The part ensures the normal operation of the VK, and, as a result, the safety of the car.
Exhaust manifold functions
It consists of several pipes that merge into one, but has different mountings and configurations for different engines. To produce VC, high-carbon cast iron, stainless steel and titanium are used, sometimes coated with ceramic/chrome.
The task of the “spider” (as the exhaust manifold is called in the Russian Federation) is to transfer combustion products collected from all cylinders to the exhaust pipe. Gases from the AC enter the catalyst or directly into the exhaust pipe and then to the muffler. The exhaust manifold is attached to the engine, or more precisely to the cylinder head (cylinder head), sealing the joint using a special element.
Installing a receiver on a Priora
As usual, installation is carried out in the same way as removal, however, during its production you must be extremely careful not to damage the receiver body. It is extremely important to insert the installed part with the holes into the connecting pins of the cylinder block, after which the manifold is directed to the mounting points on the engine.
Small but important points for installation:
- always clean or lubricate the rubber seals installed at the points of contact between the receiver and the cylinder block;
- Properly tighten the nuts at the joints of the elements.
Causes of malfunctions
The gasket is placed between the exhaust manifold and the cylinder head. The stamped asbestos gasket is resistant to high temperatures, can be compressed (creating the necessary impermeability) and has increased strength. To enhance the latter quality, the exhaust manifold gaskets are additionally reinforced with steel.
IMPORTANT! The main task of the gasket is to prevent exhaust gases from penetrating under the hood, where they can cause ignition of parts/assemblies of the engine compartment.
The gasket is recognized as the most vulnerable point of the exhaust manifold, which operates under extreme loads in both temperature and pressure. It is not surprising that gaskets have to be changed not only on cars with significant mileage, but also on almost new cars.
Gaskets need to be rotated for several reasons:
- poor factory quality;
- engine overheating due to intensive use;
- engine repair (a used gasket loses its properties when dismantled).
Welcome to the website https://lada110atricom.ru
Many people have their own cars, of various brands, configurations, tuned and simply “gray” cars for everyday driving. Some make various gadgets for cars with their own hands, some send them to special services, and others simply admire how people do it. Actually, this is what I would like to talk about - tuning!
I didn’t have a car before and somehow didn’t need one, but in my heart I always wanted to sit, steer and enjoy the speed. The first step to buying a car was getting a driver's license, which I also went to study for spontaneously. In general, I studied for 3 months in DOSAAF and on February 29, 2008 I received my driver’s license. From time to time there was a desire to buy a car, but there was no money to buy it, and I began to think about it – where should I go?
Time passed, years flew by, rumors circulated about a crisis. By that time, we had managed to save up a little cash, which we finally decided to invest in some kind of automobile before it disappeared. One wonderful morning, we got ready and went to the car market in Saratov to choose a car for me. I had to borrow a considerable additional amount of cash from friends, otherwise my savings were not enough.
We set off on the road, drove and drove, and finally arrived. Let's go to the market.
There were a lot of cars in Saratov, some not for our money, others too dead, in general, we wandered and wandered and saw a red VAZ2110 (my favorite color). After some time, after a lot of walking, it was finally decided to buy the first car I liked and finally go home.
The path to home was not close, about 200 km. At first, I thought that my friend would drive and drive my car to my native Kamyshin, but I still drove it back myself. This is my very first time when I drove for so long, because the last time I held it in my hands was back in February and that was for about 10 minutes. For the first 10-20 minutes I couldn’t come to my senses that I was sitting behind my own car, My hands were shaking a little and I still couldn’t believe that I was going. Literally, after driving 50 kilometers, I already began to feel much more confident, fell back on the seat and began to enjoy the trip.
Everything would be fine, but in Krasnoarmeysk at the traffic police checkpoint we were stopped to check our documents. And I stupidly took only my license with me, and the rest of the documents remained with my mother, who drove ahead in another car with a driver. Luckily they stopped about 300 meters from us. The inspector had to wait for some time, to which he made a menacing expression on his face. They brought the documents, checked everything, but still got to the bottom of the fact that there was no first aid kit, fire extinguisher and sign. And the fact that the car even had transit license plates and had just been purchased did not bother him; he had to pay some fine to the Inspector’s fund. We got into the car, refueled and hit the road.
We got home quickly, we drove for about 3 hours in total, although it could have been longer, but I was still a beginner at that time, and the car was not tested, you never know what would break down, so I kept the speed around 100-110 km/h . But still there was a desire to experience the drive and therefore I accelerated once to 155 km/h, the car behaved amazingly on the road, I remained satisfied throughout the journey.
Here is a short story about the steps to buying my first car, which is with me to this day and makes me happy. From time to time I do something for the soul in it, a little tuning, etc. what I will tell you about in my Logbook
.
Express your opinions about my work, and just like that, we can discuss something, further work, plans.
Signs of a burnt gasket
The easiest way is for the owner of a car with an injection engine, the operation of which is monitored by an ECU (electronic control unit). It sends a signal about a gasket failure to the dashboard, where the Check light comes on. This means that the lambda probe, which is usually equipped with the manifold, detected a change in the volume of oxygen in the exhaust, informing the ECU. The engine begins to operate in emergency mode until the defect is eliminated.
“Symptoms” of a burnt gasket:
- the engine is unstable;
- makes an uncharacteristic sound during operation;
- The cabin smells like exhaust gases.
ATTENTION! The fact that the exhaust manifold gasket has burned out is indicated by a recognizable chirping sound created by gases that break through the seal. Motorists often say that the engine “cuts.”
Exhausts through ventilation and heating systems quickly penetrate into the cabin, which is fraught not only with a deterioration of the microclimate, but also with negative consequences for health. This is why replacing the exhaust manifold gasket becomes a forced but necessary measure.
Replacing the gasket
The marker of a failed gasket is considered to be soot that forms in the place where the exhaust escapes. In this case, proceed to replacing the defective seal.
What is needed for repair
To replace the exhaust manifold gasket, prepare the following materials and tools:
- screwdrivers (slotted and Phillips);
- sharp knife or spatula (remove used gasket);
- spanners included;
- anti-rust liquid (for example, WD-40);
- 5 liter wide-neck container (for draining antifreeze);
- dry rags.
ATTENTION! When replacing the manifold gasket on a VAZ 2114 (as on other factory models), it is necessary to drain the antifreeze in advance, otherwise the engine intake windows can be flooded.
Step by Step Actions
The process of replacing a seal when it fails is simple, but has nuances for different engines. In general terms, the algorithm for dismantling and subsequent installation of the VK gasket looks like this:
- Open the hood and remove the air intake with the carburetor, under which there is a manifold.
- Remove the thermal screen covering the VC (some older models do not have a screen).
- Unscrew the bolts that attach the spider to the exhaust pipe, and then the bolts connecting it to the engine block.
- Proceed to removing the exhaust manifold itself, on which sits a burnt-out gasket, which often “sticks” to the VC.
- Carefully clean the area between the cylinder head and the manifold with a spatula, removing carbon deposits and fragments of worn gasket from the second.
- Once the area is shiny, coat it with graphite lubricant and install a new gasket.
- Treat the fasteners with the same lubricant (to prevent corrosion).
Finally, return all dismantled parts to their rightful places.
Replacing the gasket VAZ 2114
First, remove the engine protection from the car standing on the overpass, having previously drained the antifreeze, and then proceed as follows:
- Remove the air filter, having first disconnected the negative terminal of the battery.
- The fuel pipes with the accelerator cable are disconnected from the throttle.
- Disable the idle speed/throttle sensors.
- Disconnect the crankcase ventilation and brake booster hoses, turning off the receiver.
- Remove the latter by disconnecting the wires at the injection control unit.
- Dismantle the fuel rail without unscrewing the injectors.
- The receiving pipe is detached from the VC.
- Remove the intake and exhaust manifolds one by one.
- Remove the old gasket.
- Clean the joint between the manifold and the cylinder head with a knife.
- Install a new gasket and perform reverse installation.
- Fill in coolant.
The exhaust manifold gasket will last a long time if you use quality fuel and monitor antifreeze levels to prevent engine overheating. You also check the reliability of the joint between the cylinder head and the cylinder head and immediately change the gasket if you notice its malfunction. In addition, you need to buy gaskets from reputable manufacturers.
Source
VAZ 2112 engine breakdowns and repairs
To solve the problem of preserving valves from deformation when the timing belt breaks, you can install pistons from a 124 engine, but in this case several horsepower is lost. Therefore, when using a belt drive, as the instructions indicate, you need to periodically listen to the sound that the drive makes. So:
- At the beginning of wear, the rollers begin to squeak when cold, then rustle, then collapse.
- The pump begins to leak, which will lead to the presence of coolant on the belt.
- Seals that have become unusable lead to oil getting onto the belt.
- When the shafts wear out, the belt begins to slide to the side, which then rubs against the roller flange, which creates a grinding sound when cold.
- The belt may slip due to bending of the rollers.
- All of the above reasons can lead to belt rupture and, as a result, valve deformation.
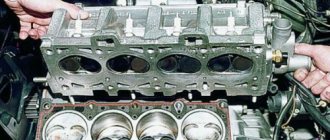
Repair of valves for VAZ 2112 cars
First of all, it is necessary to disassemble the valve block of the VAZ 2112 engine:
- All parts that are attached to the cylinder head are removed: timing belt, pulleys, thermostat, rollers, intake manifold, exhaust pipe, all wires are disconnected.
- The valve cover is disconnected.
- A brush is put on the drill and the cylinders are wiped clean from carbon deposits until they shine, for which you need to turn the crankshaft twice.
- Using a special device that clamps the spring, the valves are loosened and removed with tweezers.
- Diamond chips are applied to the edge of the valve, as shown in the photo.
Applying diamond chips to the valve
- A rubber pipe is placed on the end of the guide valve and the valve is turned with both hands. Grinding must be carried out until a ring-shaped uniform mark is formed on the seat and valve plate.
Tip: To increase friction, the valve needs to be pulled down a little.
- Carefully remove any remaining lapping paste from the seat and valve.
Valve after lapping
- The valve is installed in place.
- If grinding does not help, the gap does not decrease, the valve must be replaced.
- Assembly is performed in reverse order.
Advantages of the VAZ 2112 with 16 engine valves
By installing 16 valves in the cylinder head, record engine power is achieved, whether it is turbocharged or naturally aspirated. So:
- to an increase in power. So the 8 valve VAZ 2112 engine with a volume of 1500 cc. centimeters has 77 horsepower, and the 16 valve engine in the VAZ 2112, which has the same volume, produces up to 90 horsepower.
- Changing the shape of the combustion chamber makes it possible to increase the knock resistance of the engine with 16 valves. This indicator is important, especially when low quality fuel is used.
- In such devices, the engine cooling system works better, which increases the reliability and durability of the unit.
- During the layout, the intake and exhaust tracts are spaced in different directions from the head on a VAZ 2112 with a 16 valve engine. This makes it easier to install the correct intake and exhaust manifolds.
Eight-valve engine tuning
To increase the power of an 8-valve engine, it can be equipped with a 16-valve cylinder head. To do this, the 8-valve engine of a VAZ 2112 is disassembled and parts are replaced:
- The bolts that attract the head to the cylinder block are changed; they differ from the 16-valve device in diameter and length. When installing the cylinder block and head from different engines, modified bolts are required. In this case, the bolts are used with a diameter similar to that of an 8-valve engine and a length similar to that of a 16-valve engine.
- To install a 16-valve head, you need to drill holes for installing bolts.
- The head gasket is also being finalized, its holes are also drilled out.
- Installing modified bolts increases engine reliability.
- Before installing the cylinder head, the cylinder block itself is assembled.
- The pistons of 16 and 8 valves are different. Therefore they need to be replaced.
- If the car is equipped with old connecting rods used on the VAZ 2108, then they need to be replaced with others from the VAZ 2110. This is due to the fact that the piston pin is pressed into the old connecting rods, and 16-valve pistons can only be mounted in a new type connecting rod.
- After assembling the motor, it is necessary to modify the wiring. This is due to the displacement of some sensors, which leads to lengthening of the wires for them.
Tip: To avoid additional expenses associated with replacing the engine control unit, you need to leave the old ignition module and connect it via high-voltage wires to the spark plugs.
- The last operation is to configure the VAZ 2112 16 valve engine control unit using a special program.
Tip: To increase power, you can install tuning of the exhaust manifold; its price is much lower than that of a standard 16-valve manifold with a catalyst.
This is how the VAZ 2112 engine turns out to have 16 valves. 8 valves are replaced by 16, which increases the power and reliability of the car.
Tuning a 16 valve engine
- The simplest and most standard way to increase the power of a VAZ 2112 engine is to replace the camshafts with STI-1 (standard receiver).
- Installation of a light ShPG from a 126 engine.
- Replacing the throttle valve to a diameter of 54 - 56 millimeters.
After such changes, the output power is 120 hp. Increase power to 150 hp. possible by:
- Installations of wide-phase camshafts.
- Using lightweight T-valves.
- Performing modifications to the cylinder head intake manifold.
To obtain increased power, you can install a compressor.
Installing a compressor on a VAZ 2112