The everyday life of a car enthusiast is full of adventures. They have a place for the romance of roads, new cities, acquaintances... But one day every driver is faced with such an unpleasant surprise as: bad weather, small pebbles and sand that damage the paintwork of the vehicle. Scratches on a car need to be painted over; they not only damage the aesthetic appeal, but also cause corrosion of the metal; the longer they remain on the surface, the deeper the destruction occurs. Therefore, you should immediately remove them immediately (you can do it yourself) and properly touch up the chip.
The fight against scratches on a car should begin as early as possible, but cosmetic repairs at a car dealership require significant costs. Knowing how to do it, what materials can be used to process and cover up scratches, it will not be difficult to repair and paint over paint chips on a car with your own hands.
Damages on a car that are seemingly invisible and left unattended are filled with rust on the car body and it corrodes it.
Not every car enthusiast is ready to pay a large sum to disguise minor defects on a car so that they do not rust and is looking for a way to deal with the problem himself, including without painting.
You can get rid of the damage yourself by removing the chip on your car with your own hands (video).
What are the types of chips in nature?
The paintwork (or paintwork) of a car is exposed to adverse environmental influences every day. The lack of anti-gravel coating leads to microdamage. As a result, solid particles of road soil hit the body when driving fast. Therefore, you have to constantly monitor this and correctly touch up any chips that have arisen on the car. Such scratches are difficult to notice on the surface of your car, but gradually they become covered with rust, and this is no joke.
What else provokes microdamage to paintwork?
- choice of materials (varnish or paint) of poor quality;
- disturbances in the operation of the compressor when the body is painted;
- improper degreasing before applying paintwork;
- dirt and irregularities that were not eliminated before painting the car;
- improper processing of the putty mixture or violation of its preparation technology;
- driving fast on roads of poor quality;
- frost, strong wind raising sand; heat.
The listed factors violate the integrity of the car’s paintwork. Knowing the reasons for the deformation of the top layer, which causes paint chips to form on the car body, will allow you to avoid subsequent damage, but what to do if scratches have already appeared.
The first step in independently “treating” a car is to determine the type of defect, because cosmetic repairs require an individual approach. Damage is divided into types depending on the depth, time of occurrence, and area of the depression.
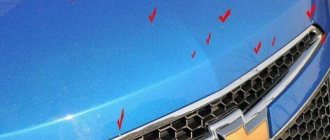
Advice: before starting cosmetic repairs, carefully inspect the area where the headlights and radiator are located. Scratches are usually located on the front of the body.
Finishing
The surface around the pimple is painted with any easily washable paint. For example, water-dispersed. This will allow you to accurately control the position of the abrasive stone and not sand off anything that shouldn’t.
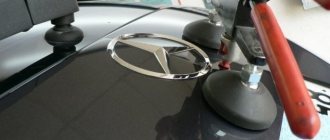
Repaired paint chip
First, take abrasive paper P1500. It is fixed on a small wooden block the size of a matchbox and slightly wetted. Sand the bump until streaks appear on the surface of the control paint. Check the quality of work by running your finger along the tubercle. Ideally, you should not feel the difference between it and the rest of the surface.
The protective paint is washed off, the 1500 sandpaper is replaced with P2000, which finally smoothes out the protrusion. The surface remains matte. Polishing is done with a paste applied to a soft cloth made of natural material. For example, flannel, flannel, felt. A felt buffing pad is too rough for this job.
The technology offered by Nussle is a long and painstaking process. But your time and energy will not be wasted. The location of the former chip is no different from the rest of the body surface.
Types of paintwork defects:
- surface scratch;
- web of cracks;
- fresh chip;
- metal corrosion (cannot be eliminated independently).
- deep chipping with rust formation.
Once you determine what “injury” you have to deal with, you can choose the appropriate “treatment” method for your car.
Minor scratch
A type of surface damage that does not affect the underlying paint layer. Such defects often occur after a mechanical car wash. To avoid this, cover the surface of the car with polish. In addition, unfavorable environmental factors lead to the formation of scratches (if you do not have a garage). Daily use of personal vehicles also damages the coating. But we can’t give up transport, can we?
You can eliminate surface scratches with a soft artistic brush for working with enamel. In case of a minor defect, a restoration pencil will solve the problem; it costs no more than 200 rubles.
Fresh chip
Unlike a scratch, this is a deeper defect in the paintwork, affecting the metal or primer layer. It surpasses small cracks in terms of the area of the damaged surface.
Local cosmetic repairs will help eliminate fresh, shallow damage. The choice of work technology depends on the number of defects:
- numerous chips require grinding and puttying, applying a primer, as well as a new layer of paint on the damaged car parts;
- if the damage is local (for example, caused by a stone hitting the hood of a car), a small brush, polishing paste, or paint will help deal with it.
Deep chip with rust
This is a type of defect when not only the primer suffers, but also part of the car body is deformed. It is necessary to deal with it immediately after its appearance, since a noticeable depression is fraught with serious consequences in the form of body corrosion. It also causes paint to peel due to moisture entering the crack. The winter season is especially dangerous for cars with deep chips: water that gets into the grooves freezes, destroying the material.
If the damage to the paintwork is significant, you need to solve the problem step by step:
- Prepare the work area (clean off dirt, rinse).
- Apply a layer of primer to the damaged area and wait for the material to dry completely;
- Carry out grinding work in the damaged area;
- Apply paint and varnish the surface.
Note: voluminous damage of noticeable depth in any case needs to be treated with P600 and P800 sanding paper to smooth out the edges of the damage and clean the working surface from micro-debris.
The entire part with local damage, even deep, does not need treatment. It is better to use local painting with a gradient: a smooth color transition to disguise the defect.
Repairing deep damage differs from repairing surface scratches by applying an anti-corrosion compound that prevents metal destruction.
Paint coating device
Anti-corrosion protection of the machine body consists of 3 layers (from the inside to the outside):
- Ground. Strengthens metal protection against corrosion and ensures high adhesion.
- Enamels.
- Clear varnish. Protects the base layer from weather factors.
Some types of paint contain varnish. In this case, there is no need for a third layer. To test, apply polishing paste to a microfiber cloth and then rub it over a small area of the coating. If traces of paint appear on the material, it means there is no varnish.
How to clean with scrap materials
What to do if a crack has formed in the road and there is no repair shop nearby? You can fix the problem with improvised means to avoid metal corrosion. Car enthusiasts are advised to keep materials for emergency do-it-yourself cosmetic repairs in the glove compartment:
- The easiest way: women's nail polish; masking tape (first the recess is covered with tape; then the working area is covered with varnish of a suitable color).
- Autoplasticine (allows you to fill the crack; prevents moisture from penetrating into the cavity).
- Stationery tape (the chip is simply sealed with adhesive tape until local repair; this method will protect the paintwork, minimizing the negative consequences of damage).
Masking pencils
This technique is not considered a high-quality restoration measure. Special pencils are used to eliminate temporary defects. This method is considered the simplest and most accessible for restoring the body of a vehicle.
There are several types of finishing material made in the form of a pencil. These include:
- Decorative wax;
- Gel corrector;
- Coloring pigments.
A wax-based pencil is used to quickly remove defects of any size and depth. Outwardly, it looks like hygienic lipstick. The product composition includes corrosion inhibitors. Experts do not recommend using this technique on a regular basis.
Gel-based correctors help avoid the use of polishes. The viscous liquid evenly fills voids and provides a dense texture. The finished coating will be visually different.
Coloring pencils combine wax and coloring pigments. When choosing, it is important to consider the color balance between decorative and restoration coatings.
Paint and brush - technology
The method is suitable for combating surface scratches. You must first purchase: a small brush, acrylic paint in a shade that matches the paintwork of the affected area, and a degreaser.
Technology for eliminating minor defects:
- Degrease the work area, having previously washed it of contaminants.
- Use fine-grit sandpaper to remove any traces of rust, if any.
- Apply primer to deep cracks.
- Apply a layer of paint with a brush, spreading it evenly over the damaged area.
- After 20 minutes, perform secondary staining to consolidate the result.
Full repair of deep scratches on the car body
In the presence of deep damage, only the staining method can help.
- Prepare the surface - rinse thoroughly and dry .
- If rusty spots appear on the damaged area, treat them with fine sandpaper.
- Degrease the cleaned surface and mark the working area with masking tape.
- Apply a layer of anti-corrosive primer and dry.
- Treat with primer to level the surface.
- Apply two layers of paint alternately , drying them well.
- After drying, apply clear varnish .
Spray can - painting technology
This method is suitable for getting rid of medium-sized chips. To eliminate defects with your own hands, you need to prepare: an acid primer in an aerosol can; a can of paint for cars; a primer for filling cavities; putty; varnish; enamel; scotch-brite; sandpaper; polishing paste and a stiff brush.
Step-by-step instruction:
- Clean the work area. Do not perform any work until dry.
- Using sandpaper, remove the layer of old paint and primer from the damaged surface.
- Remove rust with a converter and a stiff brush. Then reapply the converter, rinse with clean water and dry.
- Use putty to level each indentation. Sand the top with sandpaper.
- Treat the area around the recess with Scotch Brite (matting).
- Degrease and prime the work area.
- After the primer has hardened, apply a second coat of primer. Wait for the primer to harden. Sand any remaining unevenness with sandpaper.
- Apply a layer of acrylic primer to fill small cracks as much as possible.
- Cover the work area with three layers of toner primer, choosing a shade close to the color of the paintwork. Paintwork requires heating the paint canister to 36 degrees, followed by shaking the composition. It is necessary to shade the paint using arcuate movements.
- To fix the result, use varnish.
Car color metallic or pearl
To ensure that the painted area is not noticeable, you need to choose the right color. To do this, you need to know how to determine the shade:
- The first way is to study the vehicle's documentation. In the technical passport of the vehicle, the painting code is indicated, using it you can find the coloring material of the desired shade.
- If the documentation for the car is not available, you need to remove the gas tank cap and go to the store. There the desired paint is selected by color.
- An alternative option would be to use the services of a colorist. A specialist using special templates will select the exact shade of color.
The surface of the car is painted using a spray gun or a spray can. The paint is applied to a dried, degreased surface in a dry, closed room. If dust or moisture gets onto the area being treated during painting, the painting will be damaged. After tinting the body, with a metallic or pearl color type, polishing is performed, which almost completely masks the area to be restored.
Polish and anti-scratch – painting technology
Polish processing technology is suitable for surface cracks and medium-depth chips. Mixtures are made from wax, polymers, and epoxy resin, which form a film at the site of the defect. This method will not cope with deep scratches and cracks.
Instructions:
- Degrease the work area, having previously washed it of contaminants. Wait for the paintwork to dry completely.
- Treat the damaged area with a polishing mixture (separate the affected area from the non-working area with masking tape so that the composition does not get on the paintwork).
- Sand the recessed area to obtain a smooth surface.
- Wipe the damaged area with a polishing cloth, making circular movements. The surface should become matte.
- Fix the result with wax or Teflon polish designed to protect the coating.
Basic methods for removing chips on a car with your own hands
The method is chosen according to the size of the defect. To control the quality of work, bright lighting should be provided.
Minor scratches
To remove a shallow scratch on the outer varnish layer, it is sanded and polished. As a result, part of the material is removed along with the defect.
Sequencing:
- Sanding is performed with a grinder armed with pre-soaked P1000 sandpaper. Then change the abrasive to a finer one - P2000. Without the use of power tools, it is impossible to achieve a smooth surface.
- Having installed a special nozzle, polish the surface with a coarse paste.
- After the shine appears, change the composition to a medium abrasive one.
- Finish the surface with a microfiber cloth and polishing milk.
During the grinding process, overheating of the coating should be avoided. To do this, pauses are made periodically during work. Shallow scratches can also be repaired with a wax pencil or gel corrector.
Medium damage
To eliminate a medium-depth scratch, the enamel must be restored. Most often, the size of the defect is small, so they use paint in a bottle with a brush. Having dipped it into the enamel, they make a series of touches, reminiscent of a dot.
The coating is then sanded, varnished and polished.
Deep to metal
If the metal base is deformed, the damage is repaired as follows:
- The surface of the acrylic or epoxy primer applied at the preparation stage is sanded with fine sandpaper to roughen it.
- Degrease the area to be repaired.
- Apply starting putty.
- After drying, it is sanded and degreased.
- Apply finishing putty.
- Sand it with P1000 grit sandpaper.
Small dents are immediately filled with finishing compound and then painted. If the metal is not deformed, the paint is applied directly to the ground, after sanding it with fine sandpaper.
Procedure:
- The composition is sprayed from a distance of 20-25 cm, after shaking the can.
- Then they pause for 5-10 minutes and repeat the operation.
- After the coating has dried (it takes 24 hours), the resulting raised area is smoothed out with sandpaper of P1500-2000 grit.
- Degrease the repaired area and adjacent areas 10 cm in all directions.
- If the newly painted area has a large area, its border is covered with a transition solvent. It provides a smooth color change.
- Apply 3 layers of varnish, pausing for 5-10 minutes.
- Sand and polish the coating.
If restoration has to be postponed due to busyness, the defect should be preserved with Movil. At the right time, wash it off with diesel fuel or white spirit.
Polishing
This procedure will help smooth out the transitions between the new and old lining, smoothing out any unevenness. Residues protruding from the surface should be smoothed down with fine-grained abrasives on a hard base. In this case, the body is washed with water. Car polish is used to restore shine.
The technology described above will allow you to restore the coating and save on the services of specialists. A primer with a degreaser will ensure a high-quality and durable result.
Diagnostics to identify damage
First, the body must be thoroughly washed and dried. When inspecting each component, try to spot any defects immediately. This will allow you to immediately assess the scale of the work, determine the required amount of materials and not miss anything. Good lighting is required for inspection. It is best to do this in clear weather.
Preparation for local painting
Minor nicks and scratches, these are fairly easy to fix yourself. However, before carrying out paint restoration in small areas, you need to prepare:
- Drive the vehicle in a heated and well-lit area.
- Wash and degrease the surface to be treated. However, gasoline should not be used as a degreaser, as it can damage the body paint. Use a lint-free cloth for application.
- After degreasing, coloring compounds are applied to minor defects (the fragments are painted over) or scratches are removed with a special pencil, and around large damages they are smoothed out, the area is treated with a primer. In some cases, putty is used to smooth out small dents.
Upon completion of the preparatory work, proceed directly to restoring the paint on the car.
Minor damage can be easily removed with your own hands at home.
What you need if chips or scratches have already caused rust
Every small scratch or chip on the paintwork, if not given proper attention, can lead to big troubles - the formation of rust. In this case, you cannot do without repainting. You need to do this:
- Clean the source of damage by completely removing the paintwork.
- Treat with a corrosion inhibitor.
- Degrease, prime the surface, let it dry.
- Sand, paint and dry.
- Polish the resulting surface.
Watch a detailed video on how to remove chips and scratches from a car.